• Global community
    • Language:
      • Deutsch
      • English
      • Español
      • Français
      • Português
  • 日本語コミュニティ
    Dedicated community for Japanese speakers
  • 한국 커뮤니티
    Dedicated community for Korean speakers
Exit
6

Is there a way to make the Paint Bucket Tool actually fill a selection witout leaving an outline?

New Here ,
Jul 09, 2018 Jul 09, 2018

Copy link to clipboard

Copied

Tired of filling in a closed area with the Paint Bucket tool, and it leaving a small thin outline around the area you wanted to fill in! ME TOO! That's why I'm here asking around, lol.... I'm being silly, but in all seriousness, I have had this problem for a few years now and have never actually found an answer to this problem.

Untitled-1.png

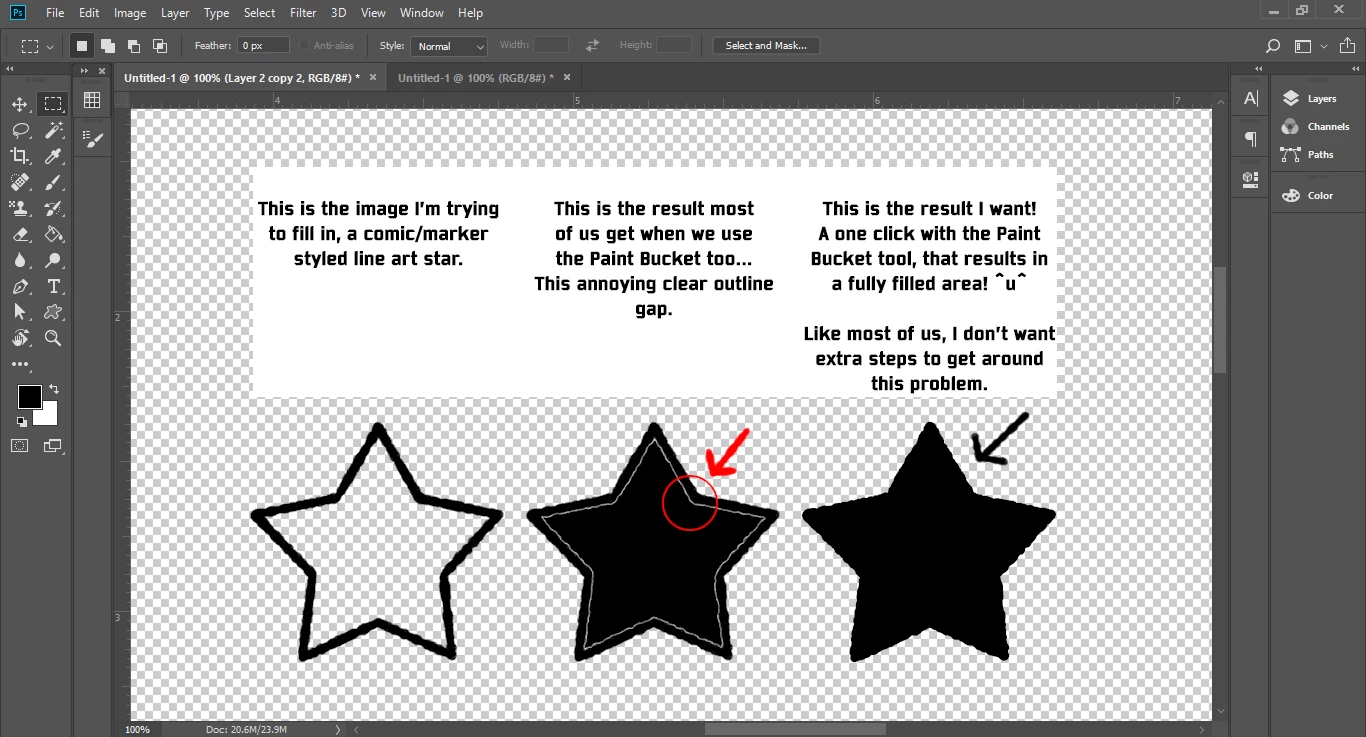
(Look at Image above for example) I want to use the bucket tool in Photoshop(2018) and with ONE CLICK, have it fully fill in a selection without leaving those annoying outline gaps.

I've asked people on many occasions on how to fix this and no one has found a solution so far. Now people have found multiple ways to fill in a section without just clicking once with bucket tool, but it requires more steps and more steps equals a waste of time. Especially when you draw comic's or commissions for fun like I do.

Untitled-1.png

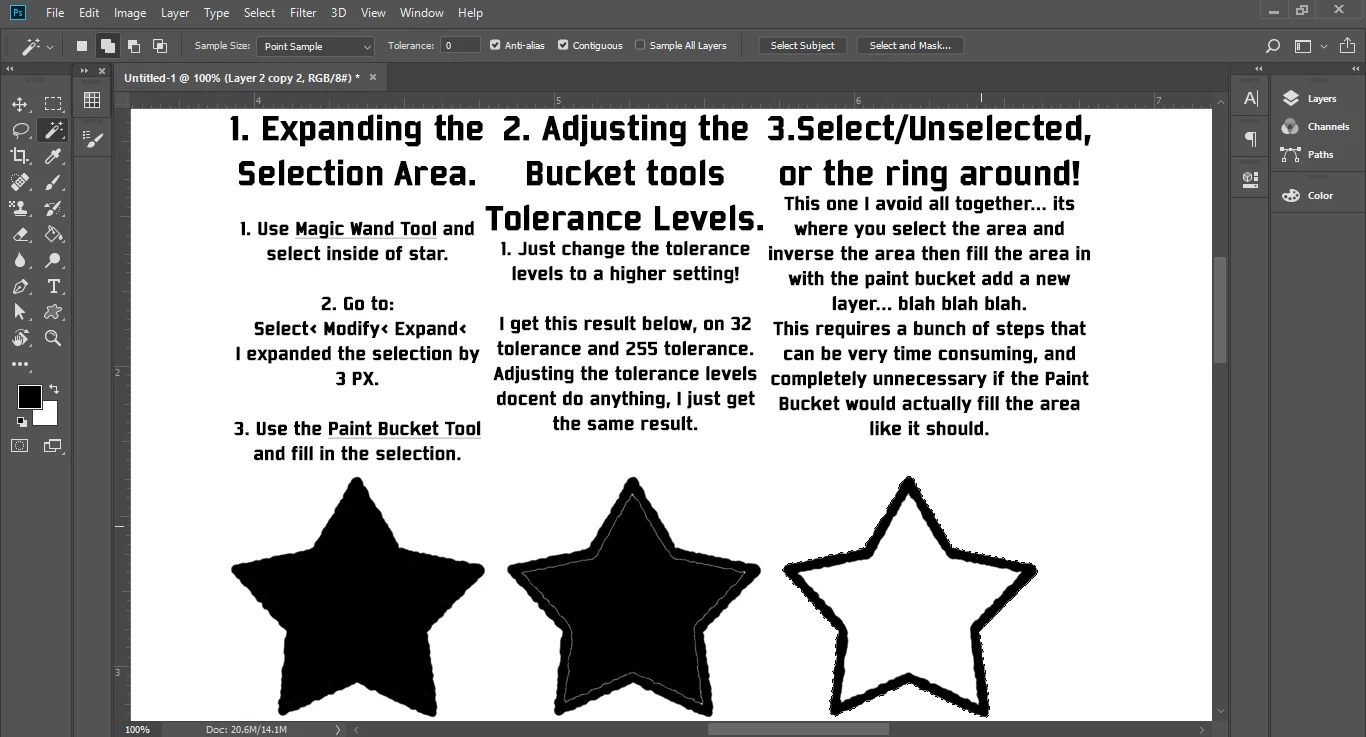
The examples above are the 3 most common ways people have avoided the Bucket problem, but I have also been told to:

- Color it in by hand.

- Color it in illustrator or a different program.

- Double click on with the Paint Bucket tool. (which docent' work because it messes up the line art, by making it blocky/pixelated)

- Photoshop's Paint Bucket can't do that.

and many more odd, time consuming, unhelpful, ways to color in an area. These are not solutions, these are extra steps and answers that are avoiding the question I'm asking...

I know Photoshops Bucket Tool should be capable of this, because on my crappy 1st gen. iPad mini I have a program called ArtStudio. It's a travel sized art program that has about 1/4th the capability of Photoshop, and it... it has masted this "One click with the Bucket tool, and an area is filled!" problem!!!

IMG_7017.PNG

IMG_7016.PNG

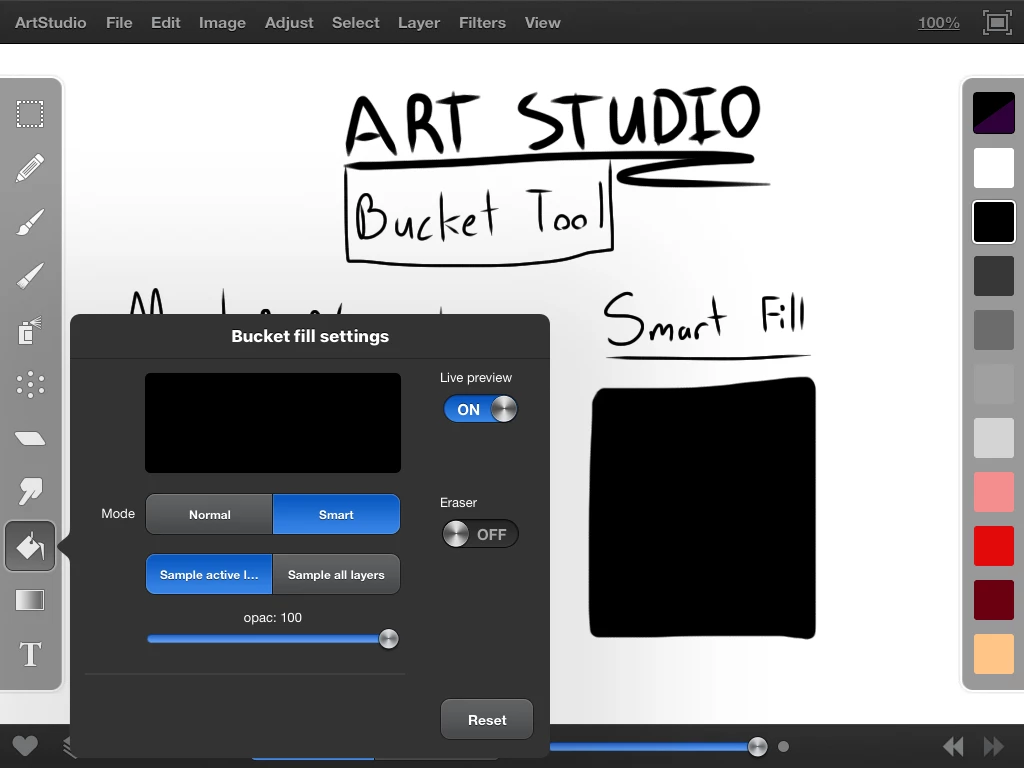
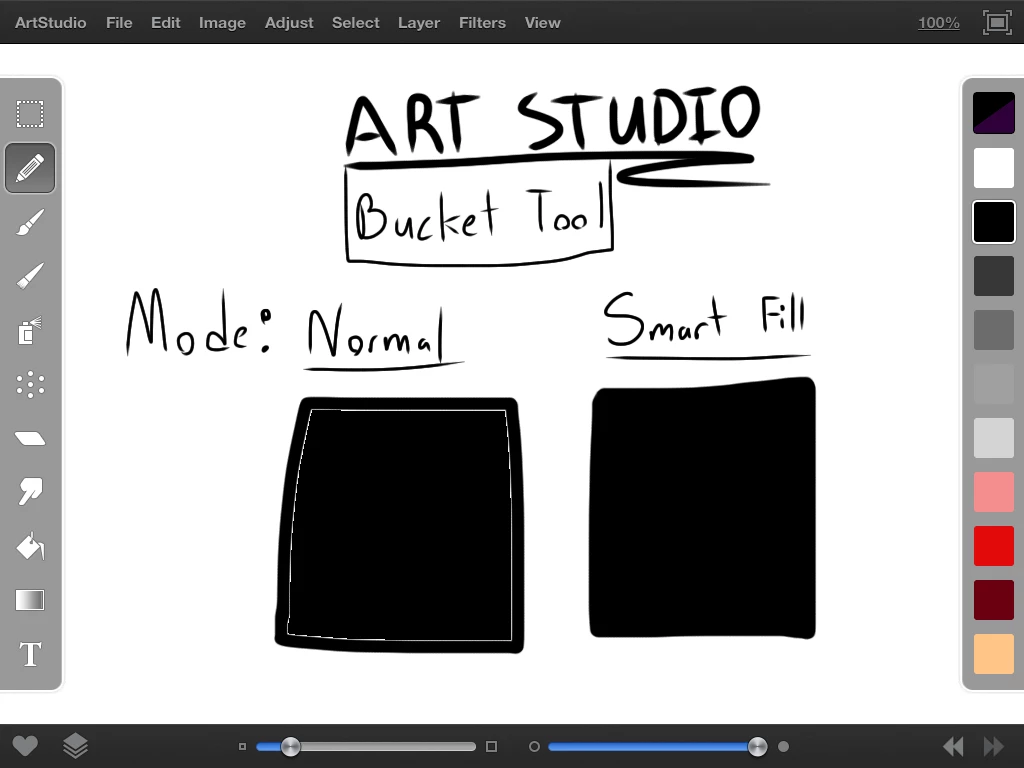
In ArtStudio the "Normal Mode" setting on the Paint Bucket creates the same effect as the Photoshop Paint Bucket. If the "Smart Mode" setting is selected in the Paint Bucket settings, it creates a solid color fill... IN ONE CLICK! 

I love Photoshop, its one of my favorite art programs, but I feel like if this little travel sized IOS art program can do this, then Photoshop should be more then capable of this too. Please if you know how to fix this "Filling in the area WITH ONLY the Bucket Tool, IN ONE CLICK" problem please.... PLEASE share your wisdom and let me know. This is my biggest and only complaint with Photoshop and fixing this/know this would make my day!

Views

63.2K

Translate

Translate

Report

Report
Community guidelines
Be kind and respectful, give credit to the original source of content, and search for duplicates before posting. Learn more
community guidelines

correct answers 1 Correct answer

Community Expert , Jul 09, 2018 Jul 09, 2018

Yes, stop using it. Do it the proper way: make your selection, modify it as needed, then fill with the desired color.

Paint bucket is really quick and really dirty. The precision level is zero.

Votes

Translate

Translate
Adobe
Community Expert ,
Jul 09, 2018 Jul 09, 2018

Copy link to clipboard

Copied

Yes, stop using it. Do it the proper way: make your selection, modify it as needed, then fill with the desired color.

Paint bucket is really quick and really dirty. The precision level is zero.

Votes

Translate

Translate

Report

Report
Community guidelines
Be kind and respectful, give credit to the original source of content, and search for duplicates before posting. Learn more
community guidelines
New Here ,
May 13, 2020 May 13, 2020

Copy link to clipboard

Copied

But even Microsoft paint can do this without problems

Votes

Translate

Translate

Report

Report
Community guidelines
Be kind and respectful, give credit to the original source of content, and search for duplicates before posting. Learn more
community guidelines
New Here ,
Dec 29, 2020 Dec 29, 2020

Copy link to clipboard

Copied

no, it can't. it will work the same ("incorrect") way if you use the Brush tool in MS paint. and it will work the same ("correct") way in Photoshop if you use the Pencil tool. 

Votes

Translate

Translate

Report

Report
Community guidelines
Be kind and respectful, give credit to the original source of content, and search for duplicates before posting. Learn more
community guidelines
New Here ,
Jan 31, 2021 Jan 31, 2021

Copy link to clipboard

Copied

In other programs you can set it to expand slightly so that it goes under the lineart without messing it up. In procreate there are no issues with using the colour fill tool really as long as you're careful. 


Votes

Translate

Translate

Report

Report
Community guidelines
Be kind and respectful, give credit to the original source of content, and search for duplicates before posting. Learn more
community guidelines
Community Expert ,
Feb 01, 2021 Feb 01, 2021

Copy link to clipboard

Copied

Isabel, you can expand a selection in Photoshop as well, but it is still not a good workflow.  Read the rest of the thread to see why.  It will pay dividends in the long run

image.png

Votes

Translate

Translate

Report

Report
Community guidelines
Be kind and respectful, give credit to the original source of content, and search for duplicates before posting. Learn more
community guidelines
Community Expert ,
Feb 01, 2021 Feb 01, 2021

Copy link to clipboard

Copied

Dag, I know this is an old thread, but someone has woken it up.  I had to laugh when reading your response above.  Priceless!

Votes

Translate

Translate

Report

Report
Community guidelines
Be kind and respectful, give credit to the original source of content, and search for duplicates before posting. Learn more
community guidelines
Mentor ,
Mar 08, 2022 Mar 08, 2022

Copy link to clipboard

Copied

Yes, it is quick and dirty but it doesn't have to be. So many other apps (including Fresco) solved this problem already, yet Adobe doesn't seem to understand just how many people need this feature.

Votes

Translate

Translate

Report

Report
Community guidelines
Be kind and respectful, give credit to the original source of content, and search for duplicates before posting. Learn more
community guidelines
Explorer ,
Jun 29, 2022 Jun 29, 2022

Copy link to clipboard

Copied

Adobe doesn't understand that people need a LOT of features... the fact that this can't be done still to this day drives me nuts. You can't even draw a straight line quickly in photoshop! It really makes you wonder what the devs are even doing over there...

Votes

Translate

Translate

Report

Report
Community guidelines
Be kind and respectful, give credit to the original source of content, and search for duplicates before posting. Learn more
community guidelines
Community Beginner ,
Jan 16, 2024 Jan 16, 2024

Copy link to clipboard

Copied

Shift+Left click makes a quick straight line without having to use the pen tool

Votes

Translate

Translate

Report

Report
Community guidelines
Be kind and respectful, give credit to the original source of content, and search for duplicates before posting. Learn more
community guidelines
Explorer ,
Jan 17, 2024 Jan 17, 2024

Copy link to clipboard

Copied

That does not work if you're using a pressure-sensitive pen on a drawing display/tablet. The line never comes out right. It's a known issue and has been an issue for years and years, but Adobe hasn't done anything to address it. If you're using a mouse or a brush that doesn't respond to pressure from a pen, it works fine, but this is often not the toolset digital artists use. And please don't throw the "photoshop is a photo editing app, not a drawing app" argument in its defense. Lots of artists pay lots of money to adobe because the application has become industry-standard, and yet it still lacks basic features that other far less expensive apps have...

Votes

Translate

Translate

Report

Report
Community guidelines
Be kind and respectful, give credit to the original source of content, and search for duplicates before posting. Learn more
community guidelines
Community Expert ,
Jul 14, 2023 Jul 14, 2023

Copy link to clipboard

Copied

Still good advice Dag, and it still makes me laugh every time someone wakes up this thread.

Votes

Translate

Translate

Report

Report
Community guidelines
Be kind and respectful, give credit to the original source of content, and search for duplicates before posting. Learn more
community guidelines
Community Expert ,
Jul 09, 2018 Jul 09, 2018

Copy link to clipboard

Copied

To fill with the foreground color, use the keyboard shorcut - alt/opt + backspace/delete


Melissa Piccone | Adobe Trainer | Pluralsight Author | Fine Artist

Votes

Translate

Translate

Report

Report
Community guidelines
Be kind and respectful, give credit to the original source of content, and search for duplicates before posting. Learn more
community guidelines
New Here ,
Jul 09, 2018 Jul 09, 2018

Copy link to clipboard

Copied

Someone just told me:

Have your line art layer on top, Locked.

Have your color layer below that and make sure your selected to draw on that layer.

While using Bucket Tool use make sure the:

Anti-alias Box is Checked (Can be uncheck, but not recommenced)

Contiguous Box is Checked

All Layers Box is Checked

Then adjust the tolerance to what is needed! (around 100 is where I put it)

Then fill in color to your hearts content.

_______________

I'm enthralled! I've been playing with this for a little bit and it seems to be working. I will keep testing this and see if this is the best solution! ^u^

Also, thank you everyone who has posted a comment helping me on this problem!

Votes

Translate

Translate

Report

Report
Community guidelines
Be kind and respectful, give credit to the original source of content, and search for duplicates before posting. Learn more
community guidelines
Community Expert ,
Jul 09, 2018 Jul 09, 2018

Copy link to clipboard

Copied

Hi Amber.  As others have said, the Paint Bucket is almost never used by experienced users.  It is much better to work with overlapping layers.  However, when the outline has a uniform thickness, it is better still to do it on a single layer and use a Stroke.

Your five pointed star, can be produced with the polygon Shape tool.  Use the little cog in the options bar and check Star, and set the required indent.

You can then choose a fill, and stroke colour and width...

or you can choose to have no fill or no stroke by selecting the red bar icon from the colour swatches.

If your artwork is raster (pixels instead of a vector shape layer) then you can use a Layer Style to stroke it.

Note I have set it stroke the Inside.  Choosing the outside would result in rounded corners.

This is a simplified account, and there is much much more you can do with these tools, but the bottom line is filling a void in a raster object is usually a bad idea because of anti-aliasing which causes the thin unfilled boundary.

Votes

Translate

Translate

Report

Report
Community guidelines
Be kind and respectful, give credit to the original source of content, and search for duplicates before posting. Learn more
community guidelines
New Here ,
Nov 10, 2021 Nov 10, 2021

Copy link to clipboard

Copied

This is the trick I've been using for years. You're right Amber. *thumbs up*

This way you can create a separate solid color layer that doesn't directly fill with your line work and increasing the tolerance over 100% allows the bucket to fill beneath the lines. 

For anyone else freaking out about the "correct" way to do it, the lasso is still there for specific selections and background fills. But this way is super fast for anyone creating comic illustrations for cartoon styled illustrations.

Votes

Translate

Translate

Report

Report
Community guidelines
Be kind and respectful, give credit to the original source of content, and search for duplicates before posting. Learn more
community guidelines
New Here ,
Mar 07, 2020 Mar 07, 2020

Copy link to clipboard

Copied

I found the magic trick! It takes a couple steps of setup on your image, but after that, you can just bucket fill after bucket fill!

This works in Photoshop CS6 and later. Later versions might have something easier, but I don't like having my tools licensed instead of owned, so I still use CS6. 


I assume you start with a line art image... the lines are black and they have some aliasing around them. Ok... here we go:


  1. Apply a new Adjustment Layer to "Black and White"... this guarantees that all the pixels really are shades of gray. A lot of art programs or scanners throw in other subtle colors that look gray to human eyes. 
  2. Use the Magic Wand tool. Turn OFF the "contiguous pixel" setting and turn OFF the "anti aliasing" setting. Now select the WHITE area of your image. 
  3. Invert the selection. Now you have every non-white pixel in your image selected. 
  4. Create a new layer by COPY.
  5. Now set the Blend Mode of the new layer to be Multiply. 
  6. Go back to your original lower layer, which is underneath the outline layer.
  7. The steps in purple are OPTIONAL, useful on some line drawings that have lots of stray gray lines that you don't want the bucket tool to stop at.
  8. (Optional) Use Magic Wand (same settings) on the orignal layer to select the BLACK areas.
  9. (Optional) Invert the selection
  10. (Optional) Shift-delete to replace with White. 
  11. Now start coloring with the fill bucket tool.


Perfect coloring achieved!

Votes

Translate

Translate

Report

Report
Community guidelines
Be kind and respectful, give credit to the original source of content, and search for duplicates before posting. Learn more
community guidelines
New Here ,
Sep 10, 2020 Sep 10, 2020

Copy link to clipboard

Copied

This is annoying for me too!!

Quickest way I get rid of it is to do the 'expand fill' method but record it as an Action bound to a function key.

So you use the magic wand to select your area and hit the function key to fill as the 'Paint bucket' function.

It's one more click but handy


Action steps

Select>Modify>Expand - Expand fill by 3 pixels (Maybe this would need to change depending on line work)

Image>Fill>Foreground colour

Select>Deselect


You can set function key to use from the action options - not through the keyboard shortcuts as far as I could see


Votes

Translate

Translate

Report

Report
Community guidelines
Be kind and respectful, give credit to the original source of content, and search for duplicates before posting. Learn more
community guidelines
Engaged ,
Dec 29, 2020 Dec 29, 2020

Copy link to clipboard

Copied

Very simple!

When you click the bucket tool... just click it again!

In other words fill the same area twice 🤔

Votes

Translate

Translate

Report

Report
Community guidelines
Be kind and respectful, give credit to the original source of content, and search for duplicates before posting. Learn more
community guidelines
Community Beginner ,
Feb 01, 2021 Feb 01, 2021

Copy link to clipboard

Copied

I am entering waaay late in the game and others have given perfectly good solutions. But here I go.


First, a philosophical point for those learning:

Use anything and everything you have at your disposal to get to your goal. There is a divergent/convergent part of the learning curve: you try everything, then you get very selective and particular about what has worked best and what hasn’t.


I urge you to never stop there. Diverge and converge again and again. Then, instead of being fearful of magic wand, paint bucket, color fill (to name just a few common purported taboos that evoke "never use!" comments), you will actually learn to use all of these skillfully – meaning, when you need them.

You don’t need a parachute to jump off a curb. What matters is your landing.


Second, question at hand:

I find that using the eraser tool and a mask layer (alpha or quick) allows you to make a shape with the desired edge softness and then, when you fill with the paint bucket (contiguous, 254 tolerance) the result will be a filled shape with no inner halo. From there, you can add it to a layer and fill it how you want. I do believe it is always a good idea to use a mask on a pixel layer for a shape, so you can have flexibility to adjust both separately.

Hope this is useful.

30 year professional, still at it (I know, I should get a life)

Votes

Translate

Translate

Report

Report
Community guidelines
Be kind and respectful, give credit to the original source of content, and search for duplicates before posting. Learn more
community guidelines
New Here ,
May 02, 2021 May 02, 2021

Copy link to clipboard

Copied

Select the area you need to fill with the magic wand tool, then create a layer beneath the lineart, use the fill bucket, and then outline-stroke the selection. I do this on a regular basis for my comic work.

You can also use shift-W to fill and outline stroke many sections at once.


Votes

Translate

Translate

Report

Report
Community guidelines
Be kind and respectful, give credit to the original source of content, and search for duplicates before posting. Learn more
community guidelines
New Here ,
Feb 18, 2022 Feb 18, 2022

Copy link to clipboard

Copied

I've been struggling with that (abuse removed by moderator)  as well for years with photoshop while other programs have an "expand" option that comes with the bucket tool (DUH ADOBE). For what it's worth, the quickest way I've found is to create a script.

So I just select the area to fill with the magic wand and then play my script that will expand the selection 2px, fill with foreground color, deselect. Hope that was helpfull

Votes

Translate

Translate

Report

Report
Community guidelines
Be kind and respectful, give credit to the original source of content, and search for duplicates before posting. Learn more
community guidelines
New Here ,
Mar 08, 2022 Mar 08, 2022

Copy link to clipboard

Copied

Rey23493145k0tv_0-1646757106516.png

try that setting it can solve your problem thanks

Votes

Translate

Translate

Report

Report
Community guidelines
Be kind and respectful, give credit to the original source of content, and search for duplicates before posting. Learn more
community guidelines
New Here ,
Mar 08, 2022 Mar 08, 2022

Copy link to clipboard

Copied

Rey23493145k0tv_0-1646757193421.png


Votes

Translate

Translate

Report

Report
Community guidelines
Be kind and respectful, give credit to the original source of content, and search for duplicates before posting. Learn more
community guidelines
Mentor ,
Mar 08, 2022 Mar 08, 2022

Copy link to clipboard

Copied

BTW, folks, this request goes back to the 90s and it boggles the mind that Adobe has yet to implement. And just so you know, Adobe Fresco added the feature some months ago...

Votes

Translate

Translate

Report

Report
Community guidelines
Be kind and respectful, give credit to the original source of content, and search for duplicates before posting. Learn more
community guidelines