

- Home
- Photoshop ecosystem
- Discussions
- Re: Making a flat object curved
- Re: Making a flat object curved

Copy link to clipboard
Copied
Hi
I'm trying to insert my company logo on a curved background, and I want the logo to follow the curve of the background.
I'm pretty sure there is a really easy way to do this in Photoshop, I just can't find it.
Can anyone help?


 1 Correct answer

Hi Anita,
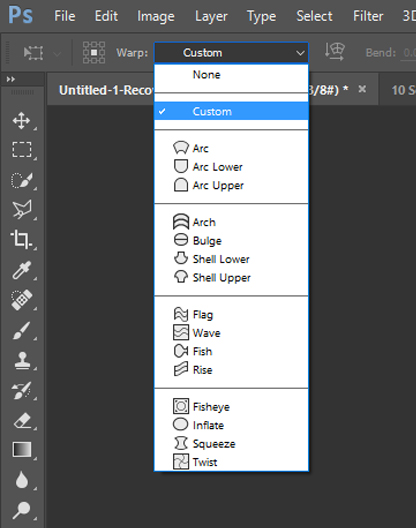
You can use the warp function in photoshop.
1. Select what you want to warp in your case it is the logo.
2. Do one of the following:
Choose Edit > Transform > Warp.
If you chose a different transform command or the Free Transform command, click the Switch Between Free Transform And Warp Modes button in the options bar.
3. Do one or more of the following:
To warp using a specific shape, choose a warp style from the Warp pop‑up menu in the options bar.
To the manipulate the shape, drag the co
...Explore related tutorials & articles
 20
Replies
20
20
Replies
20

Copy link to clipboard
Copied
Difficult to advise without seeing both the curved background and the logo you want to put on it. It is very easy to add the images to this forum. Just copy to clipboard, and paste here with Ctrl v (Cmd v).
It will probably come down to using Free Transform > Warp to distort the logo, and then applying shading to match the background.
Copy link to clipboard
Copied
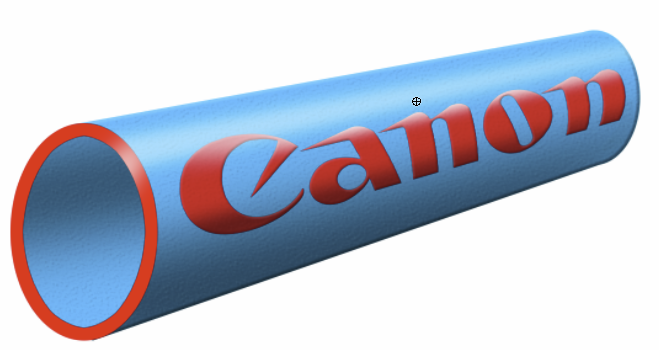
Some badly placed perspective lines with the logo fitted between, and warped so that the left and right ends of the FT box match the curve of the cylinder.

Then add shading to match the background
Copy link to clipboard
Copied
Why not using these techniques: Unlink Layer Mask from Smart Object
(please note that the title is misleading as this was the problem, not the solution. The solution is using a 3D model and the smart object as a texture, just as I suggested )
Copy link to clipboard
Copied
Feierwoon wrote:
Why not using these techniques: Unlink Layer Mask from Smart Object
(please note that the title is misleading as this was the problem, not the solution. The solution is using a 3D model and the smart object as a texture, just as I suggested )
As the person who started that thread, I can tell you that it was another poster who came with a 3D solution. What I do is create illustrations without using the 3D tools, but rather produce the affect of depth with shading. The perspective lines I added to the cylinder were completely arbitrary to demonstrate how to use them to make a composited objected fit the scene.
We still need to see the OP's image and logo before we can take this any further. Otherwise, we are just guessing, which is wasting everybody's time.
Ctrl click the Image to select it, or use Ctrl a to select it all.
Ctrl c to copy to clipboard.
Come back to this thread, and in your reply, Ctrl v to paste. It's that simple. No need to use the forum widgets.
Copy link to clipboard
Copied
Trevor.Dennis wrote:
Feierwoon wrote:
Why not using these techniques: Unlink Layer Mask from Smart Object
(please note that the title is misleading as this was the problem, not the solution. The solution is using a 3D model and the smart object as a texture, just as I suggested )
As the person who started that thread, I can tell you that it was another poster who came with a 3D solution.
I saw the thread. Quite impressive as a solution. Reminds me my old times with Wavefront... Long before I new that PS existed.
Back to the problem: If the original data is confidentional, the OP should post replacement data, that is as near to the original problem as can be. But I doubt that he can use your suggestions unless you are accessing PS CS (1?).
Copy link to clipboard
Copied
Why don't you post screenshots of your logo and curved background?
If the curved background can be represented in 3D space, you can attach your Logo as a texture to your 3D object.
Copy link to clipboard
Copied
Thank's for your answers, they're really appreciated 🙂
It appeares that I'm using an old version of the program; the Photoshop CS. It doesn't have the 3D feature, or so it seems.
Unfortunately, I can't post an image of my project as it is business confidential 😞
But it would be more or less the same as wrapping a label around a bottle.
Your suggestion comes very close, Trevor.Dennis, only the cylinder should be the other way around 🙂
Can you give me the directions to make these perspective lines?
Copy link to clipboard
Copied
I don't think that Trevor can comply as PS CS does not have that feature. The wrap however is there, when I remember the good old days. You need to do a lot of thjis work mannualy. I Sugest you draw a model by hand or take a quick picture of the real object (a bottle), with the logo scotched to and use that as a reference.
Copy link to clipboard
Copied
I actually thought the solution would be quite simple, but apparently it's more complicated than that. I don't want to be wasting your time, so here is a copy of the project but with a different logo. How can I make the logo follow the curve of the cylinder?

Copy link to clipboard
Copied
The solution is quite simple, when you know what the problem is. It's not easy when you just describe your problem incompletly.
You could also hav delivered an image of a round trashcan and a logo (type the words "LOGO"), and people would have known where to go...
I'm happy that your problem is solved. Have a nice day.
Copy link to clipboard
Copied
Hi Anita,
You can use the warp function in photoshop.
1. Select what you want to warp in your case it is the logo.
2. Do one of the following:
Choose Edit > Transform > Warp.
If you chose a different transform command or the Free Transform command, click the Switch Between Free Transform And Warp Modes button in the options bar.
3. Do one or more of the following:
To warp using a specific shape, choose a warp style from the Warp pop‑up menu in the options bar.

To the manipulate the shape, drag the control points, a segment of the bounding box or mesh, or an area within the mesh. When adjusting a curve, use the control point handles. This is similar to adjusting the handles in the curved segment of a vector graphic.
Note: To undo the last handle adjustment, choose Edit > Undo.
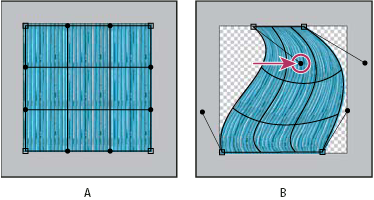
To change the orientation of a warp style that you chose from the Warp menu, click the Change The Warp Orientation button in the options bar.
To change the reference point, click a square on the Reference point locator in the options bar.
To specify the amount of warp using numeric values, enter the values in the Bend (set bend), X (set horizontal distortion), and Y (set vertical distortion) text boxes in the options bar. You can’t enter numeric values if you have chosen None or Custom from the Warp Style pop‑up menu.
4. Do one of the following:
Press Enter (Windows) or Return (Mac OS), or click the Commit button in the options bar.
Regards
Sahil
Copy link to clipboard
Copied
Hi Sahil
Thank you very much for your accurate instructions.
I understand if you can't support old versions of the program, but I'm using Photoshop CS version 8.0.1, and I don't think it has these warp styles, or at least I can't see any Warp pop-up menu 😞
Am I correct?
Copy link to clipboard
Copied
I cannot remember how we did, but we did quite what you needed putting the company's logo on a cylindrical shape.
It may have been with transformations.
You may also look into the liquify filter. A Barrel distortion at the right place could be exactly what you need.

Copy link to clipboard
Copied
Hey there,
I know this is an old thread, however, perhaps someone else out there is having the same issue and has stumbled across this like i did.
Before PS had 3D and warp functions, here's how I used to do it:
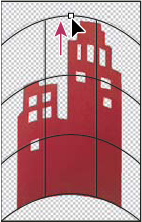
1. Have the logo or text (rasterized) on the layer above the chosen image.

2. Hit Command + T to transform it. Holding Shift down, rotate it 90 degress.

3. Draw a selection box around the logo, leaving about half the depth of the logo around each side. Go to Filter/distort/shear.
Depending which way you rotated the image, you will need to adjust the curves slider accordingly. Now REMEMBER: This filter is very sensitive. I also recommend moving the top and bottom points back ever so slightly, then the center forward even less. This will take a bit of practice/ trial and error, however, it is doable and can provide excellent results. You can of course adjust one side more etc if that is where the logo is to be placed.

4. End result (I did this is about 90 seconds so it is a bit rough- just to show the method really.
Well I hope this helps anyone else who stumbles across this page, I was looking for a way to create airplane windows in perspective!
Cheers
Rob
Copy link to clipboard
Copied
Could I get a beer? Thanks for your solution.
Copy link to clipboard
Copied
Lol, I'm working too late so I got confused! I thought you wanted a visual of a Carlsberg Beer! hahaha. (you don't do you..?)
No worries for the solution. Shame it's almost 2 years late...
Copy link to clipboard
Copied
It's never too late for a solution...  Let's go for a BATTIN...
Google Image Result for https://battin.lu/wp-content/themes/battin/images/logo_battin.png?x20072
Copy link to clipboard
Copied
ah... all i can do right now mate is...

Copy link to clipboard
Copied
Hope you realise that was me joking... lol ever in London, look me up pal.
Copy link to clipboard
Copied
You do not give that info in your public profile, but I love your edit... I have Battin in my fridge, if you ever pass by...

Get ready! An upgraded Adobe Community experience is coming in January.
Learn more
 AdChoices