Copy link to clipboard
Copied
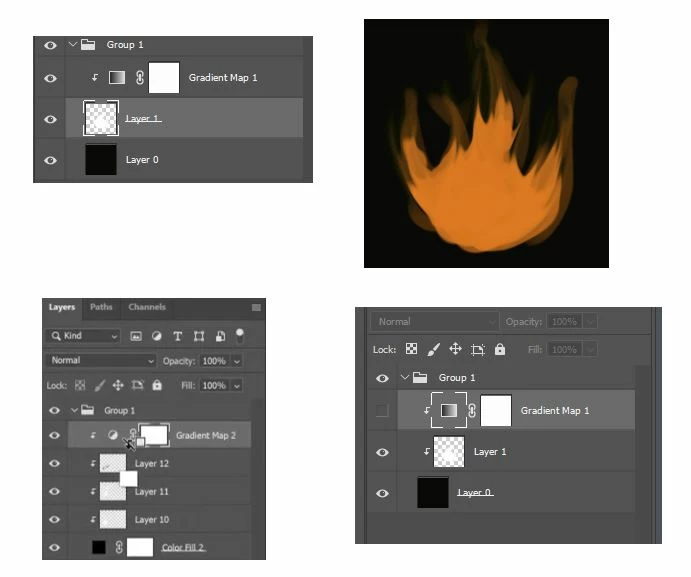
Hello, Everyone. I'm using the latest version of Photoshop (24.1.1) on a Windows machine. I was following this gradient mask tutorial (https://www.youtube.com/watch?v=ea5mrcJnIfQ&ab_channel=KatieDeSousa). The first pic (below) shows my simple layer stack. The blending mode for the bottom layer (black, Layer 0) is linear dodge. All other layers are normal. Some flames are drawn on the second layer (Layer 1). See B&W pic. Then a gradient map is added and clipped to Layer 1. Problem is--as you can see on that last pic-- the gradient map does not clip to the flames, drawn on the layer, but, instead, covers the entire layer. Can anyone tell me how to fix that?
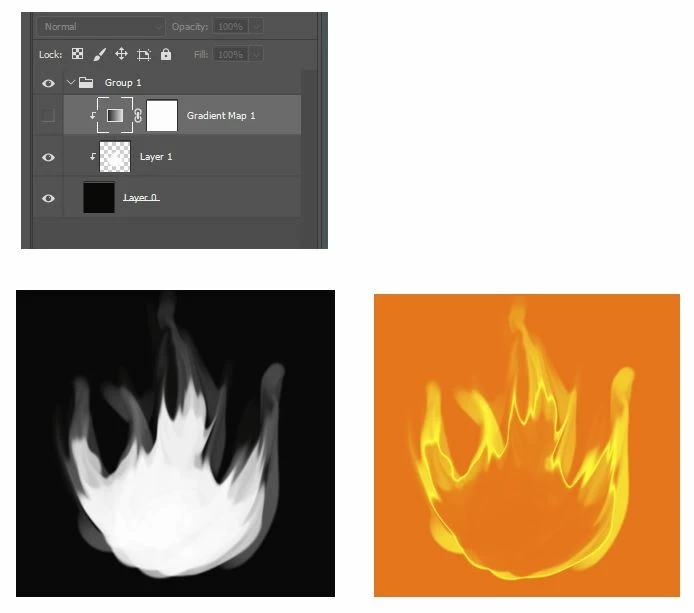
c.pfaffenbichler, yes, you are correct. I should have seen that myself. When the white image is unclipped from the black background and the gradient map is clipped to that white image, the gradient mask produces the desired result: an orange flame on a black background (as illustrated below). Thank you. I am still perplexed about the following: The second set of images shows the layer stack from the online tutorial and the layer stack from my attempt to follow that tutorial. In both cases,
...Copy link to clipboard
Copied
According to your screenshot »Layer 1« is not the basis of the Clipping Group, »Layer 0« is.
Copy link to clipboard
Copied
c.pfaffenbichler, yes, you are correct. I should have seen that myself. When the white image is unclipped from the black background and the gradient map is clipped to that white image, the gradient mask produces the desired result: an orange flame on a black background (as illustrated below). Thank you. I am still perplexed about the following: The second set of images shows the layer stack from the online tutorial and the layer stack from my attempt to follow that tutorial. In both cases, there is a bottom layer (black); white images of flames clipped to that bottom layer (3 image layers in the tutorial and 1 image layer in my case); and a gradient map clipped to the top image layer. In the tutorial, the gradient map produced the desired result: an orange flame on a black background. In my case, unhiding the gradient map produced an orange flame on an orange background, i.e., the gradient map was applied to the underlying black layer. Your explanation makes perfect sense to me. Unclipping the middle image layer from the black bottom layer does produce an orange flame on a black layer. However, I would expect that same logic to extend to the tutorial. When you compare the layer stack from the tutorial with the layer stack I produced initially, do you see any difference to explain the different result?
Copy link to clipboard
Copied
Does your gradient start at black, as in the video?
Copy link to clipboard
Copied
From what I can see in tutorial, starting at this point https://youtube.com/watch?v=ea5mrcJnIfQ&feature=shares&t=643 creator is assigning black color to dark areas and orange to lighter portion, thats the trick. You are probably using Gradient Map with single color or very similar colors for dark and white areas. Please show us your gradient map editor so we can see colors used for gradient.
By the way, another poossible option is probably to assign Multiply blending mode to Gradient Map.
Copy link to clipboard
Copied
Bojan, thanks very much for your reply and your insight. You are correct. I tried the same layer stack with a gradient that went from black to orange. It produced an effect similar to the effect in the tutorial. Thanks, again. Much appreciated.
Copy link to clipboard
Copied
By the way: If »Layer 1« should just be white pixels at varying opaqueness/transparency the Gradient Map Adjustment Layer would probably not have the intended effect when Clipping Masked to it.
Copy link to clipboard
Copied
Please show your gradient (Gradient map). IMHO the color for the darkest areas should (also) be a very dark colour. For example dark/yellow/orange/ruby red (or the other way round)