Partially transparent logo
Copy link to clipboard
Copied
Hi all,
I know how to make the background of a logo transparent using the magic wand tool, this is no problem. The problem I have run into is, I have a particular logo that is two images, a picture and text. The picture has some white lines in it, that the magic wand always wants to make transparent, and I want them to remain white. Really, what I need to do is separate the two images, (picture from text), so I can make the the background of the text transparent, and then add in my picture so it stays untouched.
I thought I would need to put the text in one layer and the picture on another, and then add the two layers together for a finished product. I tried and tried, but always fall short. Is there even a way to do this? There must be...
Can anyone help me through this process?
Much thanks
Explore related tutorials & articles
Copy link to clipboard
Copied
webmaster698 wrote
Hi all,
I know how to make the background of a logo transparent using the magic wand tool, this is no problem. The problem I have run into is, I have a particular logo that is two images, a picture and text. The picture has some white lines in it, that the magic wand always wants to make transparent, and I want them to remain white.
The magic want does not change any pixels it just select pixels so you can work on them. If the white pixels are made transparent that was not done by the magic want tool. It only makes selections.
Copy link to clipboard
Copied
You are using the magic eraser tool, not the magic wand tool.
You can try changing the tolerance.
Can you post the image so that we can see how to approach that?
Copy link to clipboard
Copied

Here is my image, and I am trying the Quick Selection Tool, not the Magic Wand. Sorry about that.
Obviously I want the picture to remain as it
Copy link to clipboard
Copied
You can isolate image with Polygonal Lasso or trace around with the Pen using path then convert path to selection and cut image. Will this solve your problem or you have more problems to solve?
Copy link to clipboard
Copied
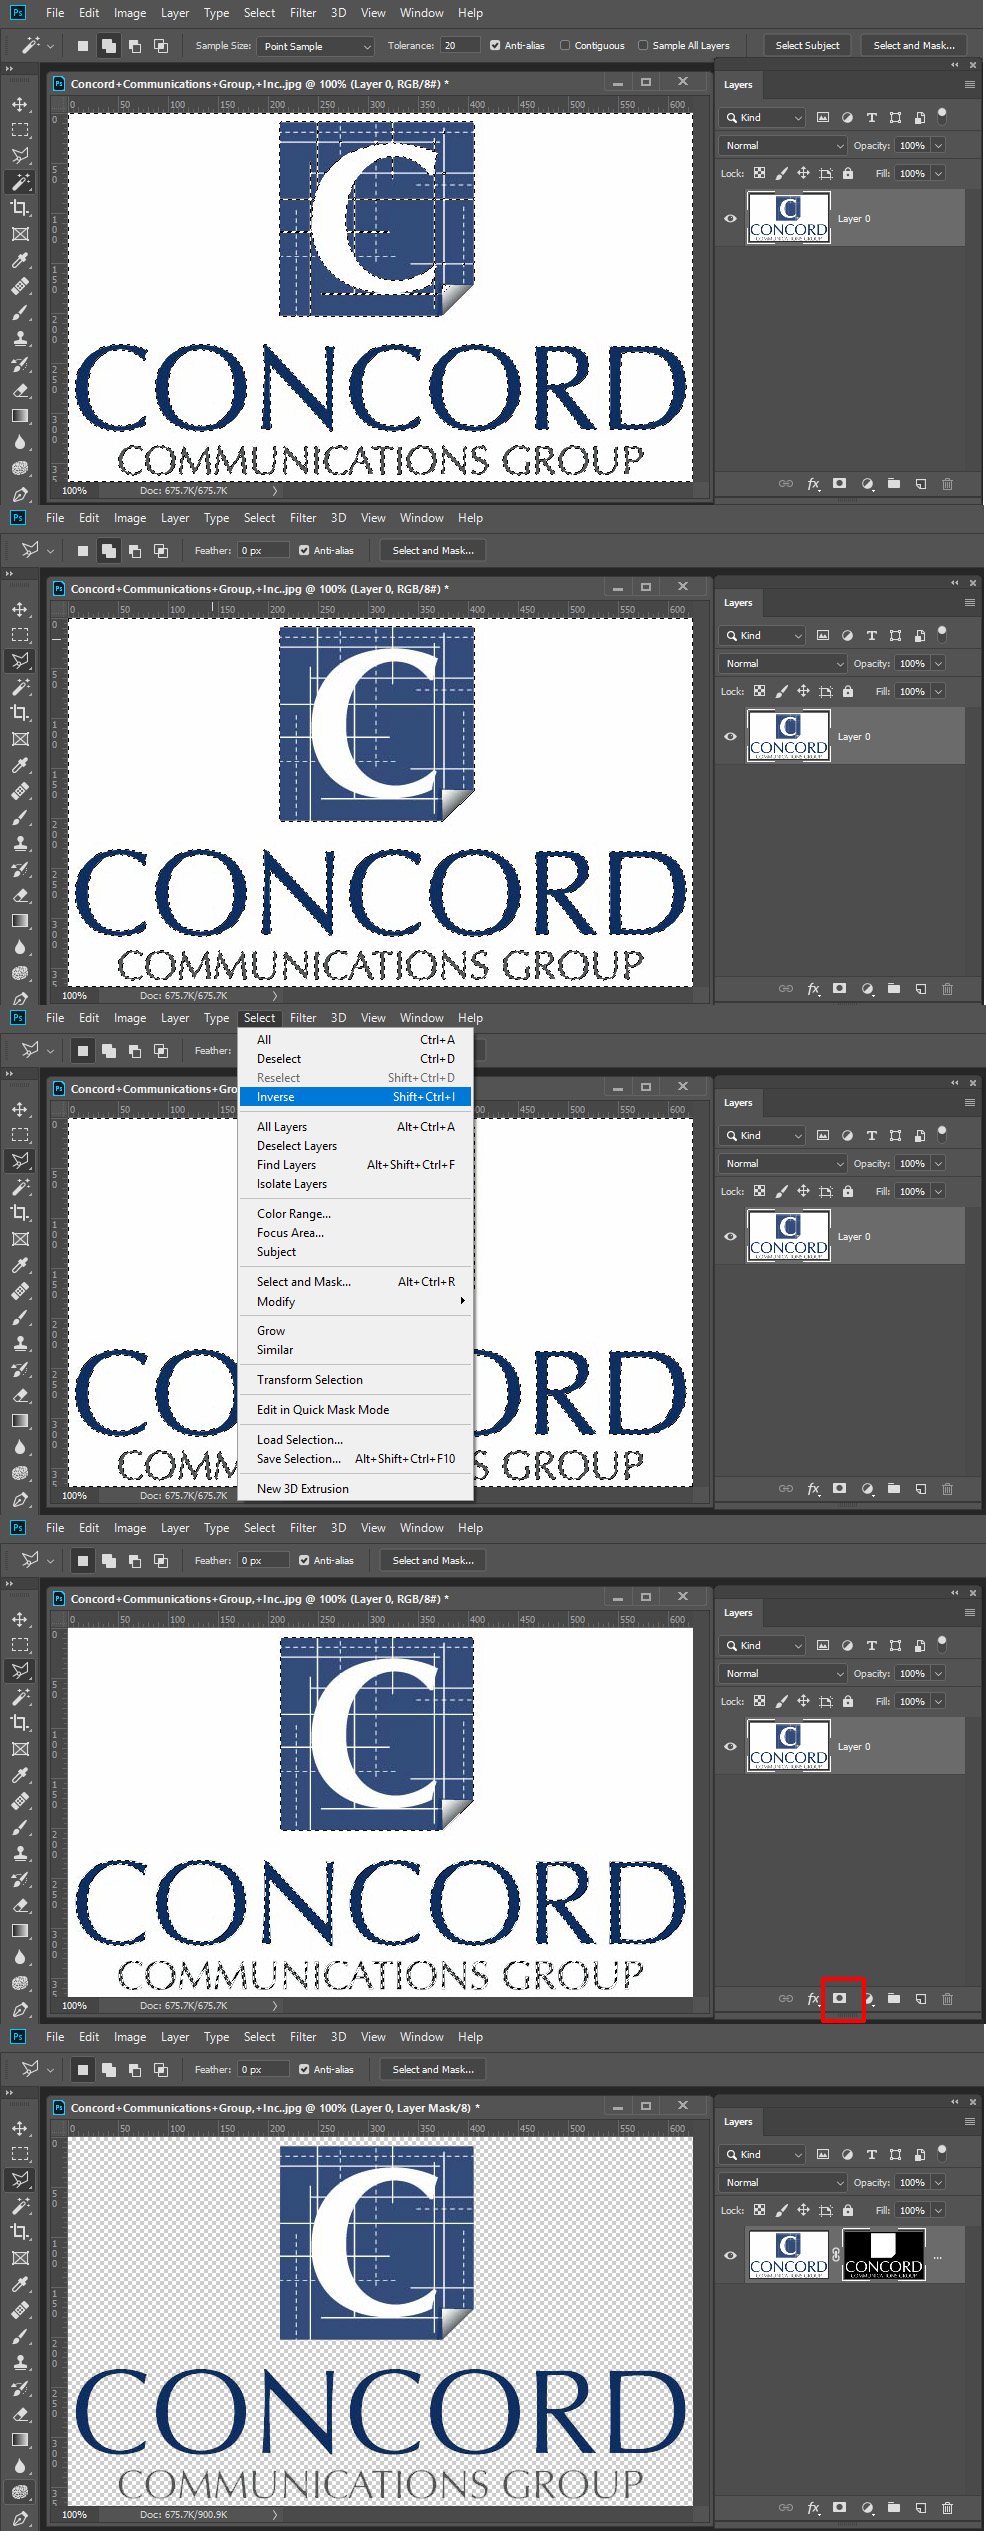
Very easy to mask that logo.
Magic wand to select the white.
Alt+ Polygon lasso to deselect the blue folded corner rectangle area.
Select Inverse
Add current selection as layer mask. Using the icon in the layers palette.
Not a single pixel was changed only a layer mask was added.
Copy link to clipboard
Copied
Let me try to answer your question:
Create layer below layer with image then paint with white where you want your lines to remain white (you are probably deleting that part of image after selecting them using magic wand).
Copy link to clipboard
Copied
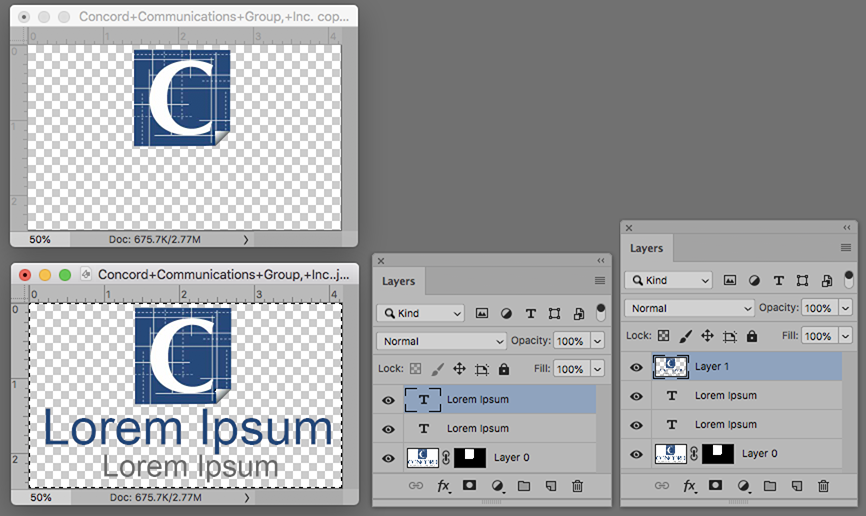
Drag the layer's Lock in the Layers panel to the Trash.
Use the Polygonal tool to outline the C logo. It will create a Selection of marching ants.
Select > Inverse the Selection. Click on the Mask symbol at the bottom of the Layer panel.
The result is the top image
Add the type layers. (The result is the bottom image
Cmd+Opt+Shift produces a composite layer that can be dragged onto another file (rightmost layer panel shows it). This allows you, at a future time, to edit the total image by trashing the composite layer, editing the image, and creating a new composite layer.
Copy link to clipboard
Copied
I'm almost there. I'm having trouble getting the c logo on one layer and the text on another.
Copy link to clipboard
Copied
I assume you have the logo on a transparent layer as shown in the illustration. Good. You did the hard part,
Now choose the Type tool and type in a chosen color and font. It will automatically appear on a layer as shown.The type will seem to be on a transparent layer.
Copy link to clipboard
Copied
Not quite. The idea is to separate the C logo from the test. The C logo should remain untouched and I can make the background transparent for the test. I'll upload the image, so you can see what I'm talking about.

Copy link to clipboard
Copied
Would you have access to a lossless version (not jpg, but PNG or even GIF)? This jpg is heavily compressed, and the logo is quite affected by JPG compression artifacting, i.e.: very noisy around the edges. Ideally you would avoid jpg for any such logo work.
Copy link to clipboard
Copied
The logo looks pretty basic- If you have a match for the font I'd just redraw the thing in Illustrator...
Copy link to clipboard
Copied
Photoshop is completely capable of producing it as a vector object.
The font is mostly Optima Light Standard Roman, available free from here
https://best-font.com/fonts/download-optima-lt-std-roman-font.html
I had trouble matching the big C, so traced it with the Pen tool and made it into a Shape layer.
The lines are all vector, but the dashed lines are not a perfect match (I always struggle with the bloody dashed line tool ![]() )
)
The wee corner gradient is raster, but easy to do as a vector.
If this was mine, I'd make all the layers a Smart Object, and drag to a new CC Library which contains all the assets for this client, including fonts, colour swatch and other graphics as Smart Objects.

It breaks my heart to think of anyone using the magic wand to produce a transparency from a graphic like this, but if that's what the OP want's to do, then I guess we should facilitate that. Overlay this as an alpha mask. Job done.

Copy link to clipboard
Copied
Forgive me for not understanding your request.
If you want the type on its own transparent layer make a rectangular selection of the type In the composite and strike Cmd+J
Deleting the type from the composite to leave only the logo is a simple matter of rectangular Select and Delete.
Copy link to clipboard
Copied
Hi webmaster698,
Looks like you have a lot of great advice here. I'd say go through them and use the one that works best for you.
When I look at this, I think of using the Rectangular Marquee tool to select the C square and then create the bottom right corner by removing a portion of the selection. You could also use other selection tools to create that shape like the Pen Tool or Polygonal Lasso tool. Once you have a selection, copy that onto it's own layer and hide the layer.
Use your favorite selection method to select the white areas and then hit Comm+Shift+I to inverse your selection. Now that you have all your text selected, copy that onto a new layer. Now just delete the layer with white pixels and you should be left with what you need.
Hope you find this helpful!
Good luck
-Sebastian


