• Global community
    • Language:
      • Deutsch
      • English
      • Español
      • Français
      • Português
  • 日本語コミュニティ
    Dedicated community for Japanese speakers
  • 한국 커뮤니티
    Dedicated community for Korean speakers
Exit
0

Photoshop brush settings - automatically remove overlapping lines

New Here ,
Sep 20, 2022 Sep 20, 2022

Copy link to clipboard

Copied

Hi all,

Long time listener first time caller...

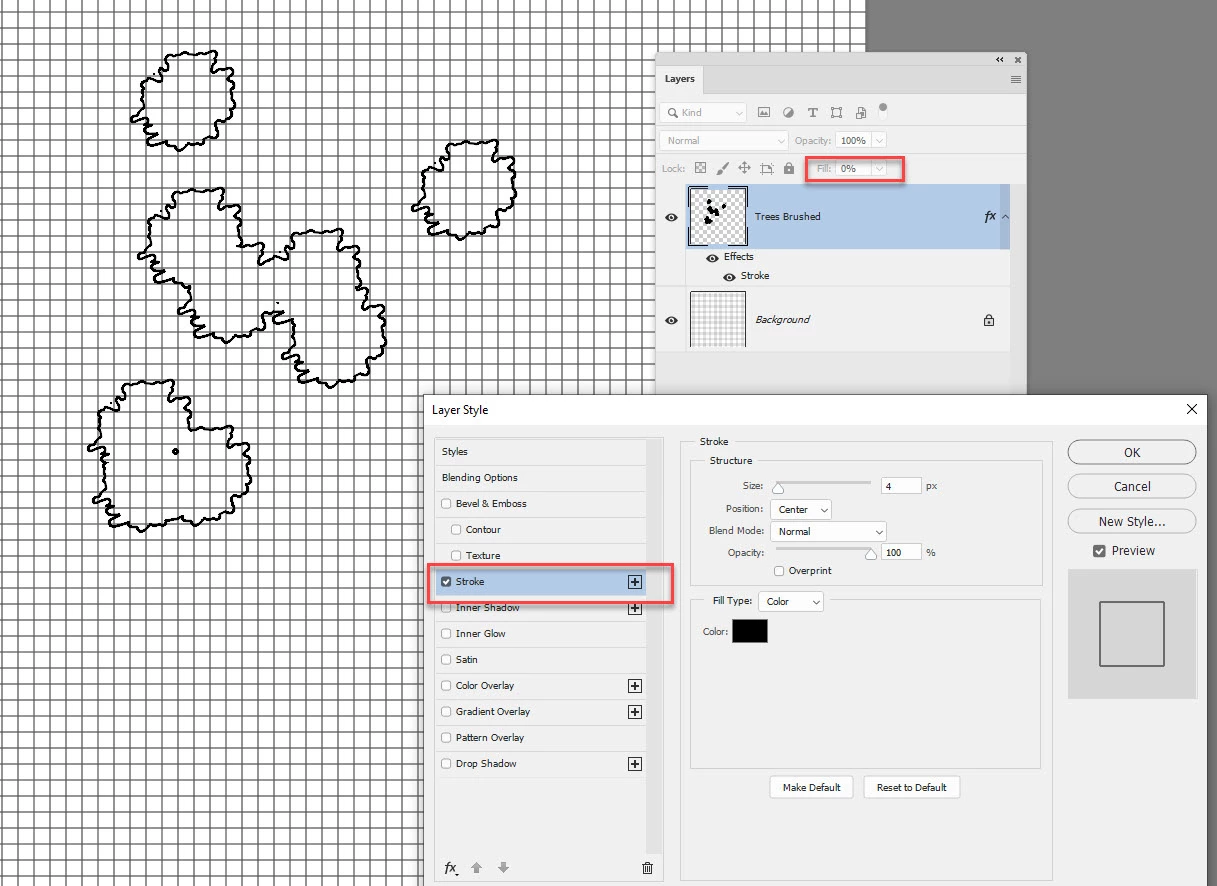
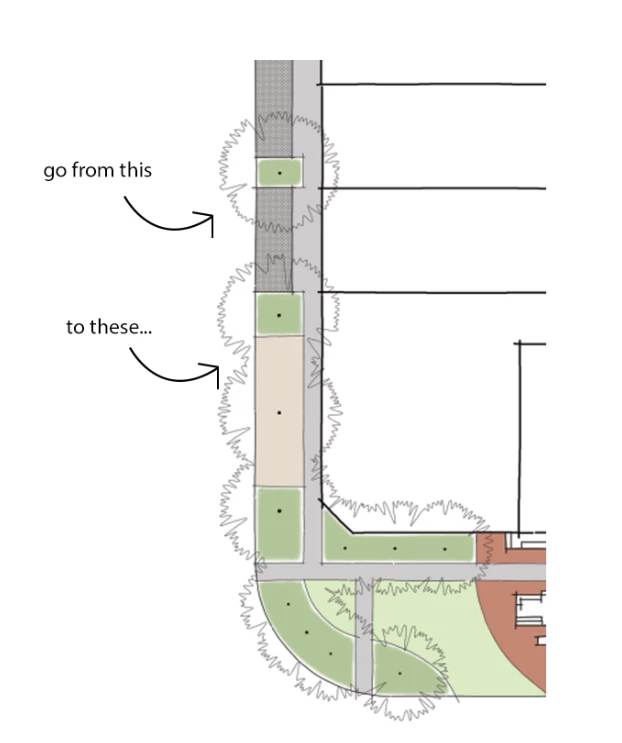
I am wondering if there is a quick and easy workflow for placing brushes over the top of each other, resulting in the overlapping lines not being visible.

For reference, I am wanting to create an architectural plan using trees in plan view.

The tree brushes are the brushes I am wanting to amend to achieve the effect stated above. 


see pic below for reference.

timothyd87725916_0-1663725675071.png


Many thanks in advance. 

TOPICS
iPadOS , macOS , Windows

Views

401

Translate

Translate

Report

Report
Community guidelines
Be kind and respectful, give credit to the original source of content, and search for duplicates before posting. Learn more
community guidelines

correct answers 2 Correct answers

Advocate , Sep 21, 2022 Sep 21, 2022

You have to create a new brush...

- make a selection of the inside of your brush

- fill the selection (on a new layer) with black

- Edit > Define Brush Preset (choose any name you like)
- make the brush settings you need (e.g. Shape Dynamics > Angle Jitter)
- make a new layer

- set "fill" in the layers panel to 0%

- add layerstyle: Stroke (size: 1px - color: grey)
- draw your trees

Votes

Translate

Translate
Community Expert , Sep 21, 2022 Sep 21, 2022

Hi

This is easy to do with a brush and layer effect combined.

Make a solid brush in the shape you want

2022-09-21_09-06-08.jpg

Use that brush on an empty layer

2022-09-21_09-07-58.jpg


Turn the fill of the brushed layer to 0% . Right click in the layers panel and in Blending options add a stroke, centered on the brushed edge

2022-09-21_09-09-21.jpg


Dave

Votes

Translate

Translate
Adobe
Community Expert ,
Sep 20, 2022 Sep 20, 2022

Copy link to clipboard

Copied

If I can understand your request correctly then you must create "effect", its not possible to instruct Photoshop using Brush Setings for such behaviour.

Votes

Translate

Translate

Report

Report
Community guidelines
Be kind and respectful, give credit to the original source of content, and search for duplicates before posting. Learn more
community guidelines
Community Expert ,
Sep 20, 2022 Sep 20, 2022

Copy link to clipboard

Copied

I am thinking probably not.  Does the interior have to be transparent (empty)?  

I used the top illustration to make a brush preset. Open up the spacing and downsized to make these plan view trees

image.png

I am not coming up with any way to do exactly what you are asking unfortunately.  @davescm  ? 

Votes

Translate

Translate

Report

Report
Community guidelines
Be kind and respectful, give credit to the original source of content, and search for duplicates before posting. Learn more
community guidelines
Advocate ,
Sep 21, 2022 Sep 21, 2022

Copy link to clipboard

Copied

You have to create a new brush...

- make a selection of the inside of your brush

- fill the selection (on a new layer) with black

- Edit > Define Brush Preset (choose any name you like)
- make the brush settings you need (e.g. Shape Dynamics > Angle Jitter)
- make a new layer

- set "fill" in the layers panel to 0%

- add layerstyle: Stroke (size: 1px - color: grey)
- draw your trees

Votes

Translate

Translate

Report

Report
Community guidelines
Be kind and respectful, give credit to the original source of content, and search for duplicates before posting. Learn more
community guidelines
Community Expert ,
Sep 21, 2022 Sep 21, 2022

Copy link to clipboard

Copied

Hi

This is easy to do with a brush and layer effect combined.

Make a solid brush in the shape you want

2022-09-21_09-06-08.jpg

Use that brush on an empty layer

2022-09-21_09-07-58.jpg


Turn the fill of the brushed layer to 0% . Right click in the layers panel and in Blending options add a stroke, centered on the brushed edge

2022-09-21_09-09-21.jpg


Dave

Votes

Translate

Translate

Report

Report
Community guidelines
Be kind and respectful, give credit to the original source of content, and search for duplicates before posting. Learn more
community guidelines
Community Expert ,
Sep 21, 2022 Sep 21, 2022

Copy link to clipboard

Copied

Excellent idea Dave

Votes

Translate

Translate

Report

Report
Community guidelines
Be kind and respectful, give credit to the original source of content, and search for duplicates before posting. Learn more
community guidelines
Community Expert ,
Sep 21, 2022 Sep 21, 2022

Copy link to clipboard

Copied

I see Tom came up with the same method at the same time. 

Dave

Votes

Translate

Translate

Report

Report
Community guidelines
Be kind and respectful, give credit to the original source of content, and search for duplicates before posting. Learn more
community guidelines
New Here ,
Sep 26, 2022 Sep 26, 2022

Copy link to clipboard

Copied

LATEST

Many thanks to you all for your prompt replies - @davescm @Tom Winkelmann much obliged! 

Votes

Translate

Translate

Report

Report
Community guidelines
Be kind and respectful, give credit to the original source of content, and search for duplicates before posting. Learn more
community guidelines