

- Inicio
- Photoshop ecosystem
- Hilos de conversación
- PS not saving dissolve blend mode correctly.
- PS not saving dissolve blend mode correctly.

Copiar vínculo al Portapapeles
Copiado
I have used blend modes seamlessly on my images. No problems saving any of them, ever. I had a new project and used "dissolve mode". This put a snow effect on my trees and it is valuable for my work!
It has stopped saving correctly. It is the only blend mode that isn't saving correctly
It does not save as shown in the PS working document. It is lighter and smoother. It doesn't look anything like the processed image. This is the only blend mode that does this. It does not matter if I save in Jpeg or Tiff. I used Save As and Export, same results.
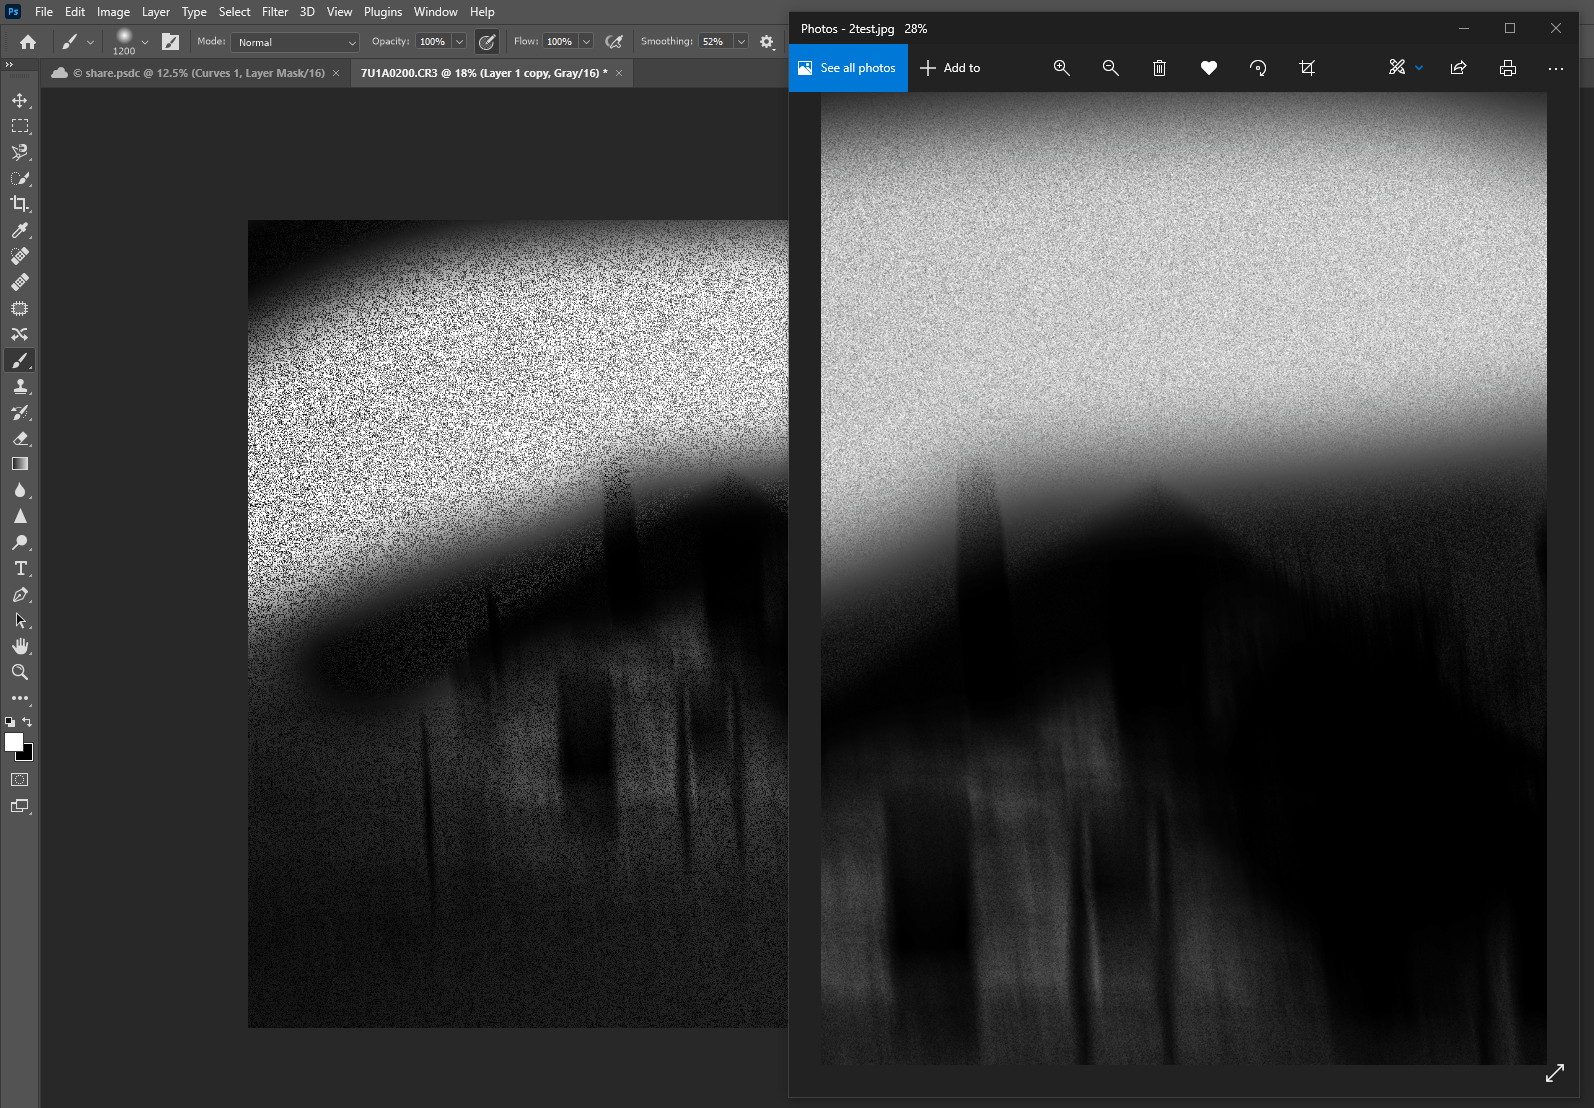
I am attaching an image. The left is the working doc in PS. On the right side is the saved image. . It is just very different.
Windows 10 - Version: 10 10.0.19043.1586
Adobe Photoshop Version: 23.2.2 20220304.r.325 49bf0ec x64


 1 respuesta correcta

To display fine noise on your screen you need to see every image pixel. The only view that does that, in any image viewer, is a zoom that directly maps one image pixel onto one screen pixel. When you zoom out, several image pixels are combined together and the resulting value is displayed by one screen pixel. That combining of pixels can be done differently in different viewers, hence both need to be viewed at that 1 to 1 mapping which in Photoshop is called 100% zoom.
There is another reason
...Examinar y buscar tutoriales y artículos relacionados
 16
réplicas
16
16
réplicas
16

Copiar vínculo al Portapapeles
Copiado
Evaluate both images at 100% view (1:1, where one image pixel = one monitor/screen pixel).
Copiar vínculo al Portapapeles
Copiado

Copiar vínculo al Portapapeles
Copiado
Your screenshots are not at 100%. The Photoshop view is at 18% zoom. That involves interpolation of pixels before blending to create the screen preview. With fine noise, such as that created by dissolve, evaluate at 100% zoom which uses 1 screen pixel for 1 image pixel - no interpolation.
Dave
Copiar vínculo al Portapapeles
Copiado
Hmmmm. It looks the same zoomed-in. Zoom in, annnd, am I looking for something or doing something?? Dissolve is there and dark in PS. I don't get what you are saying. "interpolation" what is this and what does it mean to mean in this situation? When I export I have the expectation that it will look how it is in PS, if not what is the point of editing? When I do this, mine is significantly lighter after export. Why? My issue is export/save. I want it to be dark like it is in PS. It looks very different when saved or exported. How do I get it to look the saved image to look like the work I did in PS? Thanks!! 🙂
So the Car image below (from Adorama) the dissolve border is black, mine is black UNTIL I export/save, from there it turns lighter grey.


Copiar vínculo al Portapapeles
Copiado
So the Car image below (from Adorama) the dissolve border is black, mine is black UNTIL I export/save, from there it turns lighter grey.
Photo credit Adorama.
This looks like the image with its caption from Steve Patterson's CS4 tutorial:
https://www.photoshopessentials.com/photo-effects/dissolve/
Jane
Copiar vínculo al Portapapeles
Copiado
To display fine noise on your screen you need to see every image pixel. The only view that does that, in any image viewer, is a zoom that directly maps one image pixel onto one screen pixel. When you zoom out, several image pixels are combined together and the resulting value is displayed by one screen pixel. That combining of pixels can be done differently in different viewers, hence both need to be viewed at that 1 to 1 mapping which in Photoshop is called 100% zoom.
There is another reason. When viewed at 100% each image pixel is a blend of the equivalent pixel on every layer. However, when zoomed out each layers pixels are combined within the layer then blended with the same combination below. So at 25% zoom, 16 pixels are combined together then blended with a combination of 16 pixels on the layer below before displaying the result as one pixel. In addition, at view levels less than 66.7% 8 bits/channel are used for blending the preview - even on 16 bit images. This can alter the preview of fine noise dramatically.
Hence the advice to compare any changes with Photoshop at 100% zoom and any image viewer at the equivalent level (whatever that viewer labels it).
One more item to watch out for. If you are exporting to a format that uses lossy compression, e.g. jpeg, make sure you are using a high enough quality setting to preserve the fine detail in the noise.
Dave
Copiar vínculo al Portapapeles
Copiado
I feel as though you didn't read my post and just looked at the image. Perhaps you don't understand what I saying. When I hit save the photo effect Dissolve under the blend modes, let's say doesn't save as stippling. You know like the old comics. Have a look at these link so that I know we are on the same page. I see people using this effect on borders. I can not export/save this look. I spent over an hour with tech support to include a supervisor, with them messing around with my setting trying to figure it out to no avail. The only reason I'm responding so far out is I am getting people asking if there was a fix. The answer is no and this response is very much off-topic. At this point, I'm ready for this thread to be taken down. Blogs to cut and paste in search engines as I have no clue if I can include external links and I don't have the care to search up the rules. vargiskhan photoshop-basics-dissolve-blending-mode and photoshopessentials.com/photo-effects/dissolve. When I follow the steps it will not save the effect. I hope that clears things up. I thank you so much for your time and very detailed explanation of zooming and noise. It was very good just not what this is about.

Copiar vínculo al Portapapeles
Copiado
Did you find any solution ?

Copiar vínculo al Portapapeles
Copiado
The solution is in the post directly above yours. Read it again carefully.
Copiar vínculo al Portapapeles
Copiado
There is no solution posted!!! I have a guy that doesn't sound like he read my post and just looked at pictures. I'm talking specifically about Photo Effects The blend mode dissolve. Zooming is irrelevant just as much as noise. I will refer you to the following blogs. vargiskhan photoshop-basics-dissolve-blending-mode and photoshopessentials.com/photo-effects/dissolve. When I follow the steps it will not save the effect. I hope that clears things up.
Copiar vínculo al Portapapeles
Copiado
Oh I did read your post, I also re-read it after you posted your last comment. The response is the same. View at 100% zoom.
Dave
Copiar vínculo al Portapapeles
Copiado
No, I was with tech support and they couldn't figure it out either. There are a bunch of off-topic responses, the one time I use this thing, it's a disaster. I'll stick to calling in. I'll see if I can delete this thread. Seems like people are glazing over what I wrote and basing their comments on the images. Just venting now.
Copiar vínculo al Portapapeles
Copiado
View at 100%.
That's the solution. As @davescm explained, and as @Stephen Marsh said in the very first reply. You still don't seem to understand what View > 100% means.

Copiar vínculo al Portapapeles
Copiado
You seem to be refusing to accept the nature of the caching issue … despite admitting that »It looks the same zoomed-in«.
There used to be a way to avoid the caching (setting the Cache Level to 1) – unfortunately that was broken and the bug has gone unfixed for years now.

Copiar vínculo al Portapapeles
Copiado
When exporting lower your image scale to below 100% (export -> Image Size -> Scale)
Copiar vínculo al Portapapeles
Copiado
@Mc248 The issue described has nothing to do with the exported scale. It is the image preview scale that matters here.
Dave

Encuentra más inspiración, eventos y recursos en la nueva comunidad de Adobe
Explorar ahora
 AdChoices