Exit
  • Global community
    • Language:
      • Deutsch
      • English
      • Español
      • Français
      • Português
  • 日本語コミュニティ
  • 한국 커뮤니티
0

Rasterizing image required before edit, why?

Guest
Jan 03, 2019 Jan 03, 2019

Hello, I brought an image from LR to PS as a smart object. I am trying to edit with patch tool and it is giving me this message. "This smart object must be rasterized before proceeding. Edit contents will no longer be available. Rasterize smart object." I'm confused, I thought vector images were only rasterized. I am confused. Thank you.

13.6K
Translate
Report
Community guidelines
Be kind and respectful, give credit to the original source of content, and search for duplicates before posting. Learn more
community guidelines

correct answers 1 Correct answer

Deleted User
Jan 03, 2019 Jan 03, 2019

Hi Rob, thank you for responding. I am new to PS and there is certainly a

steep learning curve. Thank goodness for Youtube! If I brought the photo

over from LR without being a smart object, modified as I would like and

then rasterize, would that work? After I rasterize is there another step

before I save as jpg for printing? Thank you.

On Thu, Jan 3, 2019 at 12:54 PM Rob de Winter <forums_noreply@adobe.com>

Translate
Adobe
Community Expert ,
Jan 03, 2019 Jan 03, 2019

Hey

You have to see a Smart Object as a 'container' filled with an image or vector (in this case, a when you double click the layer icon in the layer panel, you'll go back to that image in Lightroom again to edit the image). You can't use the Patch Tool or other retouching tools on smart objects directly.

Schermafbeelding 2019-01-03 om 18.42.44.png

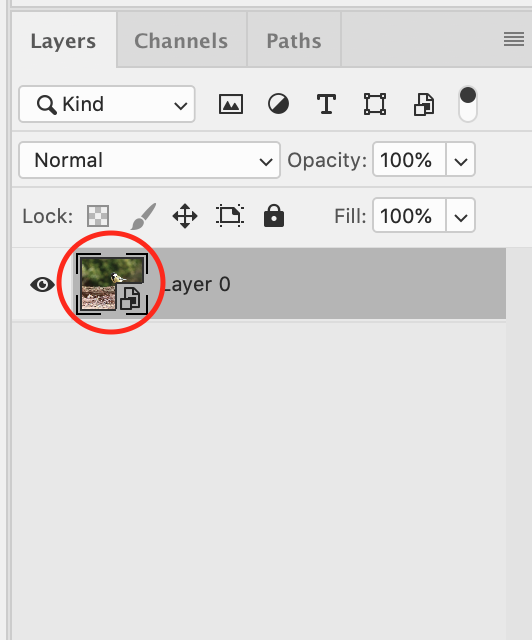
You can try this: first create a new, empty layer on top of the smart object.

Then use the Clone Stamp Tool, the Healing Brush Tool or the Spot Healing Brush tool. You can choose something like this in the Options Bar: Sample All Layers (Spot healing brush), Sample: current layer, current & below or All Layers (Healing Brush and Clone Stamp Tool) --> see screenshot below.

Schermafbeelding 2019-01-03 om 18.49.58.png

Unfortunately this option is not available with the Patch Tool.

Maybe someone else has another option, but I think this is the only way Hope this helps!

Translate
Report
Community guidelines
Be kind and respectful, give credit to the original source of content, and search for duplicates before posting. Learn more
community guidelines
Guest
Jan 03, 2019 Jan 03, 2019

Hi Rob, thank you for responding. I am new to PS and there is certainly a

steep learning curve. Thank goodness for Youtube! If I brought the photo

over from LR without being a smart object, modified as I would like and

then rasterize, would that work? After I rasterize is there another step

before I save as jpg for printing? Thank you.

On Thu, Jan 3, 2019 at 12:54 PM Rob de Winter <forums_noreply@adobe.com>

Translate
Report
Community guidelines
Be kind and respectful, give credit to the original source of content, and search for duplicates before posting. Learn more
community guidelines
Community Expert ,
Jan 03, 2019 Jan 03, 2019

Hey, haha no problem, that’s what this forum is for

When you import the photo without making it an object, you don’t have to rasterize it any more (it’s already a rasterized object then). You can just edit it in Photoshop and save it (for example) as a JPG directly in Photoshop.

You only import it as an object if you want to edit it backwards in Lightroom again.

Hope this helps

Translate
Report
Community guidelines
Be kind and respectful, give credit to the original source of content, and search for duplicates before posting. Learn more
community guidelines
Guest
Jan 03, 2019 Jan 03, 2019

Rob, again, confused a bit. I've followed a few youtube videos and have not heard that I need to convert to smart object when returning to LR. The smart object term was never used. I learned about smart objects from youtube and the benefits, of course, no negatives. Am I misinterpreting what you are saying?

Translate
Report
Community guidelines
Be kind and respectful, give credit to the original source of content, and search for duplicates before posting. Learn more
community guidelines
Community Expert ,
Jan 03, 2019 Jan 03, 2019

Ahh, okey, I thought you first exported the photo as a Smart Object directly from Lightroom to Photoshop. Have you converted it later on in Photoshop? In that case you can just double click the layer thumbnail (see the first screenshot in my first post) to go ‘inside’ the smart object, edit it and save it again. Then close the Smart Object and you’re back in the original photo again.

But, actually, to do what you want to do you can also do this. I’ve found a very short, helpful tutorial on this:

Move photos between Lightroom Classic and Photoshop |

hope this helps

Translate
Report
Community guidelines
Be kind and respectful, give credit to the original source of content, and search for duplicates before posting. Learn more
community guidelines
Guest
Jan 04, 2019 Jan 04, 2019

Hi Rob, I'm back .... thank you for your help. I have another question for

you if you don't mind. I'm bringing an image again from LR to Photoshop. I

want to make a 14 x 10 canvas to add a 12x8 photo. I create the canvas to

14x10 then resize image to 12x8. When viewing image size, it is now 14x10

including canvas. Everything seems so easy in a youtube video. Can you

please tell me my error so I may be this thing done? Thank you.

On Thu, Jan 3, 2019 at 4:13 PM Rob de Winter <forums_noreply@adobe.com>

Translate
Report
Community guidelines
Be kind and respectful, give credit to the original source of content, and search for duplicates before posting. Learn more
community guidelines
Community Expert ,
Jan 07, 2019 Jan 07, 2019

Hey, no problem! It's not completely clear to me what you mean exactly. So, can you maybe upload a screenshot of your entire screen (including the canvas and the Layer panel)?

Translate
Report
Community guidelines
Be kind and respectful, give credit to the original source of content, and search for duplicates before posting. Learn more
community guidelines
Community Expert ,
Jan 07, 2019 Jan 07, 2019
LATEST

As you describe it, this is straightforward: the full canvas size is now part of the image, so it's 14x10.

However, there's a trap here which is very easy to fall into, and for this reason I'd be inclined to advise against using smart objects at the beginner stage. Get some more experience first. Or be very careful.

The problem is that print size is not a native property of an image file. It consists of pixels only, so many pixels wide by so many pixels high. Print size is determined by adding a pixels per inch value. This is just metadata added later.

The point is that you don't want to resize a pixel-based image if you can avoid it, because it reduces quality. At least do it with an understanding of what's happening. But smart objects operate by print size because of compatibility with other applications like illustrator.

Translate
Report
Community guidelines
Be kind and respectful, give credit to the original source of content, and search for duplicates before posting. Learn more
community guidelines