- Home
- Photoshop ecosystem
- Discussions
- Replicating Ubuntu 16.04's default desktop help
- Replicating Ubuntu 16.04's default desktop help
Copy link to clipboard
Copied
Hello, as the title mentions, I'm having trouble with figuring out what effects were used to generate the lines found in the Ubuntu 16.04 desktop background, a link to which is here: http://www.omgubuntu.co.uk/wp-content/uploads/2016/02/Xerus_Default_Wallpaper-750x422.jpg
I'm a bit new to photoshop still, so I don't quite understand how the contrast was achieved by those lines. I've tried a glow line effect that there's many tutorials for, but the effect doesn't seem quite right. If anyone knows exactly how this was done, I would be very thankful!!
 1 Correct answer
Hi you could try this
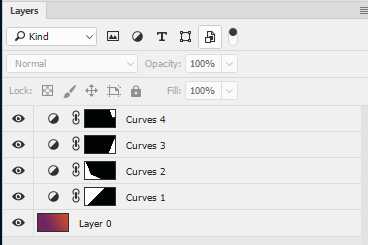
Make a layer with a gradient from orange to purple.

Make a selection (using the polygonal lasso) in the shape of the area to be changed and then add a curves adjustment layer. The adjustment layer will automatically have a mask in the shape you selected.
Adjust the curve to slightly darken or slightly lighten the image below.
Repeat for the other shapes


Dave
Explore related tutorials & articles
Copy link to clipboard
Copied

Look like 7 area were filled with closely matched color shades and then a gradient overlay was blended in with a mode like screen or multiply.
Copy link to clipboard
Copied
Hi you could try this
Make a layer with a gradient from orange to purple.

Make a selection (using the polygonal lasso) in the shape of the area to be changed and then add a curves adjustment layer. The adjustment layer will automatically have a mask in the shape you selected.
Adjust the curve to slightly darken or slightly lighten the image below.
Repeat for the other shapes


Dave
Copy link to clipboard
Copied
Awesome, thank you!!
Copy link to clipboard
Copied
You're welcome ![]()
Dave
Find more inspiration, events, and resources on the new Adobe Community
Explore Now