Thank you for this update, whoever sent same (Neil?)
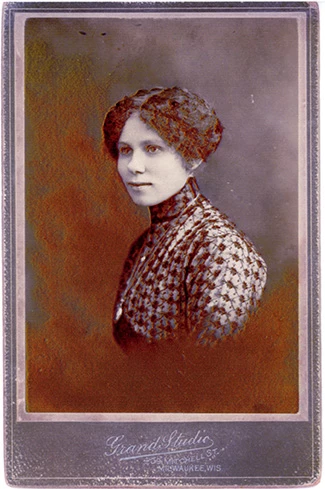
Since my last post I photographed the Old Photo and processed same to this
image.....
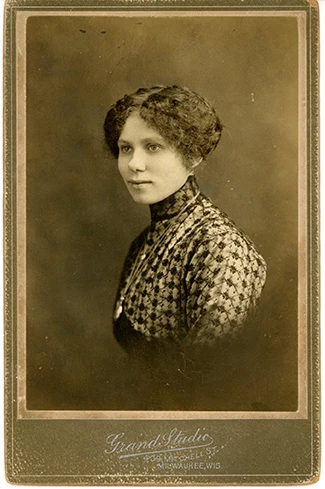
It prints, however, like this....
This print appears to be lacking in yellow, even though the yellow shows up
on a nozzle check. In more than mild frustration I replaced all the ink
cartridges with Epson cartridges, which I bought a couple weeks ago because
my prints looked a little strange and I thought it was due to some really
bad generic cartridges I had bought earlier. Nyet. Even with a full range
of Epson cartridges the print looks the same. (And yes, all the prints
were in jpg, which I'm assuming squashes layers.)
I also noticed the open line on the left of the subject, and supposed it
could be due to higher resolution of a slight blur. Also nyet, see below.
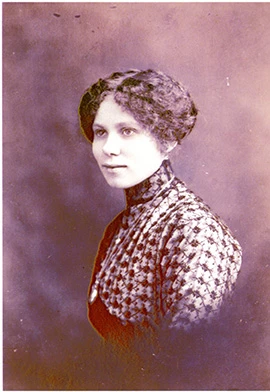
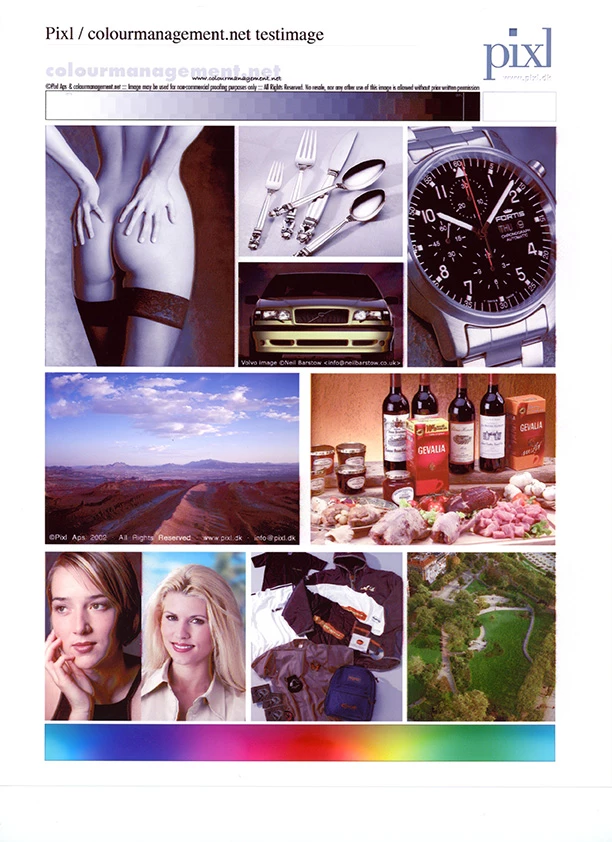
Then I received the prompt to download a test image, which I did and here's
a scan of the result. You'll notice the same red wash on the monochrome
image in the upper left, and also the same open line as mentioned above.
So, I need recommendations for a new printer, especially one that will use
the same Epson cartridges :).
Thanks to all who contributed to this thread, especially the person who
sent the info from colourmanagement!
Hi @bruceb76700895 I can see the images in your last post. Yes it was me who requested that test. So there's likely an issue with your printer it seems - but you may want to try resetting Photoshop in case that helps? Maybe print using another image utility and see if you see the same error (albeit with inaccurate colour)
Perhaps try a thorough reset of Photoshop preferences?
(read this entire post before acting please)
Resetting restores Photoshop's internal preferences, which are saved when Photoshop closes.
If they become corrupt then various issues can occur.
Here’s some info on how to do that:
https://helpx.adobe.com/photoshop/using/preferences.html
Manually removing preferences files is the most complete method for restoring Photoshop to its default state:
https://helpx.adobe.com/photoshop/using/preferences.html#Manually
Manually removing preferences files is the most complete method for restoring Photoshop to its default state. This method ensures all preferences and any user presets which may be causing a problem are not loaded.
- Quit Photoshop.
- Navigate to Photoshop's Preferences folder.
macOS: Users/[user name]/Library/Preferences/Adobe Photoshop [version] Settings
Windows: Users/[user name]/AppData/Roaming/Adobe/Adobe Photoshop [version]/Adobe Photoshop [version] Settings
Note: The user Library folder is hidden by default on macOS. To access files in the hidden user Library folder, see How to access hidden user library files.
- Drag the entire Adobe Photoshop [Version] Settings folder to the desktop or somewhere safe for a back-up of your settings
- Open Photoshop.
New preferences files will be created in their original location.
Note re macOS: The user Library folder is hidden by default.
To access files in the hidden user Library folder, see here for how to access hidden user library files.
https://helpx.adobe.com/x-productkb/global/access-hidden-user-library-files.html
Unexpected behaviour may indicate damaged preferences. Restoring preferences to their default settings is a good idea when trying to troubleshoot unexpected behaviours in Photoshop. check out the video
https://helpx.adobe.com/photoshop/using/preferences.html#reset_preferences
Learn how to access and modify Photoshop preferences and customise per your frequent workflows
https://helpx.adobe.com/photoshop/using/preferences.html
And here’s an earlier forum discussion as an aid to understanding
https://community.adobe.com/t5/photoshop-ecosystem-discussions/quick-tips-how-to-reset-photoshop-preferences/td-p/12502668
You may want to backup your settings and custom presets, brushes & actions before restoring Photoshop's preferences.
Here is general info about that: https://helpx.adobe.com/photoshop/using/preferences.html#BackupPhotoshoppreferences
Before you reset your preferences
in case of future issues, I suggest you make a copy as Adobe may need one to check problematic references.
Quit Photoshop.
Go to Photoshop's Preferences folder
Preferences file locations: https://helpx.adobe.com/photoshop/kb/preference-file-names-locations-photoshop.html\
[on MacOS see: Users/[user name]/Library/Preferences/Adobe Photoshop [version] Settings
Note for those on macOS: - be aware that the user Library folder is hidden by default on macOS.
https://helpx.adobe.com/x-productkb/global/access-hidden-user-library-files.html
In the Finder, open the “Go” menu whilst holding down the Option (Alt) key.
Library will now appear in the list - below the current user's “home” directory. ]
Now you can drag the entire Adobe Photoshop [Version] Settings folder to the desktop or somewhere safe as a back-up of your settings.
Note for those on macOS:
Preference preservation is affected by macOS permissions,
you’ll need to allow Photoshop ‘Full Disk Access’ in your Mac OS Preferences/Security and Privacy
If that doesn't fix the issue:
Go to Preferences > Performance... and uncheck Multithreaded Compositing - and restart Photoshop.
Still hanging?
Go to Preferences > Performance... click Advanced Settings... and uncheck "GPU Compositing" - then restart Photoshop.
Do you still have problems?
It may even be time to reinstall Photoshop.
It’s recommended that you use the Adobe CC cleaner tool to remove all traces first.
(See above about preserving preferences though! It’s worth preserving them unless they are corrupted.)
https://helpx.adobe.com/creative-cloud/kb/cc-cleaner-tool-installation-problems.html
Uninstall Photoshop BUT make sure to choose the option “Yes, remove app preference”.
Once that process finishes, start the installation process and look into the “Advanced Options”. Uncheck “Import previous settings and preferences” and choose to “Remove old versions”.
I hope this helps
neil barstow, colourmanagement net :: adobe forum volunteer
google me "neil barstow colourmanagement" for lots of free articles on colour management