

- Home
- Photoshop ecosystem
- Discussions
- Re: Scanning multiple photographs to be printed la...
- Re: Scanning multiple photographs to be printed la...

Copy link to clipboard
Copied
I've got hundreds of old family photographs I need to make digital copies of for both archiving purposes but also to ensure that anyone in the family can reproduce these photos, ie have them re-printed. I'm using a Canon LiDE 120 scanner with Photoshop CS6 for Mac.
Having arranged about 6 photos on the scanner bed, I then specified my import settings to the following:
Kind: Black & White
Grays: 256 Grays
Resolution: 600 dpi
Auto Selection: Detect Separate Items
Format: JPEG
The thinking being that I'd end up with 6 individual image layers which I could then clean up, balance and individually save with specific meta data assigned to each before saving. Having gone through these steps everything appeared to be working exactly as I'd intended however I then noticed that each individual file had a dpi setting of only 72 which I know won't work well for reproduction purposes.
My question then is, what should my settings be to provide the ability to scan multiple images at once with an output of individual image layers that can be edited and then saved at a resolution high enough for quality reproduction?
Appreciate your help. Thanks


 1 Correct answer

digital_vibe wrote
2. A suggestion was made to scan as TIFF as this will be better for long term archiving purposes, which makes sense but as these will eventually be made available to family members who will likely use some kind of online photo printing service and many of these do not accept TIFF files, I’ll likely have to make a duplicate of each TIFF scan as JPG. Does this present any particular issues/challenges?
The main reason for using tiff is that jpg is unsuited for edting. Edit the tif
...Explore related tutorials & articles
 14
Replies
14
14
Replies
14
Copy link to clipboard
Copied
I'm not familiar with this scanner, but there should be an option in the scanning software for setting the output dpi, set it to 300. The correct term is ppi – pixels per inch, but you'll often find dpi used in scanning software.
Ppi works like this: Pixel dimensions divided by ppi = Printed size in inches.
So if you have an image that's 1200 x 1800 pixels at 300 ppi, it will print at 4 by 6 inches.
Ppi has no effect on screen viewing, the image will display according to its pixel dimensions.
For best results, you should not scan as jpg, which uses lossy compression, and the image will degrade every time you save it. Jpg is a final format, not intended for editing. If possible, use tiff. If you're going to do heavy editing on these files, it would be best to use 16-bit tiff, but that may not be an option in the scanning software.
When you're done editing, you can save out jpg copies to send to people, keeping the tiffs as master files.

Copy link to clipboard
Copied
Always scan such work at the highest native optical ppi available (not interpolated ppi). I’d compare an RGB scan of a grayscale original vs. a gray scan, you may have more options in Photoshop for creating the gray version from varying data in the R, G or B channels.
what are the pixe width and height of scans? What is the print size of the scans at 72ppi?
Copy link to clipboard
Copied
Stephen_A_Marsh wrote
Always scan such work at the highest native optical ppi available (not interpolated ppi).
This is true for scanning film, but I got the impression that the OP is scanning prints, in which case there is little to be gained by scanning at max resolution. Although scanning at 600 ppi and downsampling afterwards may produce a little better results than scanning at 300.
digital_vibe : I overlooked the 600 dpi in your original post, it seems that the ppi value wasn't written to the file by the scanner.
Photoshop will assign 72 ppi to files that don't have a ppi value.
If the image contains the correct number of pixels, you can change the ppi under Image > Image size, with Resample unchecked.
See Stephen's reply above.

Copy link to clipboard
Copied
Hi digital vibe,
In order to get the best out of that Canon scanner you'll need to access a maximum resolution setting (and, I think, scan in RGB not "Black & White") :
Canon say it offers high resolution scans up to 2400 x 4800 ppi, pretty good.
So, any PPI you set is based on the inch size of the original image. (it's PPI really = Pixels Per Inch) DPI is dots per inch and that’s about printing not scanning.
Anyway in a scan 300 PPI = 300 DPI.
If you did set it to 600 DPI (as you mentioned) then if you double the size of an image later it'll only be 300 DPI. Does that make sense? So, even 600PPI isn't ideal for "archiving".
To give you plenty of options later, maybe for enlargements, you should definitely be using the max resolution of 2400 x 4800 PPI.
I've no idea though why the scanner is giving you 72PPI, that’s weird if you set it to 300. Anyway, try scanning at maximum resolution, that’s what I'd do.
I would recommend you scan in RGB, Photoshop will likely do a far better job of making a neutral black & white / monochrome image out of a scanned original than the scanner itself does.
Do you really want neutral black & white / monochrome images anyway? Many old pictures benefit from a bit of a tint, perhaps sepia? Adding a tint can be . great creative process, enjoyable.
I hope this helps
if so, please do mark my reply as "helpful" and if you're OK now, please mark it as "correct" below, so others who have similar issues can see the solution
thanks
neil barstow, colourmanagement

Copy link to clipboard
Copied
Invest in VueScan, its the best consumer scanner software on the market.
Scanning at 600dpi/ppi is probably fine, although you can try the built-in print settings.
Copy link to clipboard
Copied
Hi Lumigraphics
Do you really think he needs Vuescan?
Surely the Canon LiDE 120 scanner will come with OK software. Have you tried it yourself?
I note that it is a pretty low cost scanner to use for a serious archiving job though.
Occasionally I've seen Vuescan do a worse job than, say Epson's bundled software on clients scanners.
Maybe that was a thing of the past though, to be fair.
neil barstow, colourmanagement
Copy link to clipboard
Copied
https://forums.adobe.com/people/NB%2C+colourmanagement wrote
Do you really think he needs Vuescan?
Probably not. I would have thought that the Canon software would be OK for scanning small prints.
Canon say it offers high resolution scans up to 2400 x 4800 ppi, pretty good.
The resolution published by scanner manufacturers for consumer/prosumer flatbed scanners should be taken with a pinch of salt. Epson typically claims 4800 ppi for their scanners, while in reality the effective resolution is around 2000-2200.
2400 isn't all that high, but I suspect that the real resolution is a bit lower for this scanner.
Copy link to clipboard
Copied
Many thanks for all the feedback here. A few answers to some of the questions/suggestions made here:
1. This particular batch of prints I’m working on are 3” x 3”. I’ve got many more however at varying sizes that I’ll be dealing with.
2. A suggestion was made to scan as TIFF as this will be better for long term archiving purposes, which makes sense but as these will eventually be made available to family members who will likely use some kind of online photo printing service and many of these do not accept TIFF files, I’ll likely have to make a duplicate of each TIFF scan as JPG. Does this present any particular issues/challenges?
3. It was suggested that to give me greater flexibility down the road, I scan to a resolution of 4800 PPI. I’ve found I can achieve this by manually overriding Photoshops default max of 600 but in so doing the scanning process is incredibly slow and the file output size very high ( a 3”x3” photo scanned in this manner is over 40MB in size). Given that I need to scan through hundreds of photos I’m not sure that such a process is feasible especially as I’m then presented with storage challenges. Given this, is there a compromise here that provides me a high resolution file that will work well for re-printing as well as providing good archiving and flexibility down the road?
4. In terms of software, I’m not using anything that came bundled with the Canon scanner, rather I’m relying solely on Photoshop.
Copy link to clipboard
Copied
digital_vibe wrote
2. A suggestion was made to scan as TIFF as this will be better for long term archiving purposes, which makes sense but as these will eventually be made available to family members who will likely use some kind of online photo printing service and many of these do not accept TIFF files, I’ll likely have to make a duplicate of each TIFF scan as JPG. Does this present any particular issues/challenges?
The main reason for using tiff is that jpg is unsuited for edting. Edit the tiffs, and use the Image processor script to create jpgs from the tiffs. (File > Scripts > Image processor) If you're familiar with Lightroom, you can import the scans and do editing there. (retouching is best done in Photoshop before importing) Then you can export jpgs from Lightroom.
3. It was suggested that to give me greater flexibility down the road, I scan to a resolution of 4800 PPI. I’ve found I can achieve this by manually overriding Photoshops default max of 600 but in so doing the scanning process is incredibly slow and the file output size very high ( a 3”x3” photo scanned in this manner is over 40MB in size). Given that I need to scan through hundreds of photos I’m not sure that such a process is feasible especially as I’m then presented with storage challenges. Given this, is there a compromise here that provides me a high resolution file that will work well for re-printing as well as providing good archiving and flexibility down the road?
When scanning prints, there is no advantage in scanning at such a high resolution. 600 ppi is plenty, and you will probably be fine with 300 ppi. By testing, you can find out if there is any advantage in scanning at 600 ppi. Scan one image at 300 ppi, then scan the same image at 600 ppi. Then change the ppi to 300 in the 600 ppi file – go to Image > Image size, and change the ppi to 300 with Resample checked. Now compare the two images at 100% view.
4. In terms of software, I’m not using anything that came bundled with the Canon scanner, rather I’m relying solely on Photoshop.
It seems that you're using File > Import > WIA support for scanning, which is a method that gives you very few options. I suggest that you use the software that came with the scanner, which should give you more control and more options. Save the image in the scanning software, then open it in Photoshop.
Copy link to clipboard
Copied
One follow-up query on this. Quite a few of the older photographs I'm archiving are 3"x3". I've scanned in at 600dpi as TIFF, made any corrections required, saved and then also made a duplicate jpg version. I then decided to conduct a test by uploading the jpg to one of the popular online photo reproduction services and discovered that the smallest square sizing they support (like many) is 5x5.
So this means I've got a 3"x3" image (as that's the result after scanning in at 600dpi) that's being upscaled. The two test photos I received back are ok but the quality is fantastic either so am wondering what else I might do to address this. Thanks
Copy link to clipboard
Copied
If you want the photos printed 3"x3", combine four of them into a 6"x6" photo and use a rotary paper trimmer to cut them apart.
Copy link to clipboard
Copied
Hi
you could probably resize your images in photoshop (with resampling) up to 5x5" at 600ppi but its not really recommended as you are creating pixels and you can avoid that, see below.
I am surprised, though, that the popular online photo reproduction service wants 600 ppi, is that what they want?
A 3' image at 600 ppi has 1800 pixels across [it's 1800x1800pix]
a 6"x6" image at 300ppi, and 300 ppi is also [it's 1800x1800pix] - 300ppi is plenty for online printing.
You can resize your scans to 6" x 6" in Photoshop, without losing or creating any pixels -
just open the dialog and be careful to uncheck "resample" then set the resolution to 300 ppi, the file will automatically become 6"x6" at 300ppi
original before resizing below
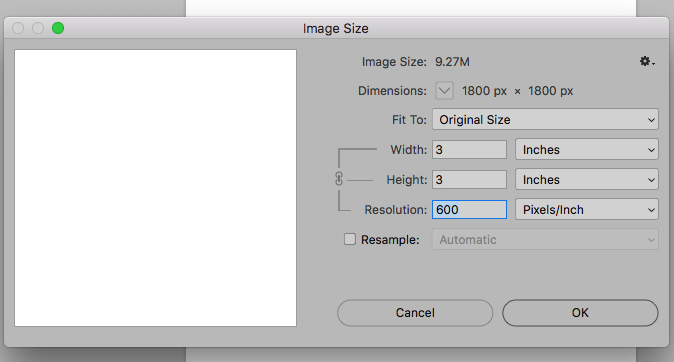
after resizing (note that both these windows show your image as 1800 x 180 pixels,
so nothing has been created or lost during resizing,
you have simply provided Photoshop with a different instruction about how to use those pixels to fill a print:

if your original image is 3" and you really do want a 5x5" image at 600 DPI - it works like this
5 x 600 = 3000 pixels along each edge
so if your images are 3" you have to scan at 1000ppi to get the number of pixels needed.
I don't think you need to do this.
I hope this helps
if so, please do mark my reply as "helpful" and if you're OK now, please mark it as "correct" below, so others who have similar issues can see the solution
thanks
neil barstow, colourmanagement

Copy link to clipboard
Copied
digital_vibe, this is actually a lot simpler than you think. It's all given by the pixels per inch (ppi) number, that's the key to the whole thing. Read it literally.
- The file consists only of pixels, nothing else. It has no size.
- The print size is then set by assigning a pixels per inch value. This decides how big the pixels get printed.
Ppi is just a standard equation, x=y/z. If you know two numbers, you can calculate the third. What's confusing you here, is that ppi can also be used inversely, as an input parameter, to set sample (pixel) density.
Copy link to clipboard
Copied
digital_vibe wrote
It was suggested that to give me greater flexibility down the road, I scan to a resolution of 4800 PPI.
That's for scanning film - transparencies or negatives. Scanning prints is something else altogether. Anything beyond, say, 300 or so is very likely wasted and not adding any detail. But just to be on the safe side you can use 600.

Find more inspiration, events, and resources on the new Adobe Community
Explore Now
 AdChoices