• Global community
    • Language:
      • Deutsch
      • English
      • Español
      • Français
      • Português
  • 日本語コミュニティ
    Dedicated community for Japanese speakers
  • 한국 커뮤니티
    Dedicated community for Korean speakers
Exit
0

Select and Mask problems

Contributor ,
Dec 07, 2016 Dec 07, 2016

Copy link to clipboard

Copied

I have watched many videos on using the new Select and Mask function on PS CC 2017.  I've  watched Scott Kelby's

Adobe Photoshop CC In-Depth: Compositing and Masking Hair Made Easy class on Kelbyone several times!  I makes a rough selection and then use the Refine Edge Brush and voila!  The hair is magically selected properly.  I've watched several other videos that all show the same thing.  But this NEVER works for me  When I trace the outline of the hair on the person in my picture, it just makes a total mess out of it.   Totally frustrated with this tool that so many people make look so easy but isn't.   I've tried the radius slider, smart radius, and lots of other things too but with no luck. 

This is the picture I'm working on.  I'm trying to extract my granddaughter in the center.

VH2A6040.jpg

Views

2.9K

Translate

Translate

Report

Report
Community guidelines
Be kind and respectful, give credit to the original source of content, and search for duplicates before posting. Learn more
community guidelines

correct answers 1 Correct answer

Community Expert , Dec 08, 2016 Dec 08, 2016

Hi Kent

Your mask is probably good enough to put on a real world background but let me see if I can help by doing the mask again and showing the steps

1. Open the image in Select and Mask and with onion skin view and transparency about 78% do an initial selection with the quick selection tool:

2. Switch to the On Black view mode and check for any missed areas or areas that should not have been included (they show up much
better against black or white) .

Correct these first with the quick select and n

...

Votes

Translate

Translate
Adobe
Community Expert ,
Dec 07, 2016 Dec 07, 2016

Copy link to clipboard

Copied

This is just a quick test made from a screen capture of your image done with my track pad. There's too much feathering but for a quick run it seems to be a good starting point compared to the old way of creating masks.

Working on a higher res image with a wacom tablet or event mouse would have yielded a better result... with a not too much more time investment to finesse it. It takes a bit of time and practice with this new feature to master it... don't give up!select&mask.jpg

Votes

Translate

Translate

Report

Report
Community guidelines
Be kind and respectful, give credit to the original source of content, and search for duplicates before posting. Learn more
community guidelines
Community Expert ,
Dec 08, 2016 Dec 08, 2016

Copy link to clipboard

Copied

It does a reasonable job with that pic.
I selected the main areas with the quick selection tool - then used refine edge with a small brush (10px : Hardness 100% : Spacing 1%) and edge detection set to 0px, Smart Radius unchecked  . I worked at 100% and painted only round the hair edges. Flicking the "Show Edges" on and off quickly allows you to see if you are using refine edge where you need it - or if you have included any areas that should not be refined. Holding the Alt key whilst brushing allows you to remove areas from edge refinement.
This was where I painted for the refine edge

I tend not to use Decontaminate colours but prefer to use a layer set to blending mode color  later to match the colours to the destination. Just brush the new colours on. Similarly I set a second layer to luminosity and brushed with a dark brush round the sleeves which had a bright edge.

Hope that helps

Dave

Votes

Translate

Translate

Report

Report
Community guidelines
Be kind and respectful, give credit to the original source of content, and search for duplicates before posting. Learn more
community guidelines
Contributor ,
Dec 08, 2016 Dec 08, 2016

Copy link to clipboard

Copied

Dave, your instructions like Scott Kelby's seem very clear and easy to follow.  I set my settings as you said and this is what I end up with that looks nothing as good as yours.  Why is this not working for me? 

Screen Shot 2016-12-08 at 7.38.38 AM.jpg

Votes

Translate

Translate

Report

Report
Community guidelines
Be kind and respectful, give credit to the original source of content, and search for duplicates before posting. Learn more
community guidelines
Community Expert ,
Dec 08, 2016 Dec 08, 2016

Copy link to clipboard

Copied

Hi

I did not do any magic, I just got the initial selection made then painted in the direction of the individual hairs with the refine edge brush.


I try and give the refine tool as little to do as possible. In your result it looks like you may have missed some hair from the refine edge selection, but have included some solid areas that should not have be refined (e.g. the ear at the right of the picture and the hair near but not at the top). These would be better selected with the quick selection  or the brush tool and left out of the edge selection.
Did you do the step of checking and unchecking the "Show Edges" box as you worked and ensuring that only real hair edges are included in the "refine"? With it switched on there are usually obvious parts where you can see clearly that there is no edge so you can take them out using the Alt key, you can usually see hairs which are going beyond the edge and you have missed.

It does take a bit of use and practice - and there are some low contrast areas that S&M refine does not deal with at all well - but in this particular case those were minimal.

A lot of the tutorials where you see the mask refine completed in 5 seconds with a couple of brush strokes are against a good contrast background and with a nice high resolution picture. Indeed if you know that an image is to be cut out you photograph for that. However if you are trying to mask a real world image, like yours, it sometimes takes a little more time to show S&M where the edges are.

Dave

Votes

Translate

Translate

Report

Report
Community guidelines
Be kind and respectful, give credit to the original source of content, and search for duplicates before posting. Learn more
community guidelines
Community Expert ,
Dec 08, 2016 Dec 08, 2016

Copy link to clipboard

Copied

Is this better than your first result? If yes then already you are getting better with the tool. As Dave said... it takes time and practice. A couple of other suggestions/questions. Are you using Onion Skin view mode to see the mask? That will help you to see if you have all of the areas you are trying to select in your mask.

select&mask.2.jpg

Votes

Translate

Translate

Report

Report
Community guidelines
Be kind and respectful, give credit to the original source of content, and search for duplicates before posting. Learn more
community guidelines
Contributor ,
Dec 08, 2016 Dec 08, 2016

Copy link to clipboard

Copied

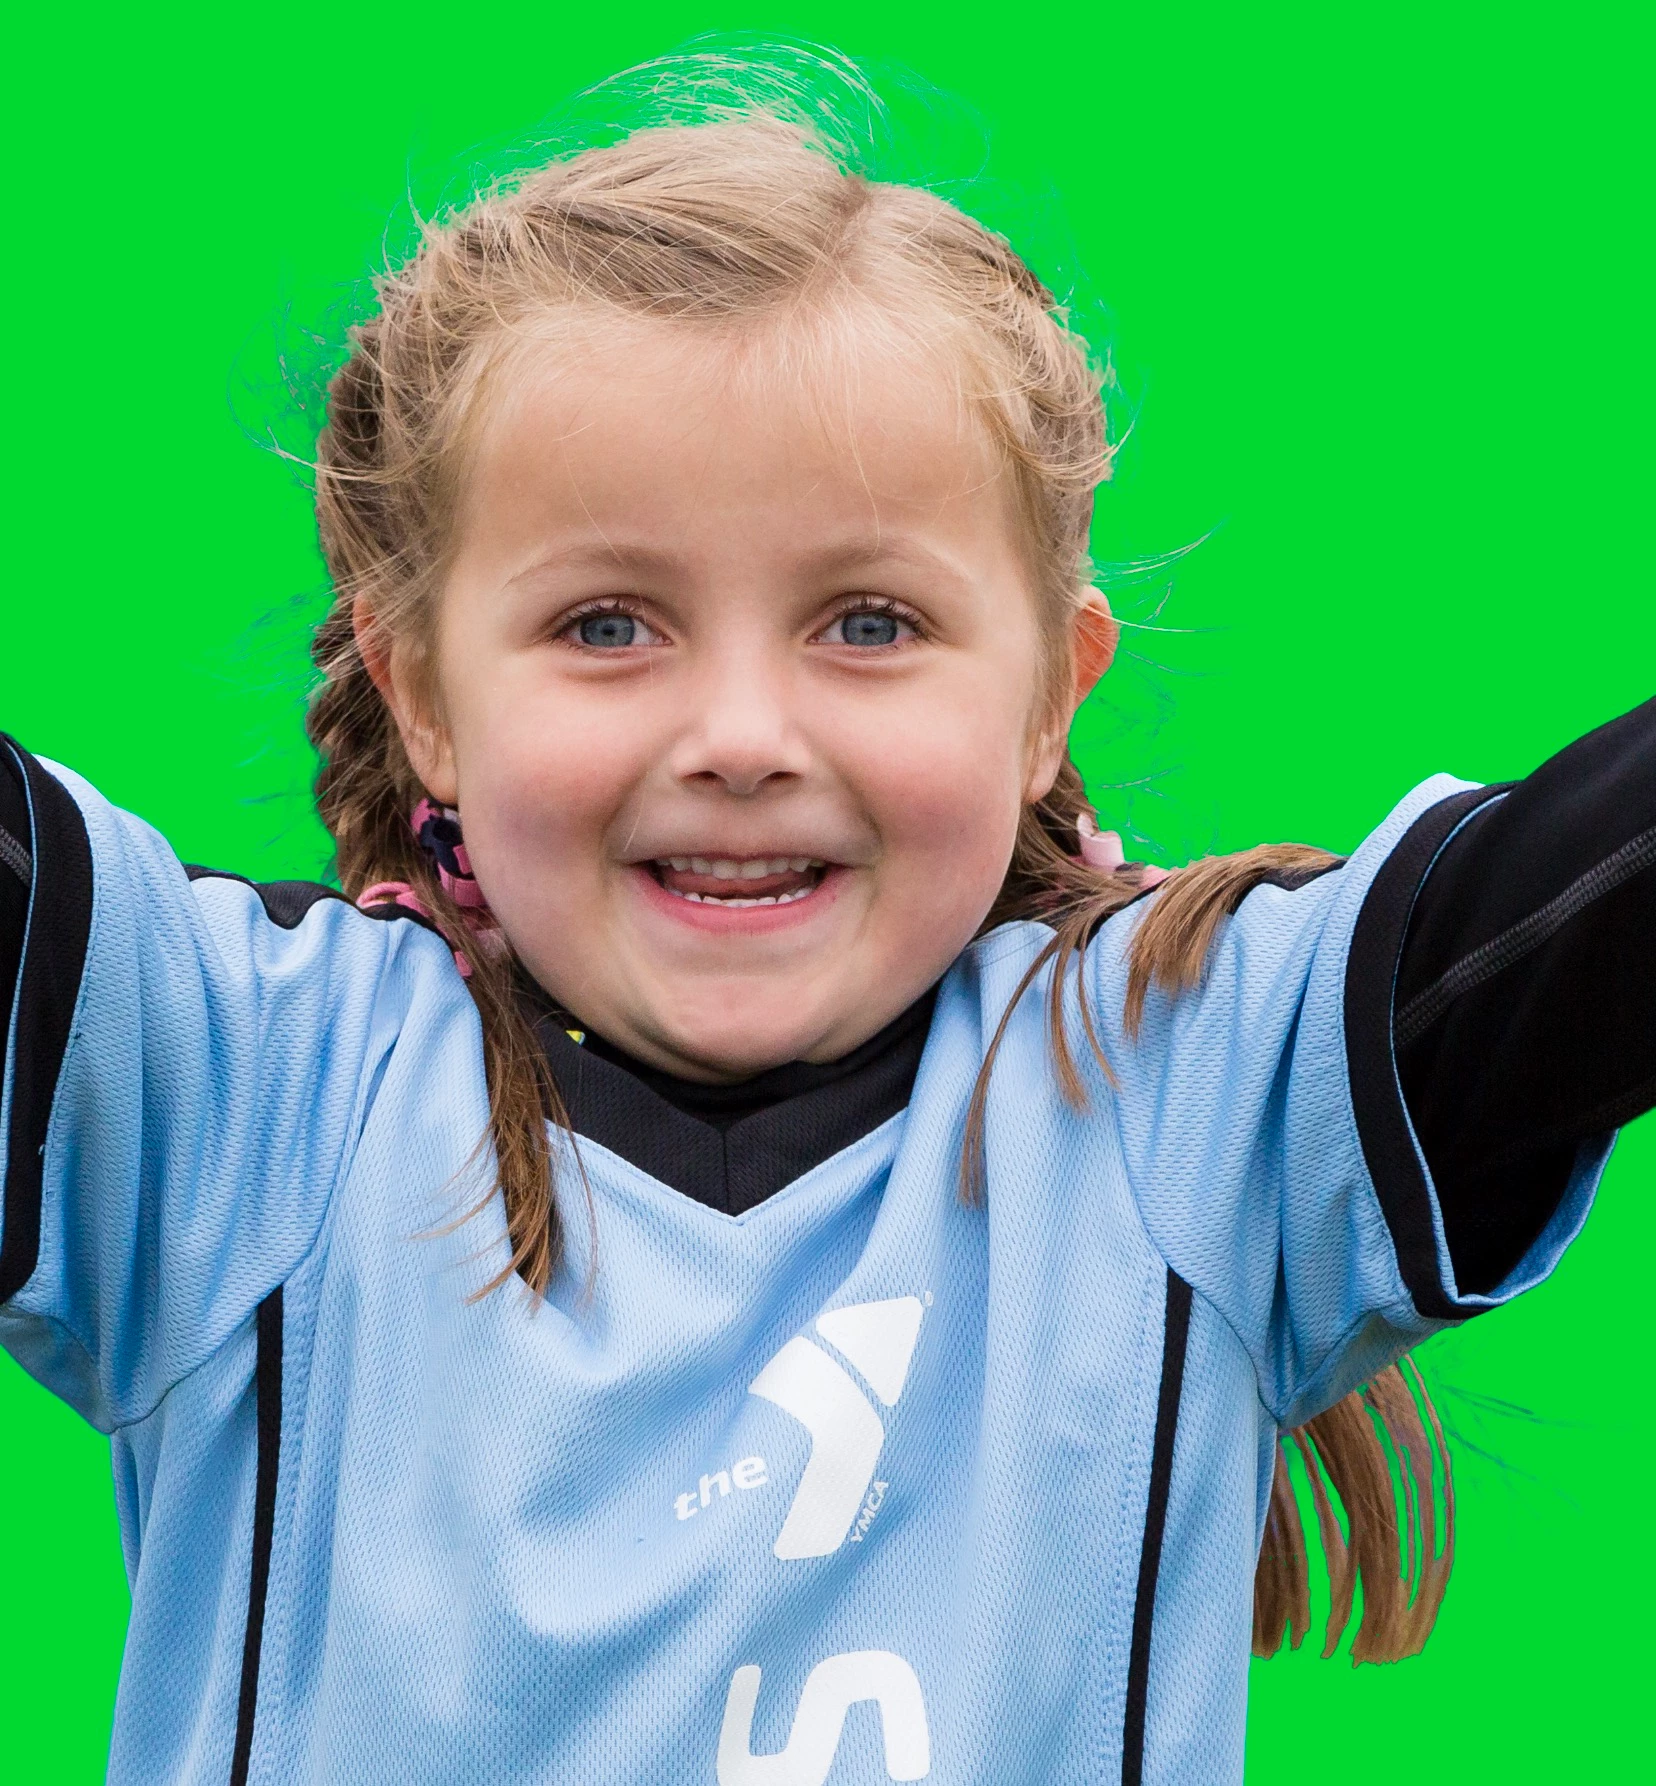
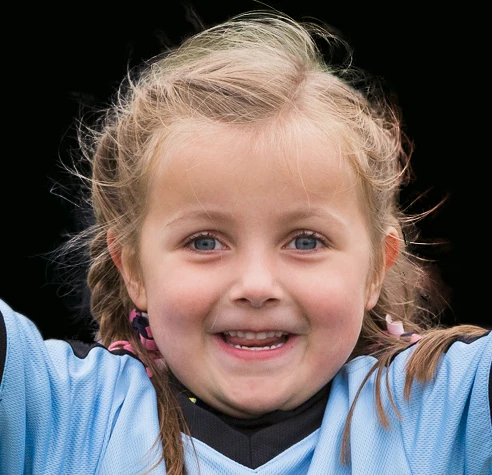
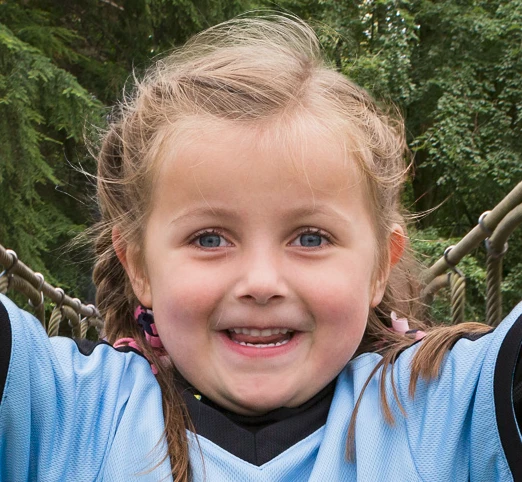
Here is my next very careful attempt using Dave's guidance.  I put a green layer behind her so the hair issues would show up better.  You see how the wispy part of her hair looks "cloudy" I'll call it? I generally use onion skinner the red overlay view.   I can do the main part of her without any trouble pretty quickly.  But the wispy parts of her hair still look terrible to me. 

Screen Shot 2016-12-08 at 10.33.47 AM.jpg

Votes

Translate

Translate

Report

Report
Community guidelines
Be kind and respectful, give credit to the original source of content, and search for duplicates before posting. Learn more
community guidelines
Community Expert ,
Dec 08, 2016 Dec 08, 2016

Copy link to clipboard

Copied

Hi Kent

Your mask is probably good enough to put on a real world background but let me see if I can help by doing the mask again and showing the steps

1. Open the image in Select and Mask and with onion skin view and transparency about 78% do an initial selection with the quick selection tool:

2. Switch to the On Black view mode and check for any missed areas or areas that should not have been included (they show up much
better against black or white) .

Correct these first with the quick select and normal brush tools. Remember holding down Alt whilst brushing takes away
from selection.

That gets this far :

3. Go to the refine edge brush – set size to 10px Hardness to 100% and spacing to 1%.

Smart Radius is off and Radius is set at 0%.

I work with High Quality Preview on – which works as longs as your video card supports it.

4. Brush carefully round the hair edges  opacity reduced to around 77% so that you can see the edge.

5. Switch to Show edge and go carefully round any areas you have missed

6. Use the Alt key with the refine edge brush  and take out any areas which are not edges .
You may need to reduce the brush size.

A couple of iterations of steps 4-6 gets to here

7 Now without checking Decontaminate colours output to new layer with layer mask
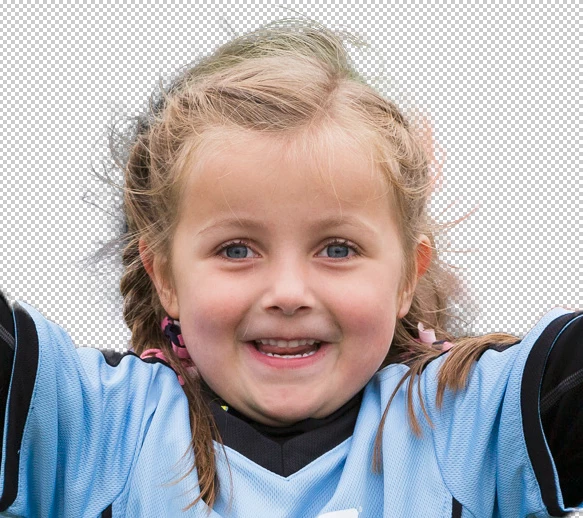
8. ­Although there are some edges which are semi transparent on many real new backgrounds that mask as it stands will work – as longs as we address the edge colours.

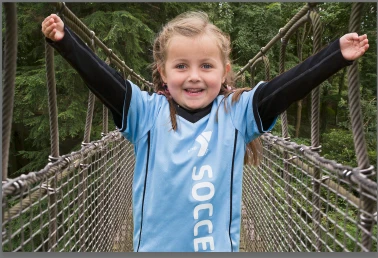
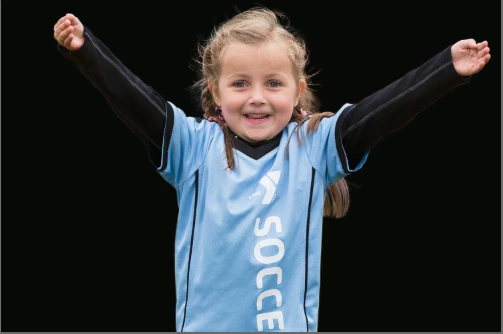
So let us take three examples

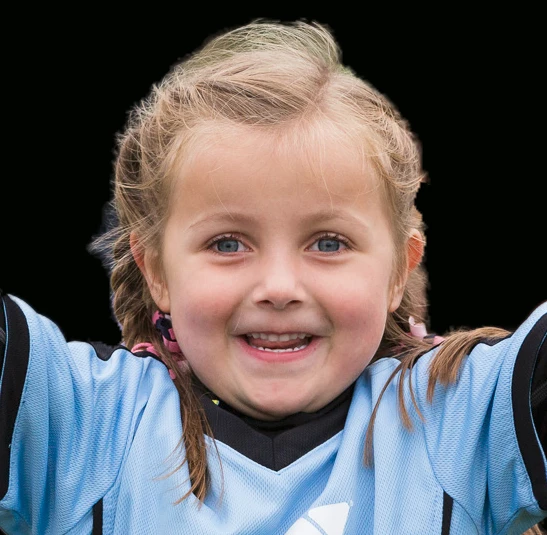
A On a real picture :

All I did was add a layer with a blending mode of  colour and a second with a blending mode of  luminosity. Both of these were clipped to the image layer so that they only affected the masked layer not the background.

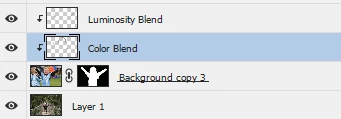
I brushed onto these to address any contamination from the old – but it was minimal

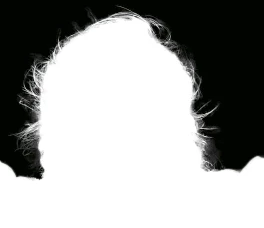
B : On black – same as before but a little more to do with luminosity layer just to avoid the hard edges

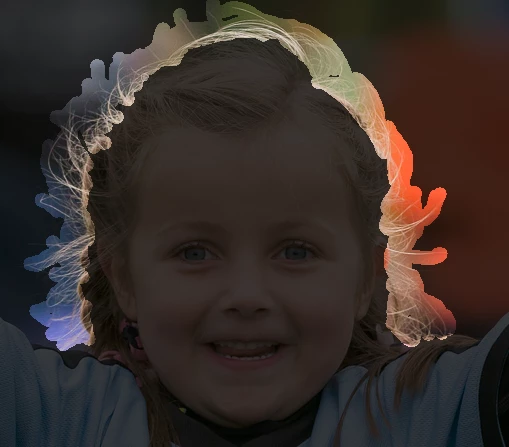
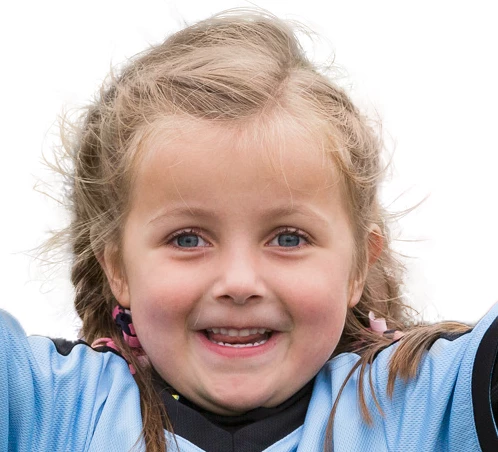
C: On White . This was the hardest and required just a little more work.

Before doing anything it looked like this

I got the mask – in channels – set a brush to Overlay blending mode and opacity at  50% and brushed round some of the less than sharp areas with black and white to sharpen up the mask a bit . Brush White on the white parts and black on the dark. You will see the contrast improve.

Just as I had in the other examples I added two layers, one with color and one with luminosity blending mode (both clipped to the image layer. This time, on the luminosity layer, I brushed round the edge hair with a soft brush set to 25% to lighten the hair strands. Hair in a photo  is semi-transparent and blonde hair against a white background should be very light.

The result was below :

I hope this helps you

Dave

Votes

Translate

Translate

Report

Report
Community guidelines
Be kind and respectful, give credit to the original source of content, and search for duplicates before posting. Learn more
community guidelines
Contributor ,
Dec 08, 2016 Dec 08, 2016

Copy link to clipboard

Copied

Dave, thank you so much for taking the time.  Your step by step instructions were very helpful.  I wonder if Scott Kelby's example worked so easily because his subject was shot against a gray background.  He literally made one or 2 quick passes around the edge of the model's hair, and voila! It looked fabulous.  A little misleading on his part I think.  Thanks again for taking the time.  I'll keep trying to learn to master this thing. 

Votes

Translate

Translate

Report

Report
Community guidelines
Be kind and respectful, give credit to the original source of content, and search for duplicates before posting. Learn more
community guidelines
Community Expert ,
Dec 08, 2016 Dec 08, 2016

Copy link to clipboard

Copied

I've seen a few tutorials where little work is required. But to be honest if you are shooting an image for a composite - you can help a lot by shooting against a plain background.

Just remember you mask only needs to be good enough to place the image in it's destination. Although a plain background will show the faults - and take the longest to correct, many of our masks are going to end up against a real world background. These are much easier.

In select and mask, you can switch it so that it shows your preview selection against the new background - which is very useful in terms of how far to take it.

Decontaminating colours is best done afterwards - as I hopefully showed.

Give it a go - any problems, shout out

Dave

Votes

Translate

Translate

Report

Report
Community guidelines
Be kind and respectful, give credit to the original source of content, and search for duplicates before posting. Learn more
community guidelines
Contributor ,
Dec 08, 2016 Dec 08, 2016

Copy link to clipboard

Copied

One other question.  Can you elaborate a little on the step where you said you create a color and luminosity layer and clip those to the mask layer below.  I get that but then you said you painted over them a bit to fix the color left over.  Are you just painting around the edge of the mask?  In black or white?  I could use a little more direction there.  Thanks.

Votes

Translate

Translate

Report

Report
Community guidelines
Be kind and respectful, give credit to the original source of content, and search for duplicates before posting. Learn more
community guidelines
Community Expert ,
Dec 08, 2016 Dec 08, 2016

Copy link to clipboard

Copied

Hi Kent

A good question - I should have explained it better.

By setting the layer to colour blending mode and clipping it to the image , it will change the colour of the image below but not the lightness. I used this around the edge of the hair for example to take out the green edge contamination that was showing along the top - and  the orange contamination from the right. All I did was  Alt-Clicked on another part of the hair to pick up the colour then brushed that colour onto the edge (on the new layer of course). That way the edges of the hair took on the same colour as the nearby hair.

For the luminosity it was a similar process but this time only affecting the lightness. For hair I only did this for the image against the white background and I used the brush set to white. However on all the images there was a light edge under the sleeves. By Alt-Clicking on the dark part of the sleeve then painting with that colour along the edge in new layer - those sleeve edges darkened to match the rest of the sleeve and blended much better.

Dave

Votes

Translate

Translate

Report

Report
Community guidelines
Be kind and respectful, give credit to the original source of content, and search for duplicates before posting. Learn more
community guidelines
Community Beginner ,
Apr 17, 2017 Apr 17, 2017

Copy link to clipboard

Copied

Adobe has completely messed up the masking tools.  I sincerely wish for you to stop changing things that make the program overly complex and take away the value of using brushes effectively for composites.  I will no doubt, like others, have to spend hours relearning something which was virtually unchanged for years, for good reason.  A process that took about 4 steps now takes double the number of steps.  Please stop trying acting like Microsoft.  Just because people don't have the ability to paint and draw doesn't mean that everything in your program should be geared to them.

Votes

Translate

Translate

Report

Report
Community guidelines
Be kind and respectful, give credit to the original source of content, and search for duplicates before posting. Learn more
community guidelines
Community Expert ,
Apr 17, 2017 Apr 17, 2017

Copy link to clipboard

Copied

What have Adobe taken away?

Select and Mask has been added, but the old tools are still available. Even the old refine edge is still available if you want to use it (with an initial selection made, Shift click on the menu item Select and Mask )

Dave

Votes

Translate

Translate

Report

Report
Community guidelines
Be kind and respectful, give credit to the original source of content, and search for duplicates before posting. Learn more
community guidelines
Community Beginner ,
Apr 17, 2017 Apr 17, 2017

Copy link to clipboard

Copied

1) When you wanted to use selection tools in the past from the tool bar you could do so and make selections and still have all the tools on the standard bar available when you went into mask mode- by merely clicking on the masking preference now no longer on the tool bar) and your selection would be loaded- without vanishing all the tools.  Secondly, when painting in or out a mask, the standard shortcut by hitting the x key could change you from negative to positive painting.  Now, you either have to select that from the clumsy bar or some other more complicated manner.  Third, when you go into the select and mask mode all other menus disappear.  The preferences for the new select and mask panel are confusing and unnecessary. I fail to see the improvement for complex selections, and apparently a few others feel the same way.  Why would they remove the masking option from the standard tool bar?

Votes

Translate

Translate

Report

Report
Community guidelines
Be kind and respectful, give credit to the original source of content, and search for duplicates before posting. Learn more
community guidelines
Community Expert ,
Apr 17, 2017 Apr 17, 2017

Copy link to clipboard

Copied

LATEST

Hi

Quick mask mode is still on the toolbar (or press Q).

If it isn't showing on your set up you can use the toolbar customise dialogue (Edit -Toolbar) to bring it back:

When painting in quick mask mode you could use the x key to paint + or -.  That is still available, alternatively within Select and Mask you can hold the Alt key to paint -ve and release for +ve

You're right - having a separate S&M workspace loses the other menus. I would like to see it expanded to enable channel selection. But you don't have to use it.

If you want to make any requests to Adobe, you should put them on the link below where they are more likely to be seen by Adobe staff.

Photoshop Family Customer Community

Dave

Votes

Translate

Translate

Report

Report
Community guidelines
Be kind and respectful, give credit to the original source of content, and search for duplicates before posting. Learn more
community guidelines