• Global community
    • Language:
      • Deutsch
      • English
      • Español
      • Français
      • Português
  • 日本語コミュニティ
    Dedicated community for Japanese speakers
  • 한국 커뮤니티
    Dedicated community for Korean speakers
Exit
0

Simulate rendering on colored paper without using soft proofing

New Here ,
Jul 27, 2019 Jul 27, 2019

Copy link to clipboard

Copied

Hi,

I consider printing an image on a dark colored paper (actually the final goal is to make a  transfer on dark T-shirt, which is nearly the same). I don't have the ICC color profile of the paper, and I don't have software such as InDesign.

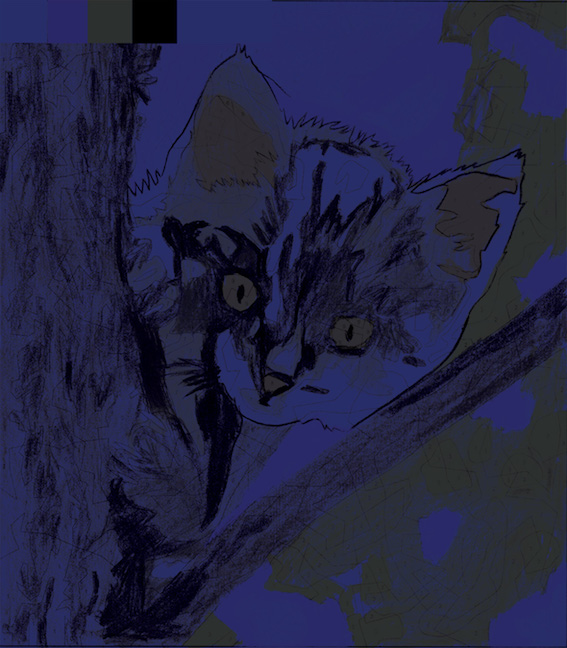
I would like to simulate what my image would look like. In particular, I'd like to see how the light colors  will be affected. Obviously, my printer does not have white ink.

I have read somewhere that one just needs to add a colored background behind the layer, and use the "multiply" blend mode on the layer; this is not correct.

I found a method, but it is very complex, so maybe an advanced photoshop user can help me there. Here it is:

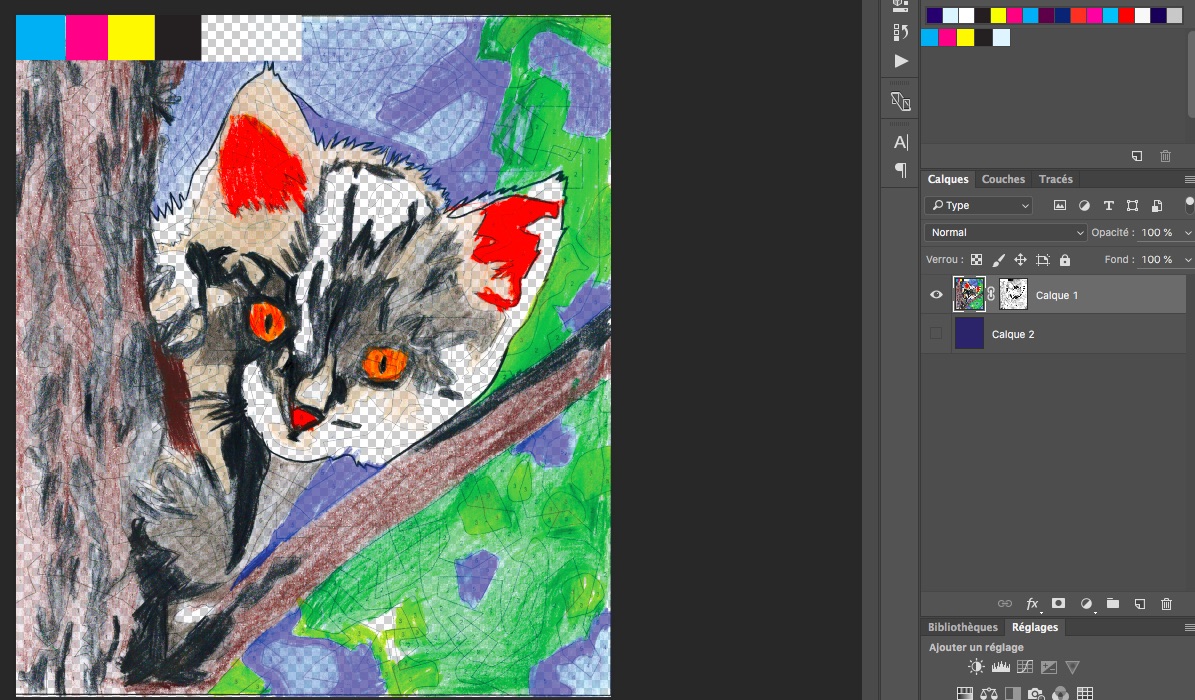
1) Create a black-and-white mask showing the colors that are not CYMK

- copy-paste each color channel (C, Y, M, K) into a new separate layer

- blend the 4 new layers using the multiply option

- merge these 4 layers

- invert the merged layer after converting the image to greyscale (otherwise black does not become white, and vice-versa; does someone know how to do this otherwise?)

- copy the merged layer: it is now a mask of the colors that are not CYMK (black = white in this mask)

2) Create a transparency mask

- Open the original image

- Select Layer->Layer mask->Transparency

- In the layers tab, click on the linked mask (it should be a white rectangle right next to the previe rectangle of the layer)

- Go to the channels tab

- A new channel has appeared: select it, and paste the black-and-white mask here

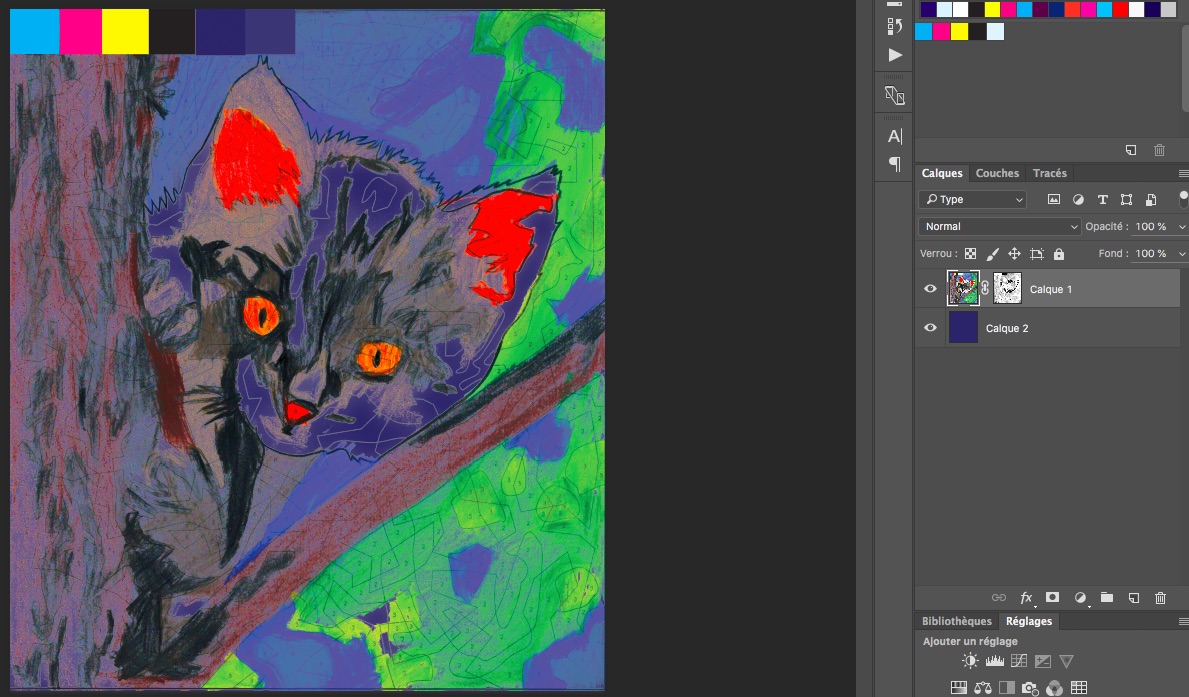
3) Create the background

- Add a background (or a layer behind the main layer)

- Paint it with the color of the paper (blue, for instance)

- Voila !

Is there a simpler way to do this?

Tx!!!

Of course, the simulation does not simulate ink transparency (it assumes that Yellow is 100% opaque), so the printed image may be even darker.

1.jpg2.jpg

Views

2.6K

Translate

Translate

Report

Report
Community guidelines
Be kind and respectful, give credit to the original source of content, and search for duplicates before posting. Learn more
community guidelines

correct answers 1 Correct answer

Community Expert , Jul 27, 2019 Jul 27, 2019

jmmelkon  wrote

I have read somewhere that one just needs to add a colored background behind the layer, and use the "multiply" blend mode on the layer; this is not correct.

Why do you conclude that's not correct? Obviously nothing can be brighter than the paper, and the inks are fully transparent (like watercolor paint). Multiply is the way to mimic that.

However, depending on the ink and paper structure, you will probably not get the deepest blacks you see on screen.

There is no way you can get you

...

Votes

Translate

Translate
Adobe
Community Expert ,
Jul 27, 2019 Jul 27, 2019

Copy link to clipboard

Copied

jmmelkon  wrote

I have read somewhere that one just needs to add a colored background behind the layer, and use the "multiply" blend mode on the layer; this is not correct.

Why do you conclude that's not correct? Obviously nothing can be brighter than the paper, and the inks are fully transparent (like watercolor paint). Multiply is the way to mimic that.

However, depending on the ink and paper structure, you will probably not get the deepest blacks you see on screen.

There is no way you can get your second example unless the inks are opaque (which they aren't).

Votes

Translate

Translate

Report

Report
Community guidelines
Be kind and respectful, give credit to the original source of content, and search for duplicates before posting. Learn more
community guidelines
LEGEND ,
Jul 28, 2019 Jul 28, 2019

Copy link to clipboard

Copied

Your workflow fails insofar as it doesn't account for the actual spectral properties of the pigments and transparency of the inks and simply assumes the (perceived) luminosity would somehow be representative of the actual densities and light reflection. That can't really work out as e.g. your faint browns would very likely be a lot darker even or more or less vanish. It's the old gag - a pure red printed on a black T-shirt will look like a bright bordeaux or brown unless there is an underprint in a brighter color. Ands that's talking about professional silk screen/ spot color workflows, not inkjet printing as you seem to be aiming at. Same for your ears - unless you intend on using a white base, they will never look this bright...

Mylenium

Votes

Translate

Translate

Report

Report
Community guidelines
Be kind and respectful, give credit to the original source of content, and search for duplicates before posting. Learn more
community guidelines
New Here ,
Jul 28, 2019 Jul 28, 2019

Copy link to clipboard

Copied

LATEST

Hi,

both your answer and D Fosse's are correct.

I have made the actual test: the result indeed looks like the one obtained with the "multiply" procedure (see below), not the one I proposed here.

As you explained to me, this is definitly because the inks are almost fully transparent (i.e. colored, but not diffusive, diffusion comes from the paper). I know that a few printers propose white inks, but not the one sold to the general public, and I have read that they are not totally opaque. I also know that some t-shirt transfer papers work with dark clothes and inkjet printers; maybe there is some white ink already in the sheet?

Anyway, thank you for taking some time to answer me!

CCI25072019.jpg

Votes

Translate

Translate

Report

Report
Community guidelines
Be kind and respectful, give credit to the original source of content, and search for duplicates before posting. Learn more
community guidelines