This first script "combine_tiles_into_montage.jsx" will get you part of the way there, presuming each tile is the same canvas size:
https://www.andrewnoske.com/wiki/Adobe_Photoshop_-_Scripts_Related_to_Montaging
However it does not add a gutter/space between the files...
EDIT: It is easy to make a quick-n-dirty hack like follows on lines 46-47 to add say 25pt spacing (PostScript points are equivalent to pixels)
var tileWidth = firstTile.width + 25;
var tileHeight = firstTile.height + 25;
EDIT 2: You can also modify line 75 to remove the %20 characters in layer names to word spaces:
layer.name = files[i].name.replace(/%20/g, " ").slice(0,-4);
EDIT 3: And also line 51...
firstTile.layers[firstLayer].name = files[0].name.replace(/%20/g, " ").slice(0,-4);
Here is the original script in full, just in case the original site disappears sometime in the future:
// Assembles a folder full of ordered image tiles into a single montage image
// with each tile in a separate layer. Before processing and tile translation
// occurs, you will be prompted to enter the number of columns and whether
// tiles are ordered by x or y first. If possible, I recommend you name tiles
// like so: "my_tile_x=0&y=0.jpg". Tiles *should* work as any image type, but
// I have had trouble before with .png, so you may need to convert to .jpg.
// All tiles are added to the first tile, and then saved as a PSD (with one
// tile per layer) at the end.
//
// TIPS:
// > This has been tested up to 80x80 (256x256 pixel tiles), but over 30,000
//   in any dimension is not supported by all photoshop versions.
// > The final PSD won't save if > 2 GB (easily fixed by saving as a TIF)
// > Images can be different types, but certain image "modes", including
//   "Indexed" color, fail (fixed by Image > Mode > RGB Color).
#target photoshop

// Open folder selection dialog (for user to chose folder):
alert("You will be prompted for the folder containing your tiles.\n" +
      "Tiles should be named like 'x=10&y=4.jpg' so they sort well, " +
      "all of the identical dimension and the folder should contain " +
      "no other image files.");

var folder = Folder.selectDialog();
if (!folder) {alert("Cancelled"); exit;}

// Set units and guess the number of columns using square root:
var origUnits = app.preferences.rulerUnits;  // Can delete.
app.preferences.rulerUnits = Units.POINTS;
var files = folder.getFiles(/\.(jpg|jpeg|tif|tiff|bmp|png|eps)$/i);
files.sort();
var numColGuess = Math.ceil(Math.sqrt(files.length));

// Prompt the user to enter the number of columns and if x appears first:
var numCol = prompt("Found " + files.length + " images.\n" +
                    "How many columns are there?", numColGuess);
var numRows = Math.ceil(files.length / numCol);

var answer = prompt("Grid will be " + numCol + "x" + numRows + " tiles.\n" +
                    "Does x or y appear first in the filenames?", "x");
var orderedWithYFirst = (answer == "y" || answer == "Y");
if (!answer || numCol == 0 || numRows == 0) {alert("Bad values"); exit;}

// Open first file to determine dimensions:
var firstTile = app.open(File(files[0]));
var tileWidth = firstTile.width;
var tileHeight = firstTile.height;

// Resize first file to a size that will fit all tiles:
var firstLayer = firstTile.layers.length - 1;  // Most likely 0.
firstTile.layers[firstLayer].name = files[0].name.slice(0,-4);
firstTile.resizeCanvas(firstTile.width * numCol,
                        firstTile.height * numRows,
                        AnchorPosition.TOPLEFT);

// Zoom to fit whole image on screen:
doMenuItemNoInteraction = function(item) {
   var ref = new ActionReference();
   ref.putEnumerated(app.charIDToTypeID("Mn  "), app.charIDToTypeID("MnIt"), item);
   var desc = new ActionDescriptor();
   desc.putReference(app.charIDToTypeID("null"), ref);
   executeAction(app.stringIDToTypeID("select"), desc, DialogModes.NO);
}
doMenuItemNoInteraction(app.charIDToTypeID('FtOn')); // Fit all on screen.

// For each tile: open, transfer into a new layer, and re-position:
for (var i = 1; i < files.length; i++) {
  var tile = app.open(File(files[i]));
  if (tile.layers.length > 1) {
    tile.flatten();
  };
  tile.layers[0].duplicate(firstTile, ElementPlacement.PLACEATBEGINNING);
  tile.close(SaveOptions.DONOTSAVECHANGES);
  var layer = firstTile.layers[0];
  layer.name = files[i].name.slice(0,-4);  // Omit the file extension.
  // Determine current column and row:
  var col = Math.floor(i / numRows);
  var row = i - (col * numRows);
  if (orderedWithYFirst) {
    row = Math.floor(i / numCol);
    col = i - (row * numCol);
  }
  // Calculate the x/y offsets and translate image:
  var xOffset = (tileWidth * col) - layer.bounds[0];
  var yOffset = (tileHeight * row) - layer.bounds[1];
  layer.translate(xOffset, yOffset);
};

// Save as new file;
var basename = firstTile.name.match(/(.*)\.[^\.]+$/)[1];
var docPath = firstTile.path;
psdOpts = new PhotoshopSaveOptions();
psdOpts.embedColorProfile = true;
psdOpts.alphaChannels = false;
psdOpts.layers = true;
psdOpts.spotColors = true;
firstTile.saveAs((new File(docPath+'/'+basename.slice(0,-4)+"_comb.psd")),psdOpts,false);
app.preferences.rulerUnits = origUnits;
Comment out or remove the code block at the bottom if you don't wish to auto save.
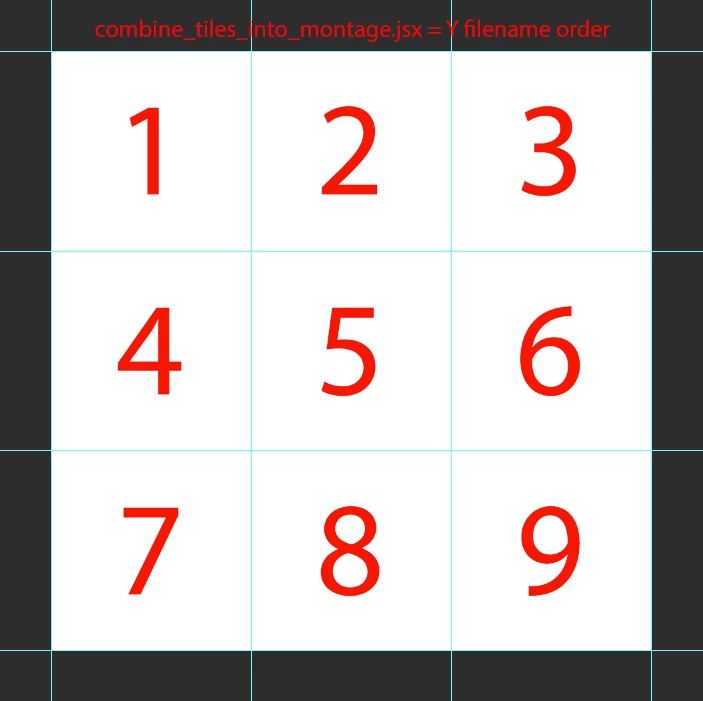
EDIT 4: Presuming nine separate input files named 1-9, here is the result of the input order when X is selected (vertical, left to right):

And here is the layout order when Y is selected (horizontal, left to right):