Copy link to clipboard
Copied
Hi,
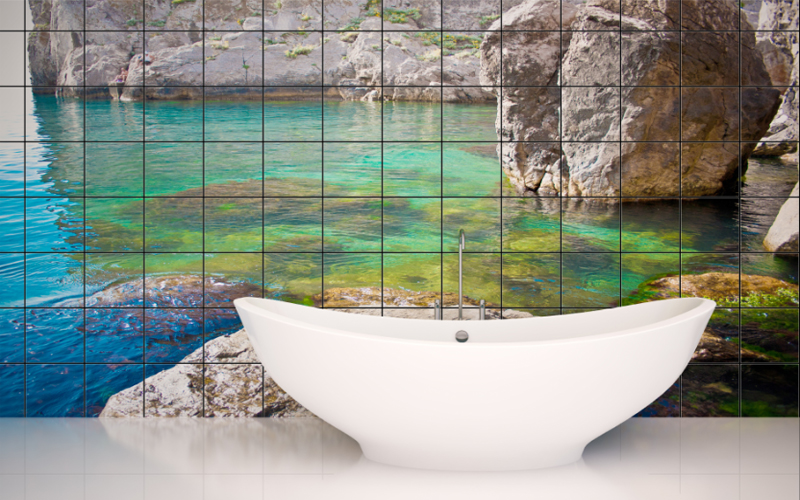
I'm looking for suggestions how to make the most realistic grout effects in the tiles design? Somebody made it for me some designs in photoshop, but I'm looking to improve it.


 1 Correct answer
Hi you could try something like this :
1. Use the pen tool to create a path in the shape of the grout lines
2.Add a mask and stroke the path with black onto that mask
3.Add a color fill layer with the grout color
4. Add a layer effect to the image layer using Bevel and Emboss to shape the tiles and Drop Shadow to shadow the grout
5. Add a painted shadow between the image and the grout layer to darken under the bath


Dave
Explore related tutorials & articles
Copy link to clipboard
Copied
Hi you could try something like this :
1. Use the pen tool to create a path in the shape of the grout lines
2.Add a mask and stroke the path with black onto that mask
3.Add a color fill layer with the grout color
4. Add a layer effect to the image layer using Bevel and Emboss to shape the tiles and Drop Shadow to shadow the grout
5. Add a painted shadow between the image and the grout layer to darken under the bath


Dave
Copy link to clipboard
Copied
Hi Dave,
That's look really good! Thank you
Copy link to clipboard
Copied
As an alternative to Dave's suggestion you could apply a Pattern overlay to the image? you could use a photograph of a tile, or tiles with good grouting. Add Black & White adjustment layer to create a grey scale image. Select the area to be used for the pattern with the rectangular marquee tool, then go to Edit > Define pattern.
then, on your image layer that you want to look tiled, add a pattern overlay. In the settings choose your tile pattern and then experiment with the blending modes and opcity settings to apply it to the layer beneath. Overlay mode or hard light may work well but I can't try it right now as I'm on my iPad.
let me know if this works for you 🙂
Copy link to clipboard
Copied
Also, you could use a displacement map on top of this just to give the surface of the tiles a bit more depth, this would work particularly well if the tile surface was slightly bumpy.
Find more inspiration, events, and resources on the new Adobe Community
Explore Now