- Home
- Photoshop ecosystem
- Discussions
- Re: warping object in a rectangle in a fast way
- Re: warping object in a rectangle in a fast way
warping object in a rectangle in a fast way
Copy link to clipboard
Copied
How can I transform a selection made using the Magic Wand tool into a rectangle?
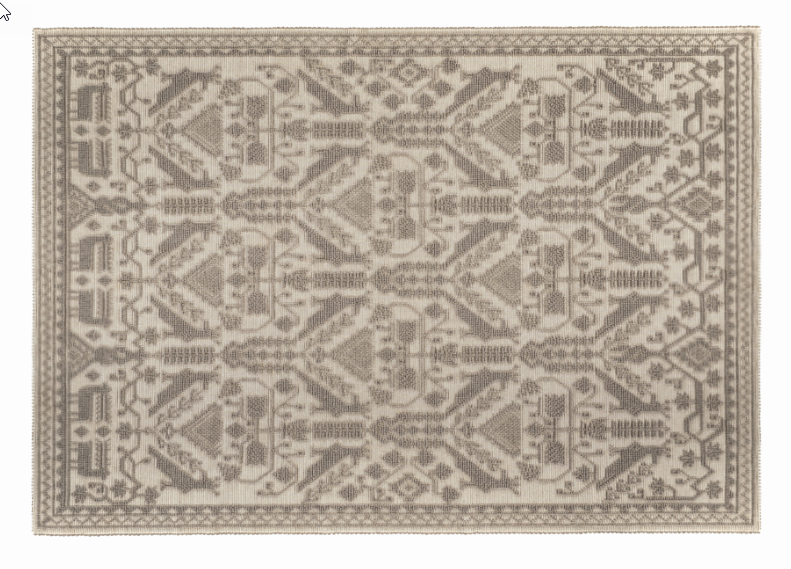
In my case I have a rug shot from the ceiling and the boundaries are not straight, perspective is ok I' m not talking about that
I just want the boundaries to fit the rectangle
I tried the transform tool but didn't find a way to transform the selection into a rectangle (or any shape for example) in a fast way (without aligning by my self)
I' m missing something for sure
Explore related tutorials & articles
Copy link to clipboard
Copied
Could you please post a screenshot to illustrate the issue?
Do you want to transform the Selection or the selected content?
Copy link to clipboard
Copied

that's an example of what I' m talking about, as you can see in the right and the left side the boundaries are not straight in some part
Copy link to clipboard
Copied
I think Puppet Warp is the way to go. It's not fast or automatic, but I think it's the way to achieve the best result.
Copy link to clipboard
Copied
it just seems strange to me there is not an automatic faster way to do that
I' m going to use it for 50+ rugs
Copy link to clipboard
Copied
Automatic would require that the program to have a certain amount of artificial intelligence - in order to fix an image like this, you have to understand what it is supposed to look like.
Copy link to clipboard
Copied
is just about dragging the boundaries of an custom selection to fit a known shape like a rectangle
are you saying that is not possible?
Copy link to clipboard
Copied
adrioss wrote
is just about dragging the boundaries of an custom selection
I'm not saying it can't be done, just that it is not as simple as you think it is. It's not just the boundary that needs to be re-shaped. The pattern of the rug is subtly distorted in the photo, and will need to be adjusted so that the lines are straight again.
That takes looking at the pattern and knowing what to adjust. I've rotated the image of the rug edge (and thickened the guidelines) to show what I mean. It's not a straightforward distortion; it changes along the height of the rug.

Copy link to clipboard
Copied
puppet warp does exactly that
it' s not something of so unbelievably complex, nothing that require an amount of artificial intelligence bigger than joining some points to a straight linehttp://context.reverso.net/traduzione/inglese-italiano/unbelievably+complex
the only big thing here is finding someone that knows the way ![]()
Copy link to clipboard
Copied
nothing that require an amount of artificial intelligence bigger than joining some points to a straight line
And how do you imagine the points would be defined other than by some »intelligent« image analysis?
Copy link to clipboard
Copied
A simpler but less precise method would be to use Edit > Transform > Warp. You could go to View > Show > Grid to get turn on the grid to some help with lining up the edges.
Copy link to clipboard
Copied
thank you, but that is exactly what I wish to avoid
Copy link to clipboard
Copied
Then maybe look in to ways to automate generating displacement maps from the images then apply the displacement to each. I'm trying to think how you could make that kind of map, though. It's not like you'd be turning the rug image into a displacement map. It would look completely different from the rug design. It would have grayscale values that that distort the rug image into the straightened shape. So maybe this is more of a lead than an actual answer.
Copy link to clipboard
Copied
Select the layer and go to Filter > Lens Correction. In there , click on the Custom tab, in there you'll find the Geometric Distortion settings, adjust the Remove Distortion slider till your edges correct themselves. You may need to adjust the Horizontal or Vertical Perspective values too to get the result you want.

Hope this helps 🙂
Copy link to clipboard
Copied
It' s not that kind of distorsion you can fix using lens correction, it's not "uniform"
the shot is mad by putting the rug in level with the floor
it changes depending on how who did the shot put the rug on the floor
Copy link to clipboard
Copied

Copy link to clipboard
Copied
I guess I don't get it 😕
Copy link to clipboard
Copied
I can't think of an automatic way but, as an alternative to puppet warp you could put some guidelines over the image and use the Liquify Filter (specifically the forward warp tool within that filter) to nudge the distortion more into line.

Definitely a case where a few minutes spend pulling each rug straight would save hours in Photoshop
Dave
Copy link to clipboard
Copied
Have you tried using Quick Mask mode? With your selection made, click on the Quick Mask button, this will turn your selection into an overlay that can be transformed and warped as you wish. You can also add or subtract from the selection by painting with black or white. You can even smudge or blur selections or even add effects to them.


