

What *exactly* is Clarity?

Copy link to clipboard
Copied
Hi,
camera raw and lightroom have the slider clarity.
But what exactly is clarity?
Yes I know what it is in principle, its mide ton contrast, but I'm asking for the algorithm to reproduce it in PS.
In the internet you read a lot about its like unsharp mask with large radius and small intensity. But this is true only for small corrections.
When moving the clarity-slider to the extrem right the image looks different. At first it seems that it influences only the luminosity.
But using an upper layer, applying unsharp mask (radius around 100, amount 20% -30%) and combining it with luminance-method looks quite differently.
I tried differenz things. Some come near, but not exaclty. And all what I found in the internet is rubbish and ad hoc thinking.
I need the hard slightly desaturated look when pushing clarity to the extreme.


Explore related tutorials & articles
 28
Replies
28
28
Replies
28

Copy link to clipboard
Copied
I don't pretend to know the exact algorithm. But on a practical point, if you want to use clarity in Photoshop, make the layers into a smart object and use Filter - Camera Raw
Dave

Copy link to clipboard
Copied
The clarity slider is an excellent tool for adding punch to images without making them look unnatural. The secret is to get all your primary corrections done first, exposure, color, highlights and shadows but not to touch the contrast. Keep the histogram within limits and then when happy with the result, slowly add in some clarity, keeping one eye on the histogram. Like any tool push it too far and the result will start to look unnatural but used carefully it can add some real sharpness to even the dullest of shots.
Copy link to clipboard
Copied
In this case I want a little unnatural look. Unnatural, but not looking unnatural, if you know what I mean.
Copy link to clipboard
Copied
Haaha! Sure then, dont go over the top while editing.Keep it minimal and i think you will get the desired loo.Keep the clarity sliders on a lower value to maintain natural appearance.

Copy link to clipboard
Copied
Clarity increases contrast, mostly in the midtones.

Copy link to clipboard
Copied
https://forums.adobe.com/people/Barbara+Ash wrote
Clarity increases contrast, mostly in the midtones.
You beat me to it Barbara, except I was going to say 'local contrast'. It stretches out the histogram dropping the black point and brightening whites, but tries not to blow highlights. But if you watch the histogram while dragging the clarity and contrast sliders to the right, the effect is very similar.
A trick some people miss is negative Clarity, which is a super easy, and very effective tool for cleaning skin blemishes. It _tries_ not to soften the blacks too much when doing this, but it is best to do it on a copied layer and mask out the eyes, lashes, hair, lips etc.

Copy link to clipboard
Copied
Clarity is for sharpening / softening an image.
Copy link to clipboard
Copied
Hi,
actually I mean with *exactly* the concrete algorithm. In a way that I can programm it as a photoshop plugin or standalone image processor etc.
All what you told is not new for me 😉
Its seems nobody except the adobe programmers really have a clue ....
Regards Thomas

Copy link to clipboard
Copied
You won't get an answer to this unless an ACR engineer comes by.
All of the above is correct, with the important distinction the clarity works locally, not globally. I suspect it's related to highlight and shadow recovery, and as such part of the "image adaptive processing". IOW it works according to actual content, not by a general rule.

Copy link to clipboard
Copied
actually I mean with *exactly* the concrete algorithm.
Over 10 years ago a company named Pixmantec created a nice piece of software known as RawShooter that was offered in “Essentials” and “Professional” versions. This product offered two “unique” tools – Clarity and Vibrance. A few years later, Adobe purchased Pixmantec and introduced Clarity and Vibrance into Adobe Camera Raw and Lightroom (however the values/numbers in Adobe’s implementation were not exactly the same or interchangeable with the now defunct RawShooter product).
In a way that I can programm it as a photoshop plugin or standalone image processor etc.
ThomasT, this is not known outside of the programmers – for good reason! This is known as Intellectual Property, I.P. or otherwise as a trade secret. You have stated that you would like to “recreate” this effect that Adobe purchased when acquiring the assets of Pixmantec.
As has been stated, the exact code is not known. What is known is the results of using the tool, which can be used to *try* to reverse engineer the results. Many have come “visually very close” using a recipe similar to this:
- Copy image to new layer
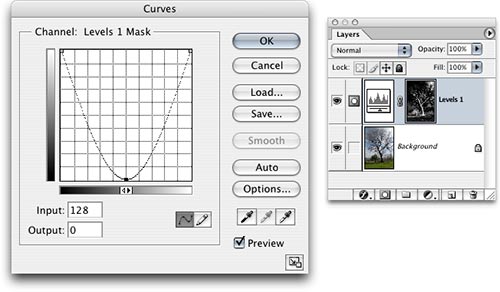
- Apply a density based mask, often known as a luminosity mask (however the density could be Lightness, channel mixed etc)
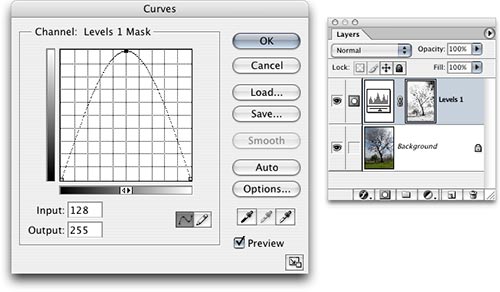
- Curve the luminosity mask into a “U” shape (or an inverted “U” shape depending on your curve display settings), known as a “midtone mask” or “endpoint mask” so that only the midtones are revealed (or using layer blend if sliders to do similar)
- Optionally soften/blur the mask a little bit
- Apply USM to the masked image using a small amount and large radius
P.S. It should also be noted that the results of using the Camera Raw filter on rendered data is quite different when compared to raw camera data.
Copy link to clipboard
Copied
Hi,
thanks for answering. I actually didn't think that in this process is much more knowledge than to say in a USM or gaussion blur. And this is fully understanded and image processing standards. So I thought Clarity is just a useful combination of such simple steps.
I think you receipe come close for small amounts of clarity. But when you push Clarity above 80% or so the image become are more graphical look and is desaturated. And in this case I need the look.
But anyway I processed the ca. 5000 raw video frames in Camera Raw ... (in steps of 500).
This is sick ...;-)
Thomas
Copy link to clipboard
Copied
No, Clarity is not a “public domain” algorithm such as Gaussian blur.
think you receipe come close for small amounts of clarity. But when you push Clarity above 80% or so the image become are more graphical look and is desaturated. And in this case I need the look.
I have tried that recipe on different values, some low and others higher, it is very close up to 50% however I have not really pushed it to 100%. I am sure that you are correct in your observations. At 100% clarity a different sharpening method may be required that is not Gaussian blur based, such as a “difference of medians” or perhaps using a contrast blend mode and desaturation with the USM or something else… I have not bothered trying to recreate the command at maximum value when the built in tool is easier and has far less steps.
I’m curious (my camera does not shoot video)…
What file format are you processing? Can you list the exact step by step to apply the Clarity option to this file?
What happens if you open one of these video frames into Photoshop without applying Clarity in the Adobe Camera Raw module – but then apply the Camera Raw filter from the filter menu to this rendered (non-raw) data? Note the Clarity Filter value used. Then open the same frame in ACR and apply the exact same value to the raw data. Are the two noticeably different in result?
Copy link to clipboard
Copied
I process the original DNGs from the blacmagic pocket cam.
Clarity works identical in both cases. Via eye. I did not check pixelvalue differences.
Copy link to clipboard
Copied
ThomasT wrote
I process the original DNGs from the blacmagic pocket cam.
Clarity works identical in both cases. Via eye. I did not check pixelvalue differences.
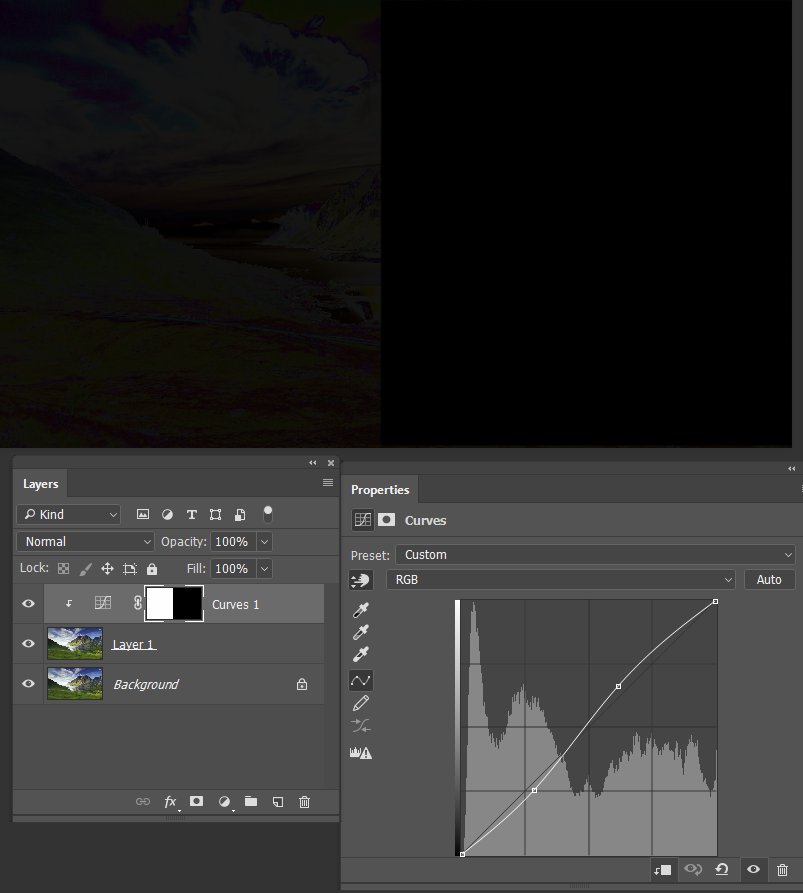
I'm guessing that you know you can overlay one version over the other, and set the upper layer to Difference? Full black indicates identical values. So the screen shot below shows the background layer copied, and a subtle curves layer clipped to the copied layer. Where the curves layer is masked it shows full black as expected. You could use this as a tool to compare and reference.
Note: the left (edited) side of the image looks darker in my browser (Firefox) than it did in Photoshop.
There are forums our there specialising in the math of image manipulation, and other companies like Topaz and On-One that produce local contrast plug-ins. Topaz is clever about it as their product range are not so very different from each other, but each one represents another revenue steam. So, like Stephen has said, it is a big ask to expect them to share their intellectual property.
Copy link to clipboard
Copied
Here is a little inside secret regarding using clarity especially on landscapes.
many people have probably used clarity on landscape images only to realize that it pushes the blue sky in to un natural colors.
Here is the best way to use clarity.
After doing your work in ACR open in PS
Use the function in PS ACR filter, not when using ACR as primary workflow.
Change the image mode to LAB.
Select the "Lightness" channel and then go to the ACR filter in PS.
Make your adjustments there. Convert back to RGB and you have a image that does not have the blue color shift in it.
Try it.
Copy link to clipboard
Copied
When pushed to the extreme (80%-100%) the saturation decreses.
I desated the green-yellow (grass) color. But keeped skin and dress (red-orange) and sky (cyan-blue) untouched.
Clarity was around 85-90%. 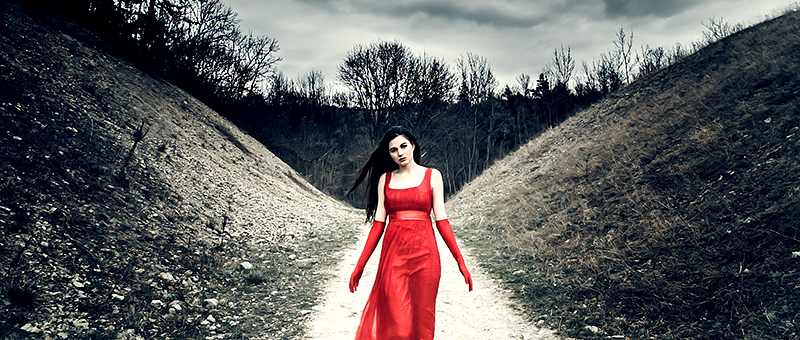
Copy link to clipboard
Copied
There are many work arounds.
But if you don't want to mess with saturation levels of complex
landscapes, my solution is the most workable.

Copy link to clipboard
Copied
Excellent! Thank you for the great tip! Difference (Blend) Mode is such a useful tool!
Another thing is to take a snapshot of the curve before and after the clarity desired, then just move the curve values to match the curve values as close as possible.
Bruce Fraser (and Jeff Schewe) shared a formula in the old "Real World Image Sharpening" Book (when talking about mid-tone contrast and "clarity") that was generally what people did before there was a "clarity" slider in ACR. I believe this info relates to the first itteration of "Clarity" however...
It was either a wide diameter USM or HighPass, then fade off using the "Blend If" sliders.
One problem about the second (and most current) itteration of "Clarity" is that it seems to also have a slight sharpening algorithm added as well. This excentuates noise, generally the largest hinderance to enlargement quality ability.
So to create it manually, without any micro sharpening-like contrast is a huge plus.
Also few people know that both "Clarity" and "Texture" can be applied to an image with great benefits after enlargement, as part of the final sharpening for output protocol! 😁

Copy link to clipboard
Copied
Stephen_A_Marsh wrote
Over 10 years ago a company named Pixmantec created a nice piece of software known as RawShooter that was offered in “Essentials” and “Professional” versions. This product offered two “unique” tools – Clarity and Vibrance. A few years later, Adobe purchased Pixmantec and introduced Clarity and Vibrance into Adobe Camera Raw and Lightroom (however the values/numbers in Adobe’s implementation were not exactly the same or interchangeable with the now defunct RawShooter product).
Actually, while "Vibrance" was indeed a part of Pixmantec, "Clarity" was homegrown by Thomas Knoll. I know this because I was the one who talked him into adding a midtown contrast tool in ACR 4.1 also incorporated "Vibrance"...
Copy link to clipboard
Copied
Thanks Jeff – so much for my memory then (it sometimes feels like each time I learn something new it pushes out something old)!
Copy link to clipboard
Copied
Hi,
thank you to all replyer.
So I think my question has been answered.
The aswer is: clarity is some magic stuff with a history and there exist some approximaitons by using usm with large radius and small amount. At least for lower values of clarity. But the clarity-algorithm itself is keeped a secret.

Copy link to clipboard
Copied
Some local tone-mapping algorithm for increasing local contrast.
Sharpen (convolution or deconvolution) can be seen as a low-quality local tone-mapping algorithm. (I call it low-quality because of ringing effect.)
Copy link to clipboard
Copied
It has a sharpening function hence the ringing effect if pushed to hard.
It also crushes the blue end to much, pushing into the purple end of the spectrum.
thats one of the reasons I use it in LAB mode
Copy link to clipboard
Copied
But paper mine has a point - you get exactly the same effect with Unsharp Mask at high radius.
Personally I hate Clarity and never use it. It always looks over-processed, fake-HDR to me.
-
- 1
- 2

 AdChoices