Copy link to clipboard
Copied
Hello - I have a CC subscription from my use of Lightroom and have zero Photoshop knowledge (except what I have been learning the last several hours on my own). I am trying to focus in on what I need to learn to accomplish this task of changing the colors of the features of a house.
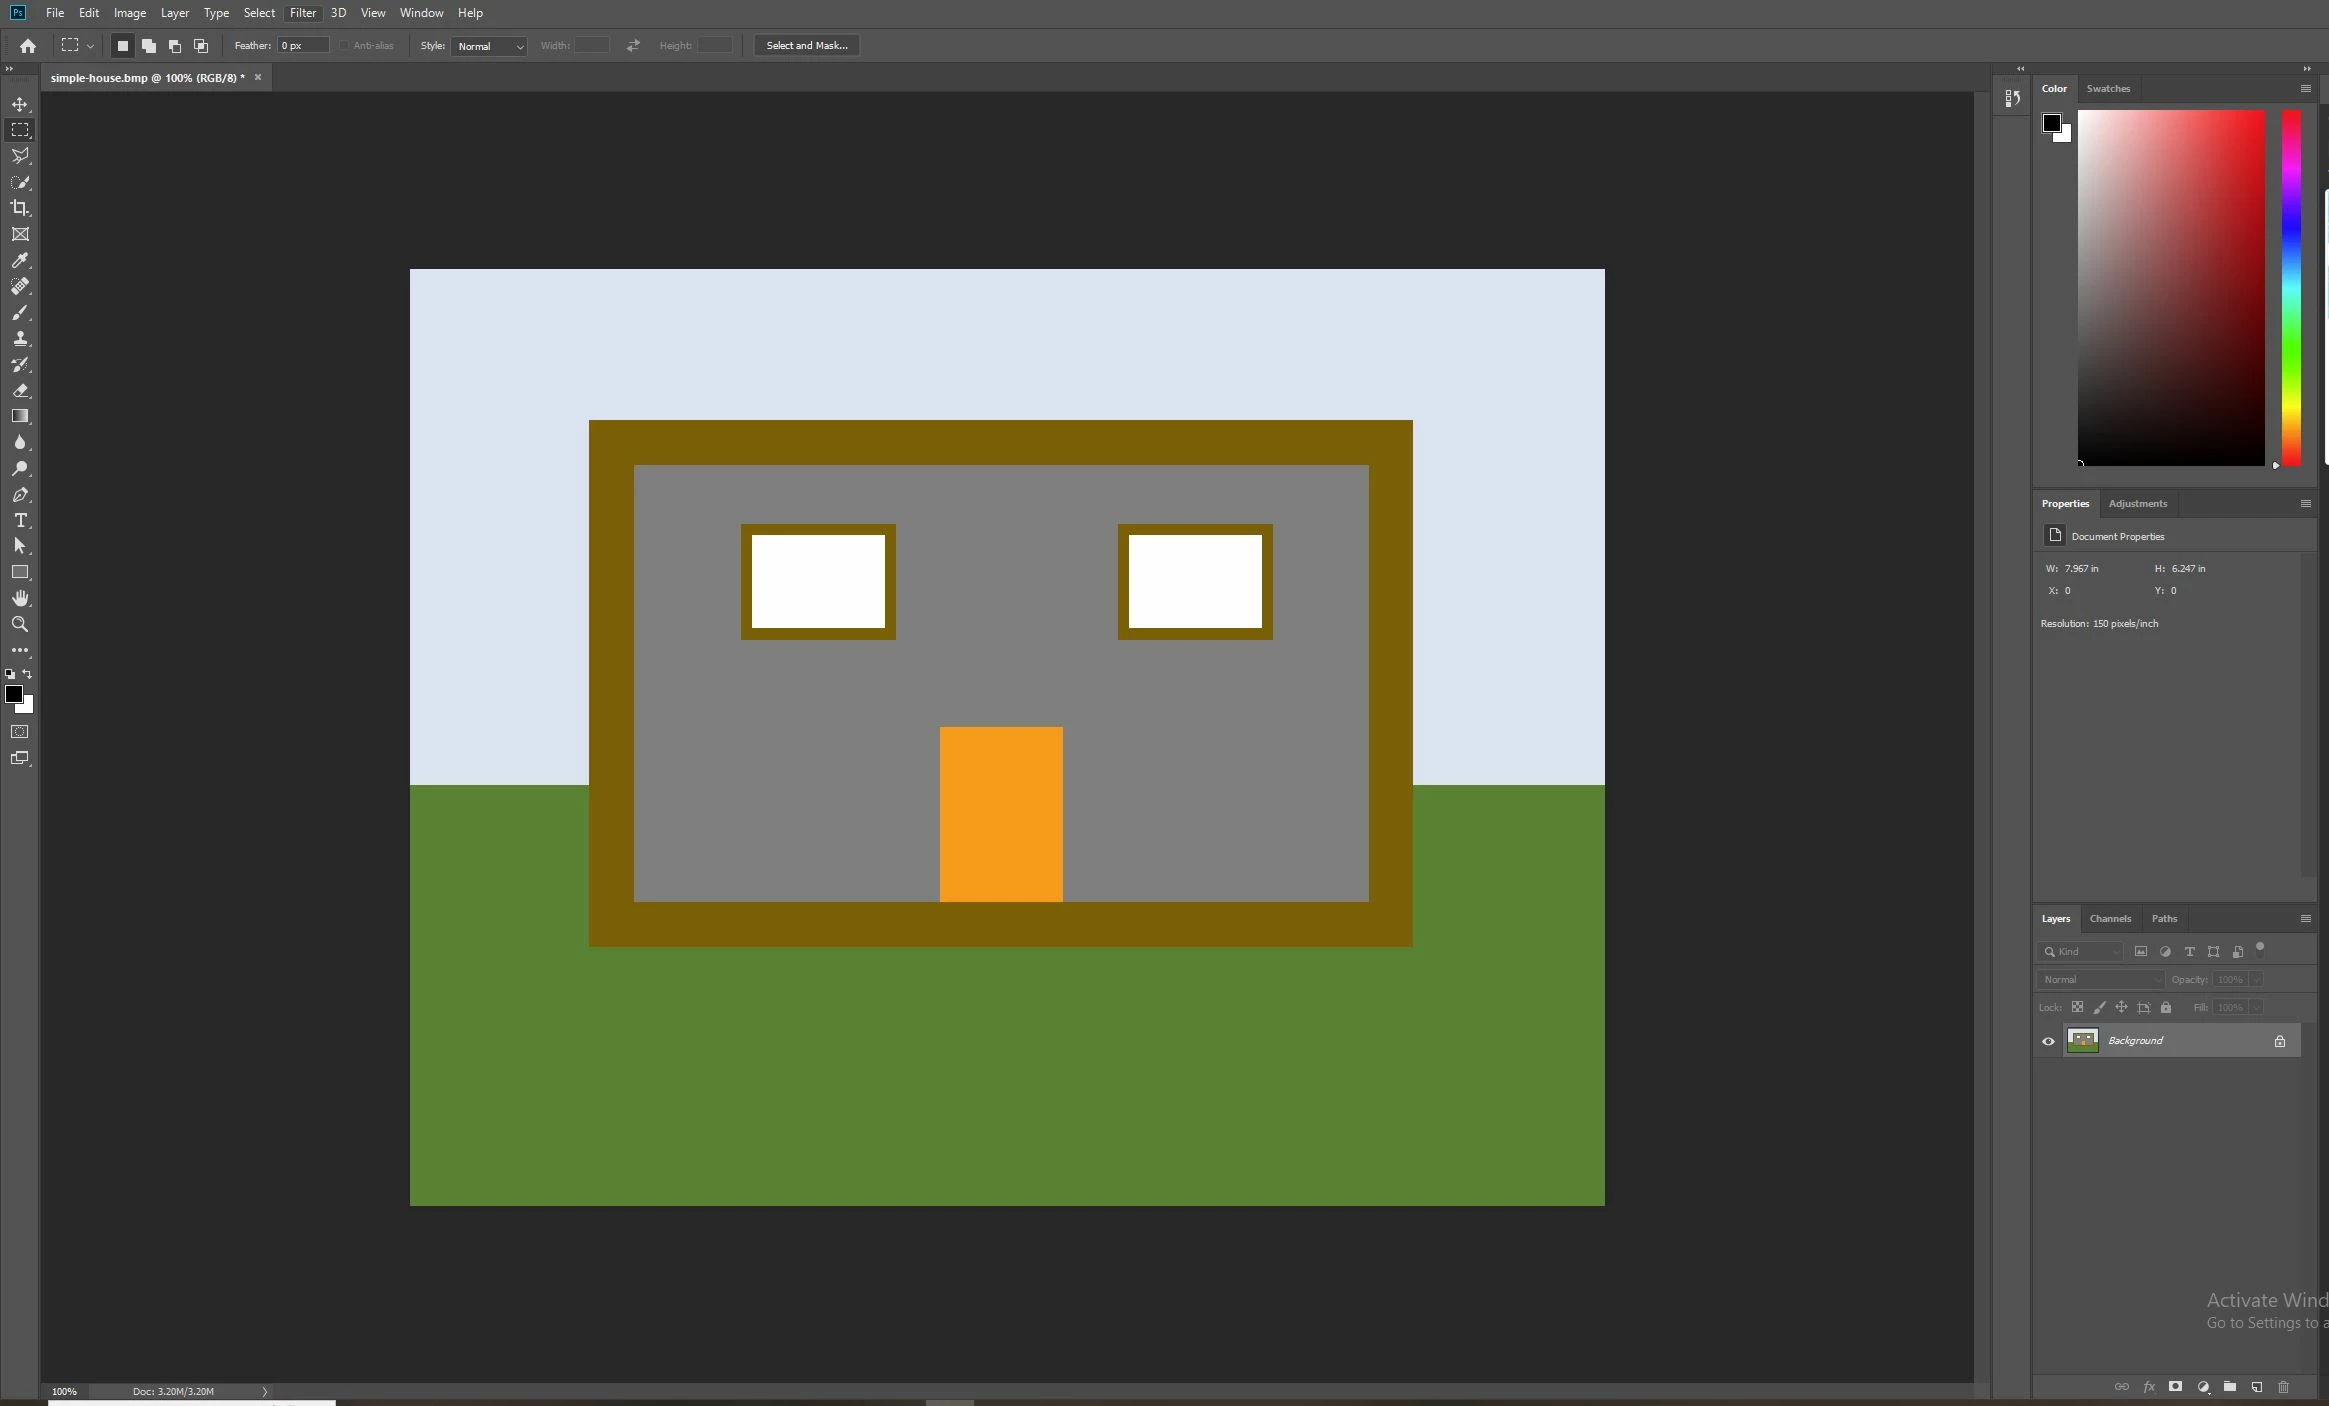
I have created a very simplified version of the problem in the image below and I would like some guidance on what the overall workflow should look like.
The image is that of a house with a gray body, brown trim and an orange door. I would like to be able to change the colors of all three independently. For example, create a red body, black trim and a green door, etc.
I know I will be needing to use selections and masking and likely some groups or layers.
Should I create 3 layers: body-layer, trim-layer, door-layer? If so, how should these be created? New>Layer or by 'duplicating' the background layer? Or should these be groups instead of layers? I am a little lost with all of the options, so any pointers would be appreciated.
Thank you for reading.
-Casey
Copy link to clipboard
Copied
Please post one of the actual images, not a mock-up.
Using Groups with Layer Masks containing the decontaminated pixel content may offer some advantages.
Copy link to clipboard
Copied
Thanks for your reply. I much prefer to take a crawl-before-walk approach and hence the mockup. I am so new to PS that with the real image I am spending 99%of my time wrestling pixels into a selection and I am not getting anywhere else. I don't even know what I am going to do with the selections. I will post the image here for completeness. Every brown piece I consider trim and would change color together.
Thank you.
Copy link to clipboard
Copied
»crawl-before-walk« is a prudent approach but I think talking about editing an image without seeing the image can lead to fruitless interactions.
I recommend putting a copy of the pixel image in a Group, masking that and adding the Adjustment Layers in that.
Adding the pixel content and not just Adjustment Layers meand that lower adjustments do not need to be masked exactly at those edges and corrections on the mask do not need to be done on two masks.
Copy link to clipboard
Copied
Thanks again and I understand your perspective. I am instantly overwhelmed by the amount of information in your reply so I hope I can pick at it a bit and start to unpack it.
When you say to "put a copy of the pixel image in a group" I am having some trouble figuring this out. I can see in your fist thumbnaiolo that Group 2 has "house-front-2024" directly above the background layer. Is this what you mean? And how did you insert it? I might be overthinking this one, but it sound like I should somehow be inserting the original jpg into the group and I am not sure how to do that.
Copy link to clipboard
Copied
A Smart Object would make sense, but jpgs can be tricky later on.
• Select the Background Layer
• ctrl-J (Layer > New > Layer Via Copy)
• ctrl-G (Layer > Group Layers)
• then add the Layer Mask to the Group
• add the Adjustment Layers (Curves to edit the luminosity for example) and/or Sold Color Layers (set to teh Blend Mode »Color« to change the Hue and Saturation)
You could apply the Layer Masks to individual Adjustment Layers but using the same Mask multiple times is wasteful and can cause edge issues especially when two adjustments »run in opposite directions« (use inverted masks), so Groups offer benefits.
The pixel layer at the bottom of the Group offers, in my opinion, further advantages concerning edges and masks but if this seems confusing at current just leave it aside.
Copy link to clipboard
Copied
As an illustration:
By stacking pixel content with the Adjustment Layers one can do the lower Masks a lot more inexactly in those regions.
And putting the Groups in a Group allows masking that, too.
Copy link to clipboard
Copied
Hi c.pfaffenbichler: I really appreciate your taking the time to reply. This is probably "crawel" for you, but it's all "run" to
me. I am having a lot of difficulty following your replies because there's a lot of implicit knowledge packed into them. I need to get the basics out of what you are describing. Also, I shoudl have mentioned, I am not looking for perfection, I just want a quick and dirty 'what would these colors on this house approximately look like".
I need some click by click help, which I realize is asking a lot, so I uinderstand if you don't have time for that. Using the 1st jpg below (tiny-sample.jpg), here's is where I am at:
Here is where I start to get lost (assuming I didn't already mess up above, plese let meknow if I did):
The result is this group which has the brown trim masked off. WHat are the clicks that get me to change the color of the gray siding and the brown trim? Here is what I have tried (note that we prbably have slightly differnet version of PS and so my options have slightly differnet names/ways of working):
With Group 1 selected > From file menu: Layer > New Fill Layer > Solid color > Check the box that says "Use previous Layer to create Clipping Mask". There is no "Blend Mode" option that I can see. I change the color of the body to blue as shown in 4th screenshot.
I am not sure if I am on the righ track or not and how to change the trim color next?
-----------------------------------------------
Starting jpg (tiny-sample.jpg)
Selecting gray siding only
Workspace with Layer Mask Added:
Copy link to clipboard
Copied
You’ve gotten some great advice, these might help fill in the gaps:
When I do this, I don’t bother duplicating any of the original image; there isn’t any need to. Like you are doing, I do apply Solid Color Fill layers, but I mask off that layer so that it applies only to the parts of the original image to be recolored.
You asked about the blending modes. That is a menu in the Layers panel, so when the layer you want is selected (in my case, Color Fill 1 for the trim), choose a mode from that menu. For recoloring, the Color mode is usually the one to use, as shown in the demo below.
Any other elements that should use the same color can simply be added to that one mask. In the demo below I subtracted the porch trim from the mask for the Color Fill 1 layer with these steps:
1. With any selection tool, select the trim pieces you want to add. I dragged the Object Selection Tool around the bits I wanted, because it’s one of the smarter selection tools (higher chance of getting it right the first time).
2. With the mask of Color Fill 1 selected, I click the paint bucket icon in the Contextual Task Bar and choose Fill with Foreground Color. As long as the foreground and background colors are the mask defaults (white and black), that command will fill the selection with white, subtracting it from the mask so that the color is now applied to that area too. (The animated GIF color quality in the porch trim shadows is bad because the Adobe forum software re-compresses animated GIF; it looks fine in the original I uploaded.)
3. I look at the mask alone by holding down the Alt key (Windows) or Option key (Mac) while clicking the mask. I Alt/Option-click the mask again to go back to seeing the image with the effect of the mask.
Clicking the paint bucket on the Contextual Task Bar is a rather new shortcut for the traditional method of choosing Edit > Fill and then choosing Foreground Color from the Contents menu, and clicking OK. So this way you can skip the dialog box. Another shortcut for Fill with Foreground Color is to press Alt-Backspace (Windows) or Option-Backspace (macOS).
As you can see, if you want to keep this streamlined, minimal, and easy to manage, all you really need is:
Which means if you only need to show one color for all trim parts, you might not need to add any more layers than one Solid Color fill layer with a mask. Each trim piece would only need to be its own white cutout in that mask. There might not be a need for duplicates and groups, unless you do need finer control over more color variations for different trim pieces.
This is often good enough for a quick and dirty recolor. If it needs to be precise, you can go back later and edit any masks to clean them up.
Copy link to clipboard
Copied
@Conrad_C Thank you for your reply and for the screenshot captures. This method is indeed simpler and I appreciate it. In fact, it is so simple that I can't figure out how to apply the mask. Sorry, PS is not very intuituve to me. Here's what I did:
Getting close I know it!
Copy link to clipboard
Copied
@Conrad_C I'll also mention that I'd love to know how you are selecting so well....I am drawing polygons for days ....
Also I don't seem to have those contextual toolbars like you do 😕
Copy link to clipboard
Copied
Also I don't seem to have those contextual toolbars like you do 😕
By @saladsamurai
If you’re using the current version of Photoshop and you don’t see that, choose Window > Contextual Task Bar.
If you are using an earlier version of Photoshop, the Contextual Task Bar is a quicker way to get at existing features that are often hidden somewhere else, so if you don’t have the Contextual Task Bar you can still use the menu command or keyboard shortcut I described.
Copy link to clipboard
Copied
Yes, part of the issue is that, as you said, each step can involve a different skill set that may take some training to be comfortable with. Layers, selection, and masking are each deep subjects individually.
For selection, yes, for many years we had to drag a lasso tool manually, with a lot of hand/eye coordination. Over the years, Photoshop has introduced more semi-automated selection tools that identify edges and objects automatically. Experienced users approach selection from different angles and pick the easiest way. If objects are distinct, they can be selected more quickly with the Quick Selection or Magnetic Lasso tools that were introduced 10 to 20 years ago. If the trim pieces were already a distinct color, it would be easier to select them using Select > Color Range.
Advanced users will know about vector masks, so instead of dragging to create a temporary pixel selection marquee, they draw vector paths with points and handles for precise straight and curved segments, and convert it to a vector mask. I do that a lot, only because I am familiar with the Pen tool. I would not push a beginner in this direction because again, both vector masks and the Pen tool are each deep subjects on their own. But I do it if I want control over the mask path in a way that’s fast and efficient to precisely draw and to edit later until it’s perfect.
For the demos I posted, I decided that the fastest way for this house example was the relatively new Object Selection tool, which is better trained to recognize objects because it’s programmed at least in part by machine learning. In the demo below, I use the Object Selection tool to roughly draw a loose, sloppy selection around the edge trim. It understands and identifies the more specific selection I want within that rough selection, and that’s the selection it gives me. Usually it’s pretty good, if not I can edit the resulting mask later.
The reason some image areas become highlighted in pink is that when the Object Finder option is enabled up in the tool options bar, it will highlight subjects it’s been trained on, such as the sky and the house. If you wanted one of those, you would just click and it would become selected. The trim I want is not automatically recognized, but again, by dragging the tool around the trim I am telling the tool that is what I want to select.
After the selection, I create the Solid Color fill layer and the mask is automatically created. This is because (again, this is something learned from training) if a selection exists, and you create a fill or adjustment layer, then the current selection is automatically converted into a mask for that layer. Saves a few steps!
For the porch trim example, I had to make multiple passes with the Object Selection tool over various parts of the porch. By setting the tool to Add To Selection mode, each additional selection is combined with the existing selection until all of the porch trim is selected. Note that using an appropriate tool mode lets you either add on to or trim off any parts of a selection as needed. For example, if the Object Selection tool includes part of the siding and I don’t want that, I set the tool to Subtract From Selection and when I drag around the unwanted bit, it’s removed from the selection. All selection tools offer these modes, so for example you can create an initial selection with one tool and add or remove bits with any other selection tool in a different mode.
In fact I just noticed that in the Object Selection tool demo, that tool did include a small area to the left that I did not want. I should have trimmed that out of the selection, but I can fix it quickly simply by painting or filling that part of the mask with black.
Copy link to clipboard
Copied
@Conrad_C Thank you for your reply and for the screenshot captures. This method is indeed simpler and I appreciate it. In fact, it is so simple that I can't figure out how to apply the mask. Sorry, PS is not very intuituve to me. Here's what I did:
- Open PS (CC) > File > Open > House.jpg
- Go straight to Layer > New Fill Layer: Solid Color:
- I pick some ridiculous color so things are obvious:
![]()
- The solid fill covers the whole image and I can't figure out how to mask the solid layer....I thought it would be obvious, but I tried changing the opacity so I can see the underlying house, then making a selction (with the color layer highlighted) but the typical "mask layer" button has turned to "vector mask" which doesn't seem to do what I want (i.e. mask the an area so that color it is not blue).
Getting close I know it!
By @saladsamurai
As per your screenshot there already is a Layer Mask; so you could delete that and apply the Selection or fill the Mask with black with the Selection, deselect and invert.
Find more inspiration, events, and resources on the new Adobe Community
Explore Now