- Home
- Photoshop Elements
- Discussions
- Re: Printing a 5x7 photo on an 8.5x11 sheet of pho...
- Re: Printing a 5x7 photo on an 8.5x11 sheet of pho...
Copy link to clipboard
Copied
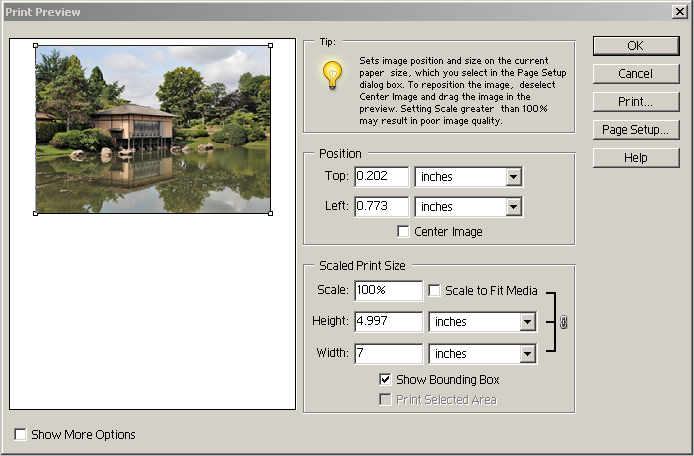
I am attempting to print a 5x7 photo on an 8.5x11 sheet of photo paper. What I want is to be able to orient the photo in a landscape position and the paper in a portrait position, and place it at the top of the page so that I can later print another 5x7 photo below it on the same sheet. No matter what I select, it always places the 5x7 in the same orientation as the sheet of paper, and I cannot figure out how to change the bounding box so the I can orient the photo differently on the sheet. I hate to waste all that perfectly good (and expensive) photo paper.
I am using Elements 9 with an Epson Stylus Photo R3000. Thanks for any help you can give me.
 1 Correct answer
...
frannie flo wrote:
I am attempting to print a 5x7 photo on an 8.5x11 sheet of photo paper. What I want is to be able to orient the photo in a landscape position and the paper in a portrait position, and place it at the top of the page so that I can later print another 5x7 photo below it on the same sheet. No matter what I select, it always places the 5x7 in the same orientation as the sheet of paper, and I cannot figure out how to change the bounding box so the I can orient the photo different
Copy link to clipboard
Copied
frannie flo wrote:
I am attempting to print a 5x7 photo on an 8.5x11 sheet of photo paper. What I want is to be able to orient the photo in a landscape position and the paper in a portrait position, and place it at the top of the page so that I can later print another 5x7 photo below it on the same sheet. No matter what I select, it always places the 5x7 in the same orientation as the sheet of paper, and I cannot figure out how to change the bounding box so the I can orient the photo differently on the sheet. I hate to waste all that perfectly good (and expensive) photo paper.
I am using Elements 9 with an Epson Stylus Photo R3000. Thanks for any help you can give me.
- Go to File>new>blank file. Enter the paper dimensions, background white (or to suit), resolution the same value as that of the picture files.
- Crop picture A to 5x7, then copy/paste A to the blank file
- Crop picture B to 5x7, then copy/paste B to the blank file
- Use the move tool to position A & B
- You should have 3 layers: Background layer, Layer with A, and Layer with B
Copy link to clipboard
Copied
Thanks Halstead...that would work, but it's a little more time consuming than I would like.
Meanwhile, I did find another solution that worked as well. I discovered I could select half-sheet (8.5x5.5) for my printer, so I just cut my paper in half and I can easily get 2 5x7 prints from 1 sheet of paper.
I still don't understand why PE thought it a good move to no longert allow you to orient a photo any way you like on a sheet of paper!
Thanks for your suggestion!
Copy link to clipboard
Copied
You're welcome. Glad to help.
Sent from my iPad
Copy link to clipboard
Copied
In my ancient PSE2 I can do File > Print Preview , uncheck the Center Image box, and drag the photo to the top of the page.
Then later do the other photo moving it to the bottom.
Has this capability been removed in PSE9? I would be shocked!

Copy link to clipboard
Copied
Unfortunately, in PSE9 someone in their infinite wisdom decided not to allow that function anymore. Now the photo comes up in a bounding box that you can drag up, down, left or right but it cannot be rotated. Best solution seems to be to print on a half-sheet (5.5x8.5) in custom size. Then you can cut your 8.8x11 paper in half and just run it through on that. Gotta print twice, but at least you can use the full sheet of paper.
Thanks, Fran www.franmadecards.com - Web Page
Copy link to clipboard
Copied
Can't you just rotate the photo 90 degrees so that it is horizontal before you print it, or does PSE9 not allow you to do even that?

Copy link to clipboard
Copied
Not even that! If you select rotate, it rotates the paper and the bounding ox, but leaves the photo as is, so now you have a photo that is cut off top and bottom (or left & right, depending on what position you started with).
www.franmadecards.com - Web Page
Copy link to clipboard
Copied
That's why I am still on Elements 2 ![]()
Copy link to clipboard
Copied
I love how Epson assumes you have a Master's degree in photo/printer adjustments. I waste more printer paper...
Get ready! An upgraded Adobe Community experience is coming in January.
Learn more