- Home
- Photoshop ecosystem
- Discussions
- Cleaning dust and scratches from scanned slides.
- Cleaning dust and scratches from scanned slides.
Cleaning dust and scratches from scanned slides.
Copy link to clipboard
Copied
I have Photoshop 7. I used to be able to click an area of a scanned slide that I then could impose on a dust spot or scratch to fix it. Now I can't seem to find the right tools/steps to do this. Please tell me the procedure. Thank you.
Explore related tutorials & articles
Copy link to clipboard
Copied
Hi if you post your image here we can guide you easily...regards
Copy link to clipboard
Copied
I believe you are referring to the Spot Healing Brush. After adjusting the brush size (via keyboard square brackets), click on the dust spot or small scratch.
Copy link to clipboard
Copied
Norman, was there a Spot Healing Brush in PS7 or was that the version that both the Healing Brush and Patch tool were introduced?
~ Jane
Copy link to clipboard
Copied
According to Wikipedia, the Spot healing brush was introduced in CS2 (version 9), so I think the OP has to use the Clone stamp tool.
Retouching scanned film can be extremely time consuming, and the Spot healing brush makes this so much faster and easier, so I think a subscription to the Photography plan would be well worth the money.
Copy link to clipboard
Copied
@Per Berntsen wrote:
According to Wikipedia, the Spot healing brush was introduced in CS2 (version 9), so I think the OP has to use the Clone stamp tool.
According to my memory and to this chart, the Healing Brush was first available in 7.0. The OP, @Romana5FEE , can tell us for certain. I think the Patch tool was also introduced in 7.0, but it wasn't popular until it got other uses in later versions. These are both gentler options than the Clone Stamp tool — which may still have been called the Rubber Stamp tool in 7.0.
~ Jane
Copy link to clipboard
Copied
Jane: Beats me.
Copy link to clipboard
Copied
If you go back enough years you may recall a technique for getting rid of dust and small scratches that involved the use of the History Panel and the History Brush Tool. The process takes longer to describe than to do.
- Cmd+J to make a duplicate layer
- Filter > Blur > Gaussian Blur. Move the slider slowly until the dust disappears.
- Choose the History Panel and move the History Brush symbol to the bottom step: the one that reads Gaussian Blur.
- Choose the step directly above it. All the blemishes will reappear.
- In the Tools panel choose the History Brush.
- Adjust the History Brush size and tap on each blemish or close group of blemishes. Don't drag it across large areas. It will blur the image.
- Flatten the file.
Copy link to clipboard
Copied
That's clever, Norman!
~ Jane
Copy link to clipboard
Copied
Thanks, @jane-e . Being old has its advantages.
I found it helps if you change the setting in the Options bar to Darken to fill a light blemish, and change to Lighten to correct a dark blemish. It limits the affected area. Not a must, but helpful.
Copy link to clipboard
Copied
@Norman Sanders wrote:
Being old has its advantages.
I love this method, @Norman Sanders ! With your years, you also have a vast amount of knowledge which you are always so willing to share with all of us here on the forums!
~ Jane
Copy link to clipboard
Copied
@jane-e Here's another goodie relating to this technique.
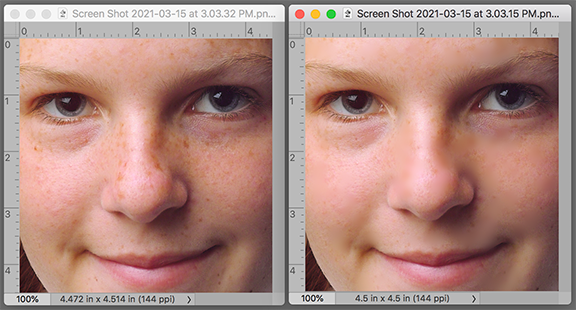
Freckles are darker than the skin surface. By setting the Options bar to lighten, when you use this technique you can eliminate freckles . It takes very little time. (Frankly, I think a face without freckles is like a sky without stars, but, for what it's worth, here is the tecnnique.)
Copy link to clipboard
Copied
That works well, Norman, and I'll give it a try. One of my sisters was a red-head with a face full of freckles. It's a beautiful shade of silvery white now, but she still has the freckles!
~ Jane
Copy link to clipboard
Copied
One of my favorite ways to eliminate dust was to use dust and scratches on a separate layer. Make it the setting eliminate the dust, but bring back the grain. This will mess up the images fine detail. So add a black mask to the dust and scratches layer, then, with a white brush, paint away the dust, being careful to avoid the fine detail areas.
Find more inspiration, events, and resources on the new Adobe Community
Explore Now


