Exit
  • Global community
    • Language:
      • Deutsch
      • English
      • Español
      • Français
      • Português
  • 日本語コミュニティ
  • 한국 커뮤니티
0

Eraser Tool erases outside of selections.

New Here ,
Nov 08, 2018 Nov 08, 2018

My eraser tool bleeds out of my selections, I have Select -> Feather set to 0.1

Pictures below for example.

I am going insane, please someone help me.

Capture.PNG

Capture2.PNG

5.7K
Translate
Report
Community guidelines
Be kind and respectful, give credit to the original source of content, and search for duplicates before posting. Learn more
community guidelines
Adobe
Community Expert ,
Nov 08, 2018 Nov 08, 2018

Please post the name of the program you use so a Moderator may move this message to that forum

-A program would be Photoshop or Dreamweaver or Muse or Premiere Pro or ???

Translate
Report
Community guidelines
Be kind and respectful, give credit to the original source of content, and search for duplicates before posting. Learn more
community guidelines
New Here ,
Nov 08, 2018 Nov 08, 2018

This is in Photoshop

Translate
Report
Community guidelines
Be kind and respectful, give credit to the original source of content, and search for duplicates before posting. Learn more
community guidelines
Adobe Employee ,
Nov 16, 2018 Nov 16, 2018

Moving to Photoshop​

Translate
Report
Community guidelines
Be kind and respectful, give credit to the original source of content, and search for duplicates before posting. Learn more
community guidelines
Community Expert ,
Nov 16, 2018 Nov 16, 2018

Try resetting the preferences and/or tools.

Translate
Report
Community guidelines
Be kind and respectful, give credit to the original source of content, and search for duplicates before posting. Learn more
community guidelines
Community Expert ,
Nov 16, 2018 Nov 16, 2018

The marching ants do not show the selection, they represent the threshold of 50% selected. Since selections are 256 levels there are 128 levels of selection inside and 128 levels selection outside the marching ants. If you want to see the selection better enter pick mask mode, or endure Select and mask workspace where you can better understand the non binary selections by viewing them as a mask or quickmask etc.

Translate
Report
Community guidelines
Be kind and respectful, give credit to the original source of content, and search for duplicates before posting. Learn more
community guidelines
Community Expert ,
Nov 16, 2018 Nov 16, 2018

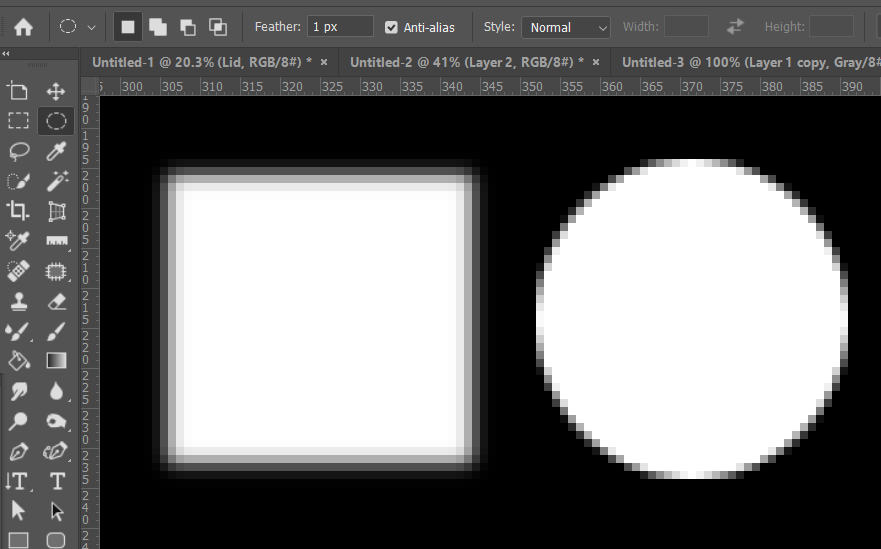
It's difficult to assess this without knowing the zoom level, but that does look to be more bleed than you'd expect.  With angled and curved lines, you'd see some anti alias effect, but on square to canvas bounds, you should see a clean edged.  The screen shot below is zoomed in to 800% and shows zero bleed on the square selection, and barely any on the round.

So you have to take account of what Lukas has said, and think about how the selection was made?

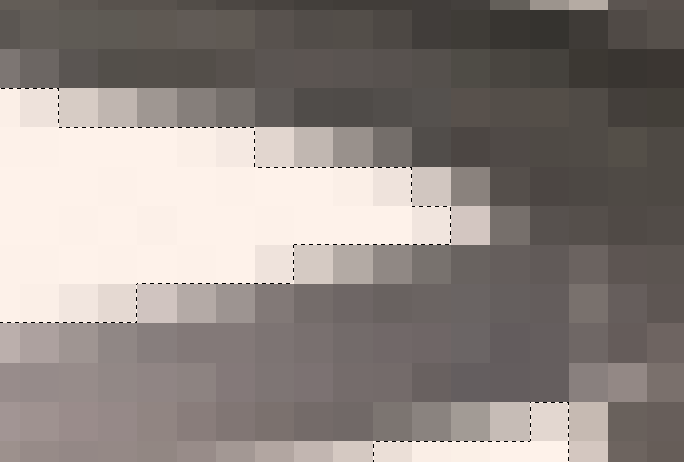
If it was with the Marquee tools, then I'd check the Options bar for feather.  A i pixel feather produces this (same zoom ratio)

If the selection was made with Quick Select, Magic Wand, Colour Range, Focus etc. then all bets are off.

Translate
Report
Community guidelines
Be kind and respectful, give credit to the original source of content, and search for duplicates before posting. Learn more
community guidelines
New Here ,
Nov 19, 2018 Nov 19, 2018

Anti-alias is turned off, my feathering is set to 0. I believe this particular selection was made utilizing colour range. Does this mean that if I want to make a clean edge I have to use the marquee tools?

Translate
Report
Community guidelines
Be kind and respectful, give credit to the original source of content, and search for duplicates before posting. Learn more
community guidelines
LEGEND ,
Nov 19, 2018 Nov 19, 2018
LATEST

The easiest way to see how the edges of your selection look is Quick Mask (Q key) and zoom in. If there is feathering, you'll see it there.

Translate
Report
Community guidelines
Be kind and respectful, give credit to the original source of content, and search for duplicates before posting. Learn more
community guidelines
Community Expert ,
Nov 17, 2018 Nov 17, 2018

Photoshop by default use the Anti Alias technique. Anti Aliasing is a software technique for diminishing jaggies - stairstep-like lines that should be smooth.

To have the accurate selection without edge smoothing / anti aliasing, make sure that you have anti-alias unchecked and feather set to [0] .

Capture.JPG

Feathering also add pixels from outside your selection depending on the value of it.

Translate
Report
Community guidelines
Be kind and respectful, give credit to the original source of content, and search for duplicates before posting. Learn more
community guidelines