

- Home
- Photoshop ecosystem
- Discussions
- How do I fade the edge of a picture into the backg...
- How do I fade the edge of a picture into the backg...
How do I fade the edge of a picture into the background?

Copy link to clipboard
Copied
I am using the trial of PhotoShop and am learning web design. I would like to know how to fade the edges of a picture so that they gracefully transition to the background color. Allow me to illustrate:
Here is a stock photo of a kind man I purchased online and as you can see, he's sitting on top of a light blue background of my web page:

I want to provide a smoother color transition at the horizontal edges, maybe near his right elbow and left hand so that the color transitions more gradually into the background. To see what I'm trying to accomplish, navigate to http://unBounce.com and scroll down to the third band where you see an Asian man explaining something. See how the horizontal edges nicely blend into the blue background? That's what I'm trying to accomplish. I realize that the Asian photo is doing some other sophisticated and cool things like blurring the background. I don't need anything that fancy. I just want to have better edge transition via blurring or some other technique.
Sorry for the rudimentary nature of this question. Thanks!


Explore related tutorials & articles
 16
Replies
16
16
Replies
16

Copy link to clipboard
Copied
To fade the edged, you need to make your original file able to have transparency.
holding the alt/opt key, double click on the thumbnail of the background layer to change it to a regular layer.
Add a layer mask by clicking on the mask icon in the layer's pallet.
Set your foreground color to white and you background color to black.
Select the gradient tool and use the foregound to background , and choold linear gradient. Also set the tools blend mode to multiply.
select a distance into your image to start the gradient and then drag out to the edge holding down the shift key. Do the same on the other side.
save your file for web using png-24.
Copy link to clipboard
Copied
looks like I've got my work cut out for me. I'll give it a whirl (that's just an expression). Thanks for taking the time to read my question.

Copy link to clipboard
Copied
If you follow the above one step at a time, it honestly isn't that complicated. I tried to think of an easier way though.
So you see here the backgound layer has the light blue colour, and the stock image of the mab is on the layer above.
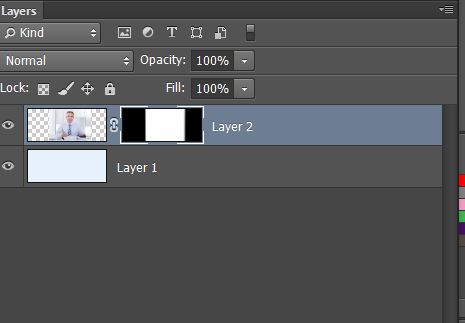
If you Ctrl (Cmd) click Layer 2 to load it as a selection, and then click on the Layer mask icon (third from left at bottom of Layers panel) you will have a layer mask that looks the image above.
Now select the paint brush, and with Black as the foreground colour, a size of about 50 pixels and Hardness set to 0%, draw down each side of the black/white intersection in the layer mask. Hold down the Shift key to force the brush to a vertical straight line.
You need to have less than half the brush width intrude into the white of the mask.
Note: The layer mask should have a thick white line round it (as above). Otherwise you will paint on the image itself.
Good luck.

Copy link to clipboard
Copied
I don't disagree with either csubele or Trevor - however a bit of an update (excuse the pun) since the update before last you no longer need to alt/opt click to convert a background layer to a regular layer. You only need to click on the padlock (with no modifier key) - that is as long as you are using CC.
Copy link to clipboard
Copied
I am not completely sure if I like that particular JDI. Of course, it is hard to go back and test the 'before' state, but it feels too easy to actually delete the BG layer now. That also feels like a nonsensical thing to say, because why the heck would you delete _any_ layer inadvertently, but my intuition tells me there's a compromise going on.
Copy link to clipboard
Copied
Completly agree that there should be a way to either turn on or turn off the default behavior for this "feature". But it is there.
Copy link to clipboard
Copied
I like the single click to change a background layer to a regular layer, but the other method still works with all versions of PS including CC.
Copy link to clipboard
Copied
Thanks so much for the help, everyone. It's much appreciated!
The approach I ended up using was:
If you take the raw picture of the man as originally downloaded from Shutterstock, you can create a background layer with the color #e8f5ff and let the picture layer sit on top of it. Then, with the picture layer selected, you can set the foreground color to #e8f5ff and choose the gradient tool -- placing it in the mode of "foreground to transparent." On the left edge I create the gradient by dragging to the right and on the right edge I create the gradient by dragging left.
What you end up with is this:

You can see that as opposed to the version of the picture in my original post, the image fits nicely on my web site's #e8f5ff background.
Thanks again for pointing me in the right direction!
Copy link to clipboard
Copied
That's a nice presentation - good job.
-Noel
Copy link to clipboard
Copied
Reminds me of 'Back to the Future' where people faded out of a photograph when history was changed. But I guess even Chuck's method in post #1 is easier than building a time machine. I mean where would you even get the DeLorean
from noawadays?
Copy link to clipboard
Copied
Here, of course: http://delorean.com/
-Noel
Copy link to clipboard
Copied
[croaky voice]
I wasn't going to post this, because it took me years to get right, and I thought you'd have forgotten about it, but I thought 'What the heck?'. Programmed February 24th, all those years ago back in 2014, and the thread was still there. BTW Adobe customer support still sucks in 2024  .
.
[\croaky voice]
Copy link to clipboard
Copied
I recognize Doc (Russell) Brown's hair. 
-Noel
Copy link to clipboard
Copied
You graphic design types have a better sense of humor than the programmers usually deal with at StackOverflow.
Copy link to clipboard
Copied
You might be surprised to know I'm a software engineer, gooberHead.
But I do have to have a good sense of humor - I'm running Windows 8.1.
-Noel
Copy link to clipboard
Copied
Brush set from a recent thread. Well worth downloading
http://castrochew.deviantart.com/art/Skin-and-Hair-Texture-Brushes-256198997

Find more inspiration, events, and resources on the new Adobe Community
Explore Now
 AdChoices