

- Home
- Photoshop ecosystem
- Discussions
- how to add a flat texture to an angled photo
- how to add a flat texture to an angled photo

Copy link to clipboard
Copied
Hi,
Let's say I have a photo of food shot at 45 degrees and a downloaded flat texture.
How do you manipulate the texture to match the angle of the photo?
Thanks,
Michael
CS6 64 bit


 1 Correct answer
Vanishing Point, maybe?
Quick rundown:
- Make sure the food image is at the top of the layer stack. Create a new layer and place it underneath the food image.
- Copy the texture to the clipboard. (It doesn't have to be part of the document; it can be a document by itself.)
- Select the new layer. Use Filter > Vanishing Point on the menu bar.
- Create a plane that matches the food image. (A "legal" 3D plane will show itself as blue.) Paste the texture (using Ctrl/Cmd + V) into Vanishing Point.
- Move the texture
Explore related tutorials & articles
 16
Replies
16
16
Replies
16

Copy link to clipboard
Copied
Perspective warp may work:
Copy link to clipboard
Copied
But how to use it in this context?
Michael

Copy link to clipboard
Copied
It helps enormously if you have a rectangular reference in the image, whether that be the plate/platter the food is on, or the table it is sat on. In this case the corners were cropped, but laying a work path on the plate makes it easy to locate the shape and corners,
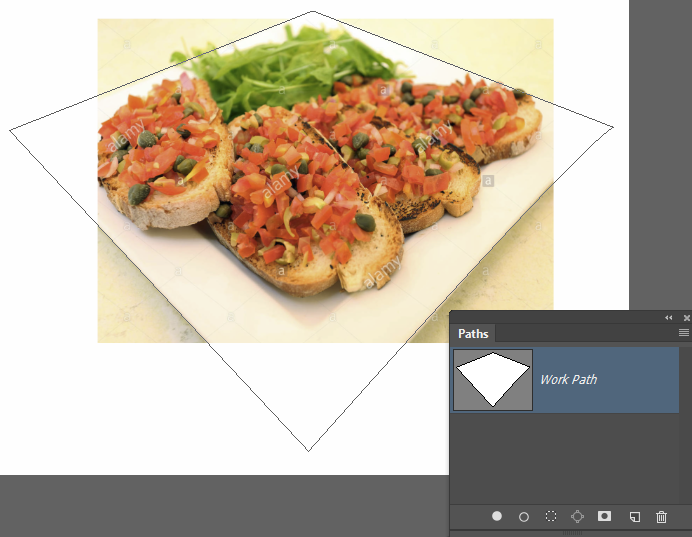
The trick with the texture is to make it a Smart Object. Transform to match the perspective of the plate table. If you need to adjust it, being a Smart Object means that the corner handles will remain at the original location relative to the texture image, and not default to a new rectangle around the new shape.
Copy link to clipboard
Copied
I will try that!
Thank you!
Michael

Copy link to clipboard
Copied
Hi
Select the layer of the texture, Edit > Transform (try Skew or others)
See others response.
Pierre
Copy link to clipboard
Copied
Vanishing Point, maybe?
Quick rundown:
- Make sure the food image is at the top of the layer stack. Create a new layer and place it underneath the food image.
- Copy the texture to the clipboard. (It doesn't have to be part of the document; it can be a document by itself.)
- Select the new layer. Use Filter > Vanishing Point on the menu bar.
- Create a plane that matches the food image. (A "legal" 3D plane will show itself as blue.) Paste the texture (using Ctrl/Cmd + V) into Vanishing Point.
- Move the texture into the plane. The texture should "snap" into the plane. You can use the tools at the left to adjust. Click OK once done.
From there, it's a matter of layer masks if you need to clean up. (e.g., Masking the food to reveal the texture underneath.)
Copy link to clipboard
Copied
Thanks
and @Trevor.Dennis too 😉
I have really only used PS for photo stuff so I got lost at .. but am very willing to learn 😉
"Create a plane that matches the food image. (A "legal" 3D plane will show itself as blue.) Paste the texture (using Ctrl/Cmd + V) into Vanishing Point".
I had already made a rough copy of the food to play with and include it with a background.
If you have time and incentive please detail the above step.
Thank you,
Michael


Copy link to clipboard
Copied
Sure. Gimme a few. I'll edit this post when I come back with the results.
ON EDIT:
When I initialized Vanishing Point, I said to myself, How would the food look on a table? The plane represents that part of the "table" (it doesn't have to perfect; just enough to "sell" the idea). I then proceeded to place and adjust the plane to extend beyond the image (because...well...the image has part of something we can't really see otherwise):

Next, Ctrl/Cmd + V and a move into the plane:

Then, click the Transform Tool and move the Northeastern handle outward; I then clicked OK:
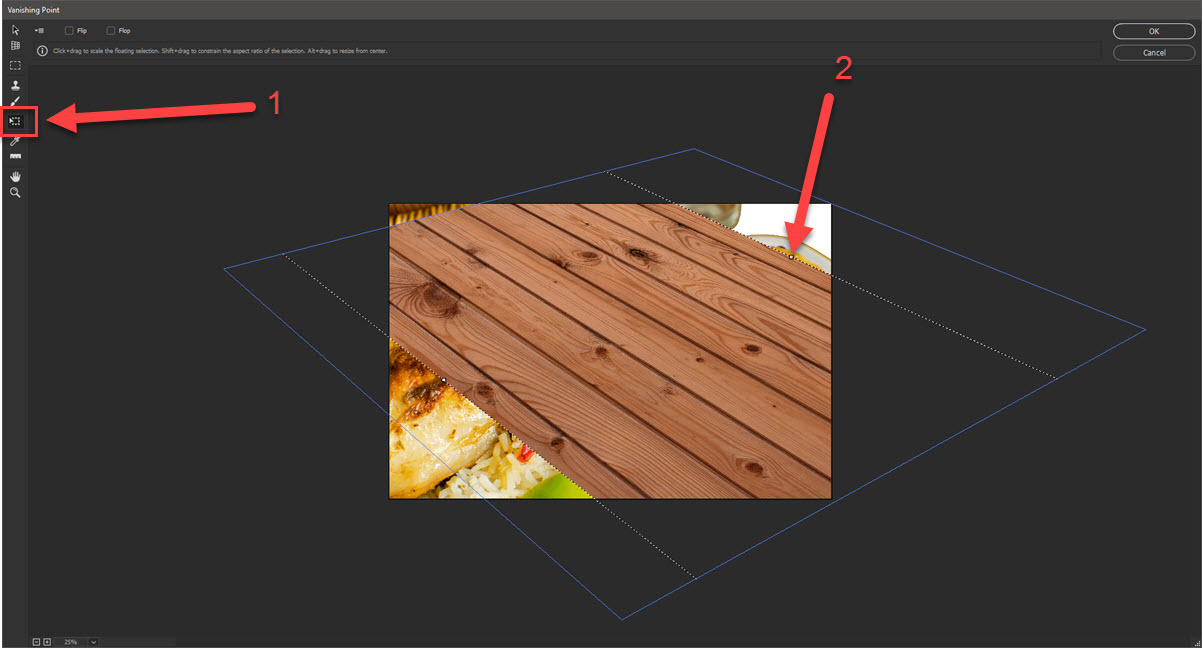

How it looks back in the workspace:
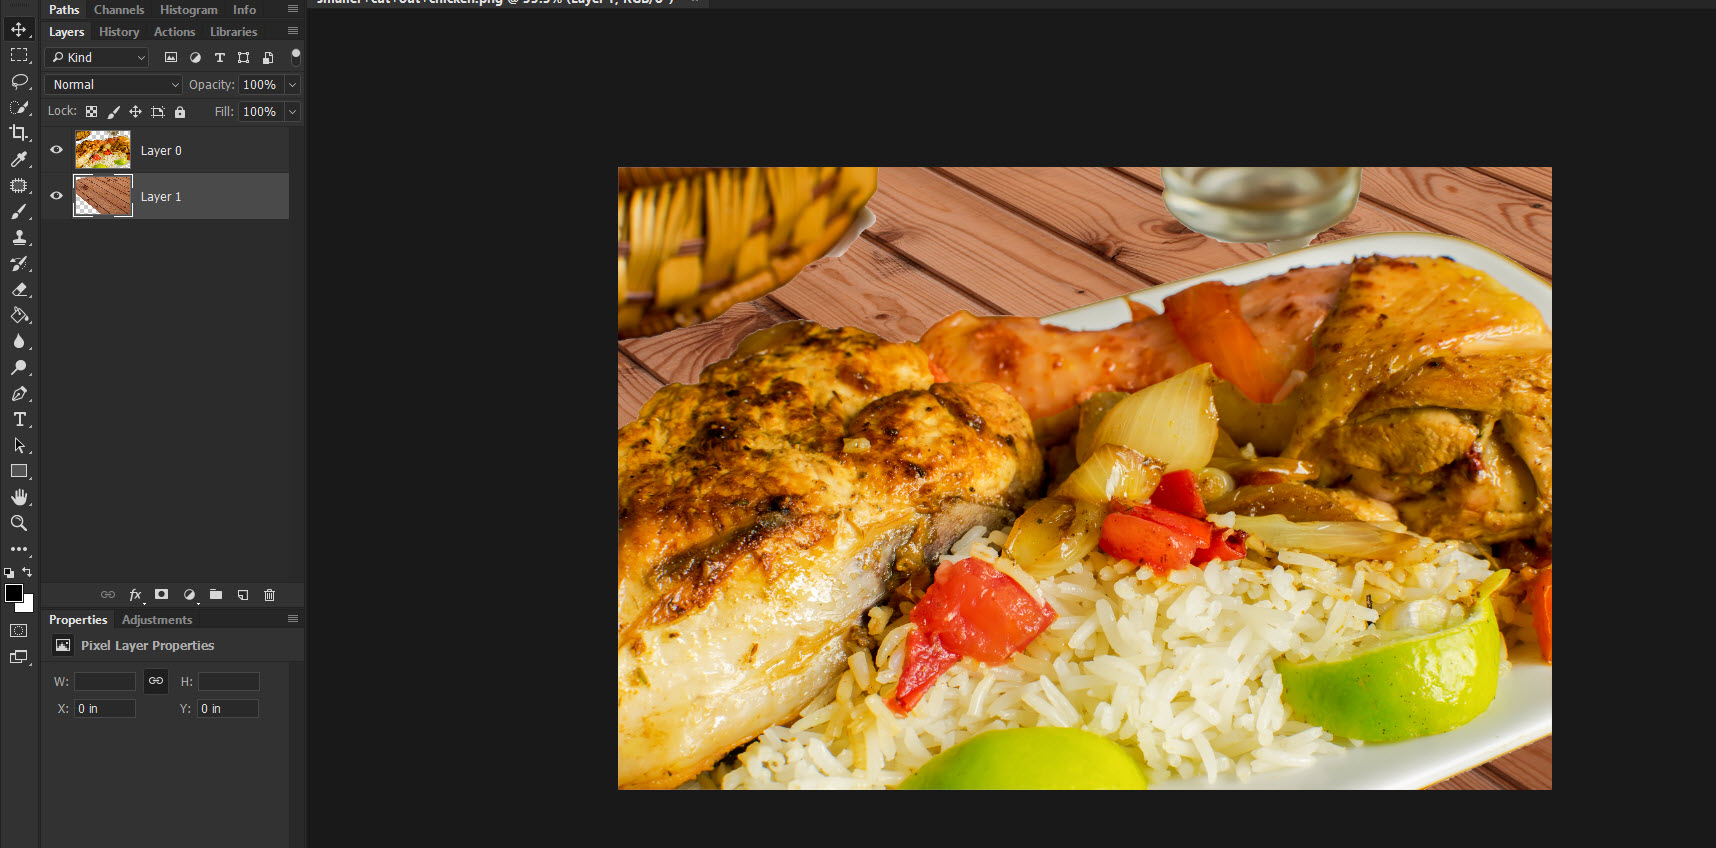
Now, if you wanted the "grain" to go the other way, you'd just rotate the "table" texture using the Transform Tool. You also have the option of stretching out the texture more if you want it to cover a wider area, but be careful because of resolution. Also, to complete the idea, you'd probably want to create shadows underneath the items like the glass and the plate and basket. Might even need a curve adjustment for the texture.
Copy link to clipboard
Copied
Thanks very much.
I will try your way and also what Trevor.Dennis posted too.
Good to learn different techniques.
Michael
Copy link to clipboard
Copied
Ok I had a try.
Have no intention of using this as the original background is much better 😉
Two issues.
My perspective doesn't look correct.
And I had to stretch the background (holding shift key down) but maybe it would be have been better to have made the background the same size as the photo before using it?
Thanks for any help,
Michael

Copy link to clipboard
Copied
Which method are you using? Trevor's or mine? (Either should work in this case as there's isn't too much angling going on.)
Looks somewhat convincing; the plate needs a shadow. The table looks like it could angle a little more to match the plate.
Try this (if you can): Take a picture of a plate resting on a surface that has a definitive pattern at a similar range and angle that you can use for reference, and then use that to roughly match what you're trying to do here.
The larger the texture, the better as you'll have more wiggle room to work with. Try to use images that are at least close to matching resolutions so there are no surprises. You can use the Image > Image Size command to remedy this. (e.g., If the plate is a 72 DPI image and try to bring in a 300 DPI texture, the texture's going to be much smaller in appearance.)
Copy link to clipboard
Copied
I used yours although I can seen the simplicity of doing it Trevor's way.
I wanted to learn a little about vanishing point,
Thanks for the tips and I will try the experiment.
Michael
Copy link to clipboard
Copied
In this case I suspect you are over thinking it. Assuming you want to place the food on the wood table, and not apply a wood texture to the food because that would be silly...
You have the semblance of two guidelines those being the long sides of the plate, so you just need to line up the texture with those sides.

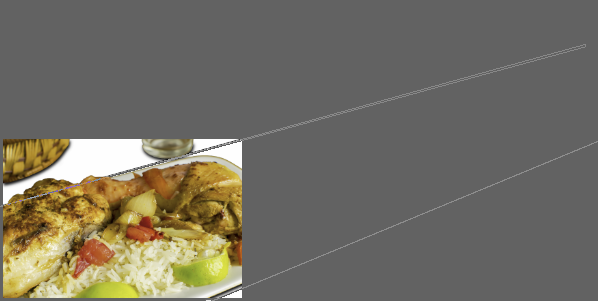
There is some perspective in the shot, but it is not enough information to create an accurate 'Vanishing Point', and it would be so far out of shot that you could easily ignore it. If you have cropped the food image and have more information to work with, then create the perspective lines as shown below, and transform the wood to align with the guides. (Hold down Ctrl [Cmd] key and drag the corner points)
BTW you appear to have a colour profile miss match with the wood texture, which opens desaturated in Photoshop. It's not my area of expertise though, so hopefully someone else can help you with that.
Copy link to clipboard
Copied
Thanks
I will try your way and Warunicorn way too.
Good to learn different ways.
Michael
Copy link to clipboard
Copied
Wishing you happiness, health, wisdom and wealth !

Copy link to clipboard
Copied
Hi Michael,
Adding a flat texture to an angled photo can be a creative way to enhance your image. In Adobe Photoshop CS6 64-bit, you can achieve this effect by following these steps:
- Open both your angled food photo and the flat texture in Photoshop.
- Start with the angled food photo as your base layer. Make sure it's selected in the Layers panel.
- Select the flat texture layer, and then go to "Edit" > "Free Transform" (or press Ctrl+T / Command+T). This will allow you to manipulate the texture's size and angle.
- In the top toolbar, you'll see transformation options. Locate the rotation option (it looks like a small circular arrow). Click and drag this option to match the angle of your food photo. You can also manually enter the angle in degrees if you know the exact angle at which the food was shot.
- Adjust the size of the texture layer to fit your image appropriately. You can do this by clicking and dragging the corner handles while holding the Shift key to maintain the aspect ratio.
- Once you're satisfied with the angle and size, hit Enter (or the checkmark icon in the top toolbar) to apply the transformation.
- To blend the texture with the food photo, change the blending mode of the texture layer. Experiment with different blending modes like Overlay, Soft Light, or Multiply, depending on the effect you want to achieve. You can find the blending mode options in the Layers panel.
- You can also adjust the opacity of the texture layer to control the intensity of the effect.
- If necessary, you can use layer masks to further refine the application of the texture, ensuring it only affects specific areas of the photo.
- Don't forget to save your work by going to "File" > "Save" or "Save As."
By following these steps, you can add a flat texture to your angled food photo and ensure it matches the angle for a visually pleasing and cohesive result.
Best Regards!

Find more inspiration, events, and resources on the new Adobe Community
Explore Now
 AdChoices