

- Home
- Photoshop ecosystem
- Discussions
- Re: How to make scans of Kodak color slides less b...
- Re: How to make scans of Kodak color slides less b...

Copy link to clipboard
Copied
Hi. I'm brand-new to Photoshop. I've never used it in my life. I have to scan quite a few Kodak color slides. I'm using an Epson 12000XL scanner to do this. They're being scanned as TIFFs, 3000dpi, 24-bit color. When I open them up in Photoshop, they could be a lot sharper. How can I make the images sharper in Photoshop? I've attached one sample slide below (as JPG, 3000dpi, 24-bit color). Notice that the edges of everything are kind of blurry. I'm using Photoshop CC 2017, and I'm on a PC. The images will not be printed out; they will be used on a PowerPoint presentation. The person in charge of the project wants them to be at 3000dpi.
Please be kind. I am brand new to this. Many thanks! 


 1 Correct answer


The differences between the two images, differences in local contrast (modeling), tonal range, image sharpness and variety of colors makes the matching the images impossible. For the image above, the reference sample was enlarged and silhouetted and added as a layer above the green image. it is at the bottom of the image and has not been modified. This eliminated the distraction of the surround.
Using Curves and Channel Mixer the color was altered to put it in the ballpark. At this point some of
...Explore related tutorials & articles
 28
Replies
28
28
Replies
28
Copy link to clipboard
Copied
OK the average size of a print is 4" x 6" (or there about). So to see what the actual quality is you take the inch of one side and multiply by the ppi to get your pixel dimension of that side, then repeat.
4 x 3000 = 12000 px
6 x 3000 = 18000 px
An 12000 x 18000 pixel image is more than enough for a print.
So if it is blurry I would say it was due to the camera and more than likely because it was not on a tripod and the camera set to the proper settings for the scene.
It could also be from a low quality lens, especially if the camera was a point and shoot style.
The film it self could also be an issue.
But from what I am seeing, I don't think the issue is the setting from scanning.
Just my opinion. I have been known to be wrong before, so...
Copy link to clipboard
Copied
Wow, I didn't know that was how you calculated pixels. Many thanks!!!
Yeah, these photos were taken in the 1970s and early 1980s....and I suspect not the sharpest cameras were used.
Copy link to clipboard
Copied
- 3000 dpi makes no sense, as the physical resolution is only 2400x4800.
- do not use sharpening when scanning, except if you know what to do.
- use dust removel only, when done in hardware.
- mechanically clean your slides before scanning.
- colour depth should be probably 16bits per channel.
- make sure the slides are plane on the scanner, when scanning. Not all scanners allow for that easily.
I scanned my slides with a special slide scanner.
The slides may be blurry, because of the camera used, the film used, the film grain, the processing and they may be further detoriated due to aging.
I do not see your test picture exceptional blurry. Infact we tend to look at the picture at a 100% of the pixel size. You should downsample to the projection size and mount into a powerpoint and project that to see how this works out.
A different thought: At the time, pictures where not as sharp and colour pinched as today. We really fast adopted the special digital style.
Copy link to clipboard
Copied
Here is a great article about digitizing slides that might be helpful.
Copy link to clipboard
Copied
Thanks for pointing to this great article. As the nominal resolution of the scanner is higher than a standard camera, I doubt that the result will be better.
Only for the records: Film grain adds to the visual quality of the pictures. Especially if you know that the source are old film slides or negatives.
Digital noise, yes but not grain. However, scanning software can deal with this.

Copy link to clipboard
Copied
Abambo wrote
As the nominal resolution of the scanner is higher than a standard camera, I doubt that the result will be better.
Scanning a 24 x 36 mm slide at 2400 ppi will produce a 3402 x 2268 pixels image, which is 7.7 megapixels.
I have never used a digital camera to photograph film, but I would have thought that a 24 megapixel camera with a high quality macro lens would outperform a mediocre flatbed scanner easily.
The Epson 12000 scanner is very expensive, but judging from what I've read on the Internet, it is no better for scanning film than the much cheaper Expression/700/800 series, with which I have quite a lot of experience.
They are quite good for scanning large format film, and reasonably good for medium format. But the optics just aren't good enough for the high magnifications that are required for 35mm.
Copy link to clipboard
Copied
You’re right, I was getting confused by Silkrooster‘s indications for a standard print. Flatbed scanners are pretty bad in scanning film negatives and slides. I have never got good results out of my scanner. I always made fist a print and scanned that one.
Copy link to clipboard
Copied
Sorry for any confusion. But yeah being a 70's or 80's film, it can be hard to get high quality scans. That was why pro's used larger cameras to capture more detail. Since I never used one, I will leave my knowledge on it there.
Copy link to clipboard
Copied
Again sorry, I think I mixed two different people in my reply. I need to look more before typing. LOL.

Copy link to clipboard
Copied
Would it be possible to update the link? No longer valid. Thanks.
Copy link to clipboard
Copied
Hi! Could you explain what you meant by this statement:
3000 dpi makes no sense, as the physical resolution is only 2400x4800.
Also, how do you know the physical resolution is only 2400x4800?
Copy link to clipboard
Copied
2400 ppi (not dpi) is the published resolution of this scanner, so when scanning at a higher resolution (like 3000) you are not recording any more detail than at 2400, and you will not get a sharper image.
Using a dedicated film scanner (like a Nikon or Imacon/Hasselblad) would give you sharper results. But since this only for screen viewing, you probably want to downsize it (use a copy) to maybe around 1900 pixels wide (depending on the resolution of the monitor), and it will look much better at that size.
Copy link to clipboard
Copied
sofias787809 wrote
Also, how do you know the physical resolution is only 2400x4800?
I looked up the specs of the scanner.
Copy link to clipboard
Copied
I want to thank everyone here, --Silkrooster, Abambo, and Per--for answering my questions. I was away from my office with whooping cough right after I posted this questions, which is why I'm so late in responding now. I didn't want anyone to think that I had posted a question and forgotten about it, which would have been so rude!!!
I want to ask each of you a question:
Per-- You said that "you probably want to downsize it (use a copy) to maybe around 1900 pixels wide (depending on the resolution of the monitor), and it will look much better at that size." How do I downsize to 1900 pixels wide? Like, where do I input the number "1900"? Or did did you mean 19,000 by any chance?
Silkrooster-- I think you're absolutely right about the quality of the camera with which these pics were taken. Following your math instructions here:
"OK the average size of a print is 4" x 6" (or there about). So to see what the actual quality is you take the inch of one side and multiply by the ppi to get your pixel dimension of that side, then repeat.
4 x 3000 = 12000 px
6 x 3000 = 18000 px"
Where would the 1900 or 19,000 fit in?
Abambo-- Thank you for the wonderful article on Digitizing Slides
Again, thank you to everyone for taking time out of your schedules to explain super basic things to a beginner. I really appreciate it.
Sofía
Copy link to clipboard
Copied
Per-- You said that "you probably want to downsize it (use a copy) to maybe around 1900 pixels wide (depending on the resolution of the monitor), and it will look much better at that size." How do I downsize to 1900 pixels wide? Like, where do I input the number "1900"? Or did did you mean 19,000 by any chance?
Since you will be using these images for a Power Point presentation on screen, consider the width of the monitor in pixels. 1920 is a common width, which is why I suggested 1900. I would guess that Power Point scales images down to fit in window (don't know, I never used it), but if you do the scaling beforehand, the file size will be reduced. (the image you posted is 3881 pixels wide)
You probably want jpgs for the presentation, so I suggest that you use Save for web, which will create a new version of the image, optimized for screen use. Go to File > Export > Save for Web, and try the settings in the screenshot below. Pay particular attentions to the items marked in red. You could also File > Export > Export As - personally I prefer Save for Web.
If you have a monitor with very high resolution, you might want to use a larger width than 1900 pixels.
Working in Photoshop will be a lot easier if you have a fundamental understanding of how digital images work.
I've written a couple of articles that you may find helpful - What is a digital image? and File formats

Silkrooster-- I think you're absolutely right about the quality of the camera with which these pics were taken. Following your math instructions here:
"OK the average size of a print is 4" x 6" (or there about). So to see what the actual quality is you take the inch of one side and multiply by the ppi to get your pixel dimension of that side, then repeat.
4 x 3000 = 12000 px
6 x 3000 = 18000 px"
Where would the 1900 or 19,000 fit in?
The 3000 number is the ppi, which controls how large an image is printed on paper. For screen use, the ppi is irrelevant.
But if you were to print a 4 x 6" image at 300 ppi, you would need at least 1200 x 1800 pixels, because 4 x 300 = 1200 and 6 x 300 = 1800.
To check the pixel dimensions (as well as printed dimensions at any ppi) in Photoshop, go to Image > Image size.
You could also resize the image here, but in your case I suggest using Save for web.
Copy link to clipboard
Copied
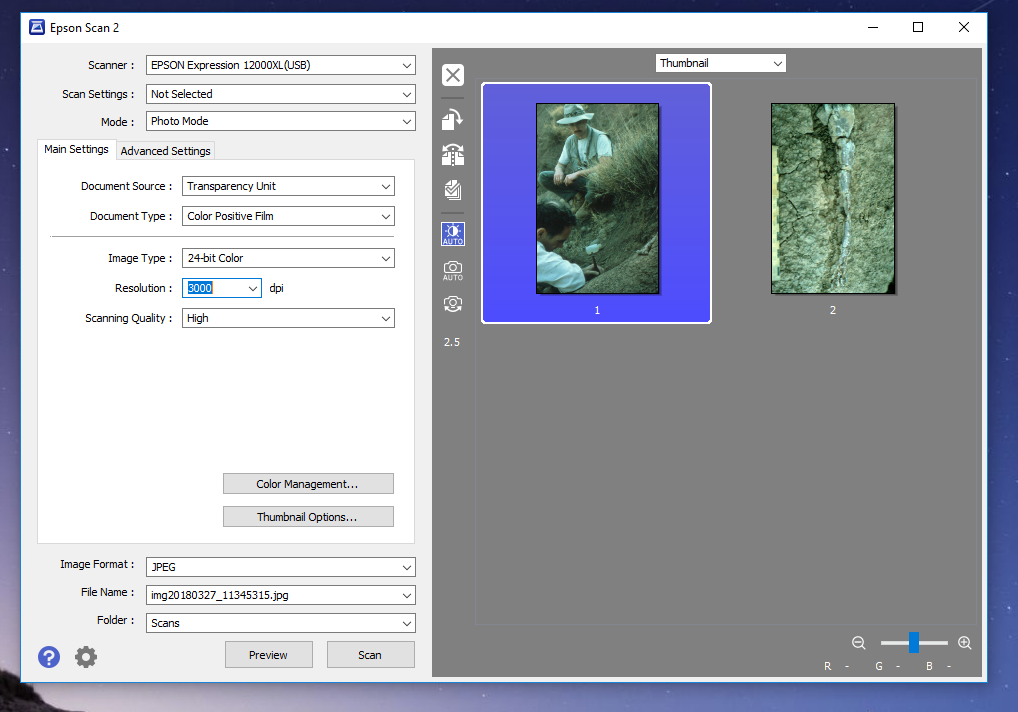
Great. Someone told me that I should be using TIFFs for the powerpoint because they would give the sharpest image. But I quickly found out that makes the file SO BIG it's unmanageable. I'm posting there a screenshot of my scanner settings. I'm going to save these as JPGs, for starters. Should I lower the dpi to 1900 then? And set the Scanning Quality to low?
Copy link to clipboard
Copied
Dpi (which is really ppi) and pixel dimensions are two different things.
You can set it to 2400, which is the max resolution of your scanner.
Do not set scanning quality to low, this will give you an image with lower quality (possibly less sharp).
You should scan as Tiff, but use Jpg in Power Point.
Copy link to clipboard
Copied
Excellent. I'm excited now about this.
I've encountered a bit of a wrinkle. When I try to convert a TIFF to a regular JPG, I get the following question.
What do you suggest I enter for Image Options? 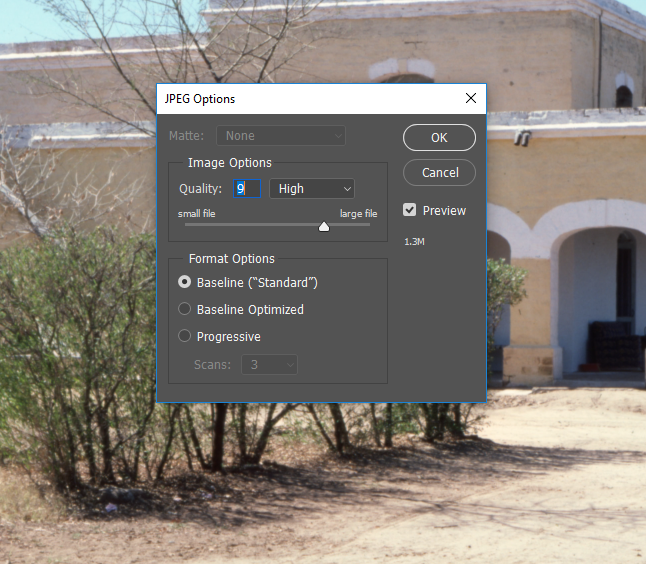
Many thanks!!!!!!!!!!
Copy link to clipboard
Copied
I see that you are using Save as to create the jpg, which is another way of doing it.
But I would recommend Save for web, because you can control all the important options (jpg quality, color management, resizing) in one dialog, and you also get a preview of what the jpg will look like.
The Quality setting in Save as goes from 0 to 12, and Save for web from 0 to 100 - they both do the same thing, but use different scales. So quality 12 in Save as is the same as quality 100 in Save for web.
Jpg uses lossy compression to reduce the file size, which means that there is some degree of quality loss involved.
Setting quality to 0 will result in a very small file, but with obvious compression artifacts.
At max quality the jpg will in most cases be indistinguishable from the original, and the file size will be much larger, but still a lot smaller than the original. So you have to find the right balance between image quality and file size.
Once you have created a jpg, you should not edit it and resave it - jpg is a final format. Repeatedly saving a jpg will reduce image quality. If you need to do some more editing to an image, edit the tiff, and create a new jpg.
Resize the Save for web dialog to full screen, and if you then use the Two up option, you can see a fair bit of the image at 100% view, and see the effect of different quality settings. You can also see the file size below the preview of the jpg.
Always use 100% view (where one image pixel is represented by one screen pixel) to evaluate image quality.
Copy link to clipboard
Copied
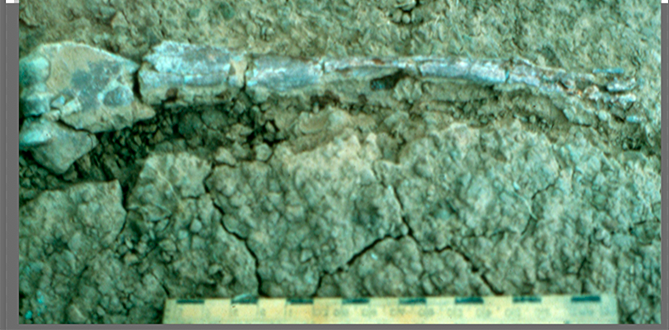
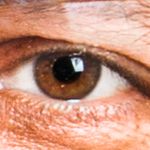
Interesting! But I don't see the "Save for Web" option in my Save options. I only have Save and Save As. By the way, there's a new challenge: the eyedropper. My professor would like me to lift the color of the bone to the far right in the pic below
and apply it to the bone in this pic:

It's the same bone by the way; it just so happens that the second picture is extremely faded, and the first picture shows the true color of the bone when it was found. Now, I know that this does not involve only just one color, but a full gradient of colors. I started by using the magic wand and outlining both bones as best I could. THEN, I used the eyedropper tool to sample some color from the bone in good condition.....but now I don't know how to "insert" that color into the second bone. I went to Lynda Campus, but the videos for doing this are at the intermediate/advanced level, where they talk about 3x3 pixels, hexa-something. Any "simple" recommendations would be appreciated.
I will continue to look for Save for Web feature in the meantime. And again, as always, many thanks.
Copy link to clipboard
Copied
As mentioned in a previous post, Save for web is located under File > Export > Save for web.
I can't help you with the faded image, I never do that kind of work, but I'm sure somebody else can.
It would probably be best if you could post the whole image, and not just a small crop.
Copy link to clipboard
Copied
Thank you. FOUND IT. 
Copy link to clipboard
Copied

The differences between the two images, differences in local contrast (modeling), tonal range, image sharpness and variety of colors makes the matching the images impossible. For the image above, the reference sample was enlarged and silhouetted and added as a layer above the green image. it is at the bottom of the image and has not been modified. This eliminated the distraction of the surround.
Using Curves and Channel Mixer the color was altered to put it in the ballpark. At this point some of the browns are a tad too red, others a tad lacking in red. Contrast adjustment could be made in Lab (L channel) without a color shift and may be needed because all these changes reduced the difference in color of the object from the setting. There have been no local corrections. The setting could be modified on a separate layer, if desired. These notes provide a good start for you on this project. Good luck
Copy link to clipboard
Copied
Wow Norman, This is amazing. I was not expecting anyone to do this, but just give me instructions. Thank you!! And thank you for noting that there have been no local corrections. That's very important.
-
- 1
- 2

Find more inspiration, events, and resources on the new Adobe Community
Explore Now
 AdChoices