
How to Restore a Vintage Photo
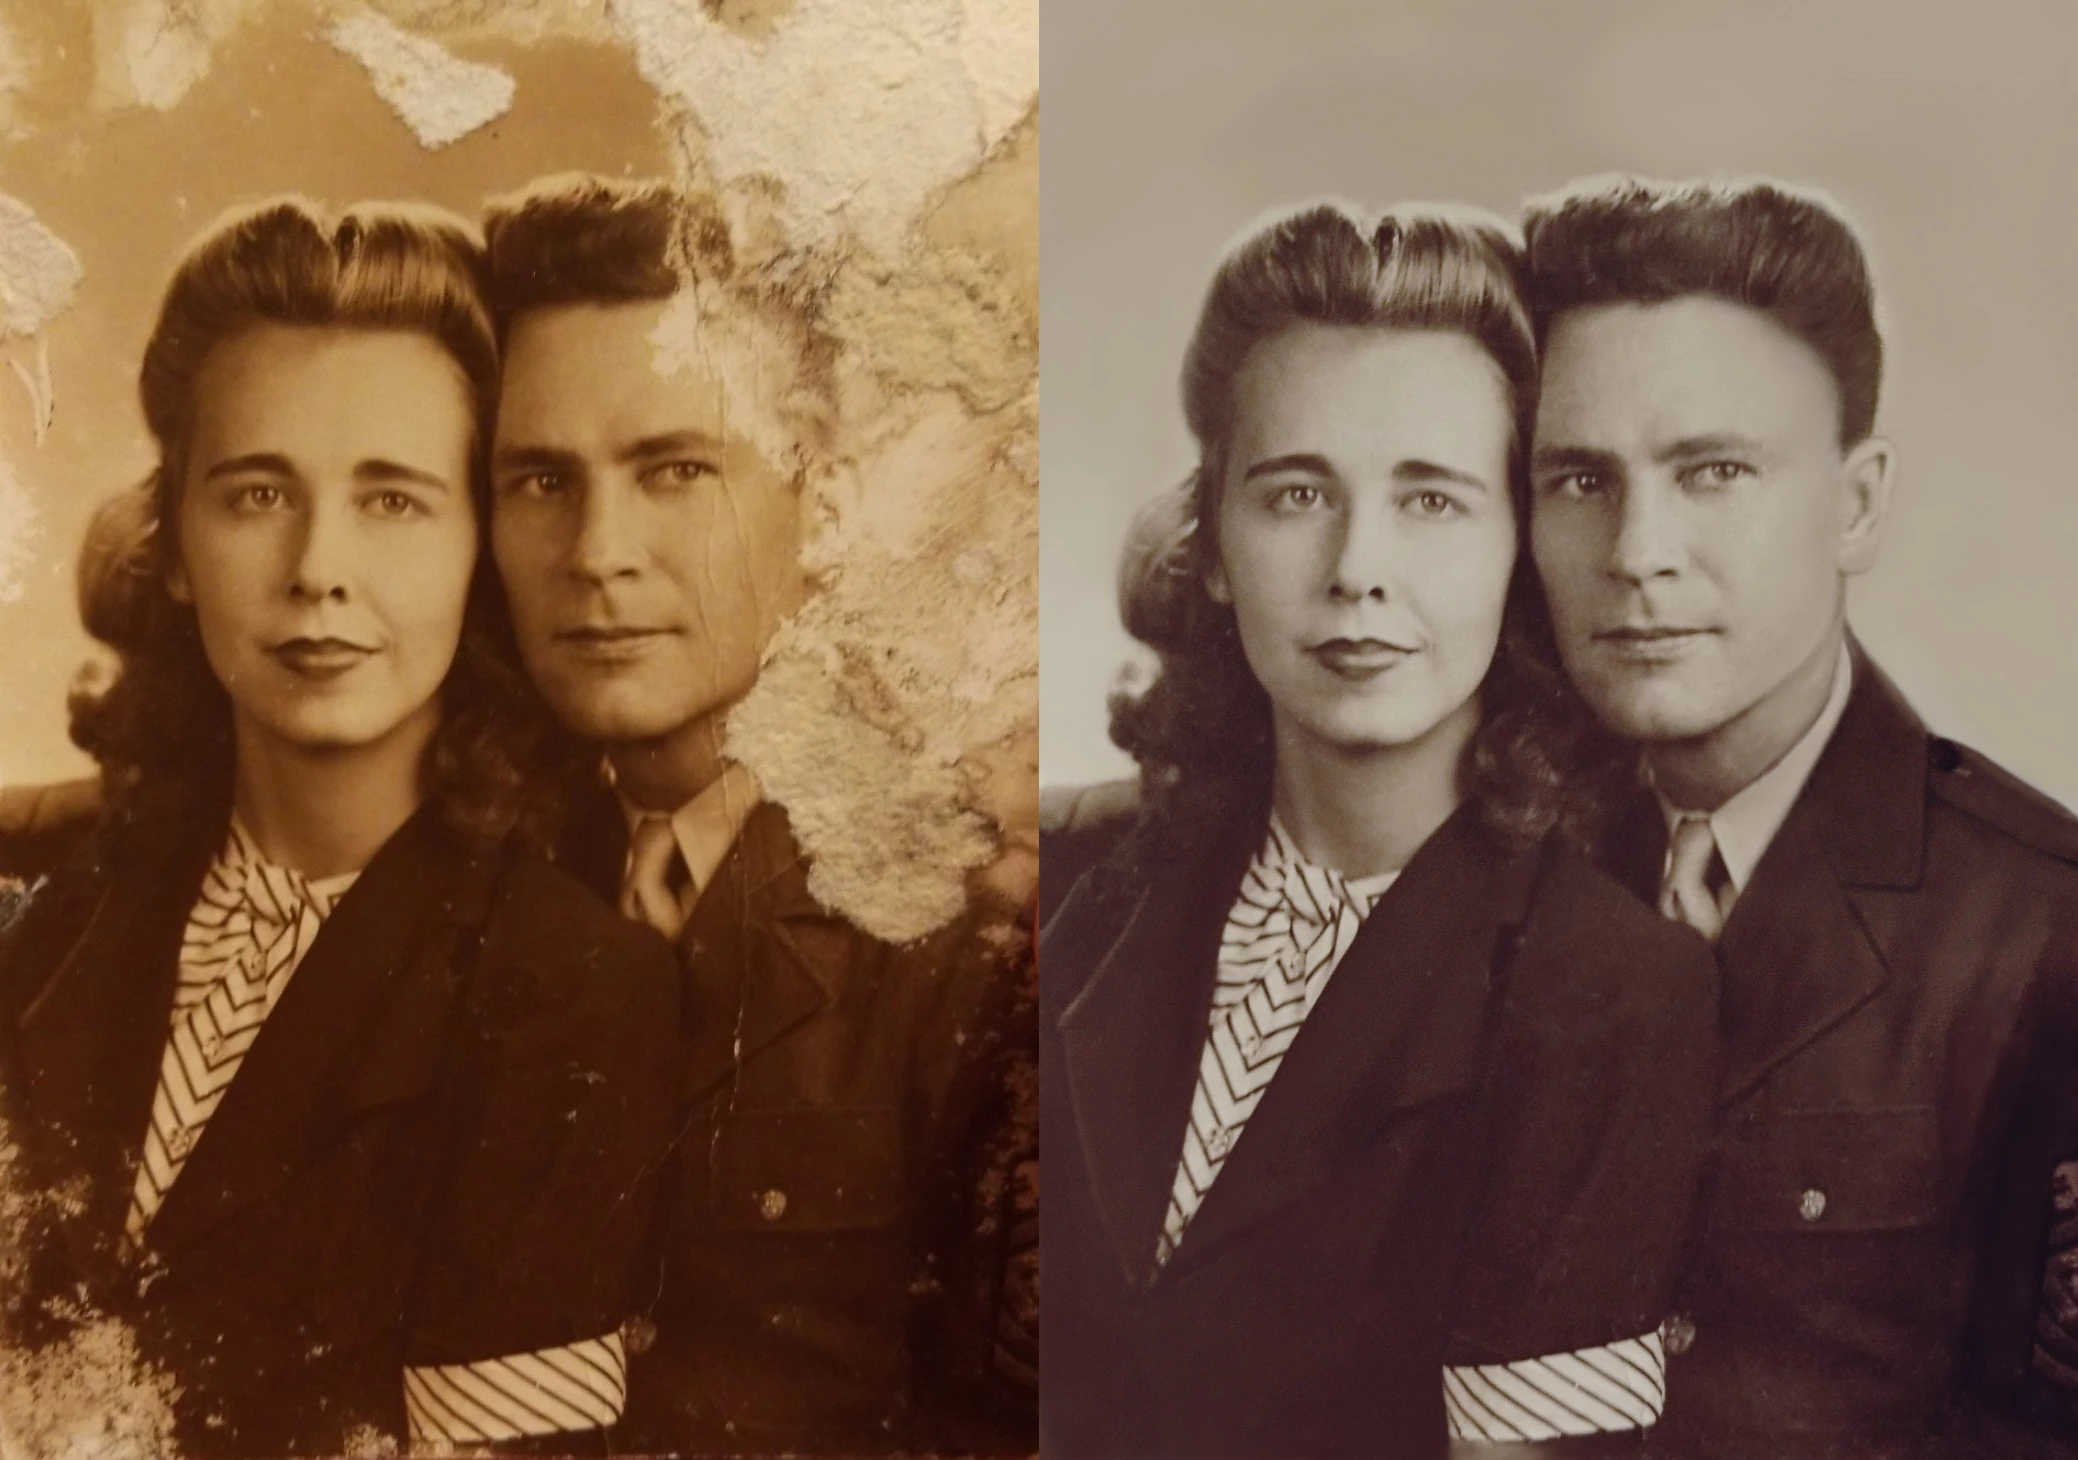
Hi my name is RaDawn and I am a Photographer in a small town in Wyoming. I have done everything from newborns, to real estate, to a UFC fight. I specialize mostly in family portrait photography, newborns being my favorite. I always love to challenge myself to learn and discover new skills, so when I recently saw a post made by Shana Hall in a photography group I am part of, asking for advice or help in restoring her old family photo that was damaged in hurricane Katrina. I was curious to see if I could figure out how to restore it with the knowledge I had in Photoshop and she agreed to let me give it a go. I decided to share how I was able to bring this photo back to life.
Here are the steps I took to fill in missing areas and restore the old photo:
❶ Repair cracks and spots
- Open Photoshop
- Open the image you wish to restore
- Duplicate the photo layer
- Select the patch tool
- Use the patch tool to repair as many of the cracks and spots as you can
❷ Paint in the damaged background and clothing
- Make a new empty layer
- With a soft, round brush, set flow to about 5%
- Use the eyedropper tool to select color from nearby areas of the photo
- Paint in the remaining areas of the missing or damaged background with a soft brush selecting color from nearby areas
- Go to filters
- Add noise to that layer to give the newly painted areas texture and lessen the chance of banding
- Create a new layer
- Select the area around the damaged clothing and paint color, adjusting the brush size to fit the area you need to paint
❸ Fix the heads
- To repair the hair, select and copy another part of the hair and from where the cracks and spots have already been fixed
- Paste them to new layers, lower the opacity so you can see the layer below, and use the free transform tool to adjust the size and rotate to match the hairline
- You can use puppet warp on each pasted layer to manipulate the shape to match the photo better
- Create a layer mask and used a soft round brush set to black with flow set to 100% and painted over the areas you want to hide. You can paint on the mask with white to bring any hidden area back
- Use a second photo taken at a similar angle to copy parts of the man's ear and shoulder
- Paste the ear selection from the second photo onto a new layer and adjust the same way as with the woman's hair, editing and masking out the part you don't need
- Make a new layer
- With a soft round brush at about 5%, select color tones from the original photo and paint over the replaced areas to match the color. Add some noise as you did above to break up the color and add texture
- Continue to add layers and paint with a soft round brush set between 10--20% using colors from the original photo to touch up additional areas that need work
Note: When I don't have access to a second photo, I go online or into my own photos and try to find someone in a similar lighting situation sitting at a similar angle and copy part of that photo. It is not as accurate, so having a photo of the same person is always the first choice. I use puppet warp to manipulate lines and angles when necessary. I add color lightly and any time I paint on color, I also add a small amount of noise using the filters.
❹ Fix the uniform
- se a different photo of the same person or search for photos of military outfits to find a shoulder and lapel that resemble the one in the picture
- Paste the uniform selection from the photo you found onto a new layer
- Mask the part you don't need
- Paint with a brush on low flow over the suit to extend the lapel to match the image
- Create a color adjustment layer set to hue to match the color of the two pictures
- Adjust the hue and saturation to further match the colors
- You can also use Color Balance to achieve the correct color match
❺ Refine the skin
- Use a soft brush at low opacity, I tend to use a 4% flow, to paint the forehead, cheek, and neck and smooth the skin selecting color sources from surrounding areas
- Add some noise to the painted area to keep it from looking like paint
❻ Save and make global edits
- Once you are happy with the edits, save it as a PSD file so you can go back and change it later if you want
- Flatten the image
- Make a duplicate of the layer
- Change mode to overlay
- Go to filters, others, High Pass
- Adjust the slider to sharpen the image
- I used 3.5 as a setting for this particular image
- Click OK
- Reduce the layer opacity to about 40%
- Flatten the image
- Duplicate the layer
- Go to Image Adjustment, Black and White, press OK
- Reduce opacity slightly to let some of the original color show through, this is how I got rid of the discoloration
- Save the image
- At this point, I like to open the image in Lightroom to make some other minor adjustments such as reduce noise, adjust black and white levels, and any other adjustments I feel it needs.
I hope you found this information helpful and that it has inspired you to find your old photos and bring them back to life!
