- Home
- Photoshop ecosystem
- Discussions
- Sharpen vs unsharp mask vs ACR sharpen
- Sharpen vs unsharp mask vs ACR sharpen
Copy link to clipboard
Copied
I noticed that there's a few different ways to sharpen an image
The 1st is to sharpen the raw file directly in either ACR or Lightroom.
And then, once you've brought it into Photoshop, there's 3 additional ways: (1) unsharp mask, (2) sharpen, and (3) smart sharpen
What are the differences between these options? Is sharpening in raw preferable? I shoot landscapes mostly.
 1 Correct answer
You always do a little capture sharpening first in ACR/Lightroom. This can be set up as part of your default settings.
Then there's output sharpening, which is specific to, er, output, but also to image content and pixel size (if resampled).
The important thing about sharpening is to not overdo it, and avoid halos and other artifacts. If you use the Photoshop tools (unsharp mask/smart sharpen etc) - it usually pays to roll off the shadows and highlights, so that the sharpening mainly works on the
...Explore related tutorials & articles
Copy link to clipboard
Copied
You can also use a highpass filter to sharpen. What will sharpen best may depend on the image's contents and the intended use of the image sharpened. Many prefer to sharpen at sever points in time and to do a final output sharpening for the image intended use. print or web or publishing, etc. A billboard does not need to be as sharp as a wallet size print. Different sharpening can introduce sharpening effects like the jaggies.
Copy link to clipboard
Copied
I agree with JJMack. I use them all (mostly not all together by the way ![]() ). Mostly I first open the image in Camera Raw, do a little bit of basic sharpening, and at the end (when I've edited the image in Photoshop) I add a Highpass Filter to sharpen a bit extra (but always be careful with that).
). Mostly I first open the image in Camera Raw, do a little bit of basic sharpening, and at the end (when I've edited the image in Photoshop) I add a Highpass Filter to sharpen a bit extra (but always be careful with that).
Copy link to clipboard
Copied
You always do a little capture sharpening first in ACR/Lightroom. This can be set up as part of your default settings.
Then there's output sharpening, which is specific to, er, output, but also to image content and pixel size (if resampled).
The important thing about sharpening is to not overdo it, and avoid halos and other artifacts. If you use the Photoshop tools (unsharp mask/smart sharpen etc) - it usually pays to roll off the shadows and highlights, so that the sharpening mainly works on the midtones.
Personally I now use the ACR filter for all output sharpening, usually with high amount/low detail (rather than the opposite). I find that vastly superior to anything in Photoshop nowadays - more flexible and much easier to control.
Copy link to clipboard
Copied
A handy little extra step that I use on occasion (it depends on the image content and its end use) is to add a composite layer and do your sharpening there. It allows you to add a mask and either reduce or eliminate local sharpening that may be overdone and/or a distraction.
Copy link to clipboard
Copied
The sharpening you do in Camera Raw is called Capture sharpening, and is designed to compensate for loss of sharpness in the digital capture. It does a very good job, and I recommend that you use it. The image should look sharp, but not too sharp. If in doubt, sharpen less. It is very important to apply and evaluate sharpening at 100% view, any other view will be inaccurate and misleading because of image scaling.
If you click the underlined text at the bottom of the Camera Raw window (Workflow options) you can set Output sharpening for screen or print. (designed to compensate for loss of sharpness when resizing and/or printing the image) Try using Medium sharpening.
I use output sharpening for screen, but not for print - I find it too harsh, and use Smart Sharpen for sharpening for print.
I haven't used Unsharp mask for many years - Camera Raw/Smart Sharpen is in my opinion much better.
(I use Lightroom and not Camera Raw, but the capture sharpening and output sharpening are exactly the same)
Copy link to clipboard
Copied
hhost05 wrote
And then, once you've brought it into Photoshop, there's 3 additional ways: (1) unsharp mask, (2) sharpen, and (3) smart sharpen
The reason there are so many sharpening options is that they were added over time. In Photoshop, the problem with Sharpen is that there are no options, so if you don't like the result there's not much you can do about it, so Sharpen is usually ignored.
Unsharp Mask has three useful options, so it is widely used by professionals. But it has its flaws too, including: It sharpens everything equally, so as you increase sharpening to bring out details, noise in flat areas like skies may become more visible. It can result in color fringing because it sharpens all the color channels. Pros get around those problems with various workarounds like the High Pass mask technique or applying Unsharp Mask to the image luminance and not the color.
Smart Sharpen came later and was designed to get around those problems. If used correctly, it can protect smooth areas and highlights and shadows so that you can turn up the sharpening much further before the image starts to fall apart. It sharpens tone much more than color so that you can avoid color fringing. On many images, you can apply Smart Sharpen and not have to do anything else.
Camera Raw sharpening also came later and was designed for intelligent sharpening, but to raw files. It has a Masking slider so you may not have to use masked High Pass sharpening later, and like Smart Sharpen, it's designed to sharpen without creating the problems you get from Sharpen and Unsharp Mask.
hhost05 wrote
Is sharpening in raw preferable? I shoot landscapes mostly.
Different kinds of sharpening should be applied at different stages of your workflow. Others have already mentioned capture sharpening and output sharpening, but there's also creative sharpening. Generally, apply capture sharpening in Camera Raw, apply creative sharpening in Camera Raw or Photoshop, and apply output sharpening from whatever application is creating the final print or web image (for example, the Output Sharpening option in the Save dialog box of Camera Raw).
The notion of capture/creative/output sharpening was introduced by the late Photoshop expert Bruce Fraser (read his 2003 article Thoughts on a Sharpening Workflow), and it's valuable to learn because current Adobe sharpening philosophy is built around his ideas. You can go deeper into it by reading his book Real World Sharpening.
Copy link to clipboard
Copied
If you are curious about the seeming contradiction -- unsharp masking actually sharpens an image – this may help. It is part of an introduction to the subject that I wrote for my students:
***
The term “Unsharp Mask” in Photoshop is derived from a graphic arts photographic color separation procedure. In essence, Photoshop’s Unsharp Mask imitates the sharpening portion of a dual-purpose film mask.
Commercial Printing (Prior to the use of computers):
Normally, one of the first objectives when color separating a color transparency (a “chrome”) using a camera and photographic film so that printing plates may be made, is to reduce the density range of the chrome so that it fits more easily within the more limited tone gamut of halftone reproduction.
To achieve this, a low contrast negative is made -- using black & white film -- by contact exposure to the transparency (which is a positive). Next, the two films – the positive transparency and the low contrast negative black & white film image -- are sandwiched together. The negative film reduces the density difference between highlight and shadow extremes of the image to be photographed during subsequent color separation and halftone steps. So much for range and contrast reduction alone.
If, instead of placing the black & white masking film in direct contact with the chrome during the making of the negative, a sheet of diffusion material (a special frosted plastic) is placed between chrome and film, the resulting negative lacks knife-edge image sharpness. Instead, the film – the black & white film negative mask -- takes on a soft-edged, out-of-focus look. When this mask is then placed in contact with the chrome for color separation, it performs two functions.
First, since a low contrast negative (the mask) is sandwiched with the positive (the chrome), overall range is reduced. Second, at the points of sharp edge contrast in the original transparency, contrast is increased, as shown in the illustration, giving the impression of a sharper image.
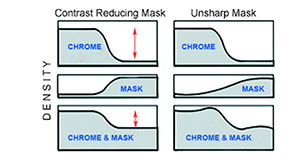
Obviously, if the transparency is not sharp to begin with, there will be no clearly defined edge-contrast to accentuate. An unsharp mask cannot rescue a blurred, soft-focus image.
As mentioned at the outset, Photoshop has adopted the term Unsharp Mask and its controlled use because it mimics the image sharpening portion of photographic masking procedures. Where, during the making of photographic masks, variations in the amount of sharpening are created by altering film exposure time, its development time and/or the number and thickness of the diffusion sheets, Photoshop offers similar controls in the Unsharp Mask dialog box.
When Filter > Sharpen > Unsharp Mask is chosen, three controls are offered.
Threshold level determines at what point the sharpening will kick in. The higher the number, the greater must be the difference in density of adjacent tones in the original image before the unsharp mask is activated.
Radius denotes the width of the sharpening effect.
Amount governs the degree of change; the amount that the light edge is made lighter and the adjacent dark edge made darker (see the illustration above).
One final reminder: Sharpening, one of the last correction operations, should be done at 50% or 100% of image size.
Copy link to clipboard
Copied
I used to use Unsharp Mask most of the time, but I now mostly use High Pass and sometime Smart Sharpen. What I like about High Pass is the degree of control it gives you. So starting with this picture of fellow Menz Shed member Peter which is 3800 pixels on the long side
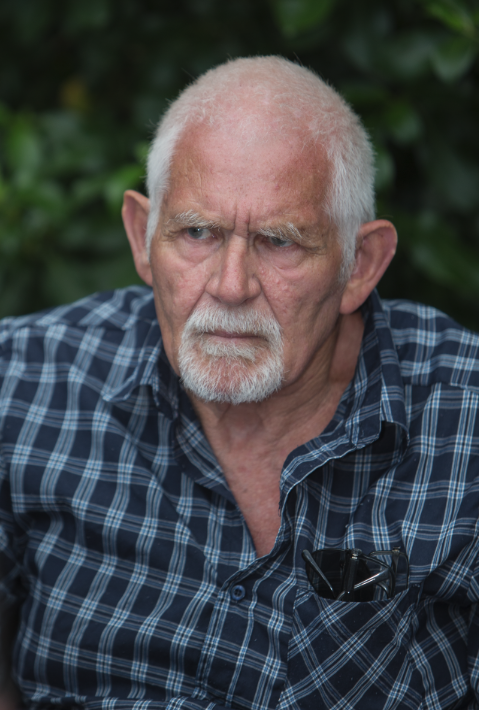
I can use a basic sort of High Pass setting
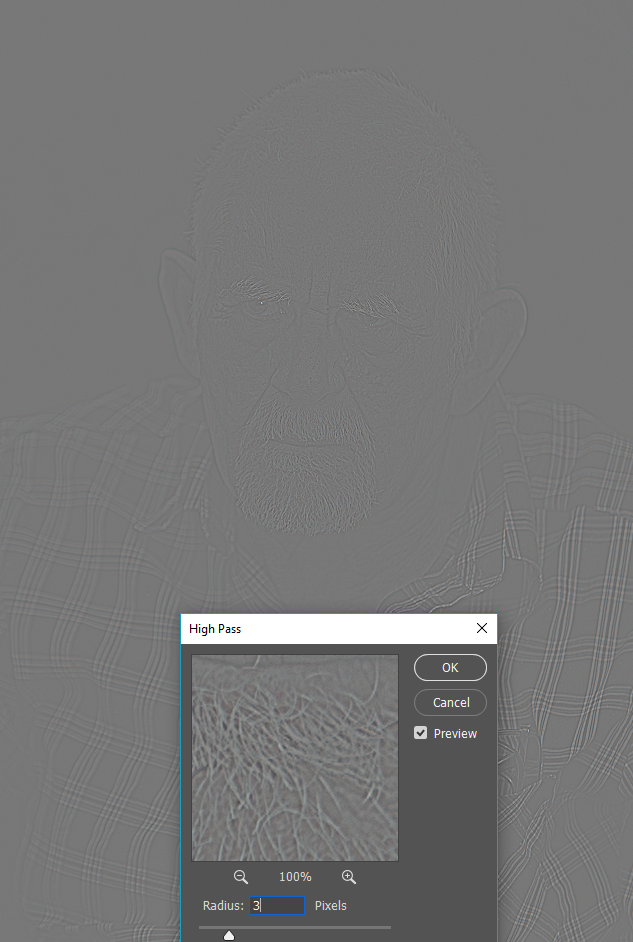
And set the blend mode to Overlay, Hard Light, or Vivid Light. I mostly use Overlay, but sometimes Hard Light, and never Vivid Light.
Click to expand the image below.
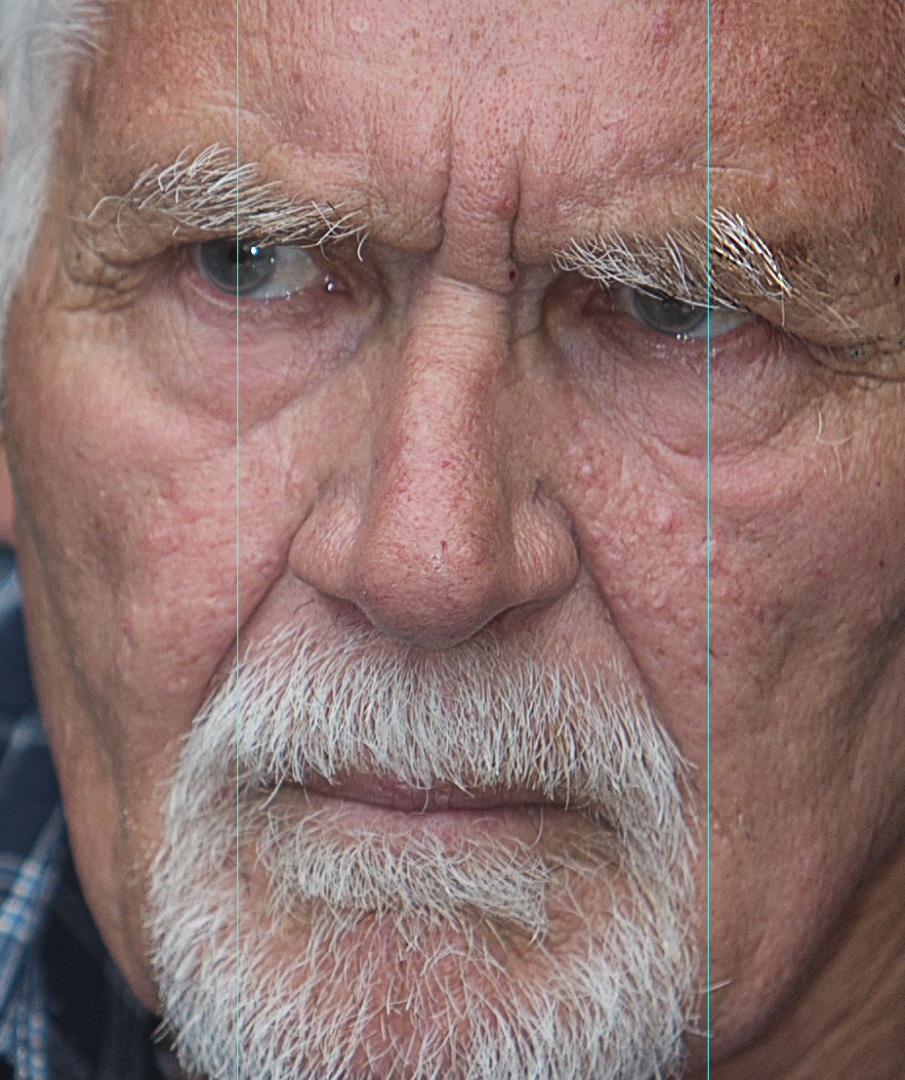
As the above example shows, you can mix multiple layers to use different blend modes in different parts of the image
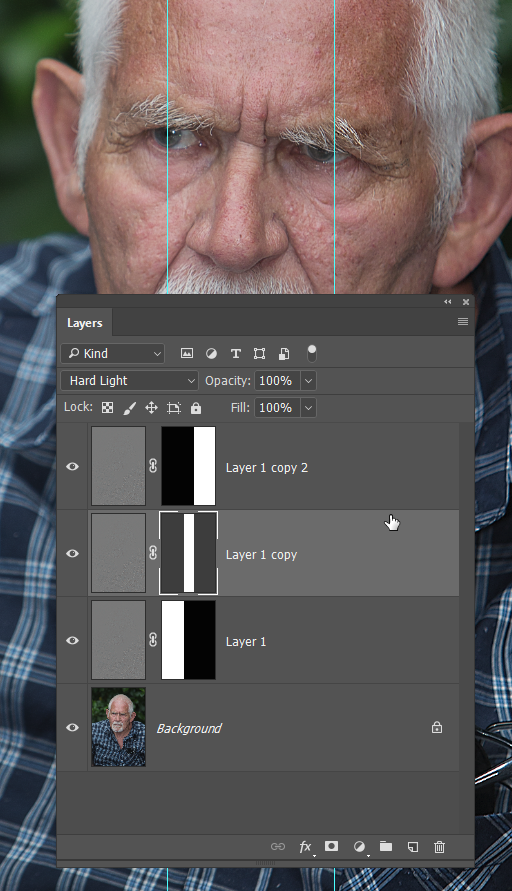
And use Mask Properties to feather the transition between layers.

By using the same value to feather each mask, you get a perfect transition. The red arrows show where the hard intersection of the mask was before feathering.

But that's just basic High Pass sharpening. We can do it in stages for high and low frequency image content by using two High Pass layers with the second using much higher value. This is how the image looks while still in Normal Blend mode. You can see that high local contrast areas have been effected, but potentially noisy areas in between have been averaged out.
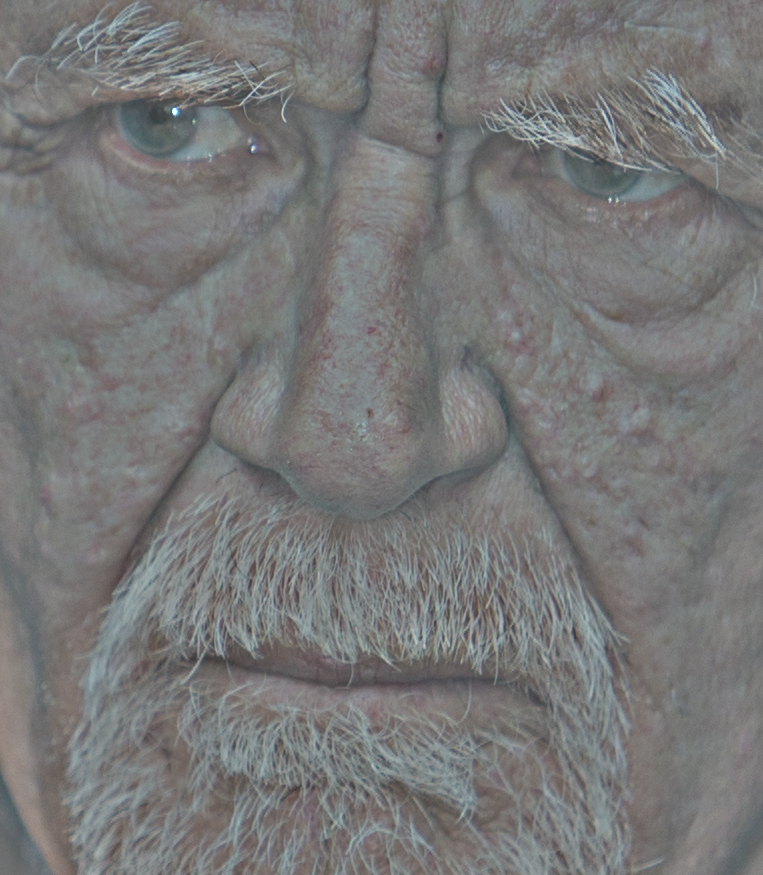
It also increases overall contrast so you need to reduce layer opacity. This is set to 50% opacity, and right of the guide is unsharpened.

The last trick is for high ISO noisy images. I'm using a temporary build here and don't have my plug-ins installed, so I can't demonstrate properly. But the trick is to use Noise reduction on the High Pass layer so that only the detail is enhanced, and not the noise. You can also apply curves or levels to the High Pass layer to increase contrast further enhancing the sharpening effect. Note that this has a similar effect to using High Pass with high values, but is definitely worth experimenting with.
Copy link to clipboard
Copied
Interesting stuff as always Norman. I believe a lot of the sharpening techniques start by blurring the image to smooth out the noise, and then apply contrasting techniques to sharpen. It's something we do ourselves to smooth out lumps and bumps. With this rasterized letter O, I gave it a highish Gaussian Blur, then used Levels to kill most of the soft edge. If I'd pulled the sliders all the way to the centre, it would have been back where it started with no anti-aliassing.

Copy link to clipboard
Copied
Years ago I learned this Technique from Deke McCelland, and it works very well for me
1- Duplicate the Layer, and make sure you are viewing your Image at 100%
2- Filter-Sharpen-Unsharp Mask. Radius less than 1.0 Threshold: 0, play with the Amount.
3- Edit-Fade Unsharp Mask Opacity: 80%. and set the Mode To: Luminosity.
4- Add A Layer Mask to the Layer
5- Select your Brush Tool , and with Black Color set to your Foreground Color, Brush the areas that you don't want to be sharpen.
and If you want to change the Mask area for sharpen, With White Color set to your Foreground apply Mask to the areas, that you want to be Sharpen.
6- Layer-Flatten Image
Copy link to clipboard
Copied
A wee not about Unsharp Mask. The whole point of using it is Threshold setting which lets us control what degree of local contrast is going to be ignored in the sharpen process. I almost never use it nowadays.
I do use Smart Sharpen sometimes. Usually for line work and engineering drawings imported from SketchUp.
The thread mentions ACR, which we all love having as a filter. Something else it does a very reasonable job of is noise reduction, and it does it very quickly. I tend to use Topaz DeNoise which gives you lots of control, and works quite well, but I don't use it when processing a large batch of images, because it takes so long.
Copy link to clipboard
Copied
There are many people that shoot RAW, and Later they export the Image for the web. In other words, If Its only going for the web, such a small file, I think Its best to sharpen only when you want to Export It to the Web. I had a friend of mine, he was a Professional Photographer,Shooting for famous Magazines, He told me the worst thing you can do as a Photographer is having a Image that Is Too Sharpen, He told me he never sharpen the Images In ACR, but only uses High Pass.
Copy link to clipboard
Copied
I absolutely agree about not oversharpening (and said so further up). But this is precisely where I find the ACR filter superior and much easier to control than any of the traditional Photoshop tools.
BTW, does anyone know if there is any functional difference between High Pass and Unsharp Mask? I always thought Unsharp Mask was High Pass, just rolled into a ready-to-use filter.
Copy link to clipboard
Copied
Dag, in "Professional Photoshop" (p. 148) by Dan Margulis (the Lab Color genius), he devoted about two dozen pages to the subject of Sharpening. Regarding his brief mention of High Pass, he wrote:
"... Some people also sharpen by creating a new layer, applying Filter > Other > High Pass, and setting the layer to Overlay mode. At typical Radius settings for this filter, the result is substantially the same as with hiraloam USM [he is referring to High Radius, Low Amount Unsharp Masking]. In addition to requiring extra steps, High Pass Sharpening lacks Threshold....If you plan to use this kludge, you should switch to straight hiraloam..."
In his first "Lab Color" book he made passing mention of High Pass: "... In addition to being more cumbersome, it's not as flexible, as there is no Threshold setting, and it's difficult to evaluate the effect of different Radius values..." In his second Lab Color book, High Pass does not appear in the index.
[EDIT} In the spirit of full disclosure: I believe that to be critical of Dan is equivalent to being critical of mom, apple pie and puppies.)
Copy link to clipboard
Copied
Thank you, Norman. I should have guessed you would have an answer for me ![]()
In the spirit of full disclosure: I believe that to be critical of Dan is equivalent to being critical of mom, apple pie and puppies.)
I don't know Dan Margulis, and I'm not familiar with his writing, so I don't have an opinion about the credibility. I don't particularly care for apple pie, but I do love puppies. I want one, except I keep too long working hours. Mom is, well, mom.
I stopped using USM precisely because I think it lacks flexibility. So if High Pass is even less flexible, I'm not tempted.
Find more inspiration, events, and resources on the new Adobe Community
Explore Now


