

- Home
- Photoshop ecosystem
- Discussions
- Simple action to replace image from walls
- Simple action to replace image from walls

Copy link to clipboard
Copied
I have record an action that replace image from wall and save as jpg actually i want this via File->Automate->Batch here is action file if any one want to see
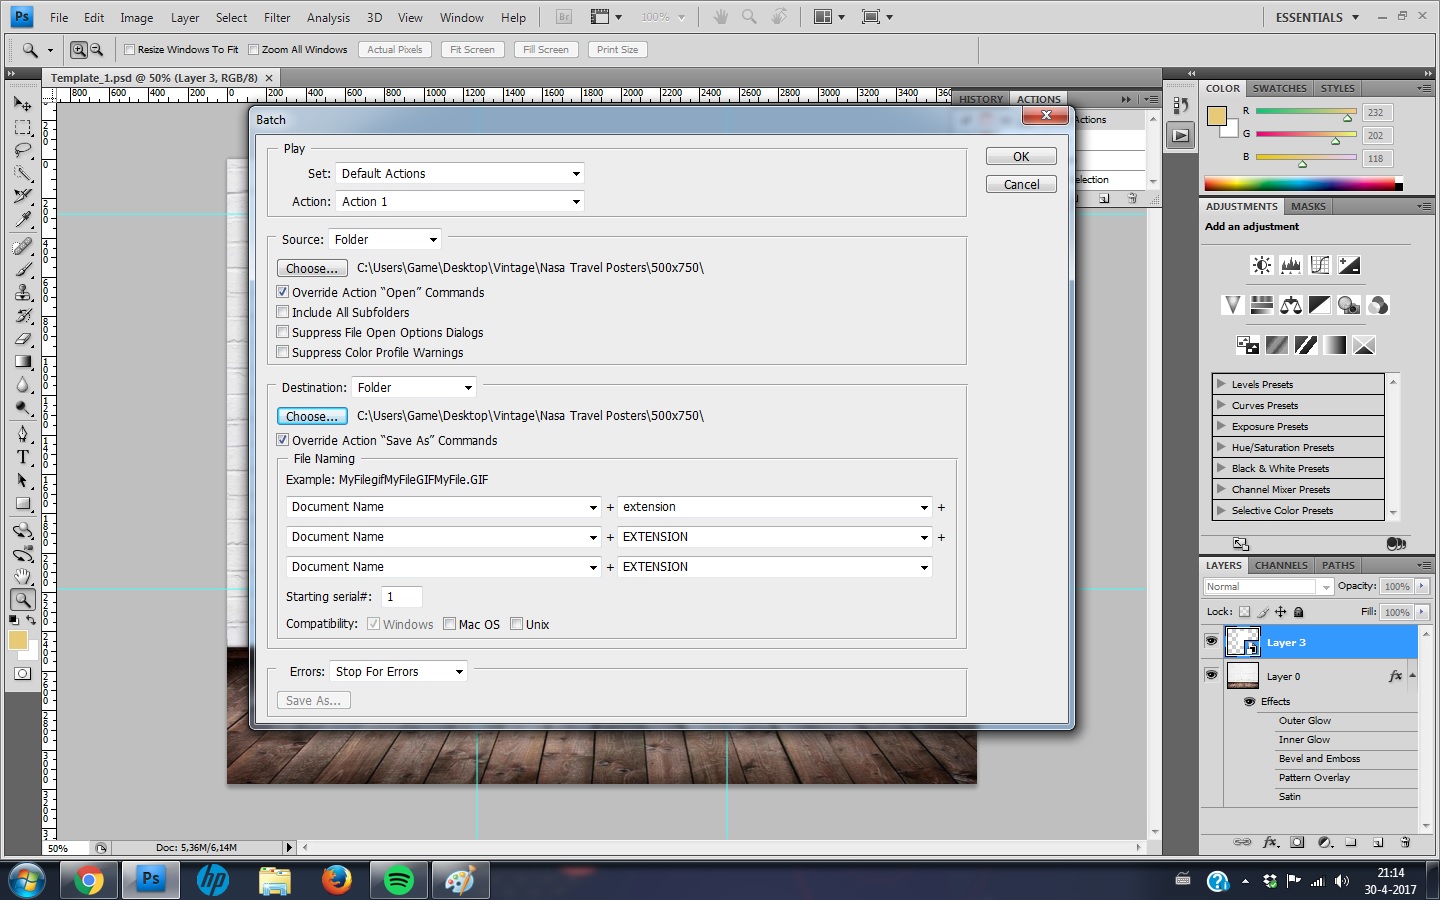
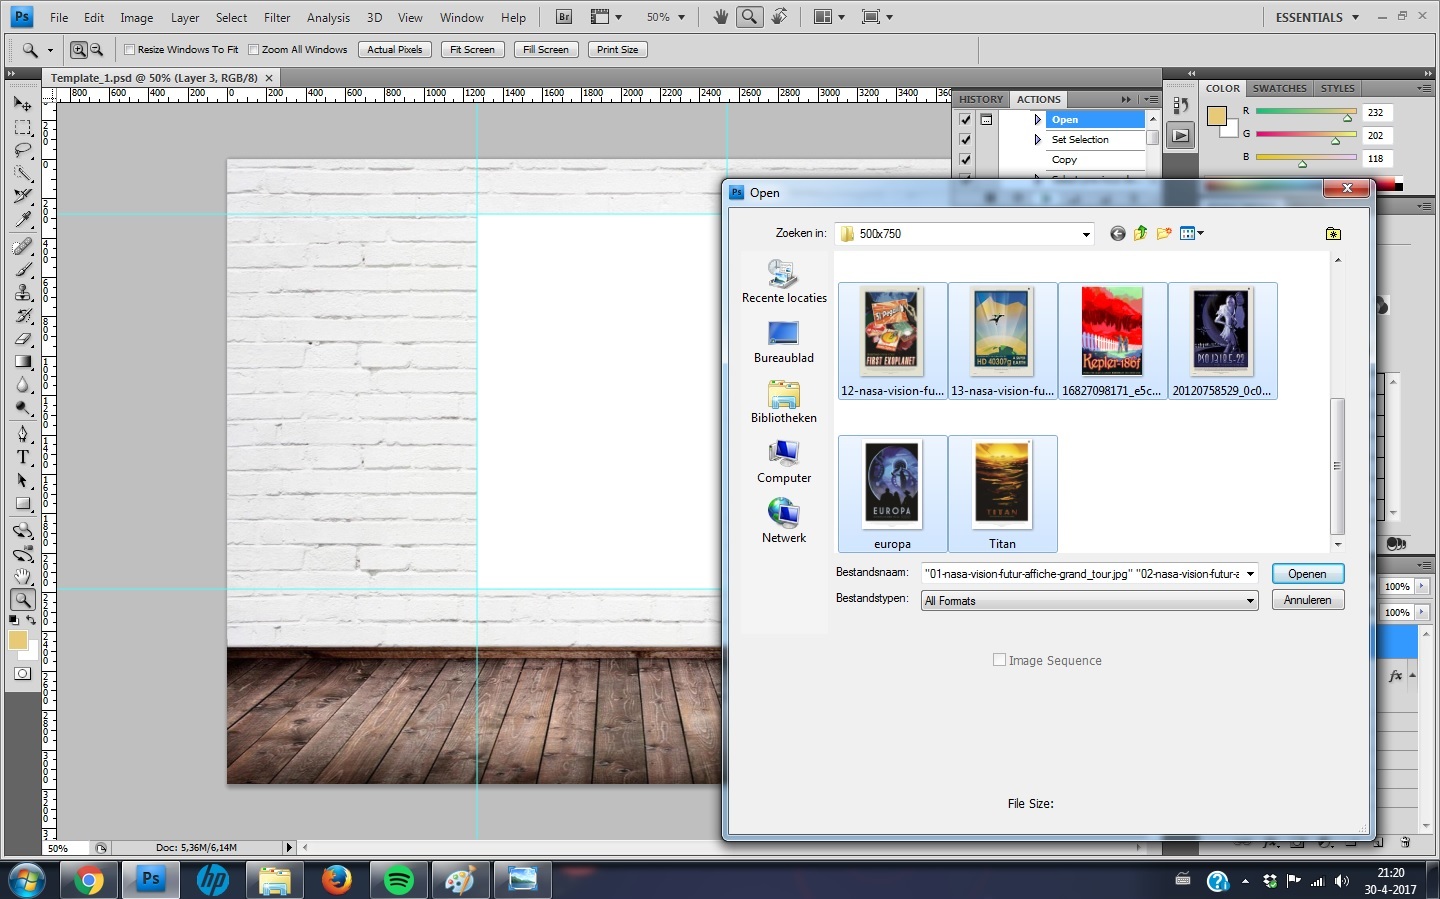
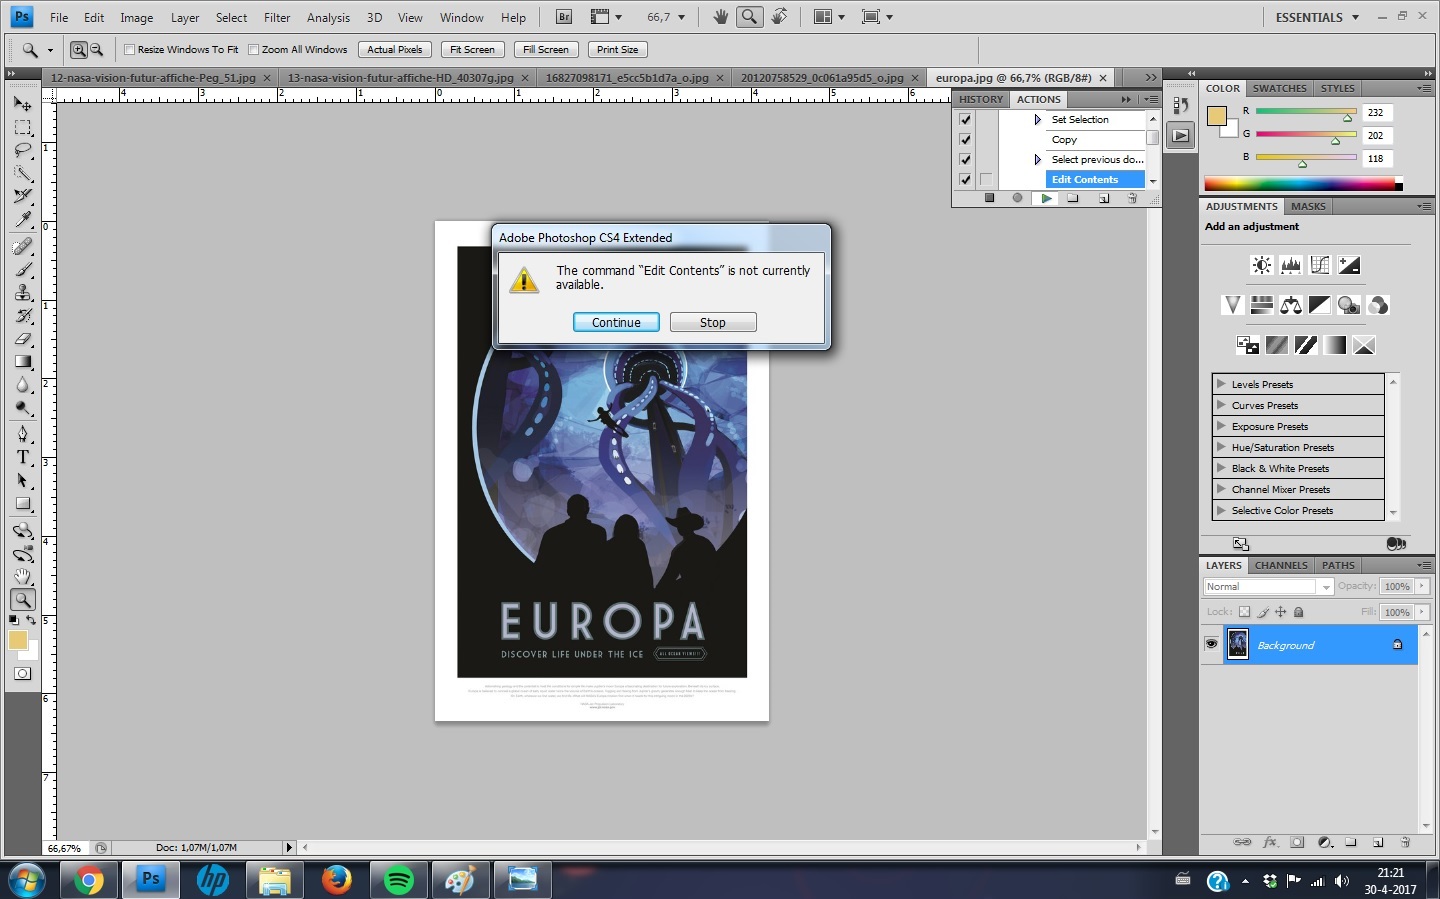
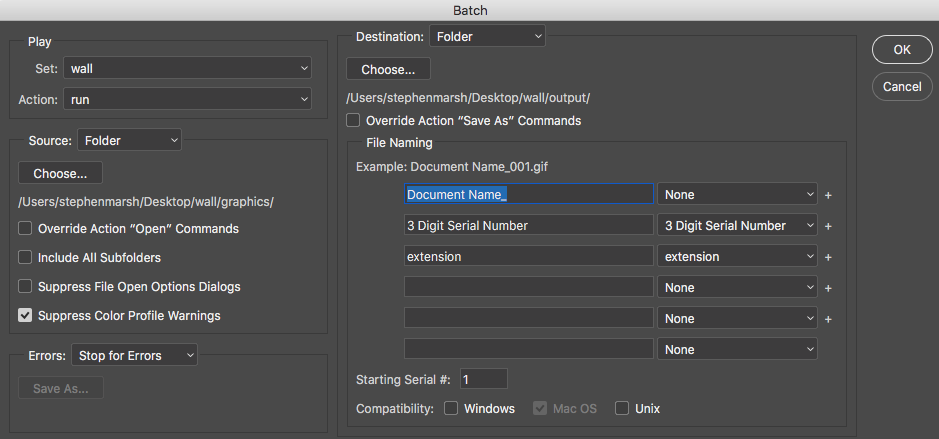
So, after creation this action I went to File>Automate>Batch and with the settings (first image attached) I tried to select all the files in the folder (2nd image attached), but then get a ''The command 'Edit Contents' is currently not available'' message (photo 3).
When I select the images one by one, the action does its work, but after the 3rd image it automatically keeps replacing the 3rd image that I did. Is it possible to just select all the images at once and let the action do its work to save all the outcomes at once?
NOTE: I have all images in same sizes to put on wall i.e 500x750px almost 500+ photos to do batch process....
Thank you so much for you help...


 1 Correct answer

mirza5313 I am not sure why you are getting that error… Close the template image if it is open in Photoshop.
Try creating a new blank document, 1500px wide x 1250px high.
Create a brand new action set and action, the record on the new action should auto start.
Use the File > Place Embedded menu and select your template image. Then press enter or the check/tick mark on the menu bar to place/scale/transform the image to the centre of the document, automatically sized to the document width/height.
The
...Explore related tutorials & articles
 33
Replies
33
33
Replies
33
Copy link to clipboard
Copied
Offhand I can think of two ways to do this. One way is using Variables (Data Driven Graphics) …however that is probably overkill.
The second way is with a simple batch run like you are looking at. There are likely many ways to get to the desired goal, this is just something fast that I knocked together at the end of a hard day, with a fresh start and more time I could probably do it better.
Action steps are pretty simple:
Then run the batch:
The final result (output folder is the result of the batch, the graphics folder are the files run by the batch, the wall.psd file is the static background that does not change):
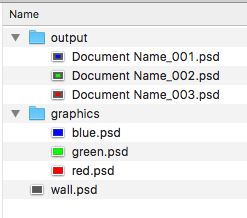
As you can see, the larger gray wall has been combined with the smaller variable colour graphics.
Explanation:
Basically all five of the action steps are (the first two steps may not be required if all images are known to be layers and not flattened) –
1. Flatten
2. Ensure that the variable graphic image is a layer
3. Resize the canvas of the smaller image to accommodate the larger image
4. Place the larger image into the correct position
5. Move/stack the larger image behind the smaller image
Copy link to clipboard
Copied
Thanks Stephen_A_Marsh but I'm really sorry I do not understand about variable, I am really new in Photoshop can you please explain more simple words how to adjust this action to get desired Batch image start working?
Copy link to clipboard
Copied
My apologies if I was not clear in my previous post.
The first sentence regarding Photoshop Variables/Data Driven Graphics – you should not need to use this approach, forget it for now. However do please learn about it when you have time, it is very useful.
Moving on…
I can see that I used the word “variable” in my description regarding using a Batch, however I was not referring to a “Variable” (data driven graphics). Sorry for the poor choice of wording, I was using the term variable to mean “changing”.
I have just downloaded and looked at your action file. I think that i can see where/why it is failing. My action only had 5 steps, potentially it only needed to have 3 to combine a static background with changing content.
If you can provide a download link to the unchanging/static wall file and to at least one of the posters that will sit on the wall (and any other required images), then I may be able to help record an action for you that will not fail when batching. It may also help to have a final flattened file so I know what the end result should look like.
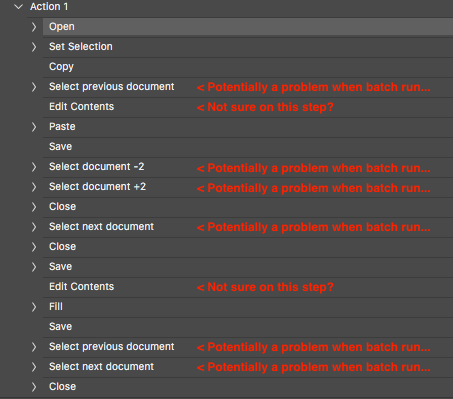
EDIT: A quick look at your ATN file and my initial thoughts are:
Copy link to clipboard
Copied
Thank you so much Stephen_A_Marsh for your precious help... I really appreciate it, I have attached static unchanged wall template and some of posters that goes center of wall as well as final file named outcome.jpg HERE
Also if possible please tell me where I doing wrong on this action that fail at batch processing?
Thank you!
Copy link to clipboard
Copied
Hi mirza5313 sorry, I don’t have time to go into detail on your action… All I can do is explain why/how I did what I did.
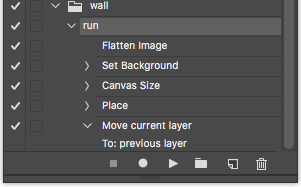
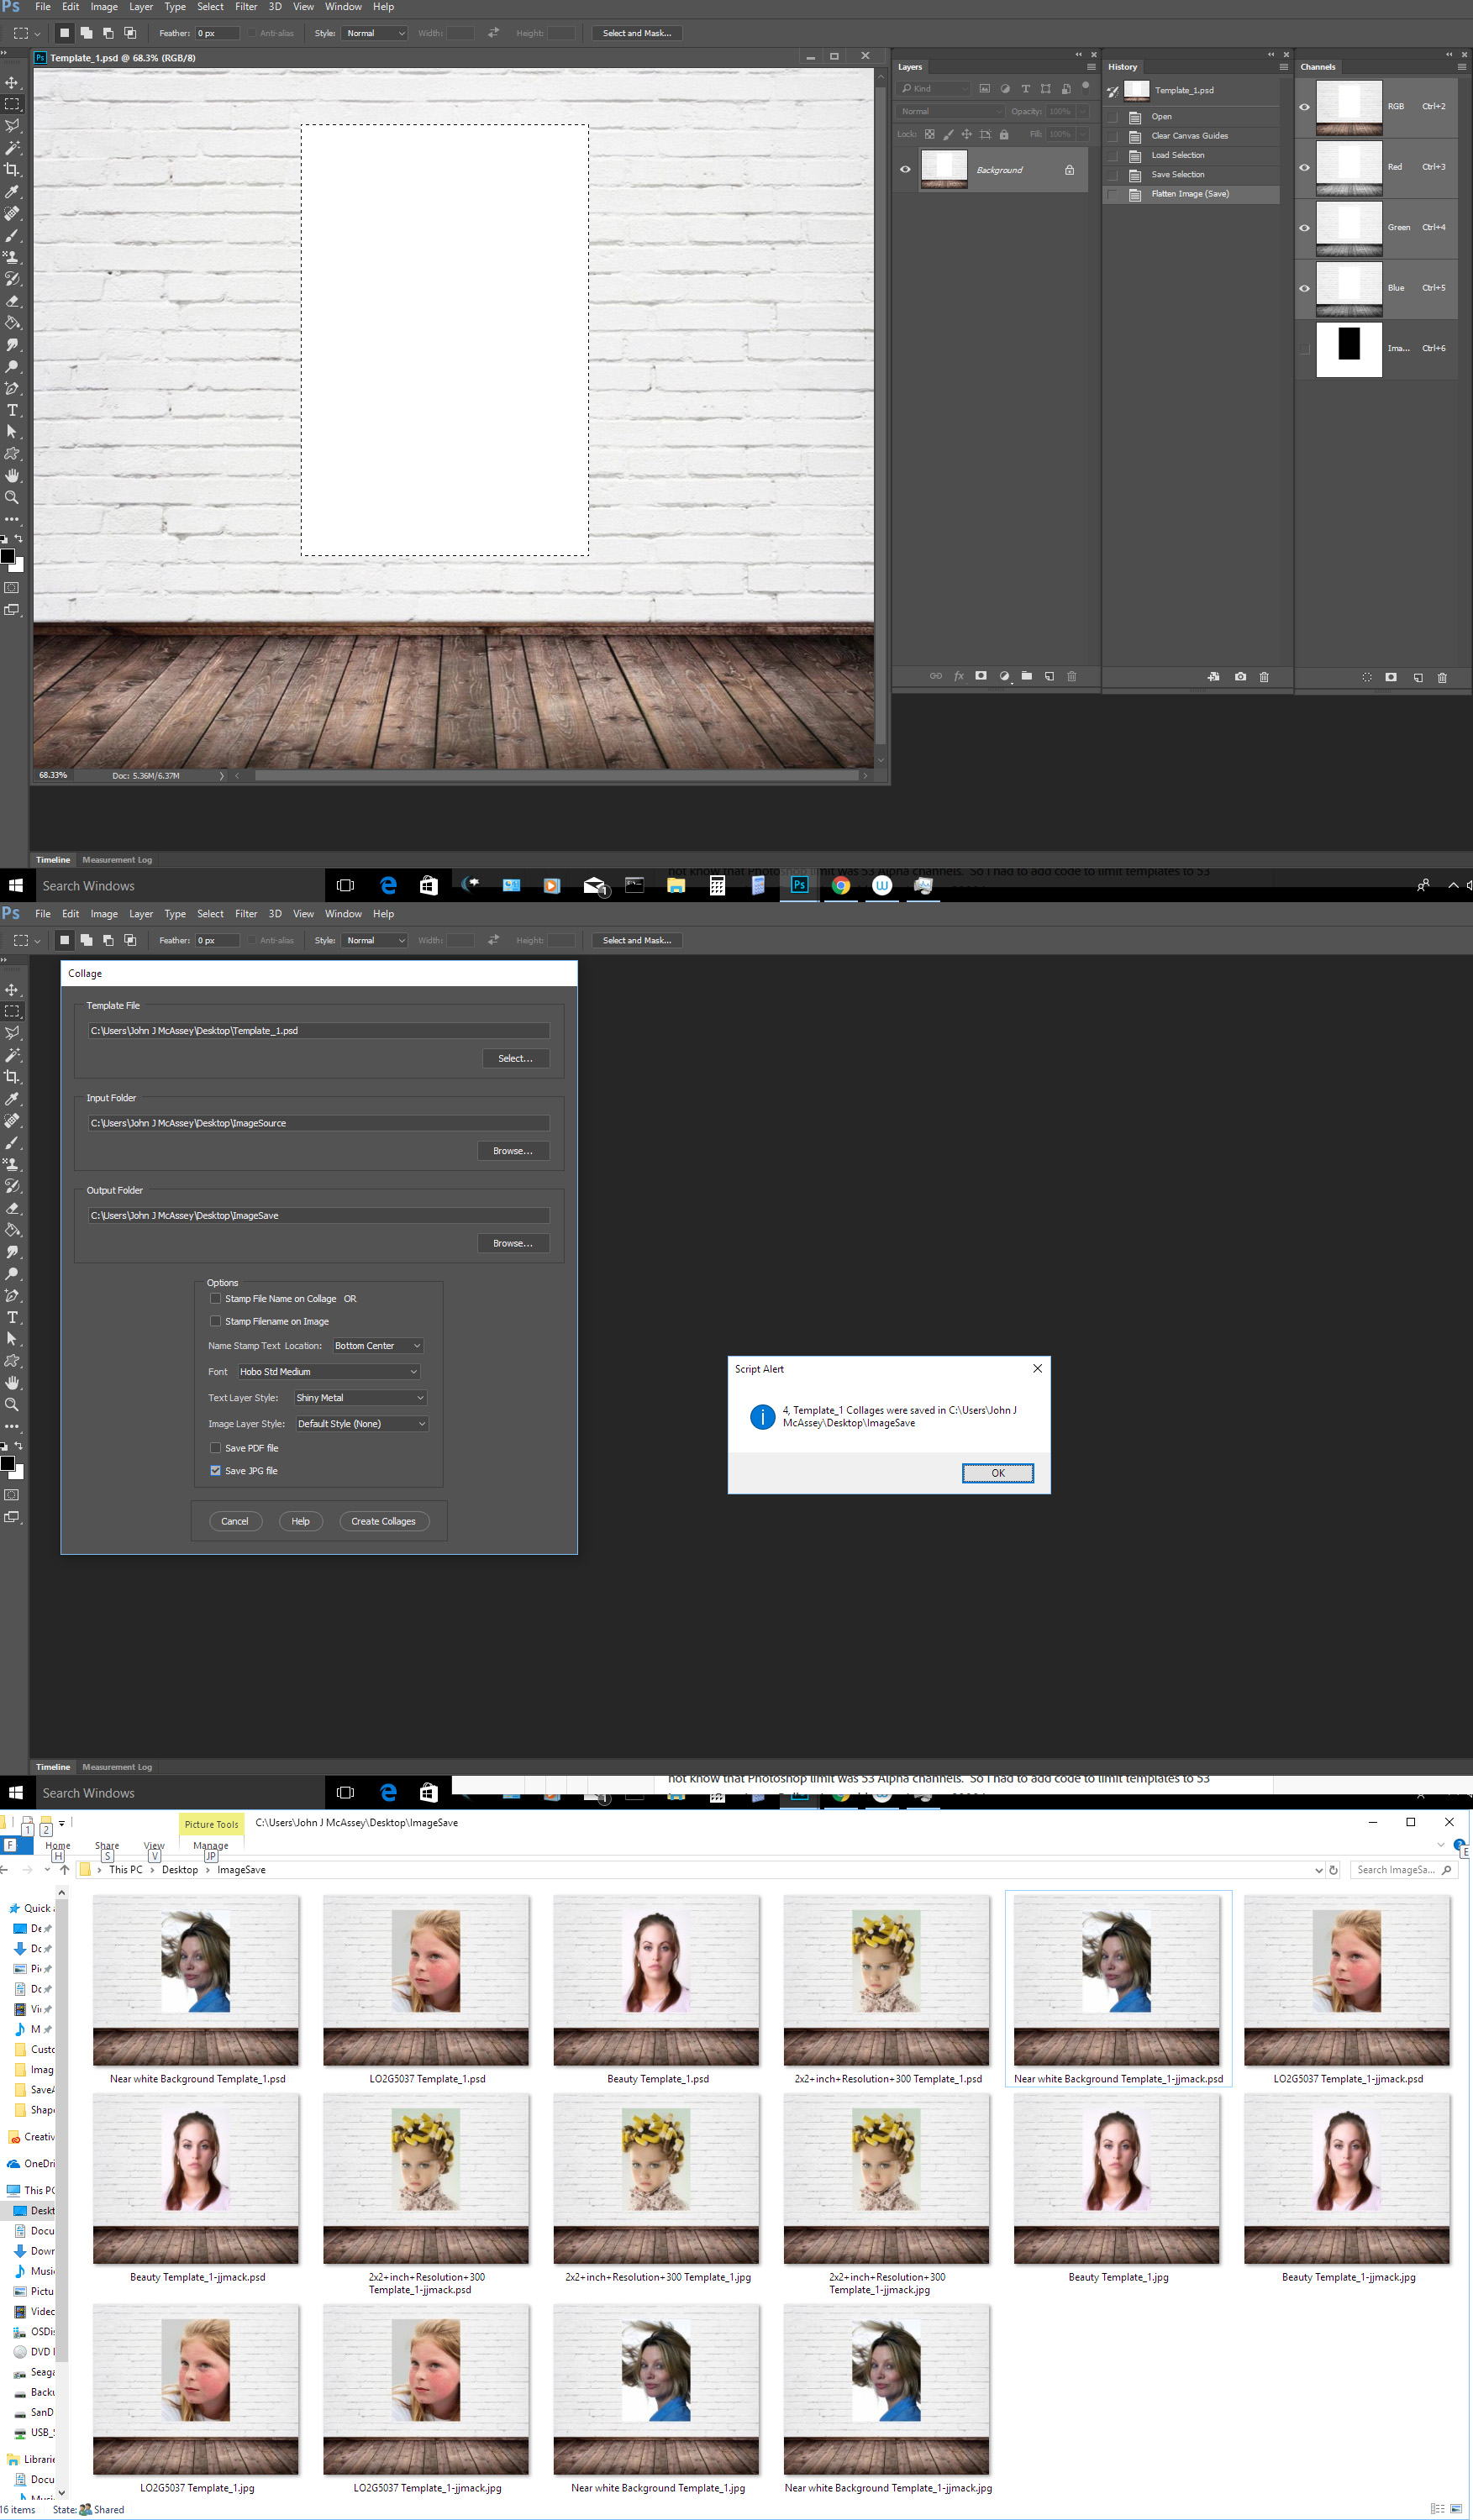
Here is a visual of the action:
Here is a visual of the Image Processor setup (I could have done this via batch, however then I would have had to record file format steps):
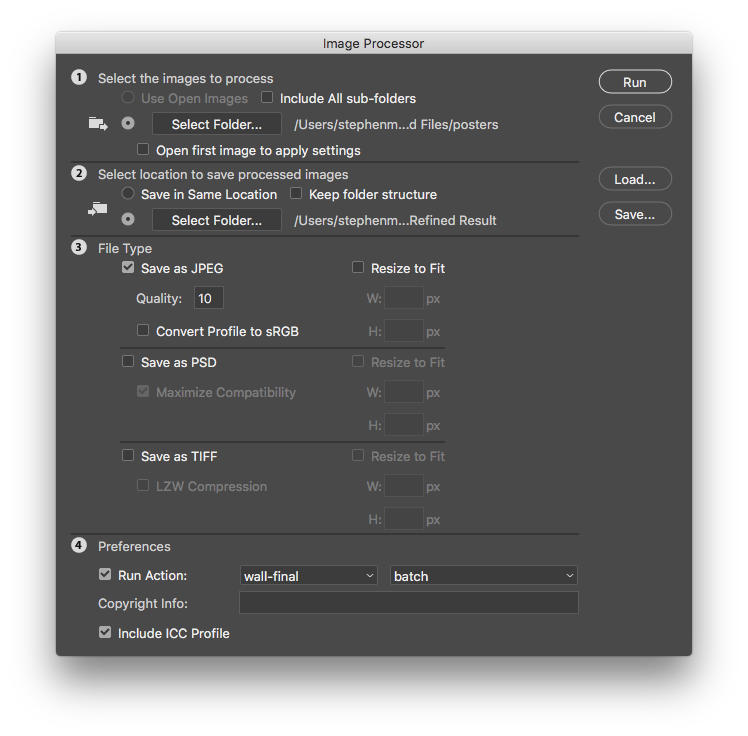
Here is the link to the action file:
https://www.dropbox.com/s/p12r0znt7xrynjk/wall-final.atn?dl=0
NOTE: I would recommend that you remove or turn off the visibility of the white box in the wall .psd template…
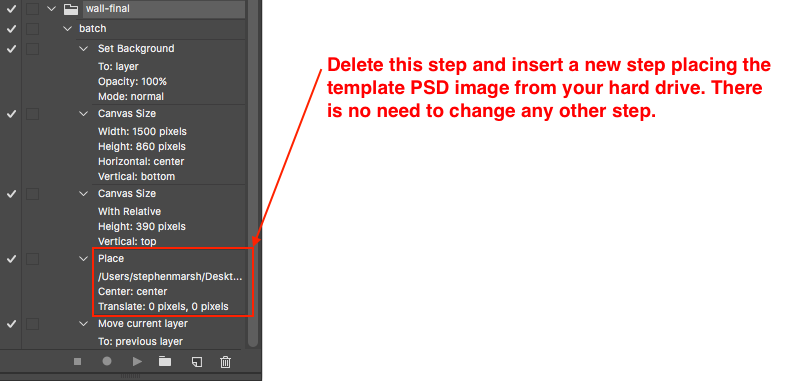
Basic overview of Action:
1. Change the poster template file from a flattened to a layered image
2. Change the poster file’s canvas width to match the width of the template image, add the required space at the top of the canvas
3. Change the poster file’s height at the bottom to match the template image
4. Place the template image .psd file (this step will need to be deleted and re-recorded on your system so that the file path is valid)
5. Move the upper wall layer to the lower layer under the poster image
File > Scripts > Image Processor is then used to batch save out the files in JPEG format while additionally processing the poster input files with this action.
That is it, no need to make this simple project any harder than it needs to be with Data Driven Graphics or custom scripts!
Copy link to clipboard
Copied
I'm really sorry, But its not working getting with errors... I have changed with place step but action stuck and says "command set is currently not available..

Copy link to clipboard
Copied
mirza5313 wrote
I'm really sorry, But its not working getting with errors... I have changed with place step but action stuck and says "command set is currently not available..
That message is a common message you will see the set in actions. What the action is trying to do has some document state requirement this not present so the set command can not be performed set is not available it is grayed out. Look at the action set step to see what the set step is trying to set, And look at the state of the document when set is not available. This is an other good reason to script thing. Error like that you can catch and deal with. Some condition required for the set step is missing that is why set is not available. Single step the action and watch each step execute see where thing go wrong.
You are also asking about action is a scripting forum. You will get answers involving scripts because scripting can do more than actions. Creating you own scripts requires a programming skill set. However there are powerful Scripts the come with Photoshop like Photomerge, Fit Image, Image processor, load file into stack etc. You can use and not have to do the programming. And scripts like Image Processor and Image Processor Pro can include action you record and edit in its processing. So again you do not need to do the programming. You just record actions and use scripts other have made available. To do what you want to do all you need do is create a template and use my scripts. Image do not need to be pre-processed and can be any image file type.
Copy link to clipboard
Copied
mirza5313 I am not sure why you are getting that error… Close the template image if it is open in Photoshop.
Try creating a new blank document, 1500px wide x 1250px high.
Create a brand new action set and action, the record on the new action should auto start.
Use the File > Place Embedded menu and select your template image. Then press enter or the check/tick mark on the menu bar to place/scale/transform the image to the centre of the document, automatically sized to the document width/height.
The new action should now contain one step. Stop recording the action. Delete the placed image and run the action again to test that it correctly places the template image. It can’t get any simpler or easier than a single step action!
If you have no more errors, then you can now do one of two things:
1) Drag the recorded step of placing the template file into the action that I provided, removing my original place step
or
2) Recreate the other four steps in my action or drag my recorded steps into your new action
As long as all of your poster images are sized 500x750px as the examples that you previously provided, there should be no other issues with performing this task as I have described. If your poster images are not all the same size/proportion as the 500x750px examples, then extra steps will be required.
I have tried to keep this simple, all of the info provided so far points to a simple method for a simple problem. Alternatively, if you need a more complicated and robust method, JJMack can help.
Copy link to clipboard
Copied
Template are very easy to make. Here is a different way to make your template and be compatible with my scripts. Different template file same results and this time I only save PSD files no jpg file were saved...
Copy link to clipboard
Copied
Thanks Stephen_A_Marsh its really helpful I just created action from your instructions and working accurately as i want....
Copy link to clipboard
Copied
Excellent, glad you got there in the end!
The solution that I proposed was simple and targeted to your specific situation. That being said, the principle is re-usable for other simple projects… As batch/image processor works on multiple files, the trick is to combine the static background into each. Using Photoshop’s Variables or Scripting provides more flexibility and complexity. I chose the pragmatic approach in this case as it could get the job done fastest, with the least amount of effort, however it is not always this simple and sometimes a more robust method is required.
Copy link to clipboard
Copied
Thanks Stephen for your help and efforts....
Copy link to clipboard
Copied
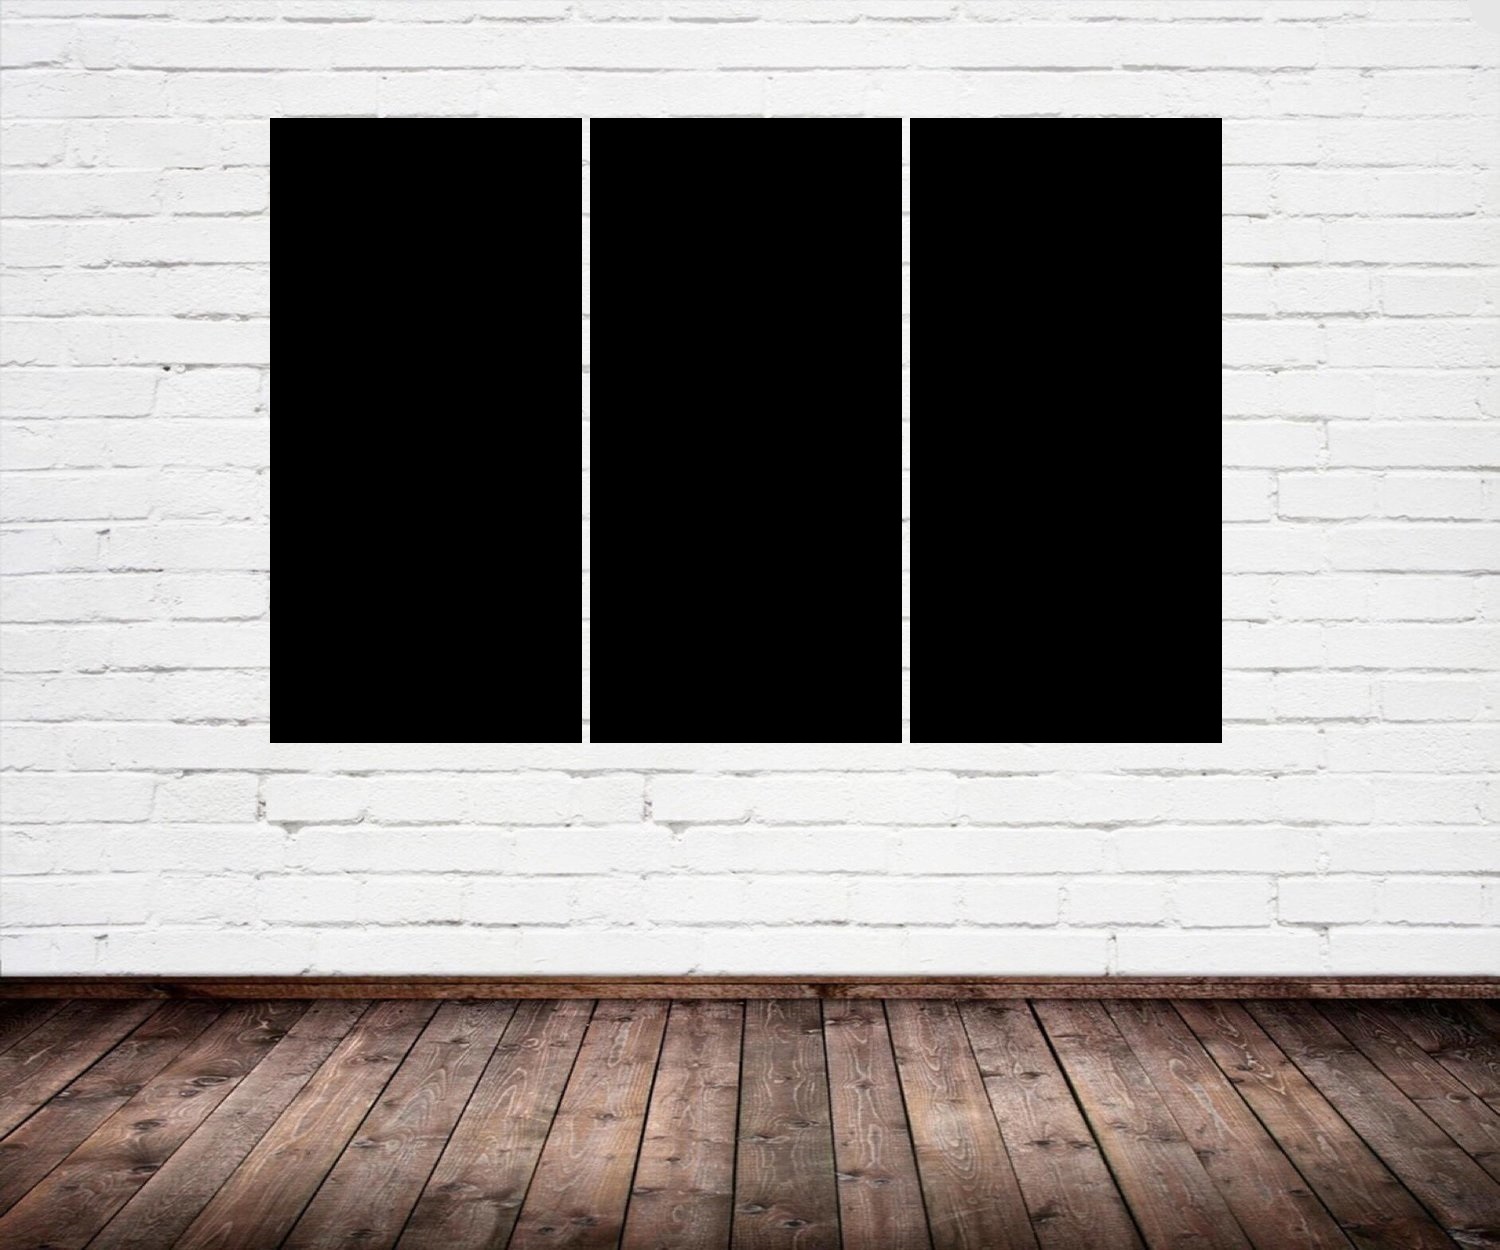
I have one more task this time image will split into three vertical or horizontal parts as attached below by one photo? is this possible? 
Copy link to clipboard
Copied
Just to be 100% clear:
1) A single image split into a faux triptych
or
2) 3 separate images, combined into a single/split image
It may also be good to disclose the sizes of the panels and if the changing images are presized exactly or not. Samples could be helpful to those wishing to offer advice or help.
Copy link to clipboard
Copied
1) A single image split into a faux triptych
or
2) 3 separate images, combined into a single/split image
Two very different things my scripts do the second 1 to 53 images can be batch populated into a template a template can have 1 to 53 image locations.
Spiting up an image my scripts do not do. However you could populate an single image and overlay the populated image with a mat that has three openings to show three parts of the image.
With my scripts all you need to do is create you own custom templates. All you need are your custom Templates and your images.
The scripts can optionally stamp file names on to the populates images in one to 9 locations. Optional layer styles can be added the the text and populate image layers. Image File name can optionally be used in the process they can contain prefix sequence number followed by a # followed by the Test yow want stamp on the images as a file. Those sequence numbers you use to order the images file sort order images are populated files system file order. The Number# will be stript and not be part of the optional text stamp. The package include some sample template files.
Copy link to clipboard
Copied
With a good template design the process can be quite strait forward but by no means is it simple.
Copy link to clipboard
Copied
What is simple is my PSD template design. This make template easy to create. You can get very creative there only are four simple rules you need to adhere to. The are not very confining and they are simple.
- Size the photo collage templates for the print size you want - width, height and print DPI resolution.
- Photo collage templates must have a Photoshop background layer. The contents of this layer can be anything.
- Photo collage templates must have alpha channels named "Image 1", "Image 2", ... "Image n". These map your images Location Position, Shape and size.
- Photo collage templates layers above the background layers must provide transparent areas to let the images that will be placed below them show through.
Copy link to clipboard
Copied
Hi JJMack, I will give your script package a go later…
EDIT: Great job JJMack, your script works great for this triptych task, especially as the source images are already split into 3.
P.S.: For some users, it might be helpful to remove the alpha channels once the montage has been created (as they still exist as layer masks anyway). I can’t attribute credit to the original author of this script as that has been lost with time, however for those looking to “clean up”:
// remove every but the composite channels,
if (documents.length > 0)
{
docRef = activeDocument;
for (var i = docRef.channels.length-1 ; i >=0 ; i--) {
if (docRef.channels.kind != ChannelType.COMPONENT) {
$.writeln(docRef.channels.kind);
docRef.channels.remove(); }
}
}
else
{
alert("There must be at least one open document to run this script!");
}
Copy link to clipboard
Copied
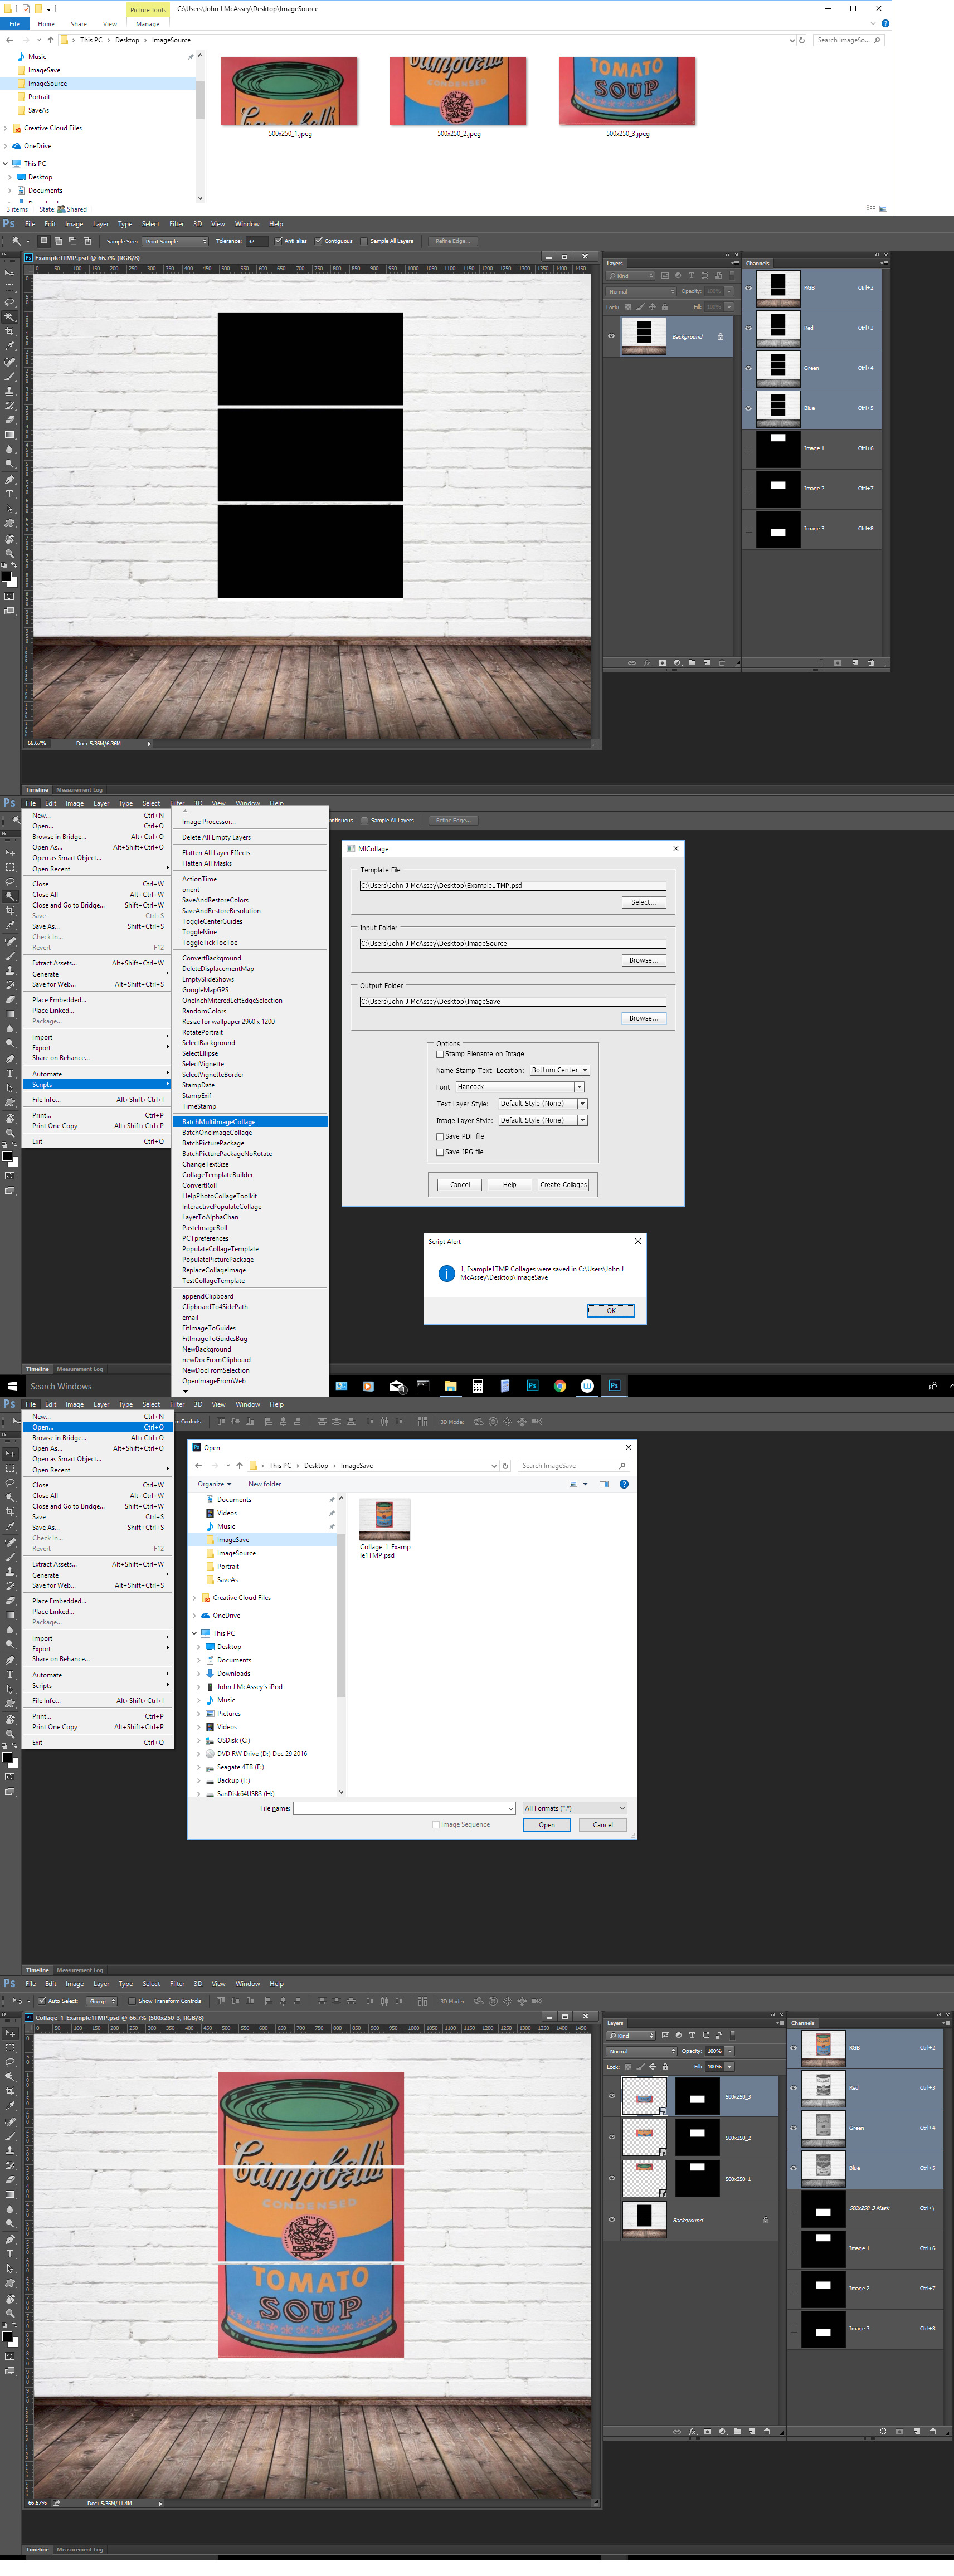
JJMack Its one image split onto three parts? so, can your scripts will do that? if I create templates according to your templates requirements..?
Copy link to clipboard
Copied
Yes its one image split onto three parts, please see attached... 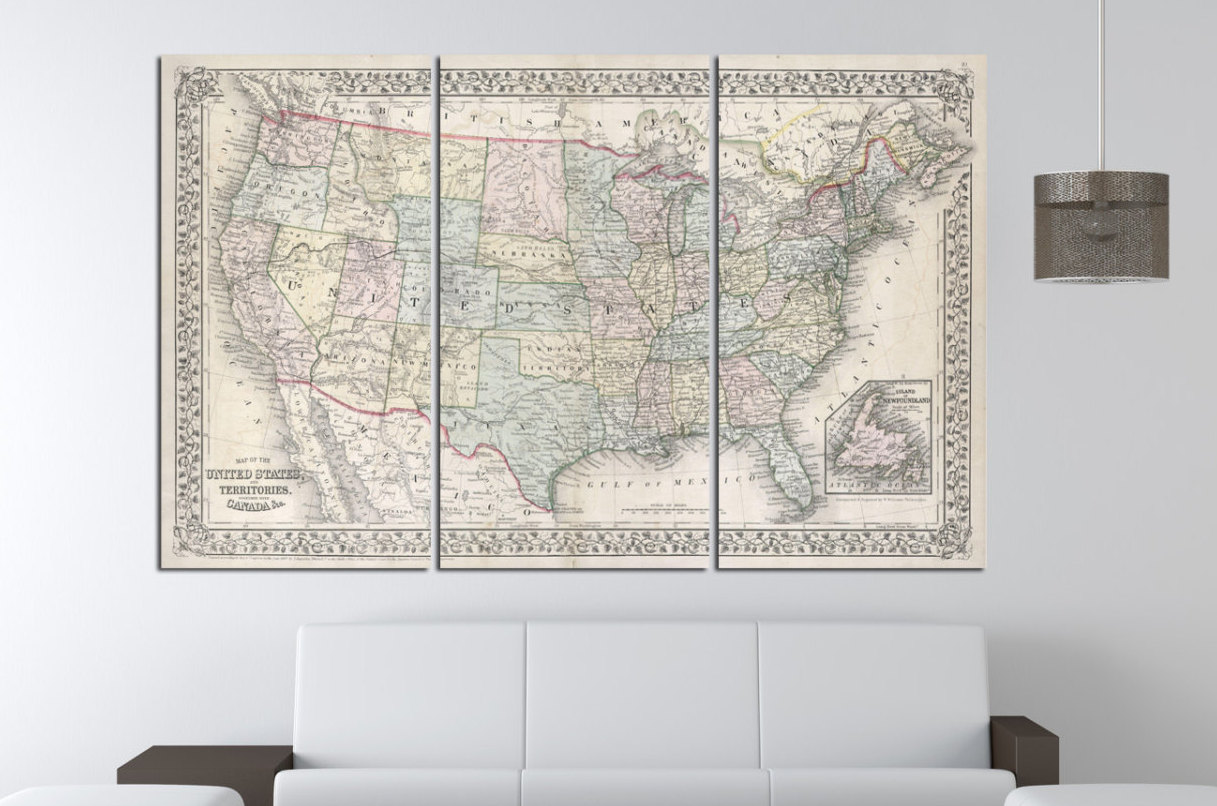


Copy link to clipboard
Copied
As I wrote the image will be populated as a single image. Your Template can lay a mat over the image to show three parts of the image the image will not be split it will be overlay by your three hole mat parts of the image will be covered. If you want the actual image split. You would need to split the image into three images and create a three image collage template. My Scripts can handle templates with 1 to 53 image locations. My scripts do not modify your image files. You Images files are just placed in the template as a smart object layer sized for the a single location and masked to shape.
Copy link to clipboard
Copied
Actually I have all images in three parts... as i have upload above, so when your script run will not recognize right part of image and put image part wrongly?
Copy link to clipboard
Copied
images are populated in the sequence of the alpha Channels image 1 image 2 image 3 File in file name sort order. If you read the documentation you will know how to use the package and the images will be where you want the populated.
My Append above also noted the image order use.
"The scripts can optionally stamp file names on to the populates images in one to 9 locations. Optional layer styles can be added the the text and populate image layers. Image File name can optionally be used in the process they can contain prefix sequence number followed by a # followed by the Text you want stamp on the images as a file. Those sequence numbers you use to order the images file sort order images are populated files system file order. The Number# will be striped and not be part of the optional text stamp. The package include some sample template files."
Copy link to clipboard
Copied
-
- 1
- 2

Get ready! An upgraded Adobe Community experience is coming in January.
Learn more
 AdChoices