- Home
- Premiere Elements
- Discussions
- Re: Screen-caps - A Photoshop Workflow
- Re: Screen-caps - A Photoshop Workflow
Screen-caps - A Photoshop Workflow
Copy link to clipboard
Copied
Users often ask how to do screen-caps, to show what is happening with their program. Below are possible workflows for creating the screen-caps, and then there are instructions on how to "attach" the screen-caps to a Reply in the Adobe Forums, but only if one is accessing them via a Web browser - with e-mail access, you cannot attach a screen-cap, or other image file. There are first several utilities that will help you do this, but I will outline the steps using Adobe Photoshop and the Windows Clipboard. One can substitute their image editing program of choice, such as Photoshop Elements, PaintShop Pro, or other.
Windows has a Clipboard feature, and one can use the Print Screen key (often seen as Prt Sc, etc., and depending on their computer, might have to also use a modifier key, such as the Ctrl key).
First, set up your program, so that the necessary items are shown. This might be zooming in on the Timeline, even expanding it vertically, moving the CTI (Current Time Indicator with the red Edit Line attached), and perhaps selecting a problem Clip. Often, the Program Monitor will also need to be seen, and perhaps the Project Panel showing the proper Asset, or maybe the Effects Control Panel. Get these setup, so that they are visible, and where you want them. Now, hit the Print Screen key (see above for comments). The screen will now be an image in Clipboard.
Open your image editing program. Here, I’m using Photoshop. Create a New Image. Photoshop will first look in the Clipboard, and if there is an image there, will even set up your New Image to match that w/ the proper pixel x pixel size. Here, I name that New Image with a name that means something to me, like, “PrE_Audio_Mixer_01.” I use the underscore, in lieu of spaces, as the forum software sometimes has problems with file names containing spaces. Yes, I know that this is so Windows 98, but it works well for me.
Hit Ctrl+V to Paste the image from the Clipboard into this New Image. If my full screen-cap has captured more image area, than I need, I Crop to the important parts.
Next, if I need to do call outs, or annotate the image, I use the Text Too, and maybe will draw boxes, or circles, to make sure that the viewer knows exactly where I want them to look and what to look for. To draw arrows, or lines, I use the Shape Tool, and/or the Pen Tool, and Stroke, or Fill these Paths, as is necessary.
At this point, I have a Layered file with drawings and text, overlaying my screen image. I will do a Save_As and choose .PSD to keep my Layers handy for any additional editing, if necessary. The one problem is that the Adobe forum will NOT attach a .PSD file. Here, one has several choices. One is to do a Save_for_Web, and let PS Flatten the Layers, and merge them into one Layer. That will also remove any Alpha Channels, and/or Paths. Two popular formats are .PNG, or JPEG, and Save_for_Web allows for either of these. The choice is yours, but I normally just use JPEG with a Quality of about 9, in Photoshop to compress the image, but still leave it sharp enough for others to read. Again, PNG is a good choice as well, and will yield slightly better quality for the file size. Only possible issue is that many older browsers (what the viewers will be using to view the screen-cap) do not handle PNG. All newer browsers do, and do so very well. I have begun using PNG, instead of any compression of JPEG, and the results are better, and sharper.
With the screen-cap image Saved to our HDD, I use the little “camera” icon, in the lower-middle of the Adobe Forum editing screen’s Toolbar, to actually attach the image:

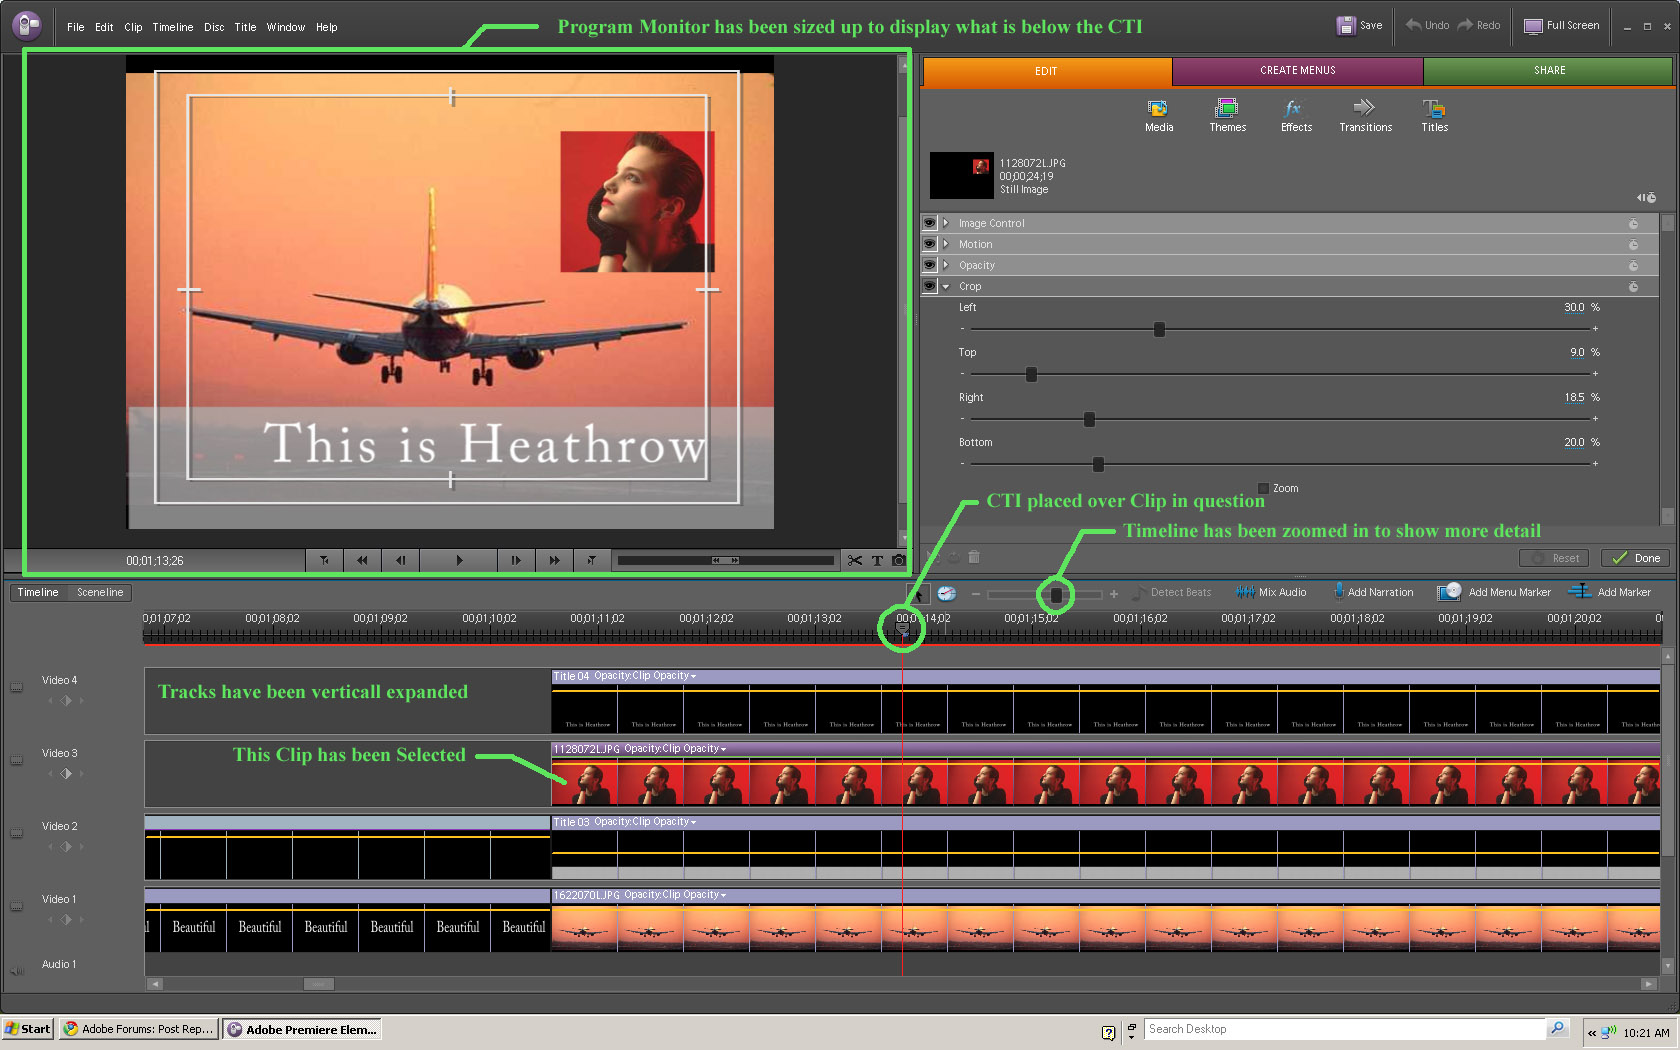
Here is an example of a screen-cap with the program setup as I needed, call outs and annotations:

Hope that this helps. Note: other image editing programs will differ, as will various screen-cap utilities.
Good luck,
Hunt
Copy link to clipboard
Copied
Note: most e-mail (POP) servers will NOT attach images to the Adobe forums. One must access the forums via a Web browser (HTTP), to attach images.
Hunt
Copy link to clipboard
Copied
Bill Hunt wrote:
Windows has a Clipboard feature, and one can use the Print Screen key (often seen as Prt Sc, etc., and depending on their computer, might have to also use a modifier key, such as the Ctrl key).
Note that [Alt] + [PrtScr] copies just the active Window to the clipboard.
Cheers,
--
Neale
Insanity is hereditary, you get it from your children
Copy link to clipboard
Copied
Neale,
Thanks for that. I had never used Alt+Prt Scr on my Sager, and did not know of the specifics of that modifier key. On my laptop, I need to do Ctrl+Prt Scr, rather than the more common Prt Scr (no modifier key), but that is fairly specific to my Sager on the Clevo MoBo, with its keyboard. On many computers, just plain Prt Scr is all that's needed.
I'll experiment with Alt+Prt Scr, as that might actually save me a Crop in PS, when doing a screen-cap.
Thanks,
Hunt
Copy link to clipboard
Copied
Here is an Adobe PS FAQ Entry, that might also be helpful: http://forums.adobe.com/thread/963429?tstart=0
Hunt