

DISCUSS: Tone Mapping in Premiere Pro Beta
We have decided to take a slightly different approach and moved the conversation over here: https://community.adobe.com/t5/premiere-pro-beta-discussions/discuss-timeline-tonemapping/m-p/13387919
We are excited to announce Tone Mapping in Premiere Pro Beta when using HDR clips in SDR sequences
We are actively seeking feedback on this feature, to make it work for everyone! This feature will also see continuous development in the upcoming days, so please make sure you keep checking it in the new Beta releases.
What is Tone Mapping and why do I need it?
When you create a new sequence using your clips (SDR, HLG, PQ), Premiere pro automatically creates a sequence from the clip’s color space. Let’s say we create a sequence with an iPhone HDR Clip- the sequence’s Working Color Space is now set to Rec 2100 HLG. This is a great way to edit your HDR clips while keeping the full dynamic range and Rec. 2100 colors of the source.
However, many of us want to create a regular SDR sequence (Because many of our friends and family are going to view the video on a regular SDR screen). For that, you would go to Sequence Settings and change the Working Color Space of the Sequence to Rec. 709.
When we change the Sequence’s Working Color Space, Premiere converts the Rec. 2100 colors of the iPhone clip to Rec. 709 colors. But there is a mismatch in the dynamic range between the higher dynamic range clip and lower dynamic range sequence. Because of this, our iPhone clips now look over-exposed with clipped highlights. This is also the case with any HLG/ PQ or color-managed log clips (like Sony log clips).

(Image: iPhone HDR clip in Rec. 709 Sequence. Notice how it looks overbright with clipped highlight details)
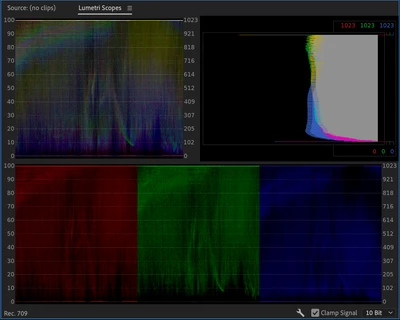
(Image: Scopes of the clip in Rec.709 Color space show that most of the highlight details are clipped)
Tone Mapping is critical when converting colors of a media from a larger dynamic range to a smaller dynamic range to obtain a pleasing version and to retain the details of the original media that might have otherwise got clipped in the process of conversion.
Simply put, Tone Map takes all the details from the HDR highlights and preserves them by rolling off into a lower dynamic range, essentially approximating the appearance of HDR content in an SDR sequence.

(Image: iPhone HDR clip using Tone Mapping in Rec.709 Sequence)
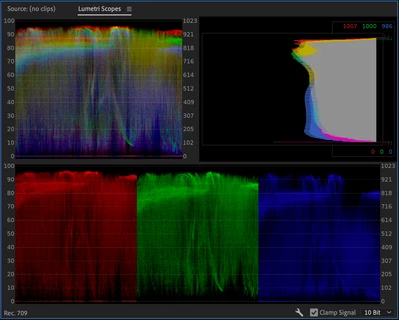
(Image: Scopes of above clip when using Tone Mapping in Rec.709 Sequence. Notice how the previously clipped details are now rolled in.)
How does Tonemapping work in Premiere?
With June Beta update (Premiere Pro Beta 22.6) you will see a few changes in Sequence Settings window. When you create a sequence, under Working Color Space you will find a new checkbox called ‘Automatically Tone Map Media’. This is checked ON by default for new Sequences.
With this checkbox ON, whenever you drop an HDR clip (say your iPhone clip) to an SDR Sequence, the clip is automatically Tone Mapped and all your overbright data is brought into Rec. 709 legal range.
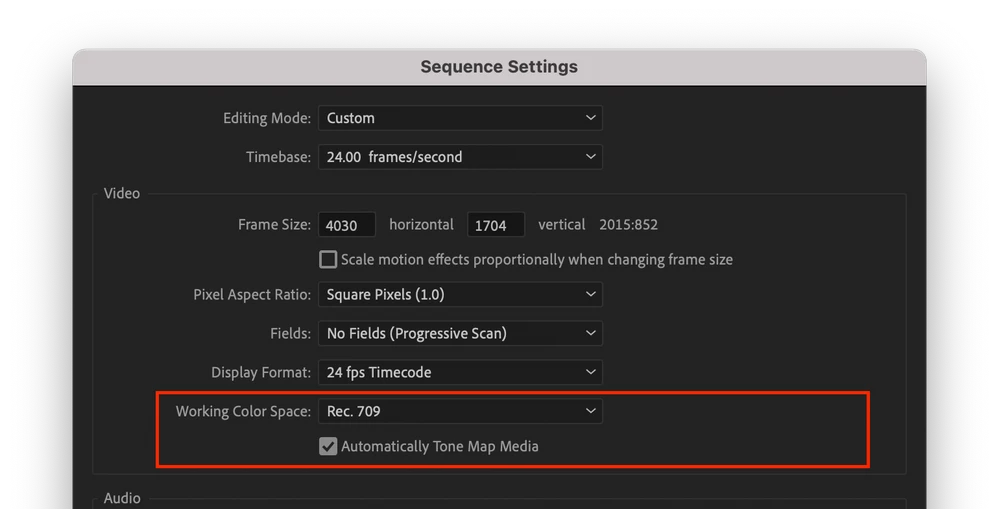
(Image: New Tonemapping checkbox under Working Color Space)
Tone Mapping only impacts clips that are of a higher dynamic range than the Working Color Space. SDR clips that are within range are not impacted.
If you check OFF ‘Automatically Tone Map Media’ in Sequence Settings, Tone Mapping will not be applied to any of the clips in the sequence. You can then use LUTs or the Lumetri Color panel to manually dial down the overbright highlights. Be aware, some LUTs may create unwanted artifacts.
Is there a way to modify Tone Mapping applied by Premiere Pro?
Tone Mapping currently is automatically managed by Premiere Pro. With this Beta release, we would love to hear from the community about the following:
- Is Tone Mapping applied to HDR clips working as per your creative expectation?
- Is the Tone Mapping applied, too strong or too weak?
- Would you want creative control over the amount of Tone Mapping on your HDR clips.
Please let us know via comments on this blog post!
What about legacy Premiere Pro files?
Legacy Premiere pro files will open with the Sequence Settings option of ‘Automatically Tone Map Media’ checked OFF. This way, your clips will continue looking as they were in the previous versions of Premiere Pro.
Tone Mapping will not be applied to any clips in the sequence until ‘Automatically Tone Map Media’ in Sequence Settings is checked ON.
Why do some files not get Tone Mapped?
Files which are currently Color-managed in Premiere Pro make use of the Automatic Tone Mapping feature. This includes color spaces of HLG media, PQ media and Sony log in Prores, h.264, HEVC, XAVC codecs.
Some log files are still not color managed in Premiere Pro and will get Color-managed over time. For those clips, older methods of LUT based Tone Mapping will continue working.
When you import and use Non Color-managed clips in a sequence where Tone Mapping is required, Premiere Pro will not Tone Map these clips.
However, If you change the interpretation of the clip and chose to override the Media color space to a Color-managed colorspace, Premiere Pro will automatically start applying Tone Mapping to the clip whenever it is used in a sequence with a dynamic range smaller than that of the clip’s.
