Exit
  • Global community
    • Language:
      • Deutsch
      • English
      • Español
      • Français
      • Português
  • 日本語コミュニティ
  • 한국 커뮤니티
20

Now in Premiere Pro Beta: New Masking Tools

Adobe Employee ,
Aug 31, 2025 Aug 31, 2025

We’re excited to push an early development preview of new masking workflows to Premiere Pro (beta).  Whether you are color grading, applying effects, or cutting objects out from the background, these new masking tools are built to help editors work faster, smarter, and more creatively without needing to go to After Effects for simple tasks.


Note: This beta is an early look at upcoming Premiere Pro workflows and is not intended to reflect general availability performance or polish. Please contact us with bugs, feedback, and feature requests to improve these features.


  • Object Mask – Automatically identify objects and people in your footage using AI and isolate them with a single click. Plus mask refinement tools and fast tracking throughout clips.
  • Redesigned Shape Masks – the traditional shape mask tools (ellipse, rectangle, pen) have been rebuilt from the ground up with many performance and UI improvements.
  • Faster Shape Mask Tracking – the tracking algorithm has been completely rebuilt too.  It’s significantly faster than before, more accurate, and offers more precise control for correction.
  • Compositing tools – blend any combination of Object and Shape Masks to create complex masks with new blend modes: add, subtract, intersect


To get started

New masking workflows are only functional in beta projects that support an upcoming major release of Premiere Pro. This means your beta projects will not open in Premiere Pro 25 or earlier. We're excited to give you early access with these steps. 

  1. Update to Premiere Beta version 25.6 build 48 or later.”
  2. If you see this dialog, choose “Enable new masking”
    Launch dialogLaunch dialog
    – OR – if you do not see the dialog at launch, or you skipped it, do the following…
  3. Open or create any project
  4. Enable “New Masking” via the beta menu in the OS menu bar at the top of the screen. Premiere Pro (Beta) will need to relaunch.
    Beta menuBeta menu
  5. From now on, Premiere Pro (Beta) will create projects in version 26.0 format. 


WARNING: these projects are NOT compatible with the current shipping version of Premiere Pro and will not open.


Quick Start guide

Follow these steps to get started with New Masking.

  1. Make sure you have enabled New Masking (see above).
  2. Select a clip on the timeline.
  3. Find the new Mask Tool group in the toolbar. Long-press to see all the masking options. Choose the Object Mask tool.
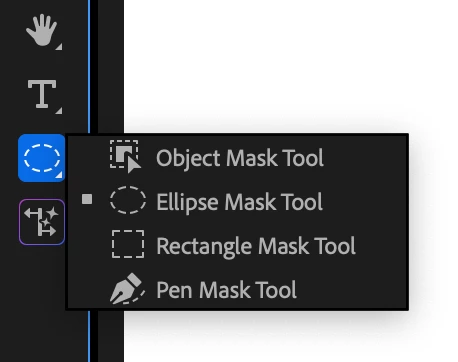
    ToolsTools


  4. Hover the mouse over the program monitor, watch as objects are identified, and click. This will draw a static mask around the object or person.
  5. Track the motion. Find the new “Object Mask” in the “Unassigned Masks” section of the Effect Controls Panel. Click on the forward and back button.

    Tip: the Effects panel is a different panel from the Effect Controls Panel. Find it in the Window menu.
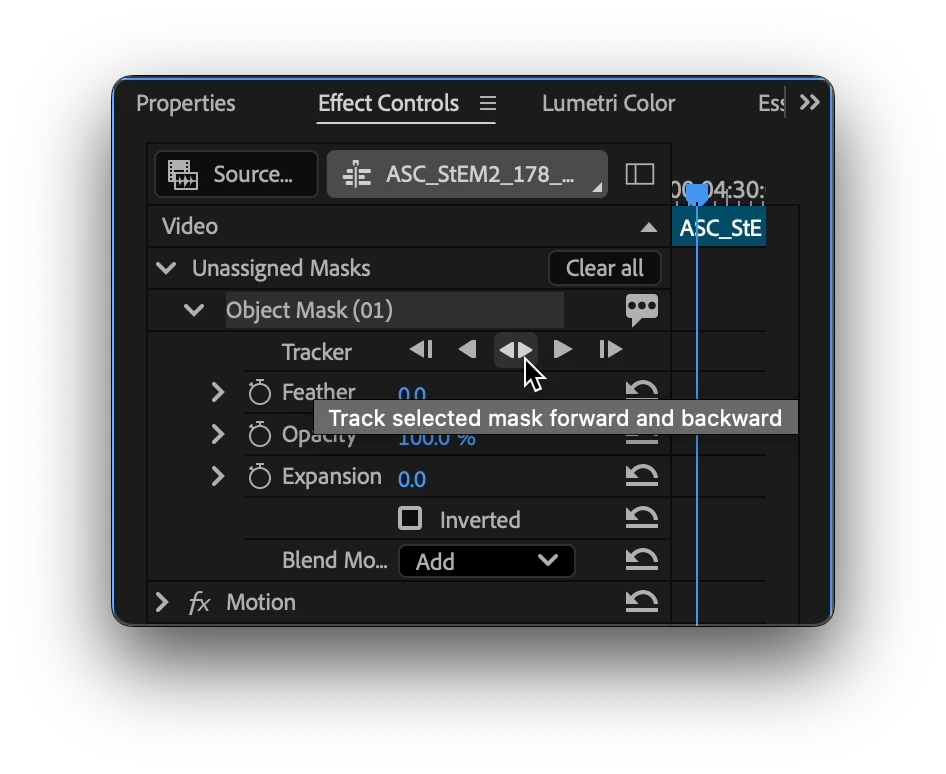
FrancisCrossman_3-1756671533370.png

  1. Add an effect. Find the Gaussian blur effect in the Effect Panel. Drop it on the clip in the timeline. The mask will automatically be applied to the effect.
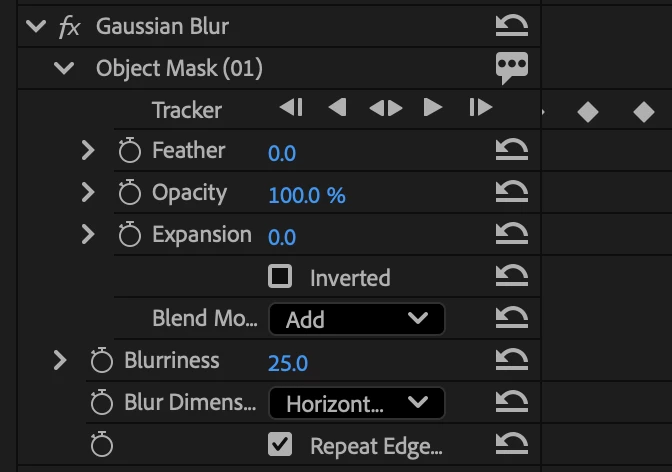
FrancisCrossman_4-1756671533371.png

  1. Congratulations, you just used Object Mask to blur an object!
  2. Now, try to use the other tools in the group in a similar manner.


Visit here for the complete documentation. https://helpx.adobe.com/premiere-pro/using/object-masking.html


We want to know what you think.  Join the conversation below.

TOPICS
Feature request , Feedback , Performance
32.8K
Translate
Report
Community guidelines
Be kind and respectful, give credit to the original source of content, and search for duplicates before posting. Learn more
community guidelines

correct answers 2 Correct answers

Adobe Employee , Sep 01, 2025 Sep 01, 2025

@FlyingFourFun Thanks for your detailed feedback.

I will reach out to you over direct message regarding how to share the videos you were referring to. 

We have a helpx page that might help with some of the questions you have raised. 
https://helpx.adobe.com/premiere-pro/using/object-masking.html

Blend mode of mask can be used to combine the masks together. You can use "Add", "Subtract" or "Intersect" to combine masks. Any number of Object Masks and Vector Masks can be combined to create complex mas

...
Translate
Adobe Employee , Sep 03, 2025 Sep 03, 2025

Make sure to right click on the tracked mask in the Effect Controls and select Change to Opacity Mask. Duplicate your video and remove the tracked opacity mask and placed that on V1 and your masked layer on V3 or above. Place your graphics on V2 and it should show up.

Translate
replies 130 Replies 130
Community Expert ,
Oct 06, 2025 Oct 06, 2025

Ah, I see. Option+click is fine. You can add a tooltip on-hover of the Anchor Point so that is more obvious. It also needs snapping to the 4 corners, edges, and center point with "Ctrl" / "Cmd".


Why do Graphic Shapes scale from the corners, but Mask Shapes scale from the center?


A big disconnect to me is why the Mask bounding box behavior is different from Graphic Shapes. They scale from different points, have different UI for rounded corners, have different Anchor Point behavior, and different keyboard shortcuts (like Shift). If you draw a box with Mask vs. Shape, they have to be edited in totally different ways.


All Points & Shapes should be editable in more or less the same way.

Translate
Report
Community guidelines
Be kind and respectful, give credit to the original source of content, and search for duplicates before posting. Learn more
community guidelines
Adobe Employee ,
Oct 06, 2025 Oct 06, 2025

These are fair points. Appreciate the feedback.

Translate
Report
Community guidelines
Be kind and respectful, give credit to the original source of content, and search for duplicates before posting. Learn more
community guidelines
New Here ,
Oct 08, 2025 Oct 08, 2025

البرنامج يعطيني اشارة انتظار مجرد الضغط على الاداة


Translate
Report
Community guidelines
Be kind and respectful, give credit to the original source of content, and search for duplicates before posting. Learn more
community guidelines
Adobe Employee ,
Oct 13, 2025 Oct 13, 2025

@fierce_Mercury8940 Can you please share a screenshot of the problem you are seeing.

Translate
Report
Community guidelines
Be kind and respectful, give credit to the original source of content, and search for duplicates before posting. Learn more
community guidelines
Community Beginner ,
Oct 08, 2025 Oct 08, 2025

First of all, I'm really glad to see features like this being explored in Premire. Resolve's AI masking has been something I wish I had in my toolbox for a while.

I'm mainly giving feedback on the object tracker here: it's amazingly quick, seems to find subjects in videos with no issue, and tracks them with 90% accuracy with one click. Amazing! BUT!
The model is too flickery/chattered/indecisive to be useful at all. For example: If I'd like to mask a subject, then invert it and apply color correction to the background with the subject cut out, I can see the flicker of the mask around the subject in a major way. Feathering, expanding, or modifying the mask with the Add or Subtract tools can't help fix it.
All in all, this is a useful feature that I'll be keeping an eye on, but in its current state: I'd like to see refinements to the model that improve its edge detection and consistency.

Translate
Report
Community guidelines
Be kind and respectful, give credit to the original source of content, and search for duplicates before posting. Learn more
community guidelines
Adobe Employee ,
Oct 08, 2025 Oct 08, 2025

@Logan_Barney5958 Thanks for the feedback. I will reach out to via DM to get additional details on what you are seeing.  

Translate
Report
Community guidelines
Be kind and respectful, give credit to the original source of content, and search for duplicates before posting. Learn more
community guidelines
New Here ,
Oct 08, 2025 Oct 08, 2025

The new masking tools in Premiere Pro Beta are a big step forward  especially the AI-powered Object Mask and improved shape tracking. These updates make editing faster and reduce the need to switch to After Effects for simple masking tasks. I’ve been exploring similar creative tech enhancements on Touch Cric , where speed and precision also matter for delivering live visuals smoothly. Adobe’s direction here clearly focuses on smarter, more efficient workflows for editors.

Translate
Report
Community guidelines
Be kind and respectful, give credit to the original source of content, and search for duplicates before posting. Learn more
community guidelines
New Here ,
Oct 10, 2025 Oct 10, 2025

The regular mask doesn't work in the beta version. It's impossible to change the position, size, or animate a regular, non-object mask. The path isn't created or moved; the mask stays in place, and its position and size can't be moved.

Translate
Report
Community guidelines
Be kind and respectful, give credit to the original source of content, and search for duplicates before posting. Learn more
community guidelines
Adobe Employee ,
Oct 10, 2025 Oct 10, 2025

You can. In the program monitor, chnage from Clip to Frame and it will allow you create keyframes for non object mask.

Translate
Report
Community guidelines
Be kind and respectful, give credit to the original source of content, and search for duplicates before posting. Learn more
community guidelines
New Here ,
Oct 10, 2025 Oct 10, 2025

Step-by-Step Process:


Convert Tracked Mask to Opacity Mask
Right-click your tracked mask in the Effect Controls panel and select "Change to Opacity Mask" to activate mask-based transparency effects [2].


Duplicate Video Layer

Create a duplicate of your original video clip
Remove the tracked opacity mask from this duplicated layer


Layer Arrangement

Place the duplicated layer (without mask) on Video Track 1 (V1)
Position your masked layer (with opacity effects) on Video Track 3 (V3) or higher
Add your graphics/elements to Video Track 2 (V2)


This stacking order ensures proper visibility:

V1: Clean background video
V2: Overlay graphics
V3+: Masked effects layer

The graphics on V2 will now appear sandwiched between the base video and masked layer for controlled compositing.

Translate
Report
Community guidelines
Be kind and respectful, give credit to the original source of content, and search for duplicates before posting. Learn more
community guidelines
Adobe Employee ,
Oct 10, 2025 Oct 10, 2025

We have shortcuts in the beta that allow for you to promote an unassigned mask to opacity and restore it to unassigned as well. You can do the right click method and drag a mask to Opacity.

Translate
Report
Community guidelines
Be kind and respectful, give credit to the original source of content, and search for duplicates before posting. Learn more
community guidelines
Community Expert ,
Oct 20, 2025 Oct 20, 2025

Finally a moment to do some testing with the new mask features. Here's my feedback after a quick spin.

As overall feature this is a great step forward. Allowing tools to be expanded in functionality by adding UI elements in the viewer (program monitor) is a good choice. Many other tools can potentially benefit from such mechanisms breaking out of the sometimes restrictive effects panel slider, checkbox, menu principles. Why not promote the tracker buttons to the Program Monitor as well? So you can keep your eyes around the same working area when tracking.


  1. Individual mask tools cannot be cycled with a single assigned keystroke (like in Photoshop or AE) making cycling between them a pain. Assigning a key per tool is not a solution.
  2. In addition to the above, what also helps is if the mask tool types are exposed in the program monitor UI so you can switch between them quickly after either of them was activated, without using keyboard shortcuts or holding down your mouse while selecting it in the toolbar. See this mockup for reference + the tracker tools.2025-10-20 18_34_53-Clipboard.png
  3. When transforming, anchor point cannot be snapped to one of the 9 boundingbox positions. Would expect this to be possible via holding CTRL while moving it for example.

  4. Transform controls for rect/elipse is confusing w.r.t their values. Anchor becomes 0,0 (top left canvas), size is the sequence resolution, shape returns to original drawn position. Why not make this function the same as AE's shapes where rect path size == absolute in pixels drawn and transform size(scale) = separate % scalar with 100%  == drawn size. Such a mechanism would also allow for drawing fixed resolution masks onto footage.2025-10-20 18_19_03-Adobe Premiere Pro (Beta).png
  5. Would be useful if center positional data of a tracked mask could be used to drive other effects. For example you track a face and you copy paste it to transform of a text element. (See how BorisFX Mocha stores tracking data)
  6. AI masking option is rough. There is severe lack of temporal stability or mask detail around edges and transparency. There are also no options to refine the matte with post effect other than feathering/blur. To make it more useful you'd need some user controlled tools like painting in gaps created on random frames by the model.
  7. Editors likely use masking tools 99/100 times for opacity. This should be a default (or user preference) if no other destination is selected when drawing on a selected clip, instead of the unnassigned masks section.

    To conclude, what definitely a showstopper is atm is the fact that it takes way too much time getting from A to B if all you want to do is apply an elipse or rectangle mask onto a clip. If point 1, 2 and 7 are addressed this should already be greatly improved.


Translate
Report
Community guidelines
Be kind and respectful, give credit to the original source of content, and search for duplicates before posting. Learn more
community guidelines
Adobe Employee ,
Oct 24, 2025 Oct 24, 2025

Thank you for the feedback. In regards to point #4, can you please explain how you got into the state where the two Ellipse masks have different Scale? 
You can use the SHIFT modifier to draw a fixed sized shape or maintain the shape when adjusting Scale with the Bounding Box.

Translate
Report
Community guidelines
Be kind and respectful, give credit to the original source of content, and search for duplicates before posting. Learn more
community guidelines
Community Expert ,
Oct 25, 2025 Oct 25, 2025

No problem @Ron Rigler ! The point isn't so much how to draw shapes, but the way data is handled is not efficient and artist friendly.


What currently happens is that the property [Scale] is upon first draw declared the dimensions of the sequence regardless of the drawn shape.

Shebbe_0-1761389130518.png

This in itself is already unusable because it doesn't reflect the ratio of the shape.


When manipulating the small shape to roughly match the larger shape, you get dimensions that are totally meaningless to the user from an information parsing point, and due to slider sensitivity roughly based around values up to say 1000, make sliding them instead of changing the shape in the viewer totally useless.

Shebbe_2-1761389333196.png

This is why it would make much much more sense if dimensions for Elipse and Rectangle were absolute pixel based.


Let's promote a new value [Size] (being a property of the path/object). In addition there could be a secondary (existing) [Scale] slider (part of transform) that at 100% (default value) reflects the shape's pixel size but can be scaled as secondary operation. This mechanism would allow animating such a shape from 0-100% but using pixel width/height to determine the real dimensions for it. This would tremendously help artists type in say 300x600 and (provided media clip matches sequence res and isn't by itself scaled) create a mask that is exactly that rather than get some arbitrary values from current mechanism.

Here's a mockup of what I mean. This way scale is also able to be reset to 100% rather than back to sequence size. The initial draw of the shape dictates [Size] in pixels instead, and so should scaling it via the path in the viewer.

Shebbe_3-1761390231888.png

Shebbe_4-1761390392518.png

Even better would also be the ability to change between Rectangle and Elipse on the mask itself. Since these are 'fixed' shapes they can easily be made dynamic and get a dropdown that allows toggling between them. When adjusting a point of a rectangle that makes it not a rectangle anymore, the Size property should reflect the dimensions of the bounding box instead and keep relative shape when altered.

When flipping back and forth between Elipse and Rectangle the previously used shape data should restore itself.


Lastly, once any point is altered in a Rectangle there seems to be no way to recover the real rectangle (90degree angles). There should ideally be an option for this for cases where you did so accidentally and can't undo anymore.


These ideas are based on how AE shape layers and the new Mesh primitives in v26 are designed. I think it's much more rugged this way and it would also help a little bit with mechanism parity between these software packages.

Translate
Report
Community guidelines
Be kind and respectful, give credit to the original source of content, and search for duplicates before posting. Learn more
community guidelines
Adobe Employee ,
Oct 27, 2025 Oct 27, 2025

@Shebbe thank you for the additional info. I will share it with the team.

Translate
Report
Community guidelines
Be kind and respectful, give credit to the original source of content, and search for duplicates before posting. Learn more
community guidelines
Adobe Employee ,
Oct 29, 2025 Oct 29, 2025

@Shebbe, we reviewed your feedback within the team, and we all agree you have a good point.  We're evaluating how to address this.  

Translate
Report
Community guidelines
Be kind and respectful, give credit to the original source of content, and search for duplicates before posting. Learn more
community guidelines
Community Beginner ,
Oct 23, 2025 Oct 23, 2025

I'm running into an issue that sometimes occurs when trying to edit an already tracked object mask. For example, If the track misses something and I try to add to the mask and re-track, it ignores the new selection and only follows its original track. Similarly if it starts tracking more than I want and I improve the selection, as soon as I hit the track button It will instantly revert back to the original mask. I can't figure out what the conditions are to reproduce the problem, sometimes it works no problem, sometimes it only works if I start at the beginning of the track, sometimes it doesn't work at all and I need to create a new mask from the point where I need to change it and hide the other one. I can have 2 videos in the same project, or even the same timeline, where one video is giving me this issue and the other video allows me to edit the mask's tracking no problem.

Translate
Report
Community guidelines
Be kind and respectful, give credit to the original source of content, and search for duplicates before posting. Learn more
community guidelines
Community Beginner ,
Oct 28, 2025 Oct 28, 2025

I think I may have found the problem. It seems like videos with variable refresh rates have problems with the object mask tracking. After converting the video to a constant frame rate tracking works much better.

Translate
Report
Community guidelines
Be kind and respectful, give credit to the original source of content, and search for duplicates before posting. Learn more
community guidelines
Enthusiast ,
Oct 28, 2025 Oct 28, 2025

I belive Adobe needs to detect and flag VFR video to the user so they know it might cause issues.... 

Otherwise, good catch figuring this out.

Translate
Report
Community guidelines
Be kind and respectful, give credit to the original source of content, and search for duplicates before posting. Learn more
community guidelines
Adobe Employee ,
Oct 28, 2025 Oct 28, 2025

@Angel_DCastillo Thanks for reporting the issue, will it possible for you to share the footage with me so that we can investigate further

Vikas
Translate
Report
Community guidelines
Be kind and respectful, give credit to the original source of content, and search for duplicates before posting. Learn more
community guidelines
Community Beginner ,
Oct 29, 2025 Oct 29, 2025

Apologies, the videos I work with are confidential so I am unable to share them. We get a lot of videos in strange formats for redactions and I didn't notice at first that the videos giving me problems were using VFR.


This feature is so helpful to us by the way, our team has already gotten so much done so quickly because of it. Thanks!

Translate
Report
Community guidelines
Be kind and respectful, give credit to the original source of content, and search for duplicates before posting. Learn more
community guidelines
Adobe Employee ,
Oct 29, 2025 Oct 29, 2025

I understand the security concerns so it is fine not to share the media. I am trying to get a repro with some VFR media but so far not able to reproduce the issue, can you let me know the format/encoding of video with which you were seeing the issue.

Thanks.

Vikas
Translate
Report
Community guidelines
Be kind and respectful, give credit to the original source of content, and search for duplicates before posting. Learn more
community guidelines
Enthusiast ,
Oct 29, 2025 Oct 29, 2025

@Vikas Gahlaut if you want a quick way to get a library of VFR footage, maybe put out a call, and a place to upload samples.  I'm sure the community would support the request if it gets us closer to handling VFR footage better.   if I had some VFR I would share it with you,  maybe others are in a position to supply it.

Translate
Report
Community guidelines
Be kind and respectful, give credit to the original source of content, and search for duplicates before posting. Learn more
community guidelines
Community Beginner ,
Oct 29, 2025 Oct 29, 2025

I'm currently out of the office, but I'll see if I can get the encoding information from some of the videos on Monday. Thanks for your attention to this matter!

Translate
Report
Community guidelines
Be kind and respectful, give credit to the original source of content, and search for duplicates before posting. Learn more
community guidelines
Community Beginner ,
Nov 03, 2025 Nov 03, 2025
LATEST

Here is the properties from Premiere for one of the files:

Type: MPEG Movie
File Size: 1.41 GB
Image Size: 1920 x 1080
Field Type: Progressive
Frame Rate: 30.00
Source Audio Format: 48000 Hz - Compressed - Stereo
Project Audio Format: 48000 Hz - 32 bit floating point - Stereo
Total Duration: 00:20:01:28
Pixel Aspect Ratio: 1.0
Alpha: None
Color Space: Rec. 709
Color Space Override: Off
Input LUT: None
Video Codec Type: MP4/MOV H.264 4:2:0
Variable Frame Rate Detected
__________________________________________

Here is the the information from FFprobe as well if you want it:

Duration: 00:20:01.74, start: 0.000000, bitrate: 10084 kb/s
Stream #0:0[0x1](und): Video: h264 (High) (avc1 / 0x31637661), yuv420p(tv, bt709, progressive), 1920x1080, 9998 kb/s, SAR 1:1 DAR 16:9, 30 fps, 30 tbr, 3k tbn (default)
Metadata:
creation_time : 2023-07-26T23:31:47.000000Z
handler_name : VideoHandler
vendor_id : [0][0][0][0]
Stream #0:1[0x2](und): Audio: aac (LC) (mp4a / 0x6134706D), 48000 Hz, stereo, fltp, 68 kb/s (default)
Metadata:
creation_time : 2023-07-26T23:31:47.000000Z
handler_name : SoundHandler
vendor_id : [0][0][0][0]

Translate
Report
Community guidelines
Be kind and respectful, give credit to the original source of content, and search for duplicates before posting. Learn more
community guidelines