Inspiring
May 24, 2014
Answered

4K video

  • May 24, 2014
  • 14 replies
  • 30243 views

I am shooting in 4K using the Sony FDR-AX100.

I can import the 4K files into Premiere Pro CS5. And, when I create a timeline with it the preview shows it in 4K. I know the preview shows it in 4K because when I bring an HD file into the same sequence/timeline it is half the size.

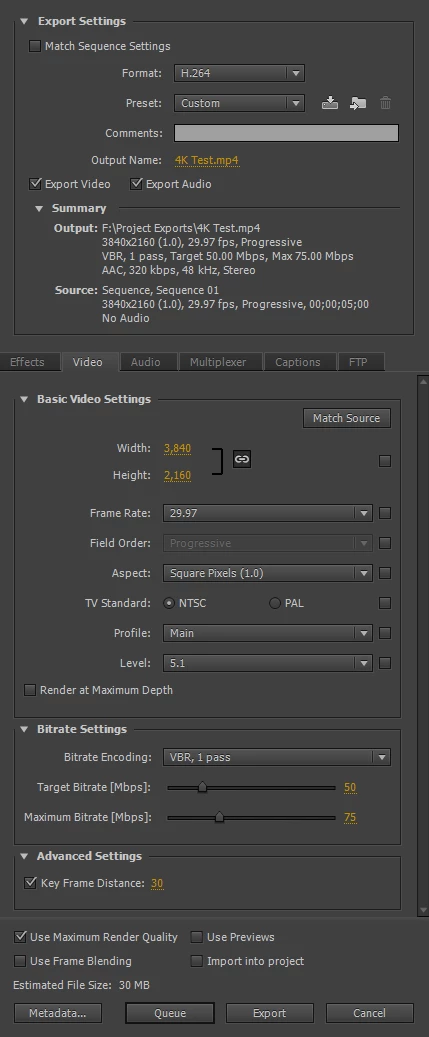
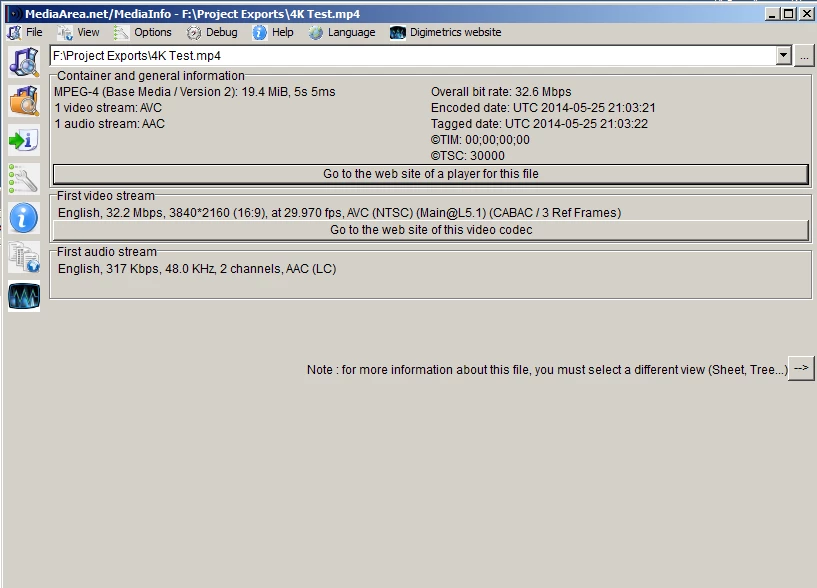
The problem I'm having is PPro CS5 doesn't export 4K. Even when I "Match sequence settings" it doesn't export in 4K.

Because money is tight, is there a way to update my version, maybe the media encoder, so I can actually export 4K in CS5? If not, what is the least expensive solution? Maybe upgrade to CS5.5 or CS6?

Thanks!

This topic has been closed for replies.
Correct answer Steven L. Gotz

You are showing us an image of the sequence presets and what we need to see are the export settings.

If you are now temporarily using CC, then the image in post #12 of this thread should show you that it is possible to export "real" 4K.

I can also export the frame size of your video (3840X2160). But Ann is correct in that you have to change the level.

Here are my export settings. Notice the sequence settings as well as the export settings. Ignore the estimated file size. I used an extremely short clip to save time.

As you can see, it is exporting as requested.

14 replies

Inspiring
December 30, 2016

I found a very helpful youtube video that shows the steps for creating a 4K sequence and export settings at Adobe Premiere Pro CS6 - 4K video sequence and render settings - YouTube

Following the youtube tutorial worked easily for me in CS6 and in CC

cheers!

NeofilmAuthor
Inspiring
May 27, 2014

Thanks everyone, I started a new discussion on this here: Help with My System Performance

NeofilmAuthor
Inspiring
May 27, 2014

Interesting, I haven't put much thought into the preset settings because I have used "Match Sequence..." for so long or just used a preset.

The idea of manually configuring the number of frames between keyframes suddenly intrigues me as I consider how this may be valuable to do. But, isn't this only necessary if I create keyframes when I edit?

There must be a way to render out the end production without losing so much quality from the original, right? Why does editing have to degrade it so much? When I could do "Match Sequence Settings" for H.264 files it didn't seem to do this!

Steven L. Gotz
Inspiring
May 27, 2014

The idea of manually configuring the number of frames between keyframes suddenly intrigues me as I consider how this may be valuable to do. But, isn't this only necessary if I create keyframes when I edit?

Apples and Oranges. A completely different issue.

Keyframes when you edit allow you to change things over time. That you already know and was for the benefit of others who might be reading this one day.

When you export to a codec with a long GOP (Group Of Pictures) the software creates one frame with all of the information in it, and that is an "I" frame, also known as a "Keyframe". Then there are "P" frames that are "predicted". These are reference frames based on what came before. There are also "B" frames which are Bi-Directional. They are based on what came before and what came after.

When you get far enough away from a keyframe. an "I" frame, the quality can suffer a bit. So I close up the distance. Does it help? Sometimes. Do I do it all the time? Yes. Why not? Files sizes are not the problem they once were.

From Wikipedia:

Generally, the more I frames the video stream has, the more editable it is. However, having more I frames substantially increases bit rate needed to code the video.
artofzootography.com
NeofilmAuthor
Inspiring
May 27, 2014

Thanks, I remember stumbling on I frames, etc... via the internet a long, long time ago. But, at the time I did not have a clue as to how this would ever become a part of what I needed to know to get things done. I haven't spent much time learning outside of what I can get my hands on gear wise, so everything I know is based on what little I can afford, based on a need to know to get projects out the door, and not very deep beyond that, just in the most basic way but with consistent and good quality. I have no formal training, just a fragmented mess of random information as I've been learning as I go. So, thanks for taking the time to go over this!

I've recently made some nice investments and look forward to taking things to the next level. Therefore, I want to know more about what you're talking about and how to apply the knowledge. I think right now is a good time because I am having exporting issues with this 4K format.

I've been digging around trying to make sense of all this stuff and how it applies. Right now I'm learning a bit more about when certain export settings should be used. As a result I'm learning how more things tie in together, I'm de-fragmenting my brain! Lol...


Right now I'm exporting a 4K file and it's taking FOREVER. Below is an image of the rendering project saying it's going to take over 2 hours and it's only 7 minutes long! I have a decent system and normally render much faster with complex multitrack HD projects. I've included images of my system below in case anyone has any suggestions on how I may improve my system. The process was $1K when I bought it but I was told the next generation was way better for editing and that I could get one for a fraction of the price and still sell mine for significantly more and have a better processor. I'm not absolutely sure if that's the bottleneck or true. I pulled up some performance information as you can see too:

  • Local Disk (C:) is of course where the program is. This is a solid state drive.
  • The Project Drive (D:) is where I store the media files and projects. F is just a partition of the same drive. These are two partitions on a RAID O composed of two spinning drives.
  • The Renders Drive (G:) is a solid state drive where I render to and have all the Adobe cache folders/files stored.

NeofilmAuthor
Inspiring
May 26, 2014

Ok, I tried the settings found in a different discussion on 4K export and it worked in CS5. I then tried your export settings, I guess I overlooked trying your export settings exactly because I had already tried manually setting up the frame sizes and the level and that didn't work. I tried customizing the export settings as you suggested via the image above and it worked too. I'm not sure if it was the setting the keyframe distance that did the trick or what, but it's working now.

Now I'm curious what the best settings will be. I prefer to do a "Match Sequence Settings" because then I would assume it's the best, but that doesn't work. The settings I got from the other discussion had a keyframe distance of 90 whereas you have it at 30, I'm not sure I understand that setting exactly. You also have the target and maximum bitrate lower, her's are both set at 80. The only other difference was the Profile, her's was set to "high" and yours is set to "Main", I don't have a clue what that means. If you have any insight you'd like to share about those three settings that would be cool, otherwise I'll have to dig up more later to learn it.

I went ahead and saved both presets and exported a 3 minute project. With your settings it rendered out 1.01 GB's in about 9 minutes and with hers it rendered out 1.64 GB's in just over 11 minutes. Both have increased noise (pixelated looking areas, esp. where the image is darker) over the original file. I wish there was a way to just render out exactly like the original file, like Match Sequence Settings presumably should work. I've tried various settings both exporting using Creative Cloud and CS5. They both rendered the same, splotchy, pixelated noise in dark areas:

Could it be because we're using H.264 since it's XAVC-S codec? That would be awesome if adobe offered a XAVC-S codec preset...

Steven L. Gotz
Inspiring
May 26, 2014

Ah, I didn't realize I didn't use "High". I should have. Sorry about that.

The actual bitrate used is up to you. I didn't have much action going on so I used a lower setting. The more action, the more you may need to up the bitrate.

As for the keyframe distance, that is a personal preference that makes files a little larger but provides me with a warm fuzzy feeling that I have done all that I can to improve the quality of the export. Since we do not generally export an All I-Frame clip, I prefer to keep the I-Frames reasonably close together. I set mine for approximately one second. Three seconds just seems reckless to me. So I change the default to tighten it up.

The quality of the H.264 could be improved if/when Adobe moves us up to level 5.2.  In the meantime, the splotchy might be alleviated by closing up the keyframes even more. That is, if it comes and goes indicating that the encoder is not able to keep up with the movement. Or, maybe exporting to an even higher bitrate? Or all of the above.

artofzootography.com
NeofilmAuthor
Inspiring
May 25, 2014

I hope I can stick with Adobe, but if I can't edit 4K maybe it's time I look at something else. I used to hate Sony Vegas but it's looking better and better: Review of Sony Movie Studio Platinum 13 - YouTube

NeofilmAuthor
Inspiring
May 25, 2014

Ok, I just installed the trial version of Premiere CC, opened Premiere CC, imported the 4K files, drug one into the timeline, exported "match sequence settings", then got properties and it still is 1920 by 1080!!!!!!!!!!!

Ann Bens
Community Expert
Community Expert
May 25, 2014

Neofilm wrote:

Ok, I just installed the trial version of Premiere CC, opened Premiere CC, imported the 4K files, drug one into the timeline, exported "match sequence settings", then got properties and it still is 1920 by 1080!!!!!!!!!!!

Change the level first as said before then you can adjust the resolution.

Or use the presets Steven provided in the link.

NeofilmAuthor
Inspiring
May 25, 2014

Also, I feel like there could very well be a trick to making it work. Like maybe installing a trial and that fixing my encoder or updating the encoder with a different, more current version... So, I'm curious if that's an option.

NeofilmAuthor
Inspiring
May 25, 2014

I mean, I'm curious if anyone has tried those things or something else that may make it export 4K.

NeofilmAuthor
Inspiring
May 25, 2014

Thanks Steven, you're right, I'm still trying a few more times, before I bite the bullet and spend hard to come by money Thanks for working with me.

There is a preset in CS5 for RED that is 4K but it doesn't render out in 4K for some reason.

Here are the properties for the original 4K file. It's from the Sony FDR AX100 and it's "4K" although it's not quite the 4K the RED is...

Here's one of the several presets I've used. Premiere came with this preset but for some reason it will not render out these properties:

Here are the properties of the clip after it's been exported, notice it's only 1920 by 1080, it always reduces it to that for some reason:

I tried "match sequence settings" when the sequence is clearly 4K and it renders out HD resolution, I tried using the RED 4K preset and still the same result, I even tried making my own preset and still same result. Why would it have a 4K preset and not export out 4k? Seems a bit buggy to me, even if I haven't given them money in several years, it should still work with the presets it came with.

Steven L. Gotz
Steven L. GotzCorrect answer
Inspiring
May 25, 2014

You are showing us an image of the sequence presets and what we need to see are the export settings.

If you are now temporarily using CC, then the image in post #12 of this thread should show you that it is possible to export "real" 4K.

I can also export the frame size of your video (3840X2160). But Ann is correct in that you have to change the level.

Here are my export settings. Notice the sequence settings as well as the export settings. Ignore the estimated file size. I used an extremely short clip to save time.

As you can see, it is exporting as requested.

artofzootography.com
NeofilmAuthor
Inspiring
May 25, 2014

The images I shared were from my CS5 before I upgraded to cloud.

The sequence preset was just showing that CS5 actually has this preset already for 4K. When I created a project using this preset and then rendered it out the file was 1920 by 1080 still. As for export settings I've tried "match sequence settings" both when I used the 4K file to create the sequence and when I used the RED 4K sequence preset. I also tried creating my own preset. It seems the highest resolution it will render is 1920 by 1080.

Premiere CS5 prompts/warns that the level needs to change as it will not let you increase the resolution if the level is not set high enough.

I am not sure what that last image is about that Steven shared regarding the export. When trying to confirm whether premiere/media encoder actually rendered a 4K file I was using premiere's "get properties" feature.

I installed CC after I made the post above with the images. I only tried 2 or 3 different ways/times to export a 4K project and it always resulted in 1920 by 1080.

I really want to continue using premiere. I prefer how it is designed over Vegas.

NeofilmAuthor
Inspiring
May 25, 2014

I believe I know what "preset" means, I assume it means, as you said, to make something easier to do next time, it's like a shortcut or action, maybe those aren't good analogies. But, I can't make a preset for something that I can't do.

In my initial post I said that I can't get it to export in 4K even when I "match sequence settings". A preset would come last presumably. That is, after I am capable of doing it then I can create a preset that has all the desirable settings so it's easier to do next time. But, first I have to be able to do it, so again, back to the original question, how can I make CS5 export in 4K? I can edit it I just can't export it in 4K. When I export it matching sequence settings and then look at the properties of the exported file it shows it as being HD resolution, not 4K. So, I believe I only need to upgrade the media encoder. I personally think that I should be able to upgrade the media encoder, esp. if it is the only thing holding me back since premiere actually can work with it already.

Steven L. Gotz
Inspiring
May 25, 2014

Neofilm,

You did not specify the exact 4K size you want to export. For reasons I can't explain, "4K" encompasses a few different frame sizes. 4K resolution - Wikipedia, the free encyclopedia

The preset I use in CS6 provides a frame size of 4096X2048 and can't go higher. The settings using Premiere Pro CC are more appropriate for most video shot with a 4K camera.

Just because you think you should be able to upgrade the media encoder does not in any way mean that you are able to. Never have, and likely never will. That's just the way it goes. You can ask for a new feature but I doubt that someone who hasn't paid them any money in a few years will really change their way of thinking.

Adobe - Feature Request/Bug Report Form

artofzootography.com
NeofilmAuthor
Inspiring
May 25, 2014

Thanks! I'm not sure what presets have to do with this, ALL I WANT TO DO IS EXPORT 4K from premiere. I don't want to subscribe to cloud just to do that. PPro CS5 that I have brings it in, I can edit it, I just can't upload it. I only need that solution in the most affordable way, nothing else.

Steven L. Gotz
Inspiring
May 25, 2014

I'm not sure what presets have to do with this,

Well, the preset added this to my Premiere Pro CS6 export dialog. Isn't that what you want it to do for you? Make it easy to export 4K?

If you don't know what a preset is for, this is it. It is a simple way to get to where you want to go. That's all it is.

So now that you know what presets have to do with it, check to see if these work in CS5. They do in CS6. If they do not in CS5 then I suggest that you upgrade to CS6.

artofzootography.com
Ann Bens
Community Expert
Community Expert
May 25, 2014

You must have made those presets yourself, I dont have them in CS6.

Besides they are located separately at the top which means custom made.

Set level to 5.1 and max the hight and width to max and see how far it will go.