• Global community
    • Language:
      • Deutsch
      • English
      • Español
      • Français
      • Português
  • 日本語コミュニティ
    Dedicated community for Japanese speakers
  • 한국 커뮤니티
    Dedicated community for Korean speakers
Exit
3

Expand Lumetri Color to support log grading

Engaged ,
Jan 18, 2023 Jan 18, 2023

Copy link to clipboard

Copied

The math of Lumetri's operators make it mostly unusable for log grading. Most of them behave linear but use curves/rolloffs and are limited to 0-1 float when you go in their opposite direction value wise.

In a more ideal world, to me, Lumetri would always have operators that fit log grading.


- Exposure should be offset math, so it's behaves as camera exposure when applied to log footage.

- Contrast should be linear instead of s-curve in both directions.

- Blacks slider should not create a toe when lifted and inverse toe when lowered. Should act as 'lift' math.

- Whites is fine as is.

- RGB Curves should also have it's end points act as lift and gain without clip 0-1 just like the seperate Curves effect.

- 3way color wheels should be Lift Gamma Gain math instead of curve Shadow/Mid/Highlights.


None of the above mentioned controls should clip 0-1 float.


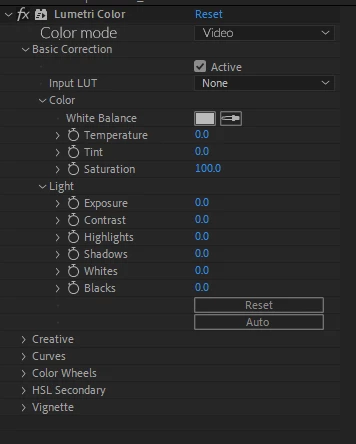
Because this would completely break video grades perhaps it's an idea to have a mode switch for Lumetri.

By default it would be 'video' with an alternative 'log' mode.


Implementation example:

Untitled-2.png

Idea No status

Views

521

Translate

Translate

Report

Report
Community guidelines
Be kind and respectful, give credit to the original source of content, and search for duplicates before posting. Learn more
community guidelines
7 Comments
Engaged ,
Jan 18, 2023 Jan 18, 2023

Copy link to clipboard

Copied

Looks like it didn't post the thread as idea. If someone at Adobe could move this that would be nice 🙂

Votes

Translate

Translate

Report

Report
LEGEND ,
Jan 18, 2023 Jan 18, 2023

Copy link to clipboard

Copied

As a true Olde Fogey, I've been complaining about these things since they dumped SpeedGrade and gave us ... Lumetri. As have many others including Jarle Leirpoll, who's requested as I have that AT LEAST they give us a toggle to tell Lumetri to let us do what WE want ... but ah welll ...


My complaints ...


Basic Tab

First, as this tab processes mostly top-down, the Input LUT should be at the BOTTOM so that you have means to trim the individual clip through the LUT with the Basic tab controls. This would help avoid clipped/crushed values from the clip exposure being a bit different than the LUT was built for.


Second ... that Blacks control is basically a swinging door from about 10-12IRE. Which is freaking WEIRD. You need to use the Shadow control then barely use the Blacks for fine trimming. Very ... odd. Difficult.


Third ... Contrast is locked to 50IRE in SDR, the equivalent in HDR. Without any Pivot control ... which is very frustrating. You need to figure out how to use Exposure to move the clip values up/down a bit to then work Contrast to get the 'action' you want.


So the best "log" normalization involves joint, simultaneous use of Exposure/Contrast. Works fine on a control panel, if you're mousing, it's a mess.


Whites is ok but rather limited.


Shadow & Highlights again have no Pivot nor 'width' control, they are difficult to target things with. Requiring typically working another tool against them. AGAIN ... easy enough with a panel, difficult with a mouse.


Creative Tab

Has the ONLY Pivot in Lumetri, the slider to control Shadow/Highlight "Tint" ... which is actually one of the better WB tools in the panel. Set the white point and correct or induce a shadow cast.


Vibrance control is good to have, fairly useful to 'trim' sat feel.


Curves Tab

Nearly all the curves are way too 'fast' in operation. They at least need a control to turn the 'speed of change' down. Fine control even with a panel is difficult.


Bottom two curves have issues if you move any point above the beginning middle line, you can get artifacts and super-blacks. Weird.


Color Wheels

As far as I can tell, the wheels are built off the LGG model LIft/Gamma/Gain ... Shadow wheel does a bit more to the shadows than uppers, but still affects everything somewhat. I've compared with Resolve many times, not that dissimilar.


Personally, I prefer OGG ... Offset/Gamma/Gain ... if I only get one set.


To me the biggest issue with the Wheels is clear: NO pivot controls! And given how 'wide' these affect the image, that simply adds to the struggle. Again, working Shadow against Mids is better with a panel than mouse.


I'd also love to have the controls "width" either brought down some or a control for that added.


My biggest gripe:

It takes a bit of practice and experience to do targeted work in Lumetri. And as we have no real pivot or 'width' controls, it makes us use several instances in a layer stack to get a lot of things done.


Second is the limits the effect has for those roll-offs you mention.


Neil

Votes

Translate

Translate

Report

Report
Engaged ,
Jan 18, 2023 Jan 18, 2023

Copy link to clipboard

Copied

Hey Neil,


I agree on the Input LUT order. But for a video grade it would have to be the first step like it is now. I don't mind that much using a second instance of the effect to apply the conversion LUT post everything else.


>Personally, I prefer OGG ... Offset/Gamma/Gain ... if I only get one set.


What's stopping Adobe from implementing Lift/Gamma/Gain/Offset for log mode. Wouldn't mind having 4 wheels like DaVinci Resolve!


Votes

Translate

Translate

Report

Report
LEGEND ,
Jan 18, 2023 Jan 18, 2023

Copy link to clipboard

Copied

Oh ... four wheels, yea, I'd drool over that.


For a short time we had a fourth Lumetri wheel for HDR speculars. And the removal of that tool for HDR work ... well, that's another choice that simply is to me well beyond comprehension.


Now ... the old SpeedGrade nine-way system ... OGG, with full pivots ... and then you could hit the Shadows section and have all three wheels only affecting the Shadow area, with a pivot to set the upper fade-out limit ... Mids, with pivots both sides ... Highlights, with a lower pivot ... that was fast & incredibly targeted work.


And having done work in Sg didn't slow or affect playback in Premiere ... that was flipping sweet.


I've had many colorists (including the guy what wrote most of the books it seems) splain to me that many LUTs are naturally built for exact situations. Say an S-log3-cine (made by Sony or by anyone else) to Rec.709, for one example.


If your field-produced clip has exposure a bit off, that can lead to crushed or clipped data. So by applying the LUT, then 'trimming' it prior to the LUT, you can feed the best quality image data to that LUT.


In Resolve, for example, apply a LUT on a node. Now within that node, do any touch of the color controls ... curves/wheels/printer points ... and that correction is applied pre-LUT. The LUT is the last thing in the processing chain in any node. That's the behavior I was asking for.


And there are so many things quite a few have been asking for within the Premiere color wheelhouse ... sigh.


Neil

Votes

Translate

Translate

Report

Report
LEGEND ,
Jan 18, 2023 Jan 18, 2023

Copy link to clipboard

Copied

I expect you might be familiar with the contrast varieties in Resolve. So which would be your wish?


  • The default for 'regular' grading, which applies an S-curve not unlike the Pr curve, where nothing exceeds 0 or 100 in Rec.709 work ... not thinking that would be your choice;
  • The second option, if you deselect the default, which is a straight-line to infinity and beyond. And will crush blacks and clip whites when pushed;
  • The "hybrid" contrast of the HDR controls, which is intended to mimic 'camera' exposure changes. The shadow area has a roll-off curve, something like (but not quite like) the default above, but the highlights/whites is a straight-line to infinity.

It sounds like you might like more the Resolve HDR type contrast control?


Neil

Votes

Translate

Translate

Report

Report
Engaged ,
Jan 18, 2023 Jan 18, 2023

Copy link to clipboard

Copied

Resolve's contrast slider is always linear if the slider's value is below 1.0. Depending on user set preference, an s-curve or linear above 1.0. My preference is linear because it doesn't alter the relationship between stops. I use the highlight and shadow sliders if I do wish to do so. I would apply the same principle in the case of Lumetri.

As it is now, lowering contrast inverts the s-curve. I don't think anyone would ever want that.

2023-01-19 01_06_45-Adobe After Effects (Beta) - Untitled Project.aep _.png

Votes

Translate

Translate

Report

Report
LEGEND ,
Jan 18, 2023 Jan 18, 2023

Copy link to clipboard

Copied

LATEST

"I don't think anyone would ever want that."


I don't know how many times I've thought that thought, then had someone want to do what seems so ... odd. And sometimes, they've even got a good reason for doing so.  😉


As someone who shoots and works with log a fair amount, yea, a log grading option would be useful.


I'd just like to get a basic working space set to a wide gamut on input, with display/output set to whatever we needed. As a start. Rather than a specific wide or Rec.709 timeline space. Log grading setup would be cream on top of the hot chocolate ...


Neil

Votes

Translate

Translate

Report

Report