• Global community
    • Language:
      • Deutsch
      • English
      • Español
      • Français
      • Português
  • 日本語コミュニティ
    Dedicated community for Japanese speakers
  • 한국 커뮤니티
    Dedicated community for Korean speakers
Exit
1

Grading looking different in adjustment layer vs. clip effect

Explorer ,
Aug 15, 2020 Aug 15, 2020

Copy link to clipboard

Copied

Hello community, 


I've come across something and I'm not sure if I'm just now noticing it or if it is a new issue. 

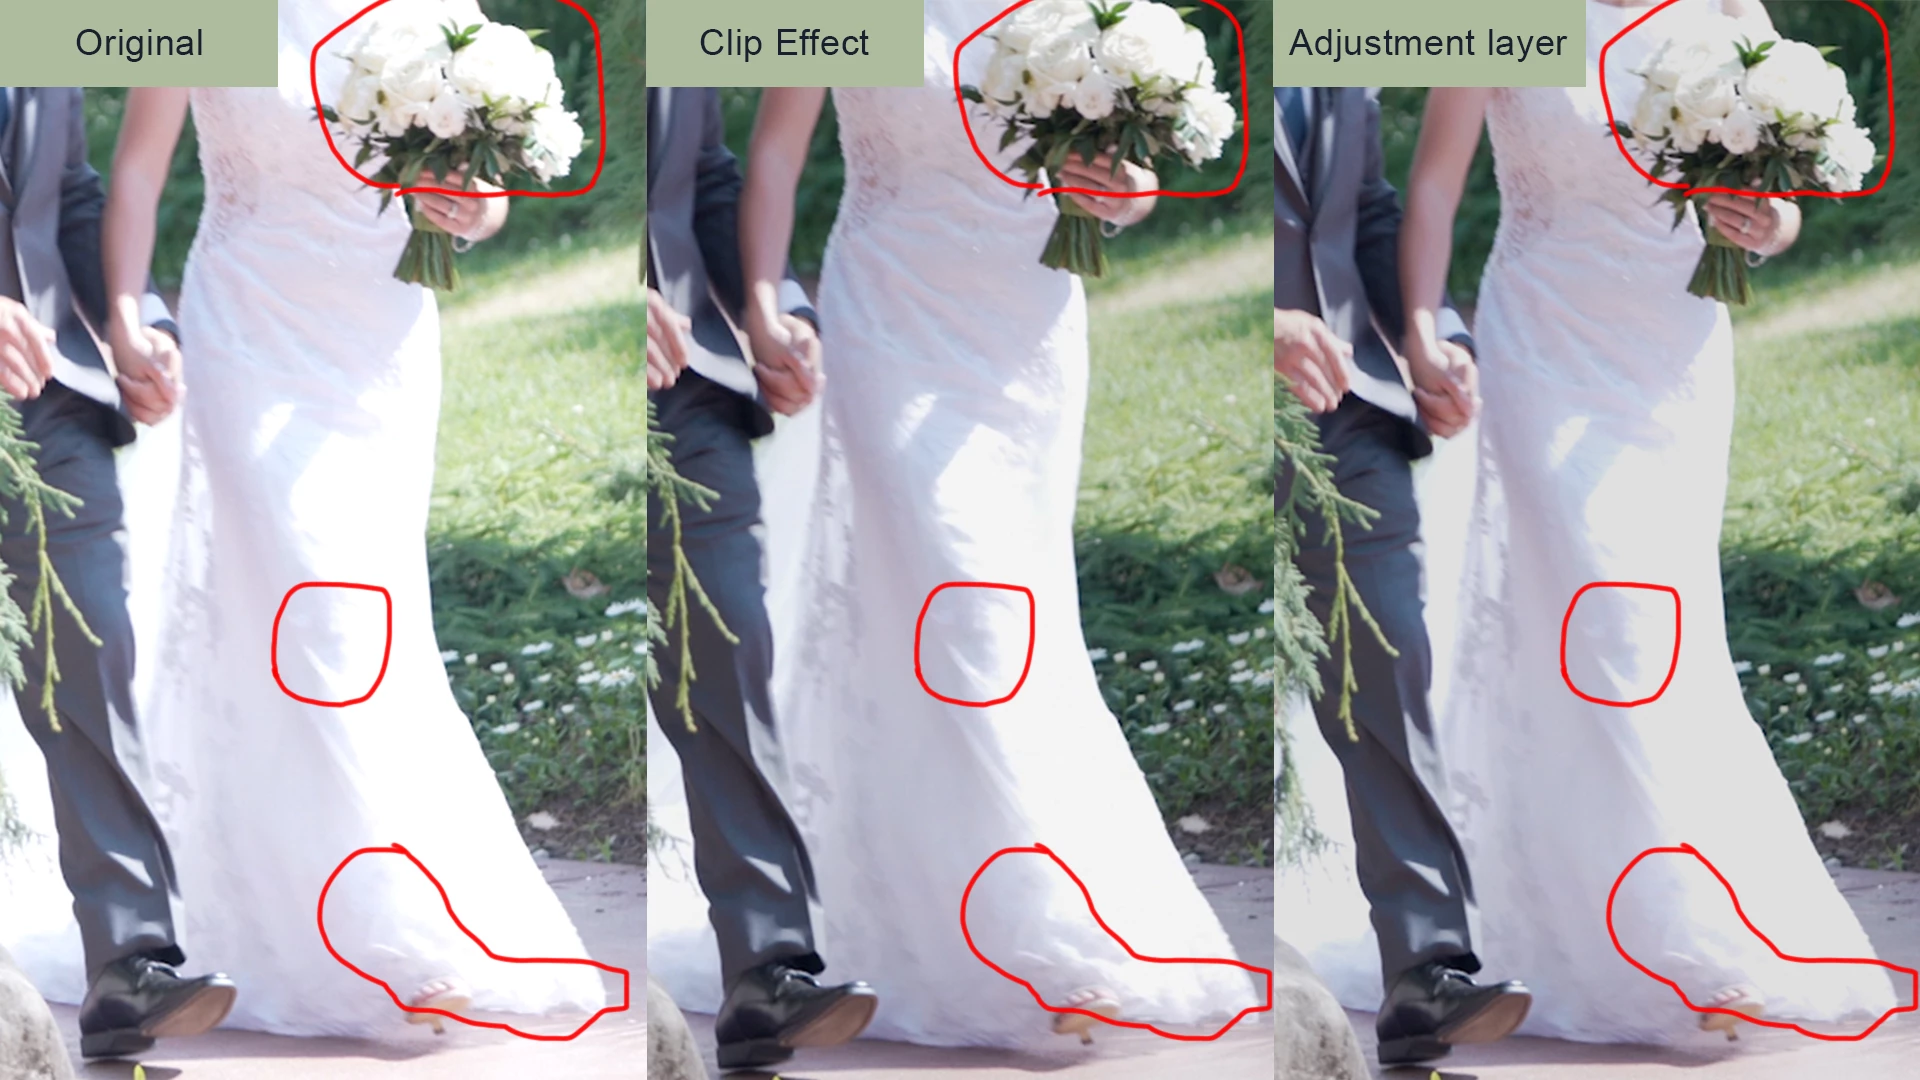
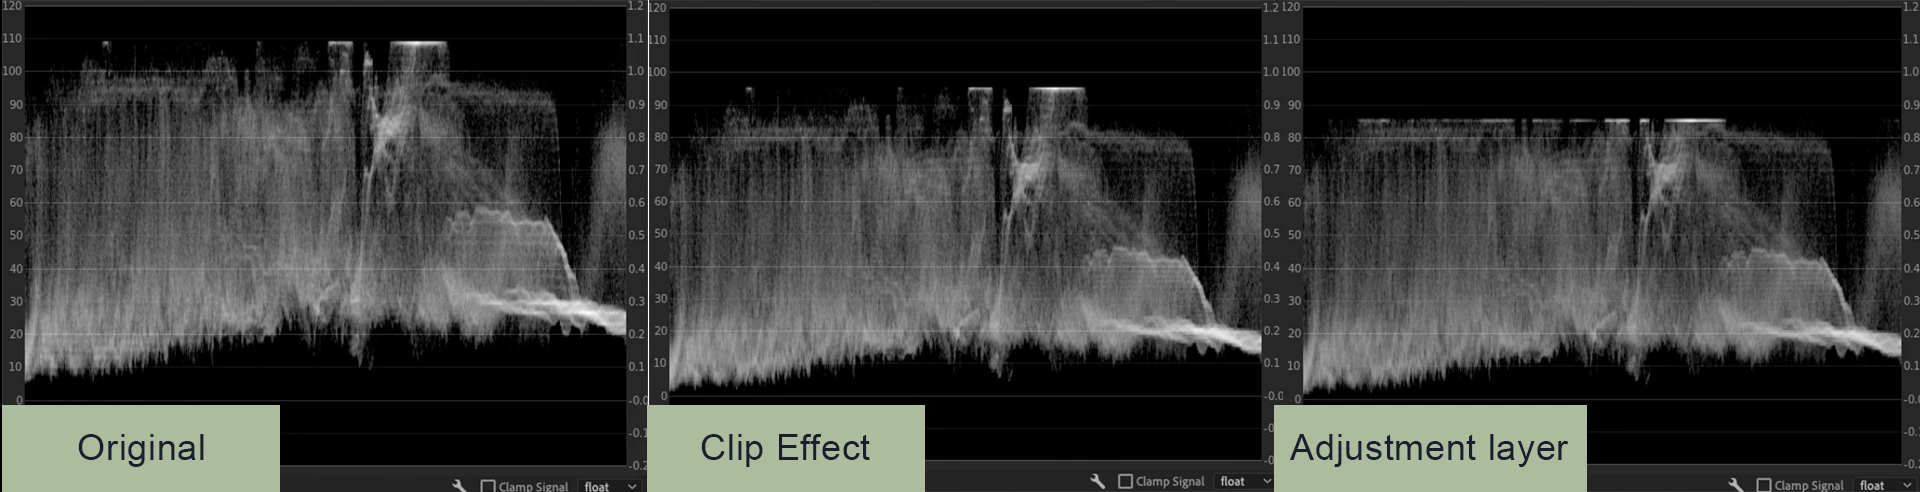
First, I am trying to do some highlight recovery on this A7III footage shot in a standard profile, so there is a lot of blown out highlights that I can actually recover some detail from. I broght down the whites in the "basic correction" panel and brought down the center of the luma curve a little just to smooth over the rolloff a tad overall. It works as intended as a clip effect, but when I tested it as an adjustment layer (copied the exact same lumetry effect to the adjustment layer, didn't touch any parameters), it seems to just dim the whites in a uniform, flat manner and recovers almost nothing from the highlights. 


What I'm hoping to do is apply a single highlight recovery effect for the entire film, and only tweak individual shots that need a little more love, instead of copy+paste to hundreds of individual clips even though the effect is more or less universally needed. 


After looking at articles and tutorials on adjustment layers, there is no mention of any technical differences between them and clip effects, just that they are a good alternative for when you need to apply a uniform effect. Does anyone know what might be happening here? Obviously, if it doesn't work out, I'll have to copy+paste the effect and do a few QA passes to make sure I didn't miss a little clip or two. That certainly doesn't save time, though. Let me know if more background is needed. Thanks everyone!


Wedding_Images.jpg

Wedding_Scopes.jpg


Adobe Premiere version: 14.3.1

OS: macOS Catalina 1015.4

MacBook Pro specs:

  Model Name: MacBook Pro

  Model Identifier: MacBookPro15,3

  Processor Name: 6-Core Intel Core i9

  Processor Speed: 2.9 GHz

  Number of Processors: 1

  Total Number of Cores: 6

  L2 Cache (per Core): 256 KB

  L3 Cache: 12 MB

  Hyper-Threading Technology: Enabled

  Memory: 32 GB

GPU: Radeon Pro Vega 16 4GB 

TOPICS
Effects and Titles

Views

1.0K

Translate

Translate

Report

Report
Community guidelines
Be kind and respectful, give credit to the original source of content, and search for duplicates before posting. Learn more
community guidelines
Explorer ,
Aug 15, 2020 Aug 15, 2020

Copy link to clipboard

Copied

Another example of the weakness of the adjustment layer effect. I always thought it was identical do the clip effect with the added capability of being a blanket effect. It is rather disapointing especially since I've used it on many projects when I was strapped for time based on much advice from numerous tutorals. If it actually is just a limited color grading option I don't see a reason to ever use it. 

Wedding_Example2.jpg

Votes

Translate

Translate

Report

Report
Community guidelines
Be kind and respectful, give credit to the original source of content, and search for duplicates before posting. Learn more
community guidelines
LEGEND ,
Aug 15, 2020 Aug 15, 2020

Copy link to clipboard

Copied

I can't see any difference between applying a Lumetri highlight reduction on the clip directly versus on an adjustment layer above the clip on my mac. Does not mean that it is not happening on yours.

Questions:

Are you confident the adjustment layer is set to 100% Opacity and Normal Blending mode?

Have you doubled checked that the lumetri settings are the same on the test clip as on the adjustment layer?


MtD

Votes

Translate

Translate

Report

Report
Community guidelines
Be kind and respectful, give credit to the original source of content, and search for duplicates before posting. Learn more
community guidelines
Explorer ,
Aug 15, 2020 Aug 15, 2020

Copy link to clipboard

Copied

Hey Meg_the_Dog, thank you for responding! Does the 2nd example come out a little better on your mac? I added it because it's more zoomed-in. If not, just to describe it, there is a huge section of the bridal veil in the adjustment layer image that is just a solid light gray, no detail at all. But in the clip effect version, you can see all of the detail in the veil throughout. It's the same Lumetry effect in the first example.


I double-checked the adjustment layer opacity and blending mode and yes, it is 100% and blending mode is normal.


Yes the parameters are exacly the same. I copied and pasted attributes from the clip to the adjustment layer and didn't touch a thing. 


Votes

Translate

Translate

Report

Report
Community guidelines
Be kind and respectful, give credit to the original source of content, and search for duplicates before posting. Learn more
community guidelines
Explorer ,
Aug 15, 2020 Aug 15, 2020

Copy link to clipboard

Copied

It seems like adjustment layers work more or less like this: If I want to paint a chair red in my backyard, I would paint red on my kitchen window (adjustment layer) outlining the chair so I can see it in red, instead of just going out there and painting the chair itself (clip effect). 

Votes

Translate

Translate

Report

Report
Community guidelines
Be kind and respectful, give credit to the original source of content, and search for duplicates before posting. Learn more
community guidelines
LEGEND ,
Aug 15, 2020 Aug 15, 2020

Copy link to clipboard

Copied

Wrong. AL's should process most of the effects exactly the same as on the clip. Give up on there being a difference ... there isn't. Some effects don't work on ALs, but color things work beautifully.


There's a problem within your system somehow.


And again ... you are totally ignoring processing order which can be crucial on some things. That is one of the main reasons to use an AL, to separate and control processing order. Understanding and controlling processing order and the effect it has on oue work is somethine one needs to learn how to use.


Neil

Votes

Translate

Translate

Report

Report
Community guidelines
Be kind and respectful, give credit to the original source of content, and search for duplicates before posting. Learn more
community guidelines
Explorer ,
May 02, 2023 May 02, 2023

Copy link to clipboard

Copied

Its happening for me now. I have some preset effects. I place them on the clip and place them on adjustment layer. clip has more sharpness. i have exported many different comparisons and re jigged all the settings to see if they werent 'kicking in'. all settings working fine on both clip and adjustment layer. only effects directly on the clip look very different.

Votes

Translate

Translate

Report

Report
Community guidelines
Be kind and respectful, give credit to the original source of content, and search for duplicates before posting. Learn more
community guidelines
LEGEND ,
Aug 15, 2020 Aug 15, 2020

Copy link to clipboard

Copied

Applied on the clip:

Screen Shot 2020-08-15 at 11.15.28 AM.png

Applied via the adjustment layer:

Screen Shot 2020-08-15 at 11.15.52 AM.png

Look the same to me.

Go to File > Project Settings > General - what is the Renderer set to?

Also, can you post a screen shot of your Sequence Settings (menu Sequence > Sequence Settings).

MtD

Votes

Translate

Translate

Report

Report
Community guidelines
Be kind and respectful, give credit to the original source of content, and search for duplicates before posting. Learn more
community guidelines
Explorer ,
Aug 15, 2020 Aug 15, 2020

Copy link to clipboard

Copied

Yes the Lumetri effect is applied to the right tier (not sure what it's called), not the "Master" on the left, on both the clip and the adjustment layer. 


My rednerer is Mercury Playback Engine GPU Acceleration (Metal)

Here are the sequence settings. I just chose "new sequence from clip" from one of the clips and left it. Hope I didn't miss anything. 

Screen Shot 2020-08-15 at 4.28.02 PM.png


Since I can clearly see the differences in this JPEG exactly as I do within Premiere (and not just within premiere), I can only assume that it will be apparent on another screens, even if not on all of them. I also see a difference between both of your images. It is way more subtle than my example but you adjustment layer example has more white distributed in the cloud and looks more flat, less detailed. But the clip effect screenshot has more detail, I can see more of the blue behind the cloud and more texture as well. 


It could be a difference between our screens. The MacbookPro screen is a 15.4-inch retina with brightness all the way up and set to the default display profile. This screen supposedly has about 500 nits of brightness, so it's not HDR or anything. My 2nd screen that I use for grading and program monitor matches well enough and is set to its factory default display profile. It is an older 1080p screen, a VX2739 ViewSonic that I matched as well as I could, and I can see the differences on both screens. 


Votes

Translate

Translate

Report

Report
Community guidelines
Be kind and respectful, give credit to the original source of content, and search for duplicates before posting. Learn more
community guidelines
LEGEND ,
Aug 15, 2020 Aug 15, 2020

Copy link to clipboard

Copied

Look at the scopes in your example ... note how the one with the AL is clipped a lot lower? Something is going on there ... like it's being worked twice or something. That is not what I can repro at all.


If I have a Lumetri effect setup on a clip, cut that, paste it on an AL, I will get exactly the same image, same scopes.


So first, make sure you have the clip without any Lumetri applied.


There's a basic and inherent problem with your thought-out process ... it's the processing order in Premiere.


Premiere is entirely top-down in the ECP as per effects applied ... top effect processed first, and within almost all effects (including Lumetri), top options processed first. But it starts with the clip on the lowest track ... typically V1, right?


Applies all effects top to bottom that have been applied directly to the effect.


Next ... it goes to the next highest track, and if you've an AL, will go top to bottom for any effects on that AL ... then look at V3.


So ... you want to do an overall, but ... mod that for individual clips. Unfortunately, for such work on the edges of the tonal scale like this, you need to do the overall on the clip itself, not an AL. Or you can get odd interactions, as the work on the clip can cause problems for the way the work on the AL is designed.


For this project, I would probably simply get the best I can from one image, then copy/paste that to every other image needing the same basic work. And skip down the sequence trimming each clip in as needed.


I might use the White against the Hilights controls in Basic, or the RGB Curves control ... or both. But then, I've also got a control surface so I can run multiple tools from variuos tabs against each other without needing to switch tabs so there's a couple other things I might well do.


Neil

Votes

Translate

Translate

Report

Report
Community guidelines
Be kind and respectful, give credit to the original source of content, and search for duplicates before posting. Learn more
community guidelines
Explorer ,
Aug 15, 2020 Aug 15, 2020

Copy link to clipboard

Copied

Niel, 


When I test the adjustment layer, I turn off the Lumetri effect on the clip. When I test the clip effect, I hide the adjustment layer. In the top-down nature of effects in this program, wouldn't only having one effect working at one time allow the effect through both methods work exactly the same way? My thought process is to have a single blanket effect that addresses a single issue found in all of the footage, and any clip effects that I might use I'll add to the clip. I.e., if something was already under-exposed, I would just bring up the shadows only there. It won't look perfect, not how I would grade something for theatrical distribution, I just need to get this done very soon but at least make some effort to fix the over-exposed shots, and there are many. 


I'm trying to get to the bottom of what the difference is between my adjustment layer effect and my clip effect. 


One last thing, can you take a look at the screenshots I provided? Do you see differences between them? I'm just curious if other monitors can show the differences since Meg_The_Dog's monitor did not.  

Votes

Translate

Translate

Report

Report
Community guidelines
Be kind and respectful, give credit to the original source of content, and search for duplicates before posting. Learn more
community guidelines
LEGEND ,
Aug 15, 2020 Aug 15, 2020

Copy link to clipboard

Copied

Of course I saw the difference ... note my comments on your scopes? I wasn't questioning whether there was a difference, but what was causing the difference.


Your concept of how to apply changes ... to 'grade' ... are not effective. Again ... processing order matters. As I noted, I would apply Lumetri to one clip needing this change, then copy/paste to all others. Then move to the individual clips and modify.


An AL is best used to say apply a final look to a job. Not for a starting, as it will be applied after the work done on the clip.


Neil

Votes

Translate

Translate

Report

Report
Community guidelines
Be kind and respectful, give credit to the original source of content, and search for duplicates before posting. Learn more
community guidelines
Explorer ,
Aug 15, 2020 Aug 15, 2020

Copy link to clipboard

Copied

As I said in the latest message, it is likely a bug. I am not questioning the processing order of the filters because a) this has worked before (went back to previous projects and checked), you even demonstrated that what ever the effect is, it should be identical whether it is on an adjustment layer or in the clip, and b) I am staying true to the processing order. As of now, there is only one layer in that process: highlight recovery. If I had another layer of grading above or below that would be affecting the appearance, then this observation would apply. But there is only one layer, one Lumetri effect. In the future I will add one, but I haven't yet, so that is not what is causing the problem...

Votes

Translate

Translate

Report

Report
Community guidelines
Be kind and respectful, give credit to the original source of content, and search for duplicates before posting. Learn more
community guidelines
Guide ,
Aug 15, 2020 Aug 15, 2020

Copy link to clipboard

Copied

I can see the difference. I would file a bug report.

Votes

Translate

Translate

Report

Report
Community guidelines
Be kind and respectful, give credit to the original source of content, and search for duplicates before posting. Learn more
community guidelines
Advisor ,
Aug 15, 2020 Aug 15, 2020

Copy link to clipboard

Copied

that cloud looks a little like a white poodle jumping to the left...see it's face on left and one paw extended out front like it is flying through the air ?


Votes

Translate

Translate

Report

Report
Community guidelines
Be kind and respectful, give credit to the original source of content, and search for duplicates before posting. Learn more
community guidelines
Explorer ,
Aug 15, 2020 Aug 15, 2020

Copy link to clipboard

Copied

........¿Que?

Votes

Translate

Translate

Report

Report
Community guidelines
Be kind and respectful, give credit to the original source of content, and search for duplicates before posting. Learn more
community guidelines
Advisor ,
Aug 15, 2020 Aug 15, 2020

Copy link to clipboard

Copied

see white poodle jumping through air ???


POODLE CLOUD.png

Votes

Translate

Translate

Report

Report
Community guidelines
Be kind and respectful, give credit to the original source of content, and search for duplicates before posting. Learn more
community guidelines
Advisor ,
Aug 15, 2020 Aug 15, 2020

Copy link to clipboard

Copied

PS. 

Whether using adjustment layers or nodes or whatever, what you see is what you should GET ... and in your case it's the Y value of GAMMA ( luminance of gamma or midtones )... and subsequent effect on lift and gain...

It's not that difficult and if an adjustment layer is messing you up ( the programming is slop and not working right ) then apply it to the clip instead. And if THAT doesn't work, use a new editing software.


Votes

Translate

Translate

Report

Report
Community guidelines
Be kind and respectful, give credit to the original source of content, and search for duplicates before posting. Learn more
community guidelines
Explorer ,
Aug 15, 2020 Aug 15, 2020

Copy link to clipboard

Copied

Salvo34 you are even LESS helpful when actually addressing the issue.  Did you read the body of my post and comments (there aren't many)? I am copying the EXACT SAME Lumetri effect from the adjustment layer to the clip, but never viewing them both activated at the same time. Individual parameters such as gamma are not relevant here since the individual parameters are not being altered at all. It is not an issue in my filter settings, it's likey a bug in the program. Please stop commenting. I'm not interested in poodle clouds LOL. 

Votes

Translate

Translate

Report

Report
Community guidelines
Be kind and respectful, give credit to the original source of content, and search for duplicates before posting. Learn more
community guidelines
LEGEND ,
Aug 15, 2020 Aug 15, 2020

Copy link to clipboard

Copied

I can't get any difference whatever between applying an effect on the clip or on an AL. I've used several thousand ALs over the last few years, never had an issue like the one you're showing. If this is working correctly on your machine, there will not be a difference.


So something is odd there. We need to solve that situation. Might it be a bug in Premiere? Yea, but ... again, what's the nature of the setup needed ... does it include OS, certain hardware ... what?


I would love to see the Waveform scopes for all your comparisons, both the on-clip and the AL ones. Any differences are an indication of the problem, and are actually far more definable than an image by itself. As I noted, your first set of examples shows a very different shape to the top ... that's what we need to solve.


Note that on mine ... three images, basic image, image with Lumetri on the clip, cut/paste to put the Lumetri on the AL. Look at the scopes (Waveform YC no chroma here) ... the scopes of the two clips with Lumetri applied show exactly the same trace. That is normal behavior.


You're not getting normal behavior for some reason.


Neil


Lumetri Basic on Clip not active.PNG

The orginal clip above ...


Lumetri Basic on Clip active.PNG

The clip with a Basic tab Lumetri touch ...


Lumetri Basic on AL active.PNG

With the Lumetri effect applied to the AL instead of the clip.

Votes

Translate

Translate

Report

Report
Community guidelines
Be kind and respectful, give credit to the original source of content, and search for duplicates before posting. Learn more
community guidelines
Explorer ,
Aug 15, 2020 Aug 15, 2020

Copy link to clipboard

Copied

I appreciate all your help and time dedicated to this strange problem, especially sharing your own examples. That took some effort and is much appreciated! But I think it is a bug. I provided my specs so at least that is not a mystery. Those waveforms I provided are labelled, one for the original, one for clip effect and one for adjustment layer. Don't have one for the veil but I'm not at my office at the moment. I didn't notice the issue before because perhaps it hasn't happened before. I saw it first today, updated Premiere to the next version which is the latest, same issue. I might have to do a fresh install or erase the preferences at startup of the program (usually fixes crashes and other odd bugs, hopefully it works on this). I have to do this every so often as the Premiere bugs start creeping back up again. And we all know there are definitely bugs in this program.


Too bad for me, Premiere is my main choice because a) it works better with other documents the creative team at work provides me (not related to weddings, this footage is for a side gig) and b) it has all the specific settings, shortcuts and options I require for my process and am used to. I've tried all the pro ones and while better than PP in some ways, don't have that special sauce I am accustomed to. But perhaps one day it will be time to move on if these random, inexplicable bugs keep popping up… 

Votes

Translate

Translate

Report

Report
Community guidelines
Be kind and respectful, give credit to the original source of content, and search for duplicates before posting. Learn more
community guidelines
LEGEND ,
Aug 15, 2020 Aug 15, 2020

Copy link to clipboard

Copied

Very easy to check ... go back to 14.3.0 or earlier. If that works, it's a bug or bad install.


They did make it a bit harder to find the older versions. In the CC app, go to the All Apps tab, scroll down to Premiere, then select the three-dot menu to the far right, select Older Versions. You can grab 14.3.0 or previous from there.


I've not seen any other posts with anyone having the issue, which is part of why I am expecting this is more likely an issue on your rig, between the install and operational work somehow.


Have you dumped your cache/cache database files? If not do so, then relaunch Premiere and check.


Also, when Premiere gets wonky, there's always Trash Preferences.


Neil


Votes

Translate

Translate

Report

Report
Community guidelines
Be kind and respectful, give credit to the original source of content, and search for duplicates before posting. Learn more
community guidelines
Explorer ,
Aug 15, 2020 Aug 15, 2020

Copy link to clipboard

Copied

Thanks! As I wrote in the last message, trashing preferences during the startup of Premiere is something I plan on doing. It has worked for other odd issues. If necessary, I will report back. 

Votes

Translate

Translate

Report

Report
Community guidelines
Be kind and respectful, give credit to the original source of content, and search for duplicates before posting. Learn more
community guidelines
Explorer ,
May 02, 2023 May 02, 2023

Copy link to clipboard

Copied

LATEST

i cant help but feel like the whole world is ignoring the fact that it is different. iv been cracking on with adjustment layers ever since being recommended them but after exporting 2 clips side by side in the same video today by chance, i have noticed a large difference. iv going through every setting now. im testing 2 versions of my presets one set to scale and the other to anchor point in (have no idea if thats going to make a difference) are there any effects that are known to react differently or not work at all on adjustment layers vs strainght onto the clip?

Votes

Translate

Translate

Report

Report
Community guidelines
Be kind and respectful, give credit to the original source of content, and search for duplicates before posting. Learn more
community guidelines
Advisor ,
Aug 15, 2020 Aug 15, 2020

Copy link to clipboard

Copied

I appreciate all your help and time dedicated to this strange problem, especially sharing your own examples. That took some effort and is much appreciated! But I think it is a bug.


I WOULD DEFINITELY FILE A BUG REPORT !    GOOD GOING ON SOLVING THE PROBLEM.

PS. Your poodle cloud is still cute no matter what you think of my observations.


Votes

Translate

Translate

Report

Report
Community guidelines
Be kind and respectful, give credit to the original source of content, and search for duplicates before posting. Learn more
community guidelines