• Global community
    • Language:
      • Deutsch
      • English
      • Español
      • Français
      • Português
  • 日本語コミュニティ
    Dedicated community for Japanese speakers
  • 한국 커뮤니티
    Dedicated community for Korean speakers
Exit
0

Keying out a background with glow

Explorer ,
Jul 15, 2022 Jul 15, 2022

Copy link to clipboard

Copied

Hi There,


Using premiere pro, it is possible to key out a blackbackground from a video. However in the attached short video I would like to keep the blue neon rotating ring together with the blue haze that surrounds it and key out the black background although I do not want quite as much of the haze to be present once the background is keyed out.  


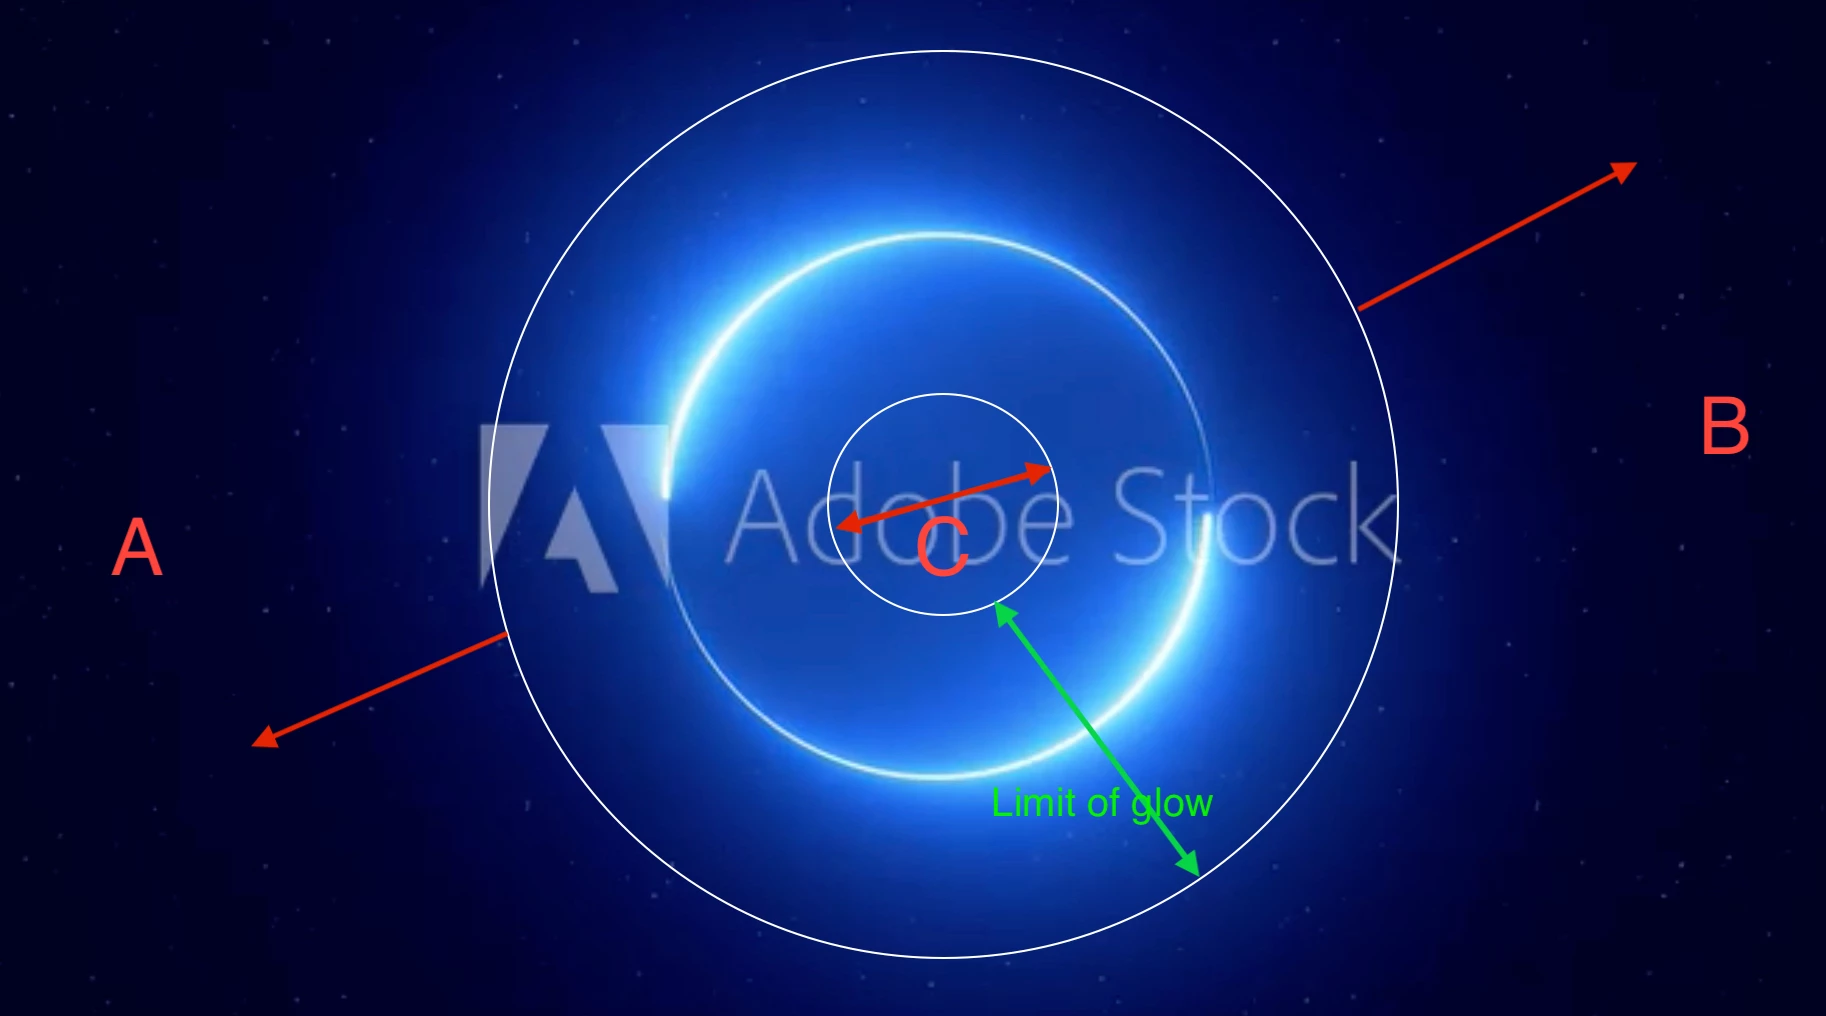
Using the image below. I would like the areas beyond the outer ring I have drawn to be completely transparent. ( A + B).  and the central area to also be completelty transparent so that  the limit of the glow would be with in the area shown by the green arrow.


I hope this makes sense.

Screenshot 2022-07-15 at 15.34.31.png


In a nutshell I want to key out but maintain the gradient glow from blue to black (transparent when the black is keyed out)


Thanks in advance for help.


Rob

TOPICS
Editing

Views

148

Translate

Translate

Report

Report
Community guidelines
Be kind and respectful, give credit to the original source of content, and search for duplicates before posting. Learn more
community guidelines
Explorer ,
Jul 15, 2022 Jul 15, 2022

Copy link to clipboard

Copied

Try this with black background graphics.

1 - select the clip on the timeline

2 - open the effect controls window in the interface

3 - you should see an option to control Opacity

4 - twirl down and you will have access to Blend Modes

5 - select Screen.


Should get rid of black and keep the glow.

There is a guy Adobe use for lectures on YouTube called PixImperfect - has an explainer for what all those modes do.

Votes

Translate

Translate

Report

Report
Community guidelines
Be kind and respectful, give credit to the original source of content, and search for duplicates before posting. Learn more
community guidelines
Explorer ,
Jul 15, 2022 Jul 15, 2022

Copy link to clipboard

Copied

Add a Lumetri Color effect to the clip.

In effect controls select Lumetri color

Go to the Curves section

You should be able to control the extents of the glow by attaching points to the RGB Curves 

Have a play around with a gentle S curve to affect the highs ans lows in the gfx image.

Votes

Translate

Translate

Report

Report
Community guidelines
Be kind and respectful, give credit to the original source of content, and search for duplicates before posting. Learn more
community guidelines
Explorer ,
Jul 15, 2022 Jul 15, 2022

Copy link to clipboard

Copied

HI Avidwarp, 


Thanks so much for replying. I will be back soon to let you know how I got on..


Rob

Votes

Translate

Translate

Report

Report
Community guidelines
Be kind and respectful, give credit to the original source of content, and search for duplicates before posting. Learn more
community guidelines
Explorer ,
Jul 15, 2022 Jul 15, 2022

Copy link to clipboard

Copied

Hi Again,


In the Effects, Controls, I can't seem to see the Lumetri "color" option ?


Could you point me in the right direction pls.


Many thanks


Screenshot 2022-07-15 at 17.14.29.png

Votes

Translate

Translate

Report

Report
Community guidelines
Be kind and respectful, give credit to the original source of content, and search for duplicates before posting. Learn more
community guidelines
Explorer ,
Jul 15, 2022 Jul 15, 2022

Copy link to clipboard

Copied

Apologies the moment I pressed "Send" I found it.. Just to loop back am I doing the correct thing in this image regarding the S Curve on the RGB Frame ?

Screenshot 2022-07-15 at 17.23.52.png

Votes

Translate

Translate

Report

Report
Community guidelines
Be kind and respectful, give credit to the original source of content, and search for duplicates before posting. Learn more
community guidelines
LEGEND ,
Jul 15, 2022 Jul 15, 2022

Copy link to clipboard

Copied

That's best accessed via the Color workspace ... the Lumetri color effect has a full panel of controls separate from the typical effects found in the ECP ... although you can access Lumetri controls from the ECP after it's applied to a clip.


The biggest advantage of the color workspace and the Lumetri panel is you never need to actually "apply" it to a clip. That step is done by the app automatically when you stop playback on a particular clip, and touch any Lumetri control. The effect is applied to the clip.


Neil

Votes

Translate

Translate

Report

Report
Community guidelines
Be kind and respectful, give credit to the original source of content, and search for duplicates before posting. Learn more
community guidelines
Explorer ,
Jul 15, 2022 Jul 15, 2022

Copy link to clipboard

Copied

Thanks Neil for your comment.  Is this where you were suggesting I go.

I do have to say I am a complete beginner here ;). Im reasonable with Photoshop but new to PPro.

Although I understand that by adjusting the levels a gradient can be applied to the hoop.

Firstly Should I first key out the black background before I proceed to the Color workspace to edit the levels ?

And secondly what controls on the levels are necessary for me to get the desired effect ?


Many thanks

Rob


Screenshot 2022-07-15 at 17.41.03.png

Votes

Translate

Translate

Report

Report
Community guidelines
Be kind and respectful, give credit to the original source of content, and search for duplicates before posting. Learn more
community guidelines
LEGEND ,
Jul 15, 2022 Jul 15, 2022

Copy link to clipboard

Copied

Yes, that's the Lumetri panel.


So, you want to remove the black surround, so you can apply this as a layer above another clip/graphic element, is that correct?


As that appears to be an Adobe Stock mogrt ... you could copy the layer or group of layers that are the blue thingy, and paste those into another mogrt.


Depending on the controls included in the mogrt, this might require opening the mogrt in AfterEffects.


As in Ae, you do have full access to every item of the graphic file. Easy to select & copy something to reuse in your own comps.


That would actually both be easier and give better results.


Neil

Votes

Translate

Translate

Report

Report
Community guidelines
Be kind and respectful, give credit to the original source of content, and search for duplicates before posting. Learn more
community guidelines
Explorer ,
Jul 20, 2022 Jul 20, 2022

Copy link to clipboard

Copied

Hi All,


I have to say I've spent a week trying to get my head around how to do this. I think overall the comments and replies , as generous as they are, are geared towards Pro users, and not beginners or intermediates, prehaps what I am trying to do is too complex for Premiere Pro as I was hoping to remove the black background with and leave the ring intact.

Votes

Translate

Translate

Report

Report
Community guidelines
Be kind and respectful, give credit to the original source of content, and search for duplicates before posting. Learn more
community guidelines
Explorer ,
Jul 20, 2022 Jul 20, 2022

Copy link to clipboard

Copied

LATEST

Hi Neil, 


The source file is attached it is a .mov file. And your understanding is spot on, I do want to apply this above another video layer.  The file was downloaded from Adobe Stock as a .mov file.  It doesnt appear to have a Morgt file attached to it. 


Will your advice still stand? Ive struggled (understatement ;)) for a week now to try and remove the blackground. I am so stressed with using Premiere Pro, its taking its toll on my

health.. 

Votes

Translate

Translate

Report

Report
Community guidelines
Be kind and respectful, give credit to the original source of content, and search for duplicates before posting. Learn more
community guidelines