Copy link to clipboard
Copied
Hello anyone knows how i can correct this?
type text
select it
insert dropdown text en complete with text
normal behaviour (editor view) : text becomes italic blue (at least for me, maybe fixed in style sheet)
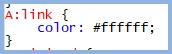
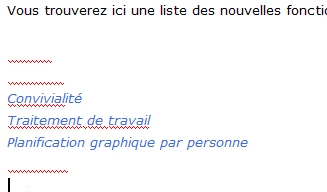
I have 3 instances open of Robohelp. In one of them, my original word font color is white, for every new item I add. See underscored spaces in the picture herebelow. Not in the other two ones...
When I compile and launch HH.Exe, they show normal, luckily...
thx for your help
Olivier
That took a while to identify the problem. You have set all links to be white. Create a hyperlink and you will see the same problem.
Right click your CSS editor and select Open in Code Editor.
Scroll down to A:link
Prefix that with /* and add */ after the closing bracket and the problem will go away.
Why set any style to be white when your background is white?
________________________________________________________
My site www.grainge.org includes many free Authoring and RoboHelp resou
...Copy link to clipboard
Copied
Please post the code for the dropspot that is appearing in white.
________________________________________________________
My site www.grainge.org includes many free Authoring and RoboHelp resources that may be of help.
Copy link to clipboard
Copied
Hello Peter, thx for your reaction.
hereunder the complete code for this page. I've added for testing purposes an extra row at the bottom, and can repeat this again and again on the same page. Not tried on another topic...
for the one that are blue: I copied an old topicitem, inserted it. changed the name and changed the content. Because the style of the content of the dropdown text had to be the same and is quiete cumbersome to recreate from scratch.
I suspect some thing goes wrong with end markers flowing over. But not sure
<?xml version="1.0" encoding="utf-8" ?>
<!DOCTYPE html PUBLIC "-//W3C//DTD XHTML 1.0 Transitional//EN" "http://www.w3.org/TR/xhtml1/DTD/xhtml1-transitional.dtd">
<html xmlns="http://www.w3.org/1999/xhtml">
<head>
<meta http-equiv="Content-Type" content="text/html; charset=utf-8" />
<meta http-equiv="Content-Language" content="fr-FR" />
<meta name="generator" content="Adobe RoboHelp 2019" />
<title>Nouveautés dans Rimses <version></title>
<link rel="StyleSheet" href="functies.css" type="text/css" />
</head>
<body>
<?rh-script_start ?><script src="ehlpdhtm.js" type="text/javascript" language="JavaScript1.2"></script><?rh-script_end ?>
<p style="text-align: center;">      <img
src="Artboard 24_300px.png" alt="" style="border: none;" border="0" /></p>
<p> </p>
<h1 class="TitelFunctie">Nouveautés dans Rimses <?rh-udv_start name="version" ?>6.11<?rh-udv_end ?></h1>
<p class="Tussentitel" style="font-size: 12pt;">BIENVENUE</p>
<p> </p>
<table style="vertical-align: top; margin-left: 4px; margin-right: 4px;
margin-top: 4px; margin-bottom: 4px;" cellspacing="0" width="100%">
<col style="width: 16.89%;" />
<col style="width: 83.11%;" />
<tr style="vertical-align: top; height: 61px;">
<td style="width: 16.89%; padding-right: 10px; padding-left: 10px;
padding-top: 6px; padding-bottom: 6px;"><p class="Tussentitel">Date
de mise en production</p></td>
<td style="border-top: Solid 1px #000000; border-bottom: Solid 1px #000000;
width: 83.11%; padding-right: 10px; padding-left: 10px; padding-top: 6px;
padding-bottom: 6px;"><p style="background-color: Transparent;">La
version <?rh-udv_start name="version" ?>6.11<?rh-udv_end ?> de
Rimses a été publiée en décembre 2024.</p></td>
</tr>
<tr style="vertical-align: top; height: 202px;">
<td style="width: 16.89%; padding-right: 10px; padding-left: 10px;
padding-top: 6px; padding-bottom: 6px;"><p class="Tussentitel">Nouveautés
importantes</p></td>
<td style="border-bottom: Solid 1px #000000; width: 83.11%; padding-right: 10px;
padding-left: 10px; padding-top: 6px; padding-bottom: 6px;"><ul
style="list-style: disc;">
<li style="margin-left: -20px; color: #000000; text-decoration: none; "><p
style="margin-bottom: 6px;">OUD    En parallèle
à la sortie de Rimses 6.10, <span style="font-weight: bold;">Rimses
Mobile Maintenance+</span> a entièrement été réécrit par Inetum-Realdolmen.
RMM+ est utilisé pour dématérialiser le traitement mobile
des ordres de travail, sur appareils Android.</p></li>
<li style="margin-left: -20px; color: #000000; text-decoration: none; "><p
style="margin-bottom: 6px;"><a name="tfs32766" id="tfs32766"></a>Liste-à-faire
:terminé techniquement et terminé administrativement également
visible</p></li>
</ul></td>
</tr>
<tr style="vertical-align: top; height: 244px;">
<td style="width: 16.89%; padding-right: 10px; padding-left: 10px;
padding-top: 6px; padding-bottom: 6px;"><p class="Tussentitel">Fonctionnalités</p></td>
<td style="border-bottom: Solid 1px #000000; width: 83.11%; padding-right: 10px;
padding-left: 10px; padding-top: 6px; padding-bottom: 6px;"><p>Vous
trouverez ici une liste des nouvelles fonctionnalités et des fonctionnalités
modifiées pour Rimses, triées alphabétiquement par sujet.</p>
<p> </p>
<p><span class="dropspot"><?rh-dropspot_start class="dropspot"
href="javascript:TextPopup(this)"
id="a2" dataid="POPUP562046050" ?>Achats<?rh-dropspot_end ?></span></p>
<?rh-droptext_start class="droptext" id="POPUP562046050" style="display: none;" ?>
<table cellspacing="0" width="100%">
<col />
<col style="width: 74.811%;" />
<tr>
<td colspan="2" style="border: Solid 1px #ffffff;"
bgcolor="#4169E1"><span style="color: #ffffff;
font-weight: bold; font-size: 10pt;">Sujet</span></td>
</tr>
<tr>
<td style="border-left: Solid 1px #ffffff; border-right: Solid 1px #ffffff;
border-bottom: Solid 1px #ffffff;" bgcolor="#E2E2E2"><p><a
name="tfs35127" id="tfs35127"></a>Réception services</p></td>
<td style="border-right: Solid 1px #ffffff; border-bottom: Solid 1px #ffffff;"
bgcolor="#E2E2E2"><p>Dorénavant il est possible
d'adapter le prix d'une ligne de commande pour un
service sur un ordre de travail déjà terminé, sans
recevoir de message d'erreur.</p></td>
</tr>
<tr>
<td style="border-left: Solid 1px #ffffff; border-right: Solid 1px #ffffff;
border-bottom: Solid 1px #ffffff;" bgcolor="#E2E2E2"><p><a
name="tfs35136" id="tfs35136"></a>Réception services</p></td>
<td style="border-right: Solid 1px #ffffff; border-bottom: Solid 1px #ffffff;"
bgcolor="#E2E2E2"><p>4 colonnes ajoutées dans
l'aperçu :Mémo demandeur, Mémo acheteur, Memo fourn.
et Document: Si une icône est présent, vous pouvez
consulter des documents liés.</p></td>
</tr>
<tr>
<td style="border-left: Solid 1px #ffffff; border-right: Solid 1px #ffffff;
border-bottom: Solid 1px #ffffff;" bgcolor="#E2E2E2"><p><a
name="tfs35149" id="tfs35149"></a>Demandes d'achat
: consultation flux d'autorisation du bon de commande</p></td>
<td style="border-right: Solid 1px #ffffff; border-bottom: Solid 1px #ffffff;"
bgcolor="#E2E2E2"><p>Si après un demande d'achat
un flux d'autorisation est crée sur le bon d'achat,
il est possible de le consulter. Depuis consulter
ou gestion demandes d'achat, sous le point de menu
'détail', vous retrouverez une nouvelle fonction 'autorisation
bon de commande'. Une fenêtre affichera les détail
de l'autorisation, sans les montants de commande.</p></td>
</tr>
<tr>
<td style="border-left: Solid 1px #ffffff; border-right: Solid 1px #ffffff;
border-bottom: Solid 1px #ffffff;" bgcolor="#E2E2E2"><p><a
name="tfs351491" id="tfs351491"></a>Autorisation de
commandes</p></td>
<td style="border-right: Solid 1px #ffffff; border-bottom: Solid 1px #ffffff;"
bgcolor="#E2E2E2"><p>En cas d'autorisation d'une
ligne de commande issue d'une demande d'achat avec
flux d'autorisation, il est dorénavant possible d'en
consulter le cycle. Une ligne de commande avec flux
aura un symbole dans la colonne 'demande d'autorisation'.
En cliquant dessus ou avec l'appel du point de menu
'demande d'autorisation', la fenêtre consultation
cycle sera affichée.</p></td>
</tr>
<tr>
<td style="border-left: Solid 1px #ffffff; border-right: Solid 1px #ffffff;
border-bottom: Solid 1px #ffffff;" bgcolor="#E2E2E2"><p><a
name="tfs35554" id="tfs35554"></a>Autorisation de
commandes</p></td>
<td style="border-right: Solid 1px #ffffff; border-bottom: Solid 1px #ffffff;"
bgcolor="#E2E2E2"><p>Un nouveau point de configuration
vous permet de grouper les lignes de commandes par
projet principal. Il vous sera également possible
de mettre en place un flux d'autorisation sur le projet
principal.</p></td>
</tr>
</table>
<p> </p><?rh-droptext_end ?>
<p style="font-style: italic; font-weight: normal; color: #4169e1;"><span
class="dropspot"><?rh-dropspot_start class="dropspot" href="javascript:TextPopup(this)"
id="a1" dataid="POPUP605073671" ?>Analyzer<?rh-dropspot_end ?></span></p>
<?rh-droptext_start class="droptext" id="POPUP605073671" style="display: none;" ?>
<table cellspacing="0" width="100%">
<col />
<col style="width: 74.811%;" />
<tr>
<td colspan="2" style="border: Solid 1px #ffffff;"
bgcolor="#4169E1"><p>Sujet</p></td>
</tr>
<tr>
<td style="border-left: Solid 1px #ffffff; border-right: Solid 1px #ffffff;
border-bottom: Solid 1px #ffffff;" bgcolor="#E2E2E2"><p><a
name="tfs34652" id="tfs34652"></a>Cubes modulaires
et tabulaires</p>
<p> </p>
 </td>
<td style="border-right: Solid 1px #ffffff; border-bottom: Solid 1px #ffffff;"
bgcolor="#E2E2E2"><p>Rappel: il est fortement
conseillé de modifier vos rapports analyzer, basés
sur des cubes modulaires, vers des cubes tabulaires.
Voir ce <a href="RimsesAnalyzer02.chm::/Cubes_modulaires_et_tabulaires.htm">chapitre</a>
ci.</p></td>
</tr>
</table>
<p> </p>
<p> </p>
<p> </p><?rh-droptext_end ?>
<p style="font-style: italic; font-weight: normal; color: #4169e1;"><?rh-dropspot_start
class="dropspot" href="javascript:TextPopup(this)" id="a112" dataid="POPUP6386188772"
style="font-style: italic; font-weight: normal; color: #4169e1;" ?><span
class="dropspot">C</span><span class="dropspot" style="font-style: italic;
font-weight: normal; color: #4169e1;">onvivial</span><?rh-dropspot_end ?><span
class="dropspot" style="font-style: italic; font-weight: normal;
color: #4169e1;">ité</span></p>
<?rh-droptext_start class="droptext" id="POPUP6386188772" style="display: none;" ?>
<table cellspacing="0" width="100%">
<col />
<col style="width: 74.811%;" />
<tr>
<td colspan="2" style="border: Solid 1px #ffffff;"
bgcolor="#4169E1"><p style="font-weight: bold;
color: #ffffff;">Sujet</p></td>
</tr>
<tr>
<td style="border-left: Solid 1px #ffffff; border-right: Solid 1px #ffffff;
border-bottom: Solid 1px #ffffff;" bgcolor="#E2E2E2"><p><a
name="tfs32763" id="tfs32763"></a>Discerner location
entrepôt et location moyen de production dans les
aperçus 'gestion objet' et 'consulter objet'</p>
<p> </p>
 </td>
<td style="border-right: Solid 1px #ffffff; border-bottom: Solid 1px #ffffff;"
bgcolor="#E2E2E2"><p>Modifications dans les colonnes
des aperçus suivants : ajoute colonne '<span style="font-weight: bold;">Entrepôt
par défaut</span>', la colonne 'emplacement' est renommée
'<span style="font-weight: bold;">Emplacement par
défaut</span>' et la colonne '<span style="font-weight: bold;">Type
d'emplacement par défault'</span> à été ajoutée.</p>
<p><img src="image54.png" alt="" style="border: none;"
border="0" /></p></td>
</tr>
<tr>
<td style="border-left: Solid 1px #ffffff; border-right: Solid 1px #ffffff;
border-bottom: Solid 1px #ffffff;" bgcolor="#E2E2E2"><p><a
name="tfs34737" id="tfs34737"></a>Objet caractéristiques
techniques</p></td>
<td style="border-right: Solid 1px #ffffff; border-bottom: Solid 1px #ffffff;"
bgcolor="#E2E2E2"><p>La fenêtre de sélection consulter/gestion
objet via les caractéristiques techniques a été étendue
avec un nouveau champ de sélection :</p></td>
</tr>
<tr>
<td style="border-left: Solid 1px #ffffff; border-right: Solid 1px #ffffff;
border-bottom: Solid 1px #ffffff;" bgcolor="#E2E2E2"><p><a
name="tfs34738" id="tfs34738"></a>Consulter/Éditer
objet</p></td>
<td style="border-right: Solid 1px #ffffff; border-bottom: Solid 1px #ffffff;"
bgcolor="#E2E2E2"><p>En sélectionnant sur base
de moyen de production, nous avons ajoutés un champ
de sélection sous le second onglet 'Extra': <span
style="font-weight: bold;">Classe objet</span></p></td>
</tr>
</table>
<p> </p><?rh-droptext_end ?>
<p style="font-style: italic; font-weight: normal; color: #4169e1;"><?rh-dropspot_start
class="dropspot" href="javascript:TextPopup(this)" id="a111" dataid="POPUP6386188771"
style="font-style: italic; font-weight: normal; color: #4169e1;" ?><span
class="dropspot">Traitement de travail</span><?rh-dropspot_end ?></p>
<?rh-droptext_start class="droptext" id="POPUP6386188771" style="display: none;" ?>
<table cellspacing="0" width="100%">
<col />
<col style="width: 74.811%;" />
<tr>
<td colspan="2" style="border: Solid 1px #ffffff;"
bgcolor="#4169E1"><p style="font-weight: bold;
color: #ffffff;">Sujet</p></td>
</tr>
<tr>
<td style="border-left: Solid 1px #ffffff; border-right: Solid 1px #ffffff;
border-bottom: Solid 1px #ffffff;" bgcolor="#E2E2E2"><p><a
name="tfs32766" id="tfs32766"></a>Liste-à-faire :terminé
techniquement et terminé administrativement également
visible</p></td>
<td style="border-right: Solid 1px #ffffff; border-bottom: Solid 1px #ffffff;"
bgcolor="#E2E2E2"><p>Dans la liste à faire vous
pouviez consulter des ordres de travail ou actions
avec le statut <span style="font-weight: bold;">Planifié
pour exécution, Exécution et Interrompu</span>. Nous
avons <span style="font-weight: bold;">ajouté</span>
<span style="font-weight: bold;">Terminé techniquement
et Terminé administrativement</span>.</p>
<p>La fenêtre de sélection à donc été modifiée: Le
dialogue de choix 'Statut OT'</p>
<p><img src="image56.png" alt="" style="border: none;"
border="0" /></p>
<p>et une zone supplémentaire:</p>
<p><img src="image57.png" alt="" style="border: none;"
border="0" /></p></td>
</tr>
<tr>
<td style="border-left: Solid 1px #ffffff; border-right: Solid 1px #ffffff;
border-bottom: Solid 1px #ffffff;" bgcolor="#E2E2E2"><p><a
name="tfs34365" id="tfs34365"></a>Contrôle disponibilité
du matériel</p></td>
<td style="border-right: Solid 1px #ffffff; border-bottom: Solid 1px #ffffff;"
bgcolor="#E2E2E2"><p>Ajoute de deux champs dans
le fenêtre de sélection : Planificateur et Superviseur</p></td>
</tr>
<tr>
<td style="border-left: Solid 1px #ffffff; border-right: Solid 1px #ffffff;
border-bottom: Solid 1px #ffffff;" bgcolor="#E2E2E2"><p><a
name="Signaal_planner_bij_open_transacties_afgesloten_werkorders"
id="Signaal_planner_bij_open_transacties_afgesloten_werkorders"></a>Signal
planificateur en cas de transactions ouvertes</p></td>
<td style="border-right: Solid 1px #ffffff; border-bottom: Solid 1px #ffffff;"
bgcolor="#E2E2E2"><p>Si, lorsqu'on termine un
ordre de travail, il y a encore des transactions ouvertes,
le planificateur recevra un signal.</p></td>
</tr>
<tr>
<td style="border-left: Solid 1px #ffffff; border-right: Solid 1px #ffffff;
border-bottom: Solid 1px #ffffff;" bgcolor="#E2E2E2"><p><a
name="Open_transacties_venster" id="Open_transacties_venster"></a>Transactions
ouvertes</p></td>
<td style="border-right: Solid 1px #ffffff; border-bottom: Solid 1px #ffffff;"
bgcolor="#E2E2E2"><p>S'il y a encore des transactions
ouvertes lors d'une terminaison d'ordre de travail,
une fenêtre sera affichées. Si l'utilisateur a les
droits, il pourra les annuler. Type de transactions:</p>
<ul style="list-style: disc;">
<li>Demande de matériel</li>
<li>Demande d'achat</li>
<li>Matériel prêté</li>
<li>Matériel à produire</li>
<li>Obligation d'échange de matériel (ancien pour
nouveau)</li>
</ul>
<p> </p>
<p>Cette fenêtre est affichée:</p>
<ul style="list-style: disc;">
<li>lors de la terminaison d'un ordre de travail</li>
<li>gestion ordre de travail (info/transactions
ouvertes)</li>
<li>en cas d'appel du point de menu "transactions
ouvertes"</li>
<li>depuis l'aperçu après sélection du signal transaction
ouvertes, point de menu 'transactions ouvertes'</li>
</ul>
<p> </p></td>
</tr>
<tr>
<td style="border-left: Solid 1px #ffffff; border-right: Solid 1px #ffffff;
border-bottom: Solid 1px #ffffff;" bgcolor="#E2E2E2"><p><a
name="tfs34734" id="tfs34734"></a>signal acceptation
OT exécutés</p></td>
<td style="border-right: Solid 1px #ffffff; border-bottom: Solid 1px #ffffff;"
bgcolor="#E2E2E2"><p>Ajoute de deux colonnes N°
d'arrêt et description d'arrêt dans l'aperçu.</p></td>
</tr>
<tr>
<td style="border-left: Solid 1px #ffffff; border-right: Solid 1px #ffffff;
border-bottom: Solid 1px #ffffff;" bgcolor="#E2E2E2"><p><a
name="tfs34819" id="tfs34819"></a>Historique Ordre
de travail</p></td>
<td style="border-right: Solid 1px #ffffff; border-bottom: Solid 1px #ffffff;"
bgcolor="#E2E2E2"><p>Ajoute de la colonne 'compteur'</p></td>
</tr>
<tr>
<td style="border-left: Solid 1px #ffffff; border-right: Solid 1px #ffffff;
border-bottom: Solid 1px #ffffff;" bgcolor="#E2E2E2"><p><a
name="tfs34825" id="tfs34825"></a>Consulter Ordre
de travail</p></td>
<td style="border-right: Solid 1px #ffffff; border-bottom: Solid 1px #ffffff;"
bgcolor="#E2E2E2"><p>Dans l'aperçu deux colonnes
ont été ajoutées: Créé le (date) et Créé le (heure)</p></td>
</tr>
<tr>
<td style="border-left: Solid 1px #ffffff; border-right: Solid 1px #ffffff;
border-bottom: Solid 1px #ffffff;" bgcolor="#E2E2E2"><p><a
name="tfs34826" id="tfs34826"></a>Demandes de travail
à approuver</p></td>
<td style="border-right: Solid 1px #ffffff; border-bottom: Solid 1px #ffffff;"
bgcolor="#E2E2E2"><p>Dans la liste d'approbation
de demandes de travail une colonne est ajoutée : 'Type
de travail'</p></td>
</tr>
<tr>
<td style="border-left: Solid 1px #ffffff; border-right: Solid 1px #ffffff;
border-bottom: Solid 1px #ffffff;" bgcolor="#E2E2E2"><p><a
name="tfs35165" id="tfs35165"></a>Arborescence d'ordres
de travail composés</p></td>
<td style="border-right: Solid 1px #ffffff; border-bottom: Solid 1px #ffffff;"
bgcolor="#E2E2E2"><p>Pour indiquer la différence
entre :</p>
<ul style="list-style: disc;">
<li>Projet</li>
<li>Ordre de travail</li>
<li>Tâche de mise en grappe</li>
<li>Tâche de liste de contrôle</li>
<li>Ordre de vente</li>
<li>Ordre de réparation</li>
</ul>
<p>Ces éléments seront affiché avec un icône différent
dans l'arborescence de la composition.</p>
<p> </p></td>
</tr>
<tr>
<td style="border-left: Solid 1px #ffffff; border-right: Solid 1px #ffffff;
border-bottom: Solid 1px #ffffff;" bgcolor="#E2E2E2"><p><a
name="tfs35158" id="tfs35158"></a>Terminaison technique
d'un OT : arrêt effectif</p></td>
<td style="border-right: Solid 1px #ffffff; border-bottom: Solid 1px #ffffff;"
bgcolor="#E2E2E2"><p>Quand un ordre de travail
est terminé techniquement une première fois, les champs
arrêt effectif seront vides ou pré remplis avec des
zéros en fonction du type de travail. Le réglage à
lieu dans la gestion du tableau des types de travail.
Le contenu de la case à cocher sera prédéterminé par
le point de configuration 915 : 'Arrêt de production
vide en cas de terminaison d’un ordre de travail'.</p></td>
</tr>
<tr>
<td style="border-left: Solid 1px #ffffff; border-right: Solid 1px #ffffff;
border-bottom: Solid 1px #ffffff;" bgcolor="#E2E2E2"><p><a
name="tfs35554" id="tfs35554"></a>Gestion de projets</p></td>
<td style="border-right: Solid 1px #ffffff; border-bottom: Solid 1px #ffffff;"
bgcolor="#E2E2E2"><p>Si vous activez le point
de configuration 1180 'Bon de commande :  groupement
par projet principal', vous pourrez également mettre
en place un flux d'autorisation sur ce projet principal.
L'autorisateur désigné sera le premier dans la liste
des autorisateurs, non modifiable par les acheteurs.
Après envoi, il n'y a plus moyen de modifier cet autorisateur
de projet.</p></td>
</tr>
<tr>
<td style="border-left: Solid 1px #ffffff; border-right: Solid 1px #ffffff;
border-bottom: Solid 1px #ffffff;" bgcolor="#E2E2E2"><p><a
name="tfs34799" id="tfs34799"></a>Enregistrement valeur
de mesure</p></td>
<td style="border-right: Solid 1px #ffffff; border-bottom: Solid 1px #ffffff;"
bgcolor="#E2E2E2"><p>Il est dorénavant possible
d'<span style="font-weight: bold;">ajouter une remarque</span>
à une valeur de mesure saisie. Ceci n'a pour le reste
pas d'influence sur le fonctionnement de la maintenance
conditionnelle.</p></td>
</tr>
<tr>
<td style="border-left: Solid 1px #ffffff; border-right: Solid 1px #ffffff;
border-bottom: Solid 1px #ffffff;" bgcolor="#E2E2E2"><p><a
name="tfs35017"></a>Contrôle maintenance planifiée</p></td>
<td style="border-right: Solid 1px #ffffff; border-bottom: Solid 1px #ffffff;"
bgcolor="#E2E2E2"><p>Vous pouvez sélectionner
pour quels départements le contrôle de la maintenance
planifiée doit être lancée.</p></td>
</tr>
<tr>
<td style="border-left: Solid 1px #ffffff; border-right: Solid 1px #ffffff;
border-bottom: Solid 1px #ffffff;" bgcolor="#E2E2E2"><p><a
name="tfs35106"></a>Colonnes supplémentaires dans
les aperçus</p></td>
<td style="border-right: Solid 1px #ffffff; border-bottom: Solid 1px #ffffff;"
bgcolor="#E2E2E2"><p><img src="image59.png" alt=""
style="border: none;"
border="0" /></p>
<p>Après configuration de points de configuration vous
obtiendrez ces deux colonnes dans des aperçus. S'il
y a plusieurs objets parent, l'objet parent sera choisi
au hasard.</p>
<p>Attention:L'affichage de ces colonnes peut causer
des problèmes de performance sur l'écran en question.
Il faut donc les activer via le point de configuration
correspondant.</p>
<table style="border-collapse: separate; border-collapse: separate;"
cellspacing="0" width="100%" border="1">
<col style="width: 23.005%;" />
<col style="width: 76.995%;" />
<tr>
<td><p style="text-align: center;">Point de
configuration</p></td>
<td><p>Aperçu</p></td>
</tr>
<tr>
<td><p style="text-align: center;">1214</p></td>
<td><p>Gestion ordre de travail</p></td>
</tr>
<tr>
<td><p style="text-align: center;">1216</p></td>
<td><p>Liste-à-faire</p></td>
</tr>
<tr>
<td><p style="text-align: center;">1223</p></td>
<td><p>Historique ordre de travail</p></td>
</tr>
</table>
<p> </p></td>
</tr>
</table>
<p> </p><?rh-droptext_end ?>
<p style="font-weight: normal; font-style: italic; color: #4169e1;"><?rh-dropspot_start
class="dropspot" href="javascript:TextPopup(this)" id="a1111"
dataid="POPUP63861887711" ?><span class="dropspot" style="font-style: italic;
color: #4169e1;">Planification
graphique par personne</span><?rh-dropspot_end ?></p>
<?rh-droptext_start class="droptext" id="POPUP63861887711" style="display: none;" ?>
<table cellspacing="0" width="100%">
<col />
<col style="width: 74.811%;" />
<tr>
<td colspan="2" style="border: Solid 1px #ffffff;"
bgcolor="#4169E1"><p style="font-weight: bold;
color: #ffffff;">Sujet</p></td>
</tr>
<tr>
<td style="border-left: Solid 1px #ffffff; border-right: Solid 1px #ffffff;
border-bottom: Solid 1px #ffffff;" bgcolor="#E2E2E2"><p><a
name="tfs33319" id="tfs33319"></a>Champ 'à faire'</p></td>
<td style="border-right: Solid 1px #ffffff; border-bottom: Solid 1px #ffffff;"
bgcolor="#E2E2E2"><p>A coté du nom de l'exécutant,
après la capacité, nous avons ajouté le temps restant
à faire sur la période affichée.</p></td>
</tr>
<tr>
<td style="border-left: Solid 1px #ffffff; border-right: Solid 1px #ffffff;
border-bottom: Solid 1px #ffffff;" bgcolor="#E2E2E2"><p><a
name="tfs34983" id="tfs34983"></a>Remplacement planificateur</p></td>
<td style="border-right: Solid 1px #ffffff; border-bottom: Solid 1px #ffffff;"
bgcolor="#E2E2E2"><p>Quand un utilisateur assigne
un ordre de travail à un exécutant, il devient le
planificateur de l'OT. Avec le point de configuration
1210 le planificateur d'origine de l'OT ne sera pas
substitué par l'utilisateur.</p></td>
</tr>
</table>
<p> </p><?rh-droptext_end ?>
<p><?rh-dropspot_start class="dropspot" href="javascript:TextPopup(this)"
id="a3" dataid="POPUP598280916" ?>Interface<?rh-dropspot_end ?></p>
<?rh-droptext_start class="droptext" id="POPUP598280916" style="display: none;" ?>
<table cellspacing="0" width="100%">
<col />
<col style="width: 74.811%;" />
<tr>
<td colspan="2" style="border: Solid 1px #ffffff;"
bgcolor="#4169E1"><span style="color: #ffffff;
font-weight: bold; font-size: 10pt;">Sujet</span></td>
</tr>
<tr>
<td style="border-left: Solid 1px #ffffff; border-right: Solid 1px #ffffff;
border-bottom: Solid 1px #ffffff;" bgcolor="#E2E2E2"><p><a
name="tfs34966" id="tfs34966"></a>Performances</p></td>
<td style="border-right: Solid 1px #ffffff; border-bottom: Solid 1px #ffffff;"
bgcolor="#E2E2E2"><p>Via le paramétrage de l'interface
il vous est désormais possible de débloquer l'éditions
des heures prestées dans Rimses. Normalement une fois
exportées, les prestations ne sont plus éditables.
Il va de soi qu'en cas de déblocage, le système recevant
les données xml devra gérer les mises à jours.</p></td>
</tr>
</table>
<p> </p>
<p> </p>
<p> </p><?rh-droptext_end ?>
<p> </p></td>
</tr>
<tr style="vertical-align: top; height: 244px;">
<td style="width: 16.89%; padding-right: 10px; padding-left: 10px;
padding-top: 6px; padding-bottom: 6px;"><p class="Tussentitel"> </p></td>
<td style="border-bottom: Solid 1px #000000; width: 83.11%; padding-right: 10px;
padding-left: 10px; padding-top: 6px; padding-bottom: 6px;"><p><?rh-dropspot_start
class="dropspot" href="javascript:TextPopup(this)" id="a4" dataid="POPUP590137894" ?>word
with dropdown text<?rh-dropspot_end ?></p>
<?rh-droptext_start class="droptext" id="POPUP590137894" style="display: none;" ?>
<p>content not important, will make no difference</p><?rh-droptext_end ?>
<p> </p></td>
</tr>
</table>
<?rh-script_start ?><script type="text/javascript" language="JavaScript1.2">//<![CDATA[
if( typeof( TextPopupInit ) != 'function' ) TextPopupInit = new Function();
TextPopupInit('a2', 'POPUP562046050');
TextPopupInit('a1', 'POPUP605073671');
TextPopupInit('a112', 'POPUP6386188772');
TextPopupInit('a111', 'POPUP6386188771');
TextPopupInit('a1111', 'POPUP63861887711');
TextPopupInit('a3', 'POPUP598280916');
TextPopupInit('a4', 'POPUP590137894');
//]]></script><?rh-script_end ?>
</body>
</html>
Copy link to clipboard
Copied
Just tested with a new topic. with the default.css
in that case the title is italic green and is kept readable
replacing the functies.css by one from a working project doesn't make any difference, it gets white again.
strange situation
Copy link to clipboard
Copied
Maybe I don't know where to put a replacing css sheet. is it in de root of my composed project or in the root for this single project. Ore some where else...
I'm not a html specialist. I suspect there is an issue with style sheet and superseding styles. Because the called functies.css should have green as result. But is blue in all projects, except this one.
Copy link to clipboard
Copied
the color to be applied is a custom color. called 'royal blue'. I think there is a problem with this. If I change the color of the default style to royal blue, it gets white too. So nearing a solution, just describing the problem 🙂
Copy link to clipboard
Copied
Make it easier for me and just supply the code I asked for. Highlight the dropdown, go to code view and it will be highlighted. That might not help but it's easier to start there.
Alternatively and perhaps I will need it anyway, can you share the project? If you can, then see the Contact page on my site and send the project as instructed there. Do make sure you include a link to this thread and please do not email the project direct.
________________________________________________________
My site www.grainge.org includes many free Authoring and RoboHelp resources that may be of help.
Copy link to clipboard
Copied
here you are. Is stongly suspect a superseding color change, somewhere
<tr style="vertical-align: top; height: 244px;">
<td style="width: 16.89%; padding-right: 10px; padding-left: 10px;
padding-top: 6px; padding-bottom: 6px;"><p class="Tussentitel"> </p></td>
<td style="border-bottom: Solid 1px #000000; width: 83.11%; padding-right: 10px;
padding-left: 10px; padding-top: 6px; padding-bottom: 6px;"><p><?rh-dropspot_start
class="dropspot" href="javascript:TextPopup(this)" id="a4" dataid="POPUP590137894" ?>word
with dropdown text<?rh-dropspot_end ?></p>
<?rh-droptext_start class="droptext" id="POPUP590137894" style="display: none;" ?>
<p>content not important, will make no difference</p><?rh-droptext_end ?>
<p> </p></td>
</tr>
</table>
<?rh-script_start ?><script type="text/javascript" language="JavaScript1.2">//<![CDATA[
if( typeof( TextPopupInit ) != 'function' ) TextPopupInit = new Function();
TextPopupInit('a2', 'POPUP562046050');
TextPopupInit('a1', 'POPUP605073671');
TextPopupInit('a112', 'POPUP6386188772');
TextPopupInit('a111', 'POPUP6386188771');
TextPopupInit('a1111', 'POPUP63861887711');
TextPopupInit('a3', 'POPUP598280916');
TextPopupInit('a4', 'POPUP590137894');
//]]></script><?rh-script_end ?>
Copy link to clipboard
Copied
As I feared, that's not helping. Import the topic and the associated css into a new project and check the issue persists. If it does, send that to me. You can reduce the content to the dropdown.
See the Contact page on my site and send the project as instructed there. Do make sure you include a link to this thread and please do not email the project direct.
________________________________________________________
My site www.grainge.org includes many free Authoring and RoboHelp resources that may be of help.
Copy link to clipboard
Copied
Edited as was thinking in new UI terms.
Does the SSL use the same CSS as topics?
________________________________________________________
My site www.grainge.org includes many free Authoring and RoboHelp resources that may be of help.
Copy link to clipboard
Copied
Sorry, you lost me here. SSL, looked it up. is a osi layer detail for me. I produce chm files. there is a ssl directory in the project, but only contains chm files.
best regards Olivier
Copy link to clipboard
Copied
The SSL is the output.
If you specify a different CSS or Master Page with a different CSS, that would make the CHM differ from the authoring panel.
________________________________________________________
My site www.grainge.org includes many free Authoring and RoboHelp resources that may be of help.
Copy link to clipboard
Copied
Hello Peter,
that zone is containing grayed out input (unless I click 'apply to all topics'); identic for a project with coloured hotspots
the content is not valid anyway. I mean there is no relation between the mentionned css names and the content of this topic. I honestly hope this won't be applied neither
Copy link to clipboard
Copied
I am seeing the problem before generating an output so that being part of the problem is ruled out.
I have looked at the obvious causes and got nowhere so far. Is your project a new one and this has occurred from the start or is it an old project where this has now occurred. If the latter, what might you have changed.
________________________________________________________
My site www.grainge.org includes many free Authoring and RoboHelp resources that may be of help.
Copy link to clipboard
Copied
That took a while to identify the problem. You have set all links to be white. Create a hyperlink and you will see the same problem.
Right click your CSS editor and select Open in Code Editor.
Scroll down to A:link
Prefix that with /* and add */ after the closing bracket and the problem will go away.
Why set any style to be white when your background is white?
________________________________________________________
My site www.grainge.org includes many free Authoring and RoboHelp resources that may be of help.
Copy link to clipboard
Copied
Hey Peter. fantastic.
It must have happen by accident. I did not edit this. had never the purpose to change the color of a link. Just beginning to understand the importance of the stylesheet with this problem.
Seems a bit stupid to want this on purpose...
anyhow, case closed. I'll try to enhance style sheet and change de font color from witihin the style sheet (for the hotspot text)
thank you very much!