- Home
- Stock Contributors
- Discussions
- Re: [branched] Changing resolution?
- Re: [branched] Changing resolution?
Copy link to clipboard
Copied
I have several photos that came out of my camera at 72 DPI. I increased the DPI to 300 and changed my longest side to 5000 pixels. The photo was rejected. If I didn't change the DPI, would that then help with "artifacts or excess compression" remark? I'm obviously new to submitting to Adobe
Thanks,
Patti
 1 Correct answer
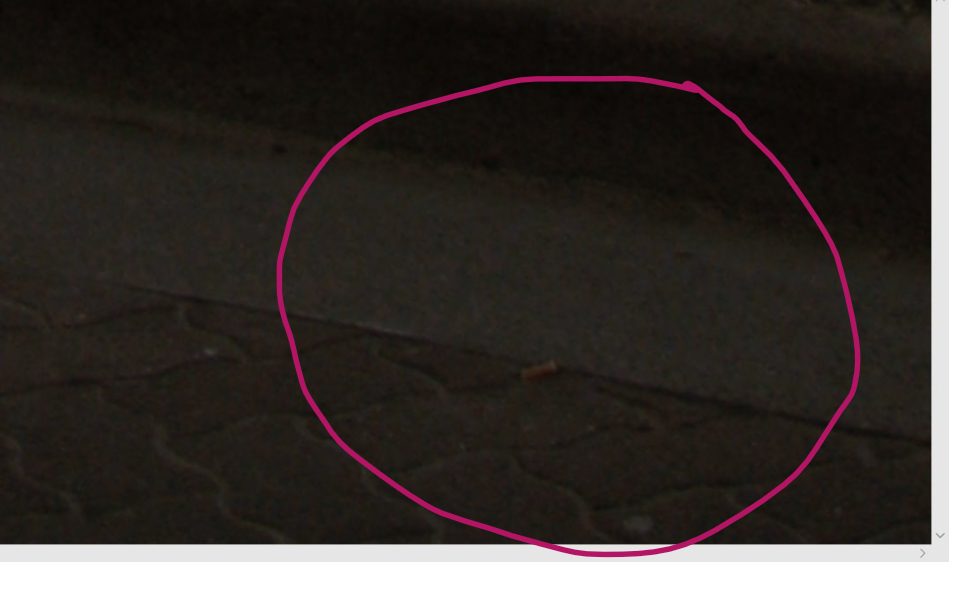
 The image has excessive grains and artifacts. Also There is an exposure issue. I circle a small section of where you can find the grains and artifacts when you zoom to between 100 and 200%. Look carefully you will see the very small spots (grains); but also look closer you will notice that many of the spots are of different color, namely purple. You need to remove those spots to produce uniform colors.
The entire image is pale and lacks vibrancy. Cleaning up the grains and artifacts will brighten
...Copy link to clipboard
Copied
Hi Patti,
I branched your question because it was unrelated to the thread where you posted it.
Printers will not agree here, but the PPI value is just a value without real use for photographers. The only value that counts is the resolution in pixels. See here for more information: Pixel density - Wikipedia .
Changing the resolution of a picture is a bad idea, as this will not make the picture better. However the real reason for a rejection may also be you processing that is not correct, without changing the resolution. Exessive compression is shown with artefacts especially where you have hard borders.
If you post a picture with the rejection reason, it will be a pleasure for us to look at the picture and advice on what needs to get improved.
Copy link to clipboard
Copied
I would love to send the photo and the rejection to you but I don’t know how to port it over From my rejected the photo file. I’d appreciate your assistance to do this
Sent from my iPhone
Copy link to clipboard
Copied
Hello,
You can insert a file from your computer into this thread, by using the picture icon - 5th square from the left.
Inserting from your rejected picture files won't be any good anyway, as that is really only a thumbnail and for your records only.
The DPI, - Dots Per Square Inch is only useful if you are printing photos. 72 DPI is recommended for web photos. (Because of file size - it makes the file smaller.)
PPI - Pixels Per Square Inch.
DPI/PPI is irrelevant in terms of uploading and being accepted.
What is important is the resolution of the image - MP (Mega Pixels)- in uploading it should be a minimum of 4MP.
Copy link to clipboard
Copied
This is the rejected photo. I see that the file is only 2.33 MB How or where do I check for file size in my software? Maybe that’s the problem. The complaint was: Thanks for giving us the chance to consider your image. Unfortunately, during our review we found that it features excessive post-processing and/or noise, so we can't accept it into our collection.
Excessive artifacts/noise can be caused by low light, bad camera settings, strong compression or excessive post-production.
If it was due to post production effects, know that our customers typically prefer to add their own special effects, filters or black-and-white conversions to fit the needs of their projects, so adding these effects in advance drastically reduces the market for your image.
Any help or suggestion will be greatly appreciated. Thanks for your help
Sent from Mail for Windows 10
Copy link to clipboard
Copied
Mega bytes and Mega pixels are different measurements. For the pixels look at the resolution and multiply width and height. Divide by 1,000,000 and you have the Mega pixels value. But you file was good in that sense.
I’m sorry, but you cannot include a picture by mail. You need to go to the forums using a web browser and click the picture icon:

Artifacts and/or noise was your problem. The rest is explanatory text or introduction text.
Show us the picture and we will probably find the faults and suggest remedies if there are any.
Copy link to clipboard
Copied

this is the rejected photo because of "artifacts" or compression, as I understand it.
Thanks for your help on teaching me how to upload my photo.
Copy link to clipboard
Copied
 The image has excessive grains and artifacts. Also There is an exposure issue. I circle a small section of where you can find the grains and artifacts when you zoom to between 100 and 200%. Look carefully you will see the very small spots (grains); but also look closer you will notice that many of the spots are of different color, namely purple. You need to remove those spots to produce uniform colors.
The entire image is pale and lacks vibrancy. Cleaning up the grains and artifacts will brighten it a bit, but you will also need to adjust shadows, and black, to add more light to the dark areas.
Best wishes
JG
Copy link to clipboard
Copied
Thank you so much for your reply. This is the photo that showed a 72 dpi that I changed to 300 dpi, then that make the file large so I then down sized the longest side to 2400 pixels. So, my question is, would that have caused the graininess and color spots? May I upload the original photo for you to compare? I need to learn these technical issues.
Sent from Mail for Windows 10
Copy link to clipboard
Copied
Hi pattic,
While some post-processing, such as over-sharpening, is said to cause graininess, in your case I believe the main cause is low lighting. Another reason for graininess is high ISO. It is recommended that you use the lowest ISO value on your camera. However in some cases, high ISO is unavoidable, such as shooting at nights. Grains are unavoidable, but depending on the ISO value and exposure, will determine how much grains there is. One other thing it is better to shoot in RAW format.
Get to know your camera. Read-up its manual. That will help a great deal.
You may also get some tips on how to minimize noise during a shoot from
https://www.dreamstime.com/blog/dealing-noise-smarter-way-39172?referrer=23340533
Best wishes
JG
Copy link to clipboard
Copied
Thanks so much for your info. I’ve been shooting in only raw the past few months so hopefully that will help. The reason I really like that photo is because the sun was just coming up and the buildings at the coast were dark and cast a shadow on the statue and the sun lit the flag like a spotlight I just thought it was so pretty and it’s a historical site and I was thinking from sea to shining sea when I took the photo. I also like the old couple sitting on the bench looking at the ocean and I thought that was sweet. So I was just really hoping to be able to use this photo. ![]()
Sent from my iPhone
Copy link to clipboard
Copied
It is a nice image. All you need to do is to make the corrections using a photo editor and resubmit.
Copy link to clipboard
Copied
pattic89911320 wrote
Thank you so much for your reply. This is the photo that showed a 72 dpi that I changed to 300 dpi, then that make the file large so I then down sized the longest side to 2400 pixels. So, my question is, would that have caused the graininess and color spots? May I upload the original photo for you to compare? I need to learn these technical issues.
Sent from Mail for Windows 10
No, changing the DPI would not cause the graininess - though in digital terms graininess means noise. (Grain is a term used in the film days - higher the film speed the more sensitive to light and the more grain there is.)
Digital noise is created by a high ISO and other factors as mentioned above.
Have a read about digital noise on the web.
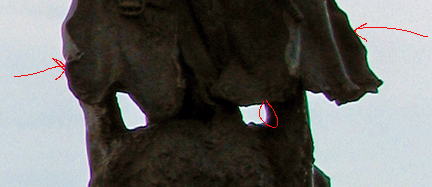
Actually, you also have other problems like chromatic aberration - which is the purple and green fringing around the edges:

This would be rejected under technical issues. This is caused by the light going through the lens and falling onto the sensor. You should read about this as well. It's too complex to explain here. However, this can be removed as well using editing software.
Copy link to clipboard
Copied
Thanks so much. I will research the fringing issue. Thanks so much. I do have software I’m just learning how to use LOL It’s ON1 2019 They have both green and purple corrections. I will work on learning the software that is very intimidating.
Sent from Mail for Windows 10
Copy link to clipboard
Copied
The program you use has probably an automatic correction of the aberration. I general those work very well and it is rarely necessary to do manual edits on that.
Copy link to clipboard
Copied
pattic89911320 wrote
Thank you so much for your reply. This is the photo that showed a 72 dpi that I changed to 300 dpi, then that make the file large so I then down sized the longest side to 2400 pixels.
Don't do that. The ppi value should be ignored by you. There is absolutely no difference between a 72dpi picture and a 300dpi picture for stock given that you do not change the pixel value! The maximum pixel value is determined by the resolution of your camera*.
You should not downsample your picture (except you have a camera taking pictures of more than 100Mpix) nor should you upsample your picture. If the picture is one way or the other not good enough for stock, the best solution (for you and stock) is to drop that picture.
*for all the nerds: Stitching several pictures together to a single panoramic picture is an exception to this!
Copy link to clipboard
Copied
Hi pattic,
Welcome to the world of stock photography. Once you have a modern, or close to modern camera you need not to concern yourself about the size of the photograph it takes. Your photographs will definitely be equal to or larger than the minimum - most likely larger. The size picture your camera takes should be printed on the camera and/or in the manual.
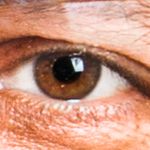
After taking the photos, you need to do some amount of post-processing with a photo editor such as Photoshop to remove noise, correct exposure, and other correction. To see noise/grain, sharpness and other flaws you need to magnify your images to between 100 and 200%.
tagproducts_SG_STOCK-CONTRIBUTOR_i18nKeyHelppagetitle and Create better photos for Adobe Stock with 7 tips for success | will give you some guidelines you will find useful to produce the kind of images Adobe is looking for.
Also here are some pointer to look out for Do's and don'ts for selecting and editing photos for Adobe Stock .
So to see the noise of your rejected photograph, you need to use a photo editor to magnify it to about 200%. Look in the darker areas you will see tiny dots, or blabs like water marks. You use the relevant noise correction tool(s) to make the correction. Your colors should be smooth and even. Check to make sure your image is sharp and has balance exposure, as well as correct white balance, then resubmit.
I hope you found this useful.
Best wishes
JG
Get ready! An upgraded Adobe Community experience is coming in January.
Learn more

