

DISCUSS: New Captions Workflow in Premiere Pro
UPDATE: January 29, 2021
Since the innitial post back in October of last year we have made a ton of progress and some of the details originally posted here are no longer acurate. I have updated the post to be more accurate to the state of things today.
Here are some important changes to be aware of
- The Premiere Pro beta is now version 15 (starting January 26, 2021)
- The captions workflow in on by default - no need to enable it
- The beta menu has been removed (because you don't need it anymore - the advanced beta features are always on)
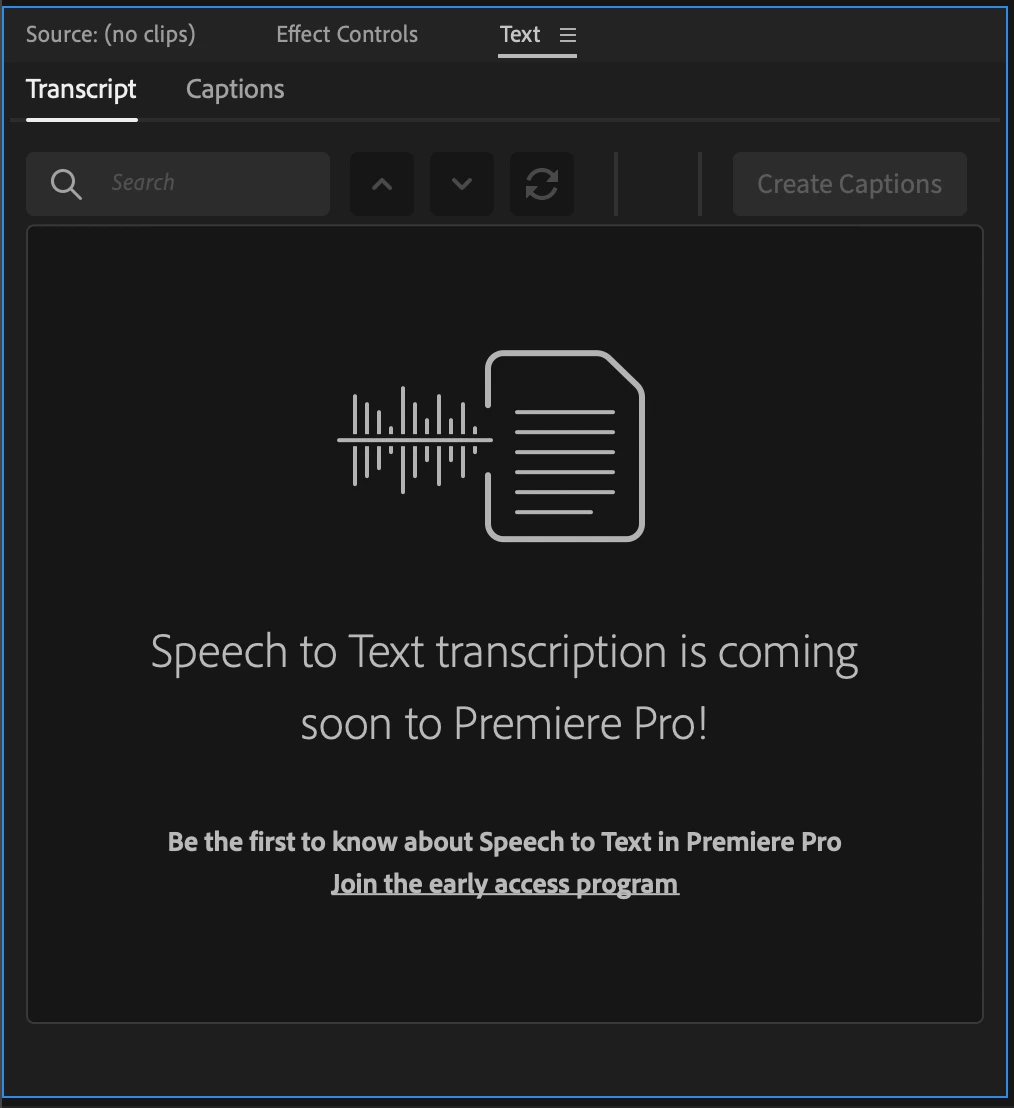
- Applications for speech to text early access has closed and those who have been accepted should have recieved an email. The email you used to apply needs to match the email (Adobe ID) you use to log into creative cloud. If you did not recieve an email stating that you have been accepted, or if you are logged into creative cloud using a different email you will contininue to see the message stating that speech to text is coming soon.
- Broadcast closed captions are now supported CEA 608/708, OP47, Teletext, EBU Subtitles.
- Exporting is working (burned-in, sidecar, embedded) and queue to Media Encoder is working too now.
Thanks to everyone for testing and for all your awesome feedback! - Francis
The captioning workflow in Premiere Pro is getting a complete makeover and you can be the first to try it out! We have a new text panel for editing and viewing your captions as text. Captions now have their own track on the timeline so they can be edited just like video. Styling uses the power of the Essential Graphics panel so you can make fantastic looking captions.
Best of all – we will be adding speech to text and auto captions powered by Adobe Sensei – coming later.
Some important things to know before you start testing this feature
- Just like any beta software, we do not recommend using this for mission critical projects since features are likely to change over time.
- The Premiere Pro beta has been updated to the next major version – 15. This means your projects will NOT be backwards compatible with the current shipping version of Premiere Pro – 14.x. All projects created in Premiere Pro Beta, even if you don’t use captions, will be saved as version 15.
- Opening existing projects in Premiere Pro Beta will ask you to save a copy of your project in the new project version. Take extra care with Team Projects since you do not get a version update warning and you can mess up the project for your entire team!
- If you have existing captions in a project that gets upgraded, we will convert from the old style captions to the new style. We will do our best to match the styling, but do not guarantee a pixel-perfect transition.
So, if you’re good with all that, read on . . .
Enabling the Feature:
- Update to the latest Beta version - you're done. It's on by default now
Quickstart Guide:
Download this sample project to follow along PR New Captions Workflow quickstart.zip
- Open the sequence The climber - start here and familiarize yourself with the spoken dialog.
- Open the Text panel from the window menu and make sure it’s showing the Captions tab.
- Locate the SRT file in the project panel The Climber - subtitles.srt
- Drag the SRT file into the sequence and drop it anywhere.
- A new caption track is created, and all the caption items are placed at the correct time.
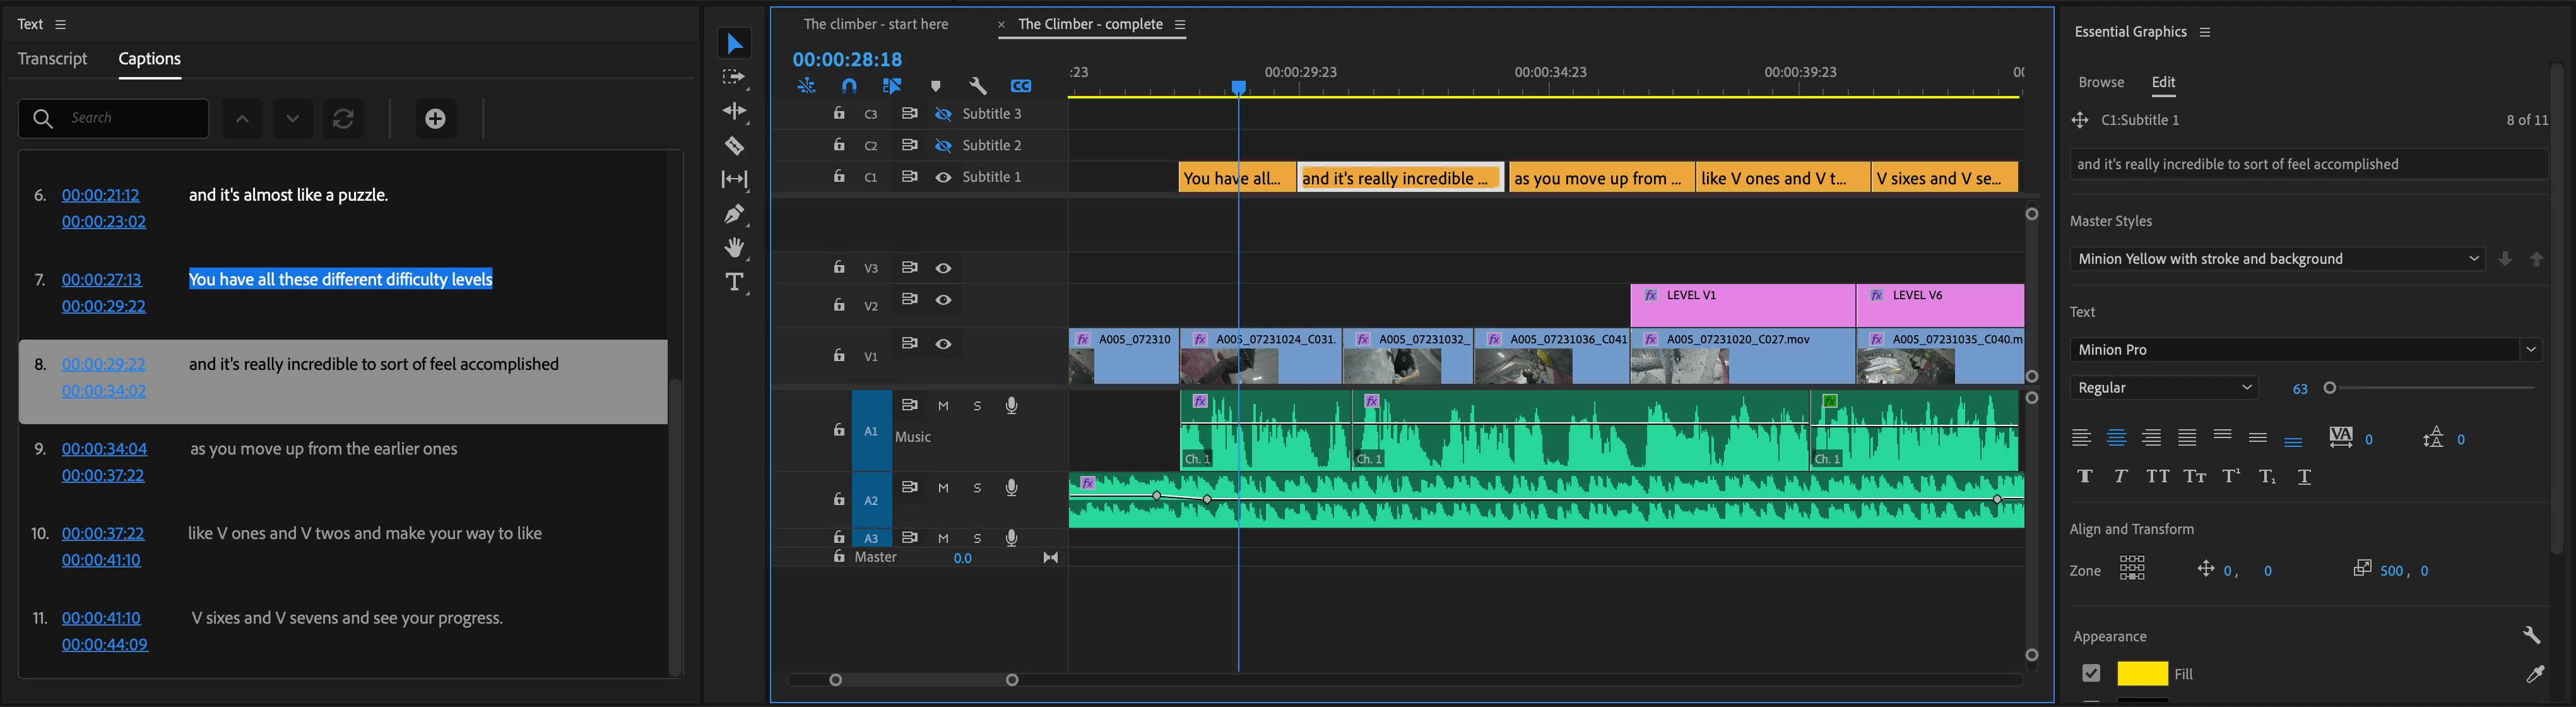
- Place the playhead over one of the caption items to select it. This should activate the Essential Graphics panel into editing mode.
- Change the Style in the Essential Graphics panel by choosing a different preset from the Style dropdown.
- Notice the font, size, color, and background have been updated.
- Play the sequence and watch the captions follow along in the Text panel.
Play around with visual styles in the Essential Graphics panel and try editing the text in the Text panel. Read on for more detailed info on the various pieces of the workflow.
The Text Panel
Open the Text panel from the Window menu. This is where you interact with text and it has two tabs – Transcript and Captions
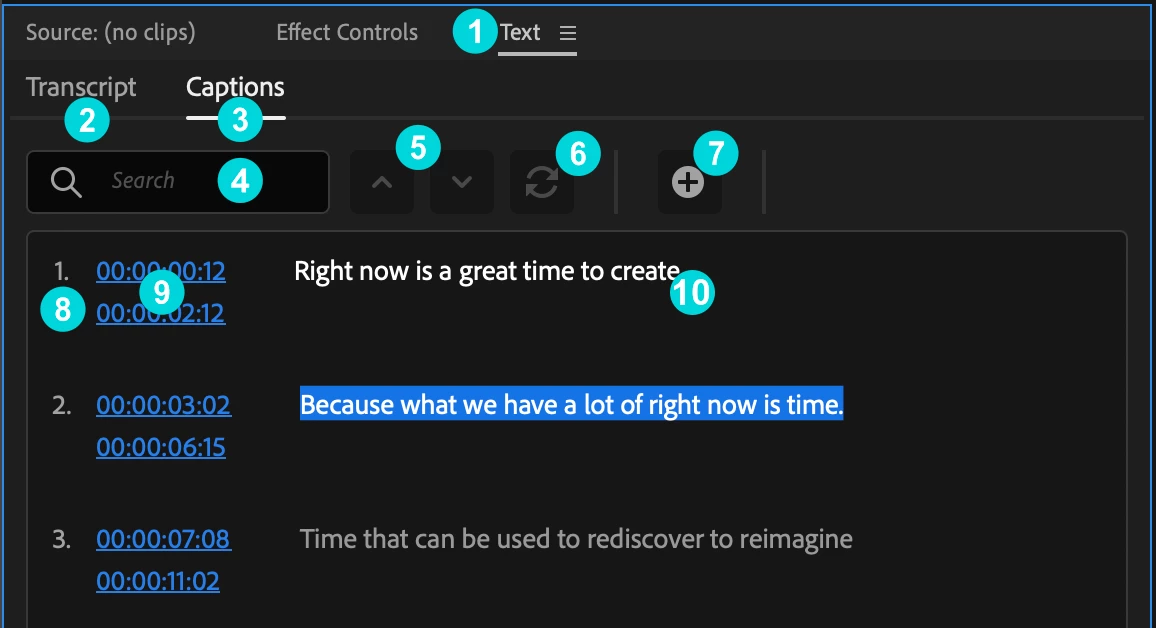
- Text panel – open from the Window Menu
- Transcript tab – This is where you can create automatic speech to text transcriptions, navigate the transcript, and create automatic captions. This is only available to those who been accepted into the eary access program for speech to text. All others will continue to see the "coming soon" graphics.
- Captions tab – Navigate and edit caption text.
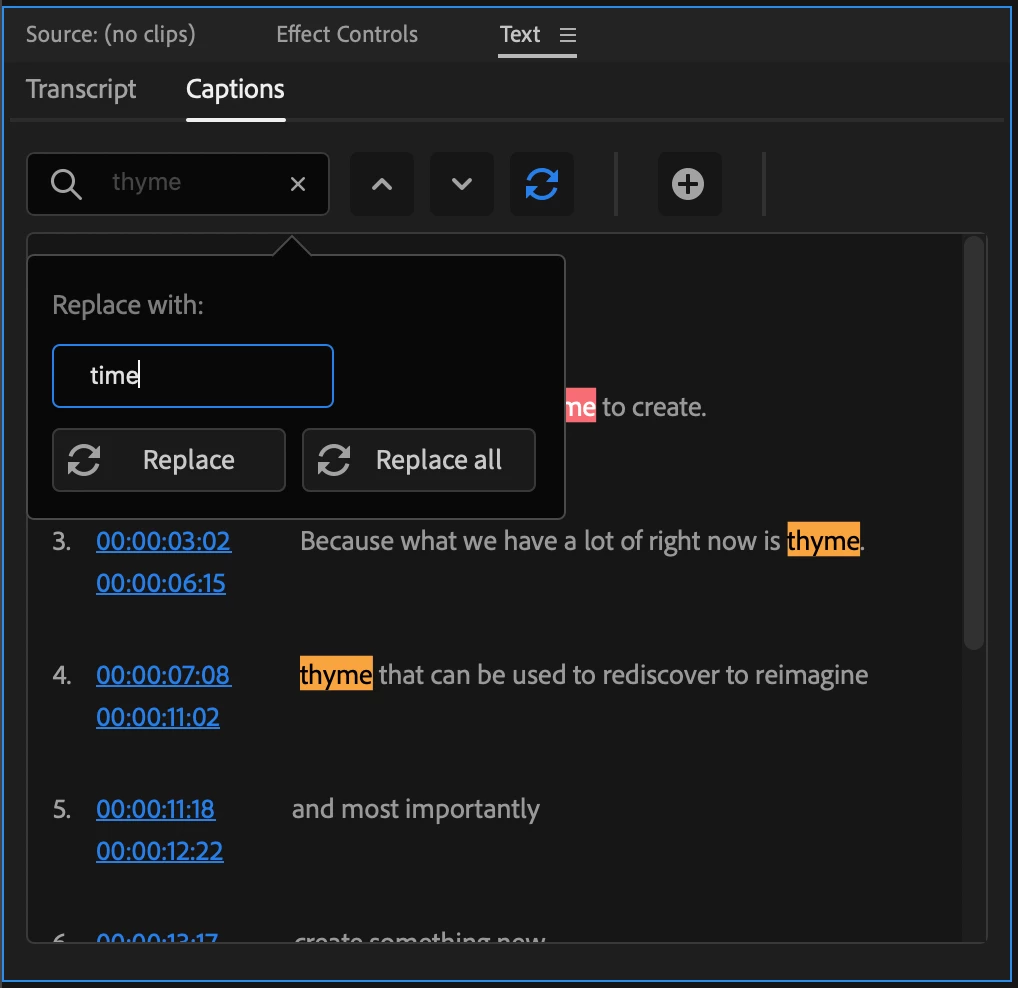
- Search – find characters, words and phrases in your captions.
- Next / Previous search result – use to navigate search results.
- Replace / Replace All – used to replace search results with new text.
- Add Caption – this will place a blank caption at the playhead in the current sequence
- Caption number – a sequence number to count your captions
- Timecode – TC start and stop of the current caption item. This is not editable. To change the timing of the caption, edit it in the sequence.
- Caption text – the text of the caption itself. Double click to edit.
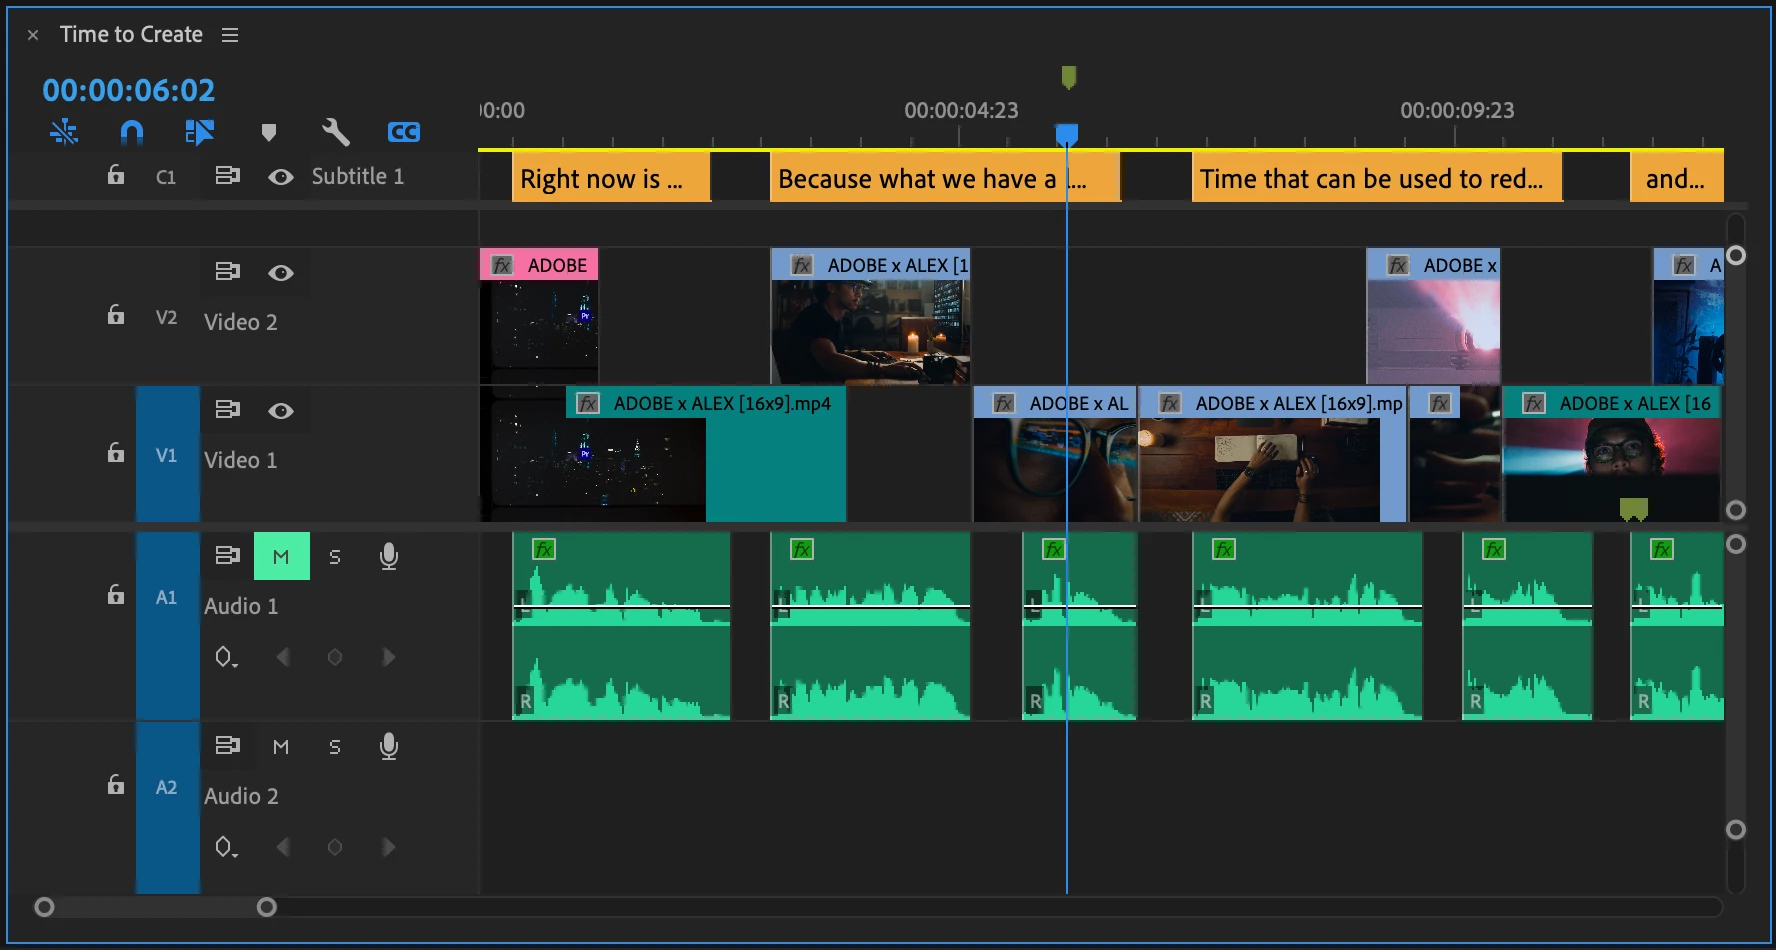
The Caption track - working with captions in the Sequence
We have completely reimagined the way captions work in Premiere Pro. If you have used captions previously in Premiere Pro, this is totally different – much better we think. Please tell us what YOU think by leaving a public comment below.
Create and delete caption tracks
There are a few ways to create a new caption track. You can drag an SRT file onto the Sequence or use the “Create new captions track” button in the Captions tab of the Text panel. To delete a caption track, right-click on the caption track header and choose “delete track”
Drag an SRT file on the sequence
Dragging an SRT caption file onto the Sequence will automatically create a new caption track at the top of the Timeline.
Keyboard Shortcuts
To see all the keyboard shortcuts available for captions, open the keyboard shortcuts menu from the Premiere Pro menu and search for "caption". Here are some notable ones. There are many other which do not have default assignments.
- Add a captions track - option/alt + command/ctrl + A
- Add a new caption segment at the playhead- option/alt + command/ctrl + C
- Go to next caption segment in the timeline - option/alt + command/ctrl + UP
- Go to next caption segment in the timeline - option/alt + command/ctrl + down
Captions tracks
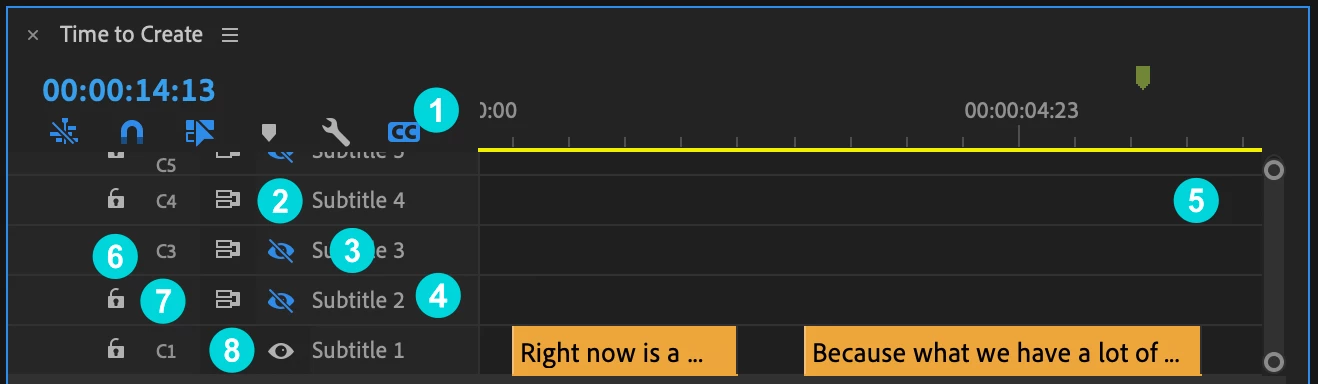
- Caption track setting – the CC button
This can hide the caption track area or solo just the active caption track if you have more than one. It is useful if you want to declutter your timeline. It does not turn off the active caption track from rendering in the program monitor, however.
- Hide all caption tracks
- Show all caption tracks
- Show active caption track only
- Active Track/Visibility – the eyeball icon
This will enable/disable Program Monitor viewing of the Caption track selected. Only one Caption track can be active at a time, so when you make one track active, the other tracks will automatically be disabled. You can also choose to disable all Caption tracks. Inactive Caption tracks will dim making it easier to note your active Caption track.
- Label
By default, this will show the caption track format (eg Subtitles, CEA-708, CEA-608, etc.) You can right-click the Caption track header and choose Rename to choose a custom name (same functionality as A/V tracks)
- Right-click the caption track header
Additional caption tracks can be added by right-clicking in the caption track header – choose “Add Track”. You can also delete or rename a caption track in the same way.
- Caption tracks area
Caption tracks will always be at the top of the sequence. Additional caption tracks are added on top. This will continue until you have reached 25% of the Timeline vertical space, then the tracks will stop “growing” and scroll bars will appear to the right. Caption tracks will never take up more than 25% of the upper space of the Timeline. This is dynamic, so if you increase or decrease the Timeline panel height, the 25% will adjust accordingly.
- Track Lock
Lock the track to prevent editing. This functions the same as A/V tracks.
- Track Targeting
The Caption track header has a ‘Toggle the track targeting for this track’ button with same functionality as A/V tracks.
- Sync Lock
The Caption track header has a ‘Toggle Sync Lock’ button with same functionality as A/V tracks.
Editing timing of caption items on the track
You can use all the familiar editing tools that you are used just like editing video and audio.
- Select (one or many) You can select multiple Caption track items by Shift-selecting each item or marquee/lasso select items or use Select All (which will also include other items in tracks like video, audio, etc.)
- Trim
- Ripple Trim
- Razor/Add Edit: You can add an edit/razor a Caption item as you would with any Timeline item and Track Targeting is supported. The difference is that when you razor a Caption item, both items will have the same text which you can then modify in the Text panel
- Copy/Paste: paste of Caption item(s) follows Track targeting which allows you to copy and paste captions items between tracks.
Styling with the Essential Graphics panel
Open the Essential Graphics panel from the Window menu. This is where you choose things like font, size, color and position. Make sure you have at least one caption selected. This will activate the Edit tab of the Essential Graphics panel. If you have created and stylized text in Premiere Pro before, the following should be very familiar to you. However, for captions we are adding small enhancements such as zones, and vertical text alignment.
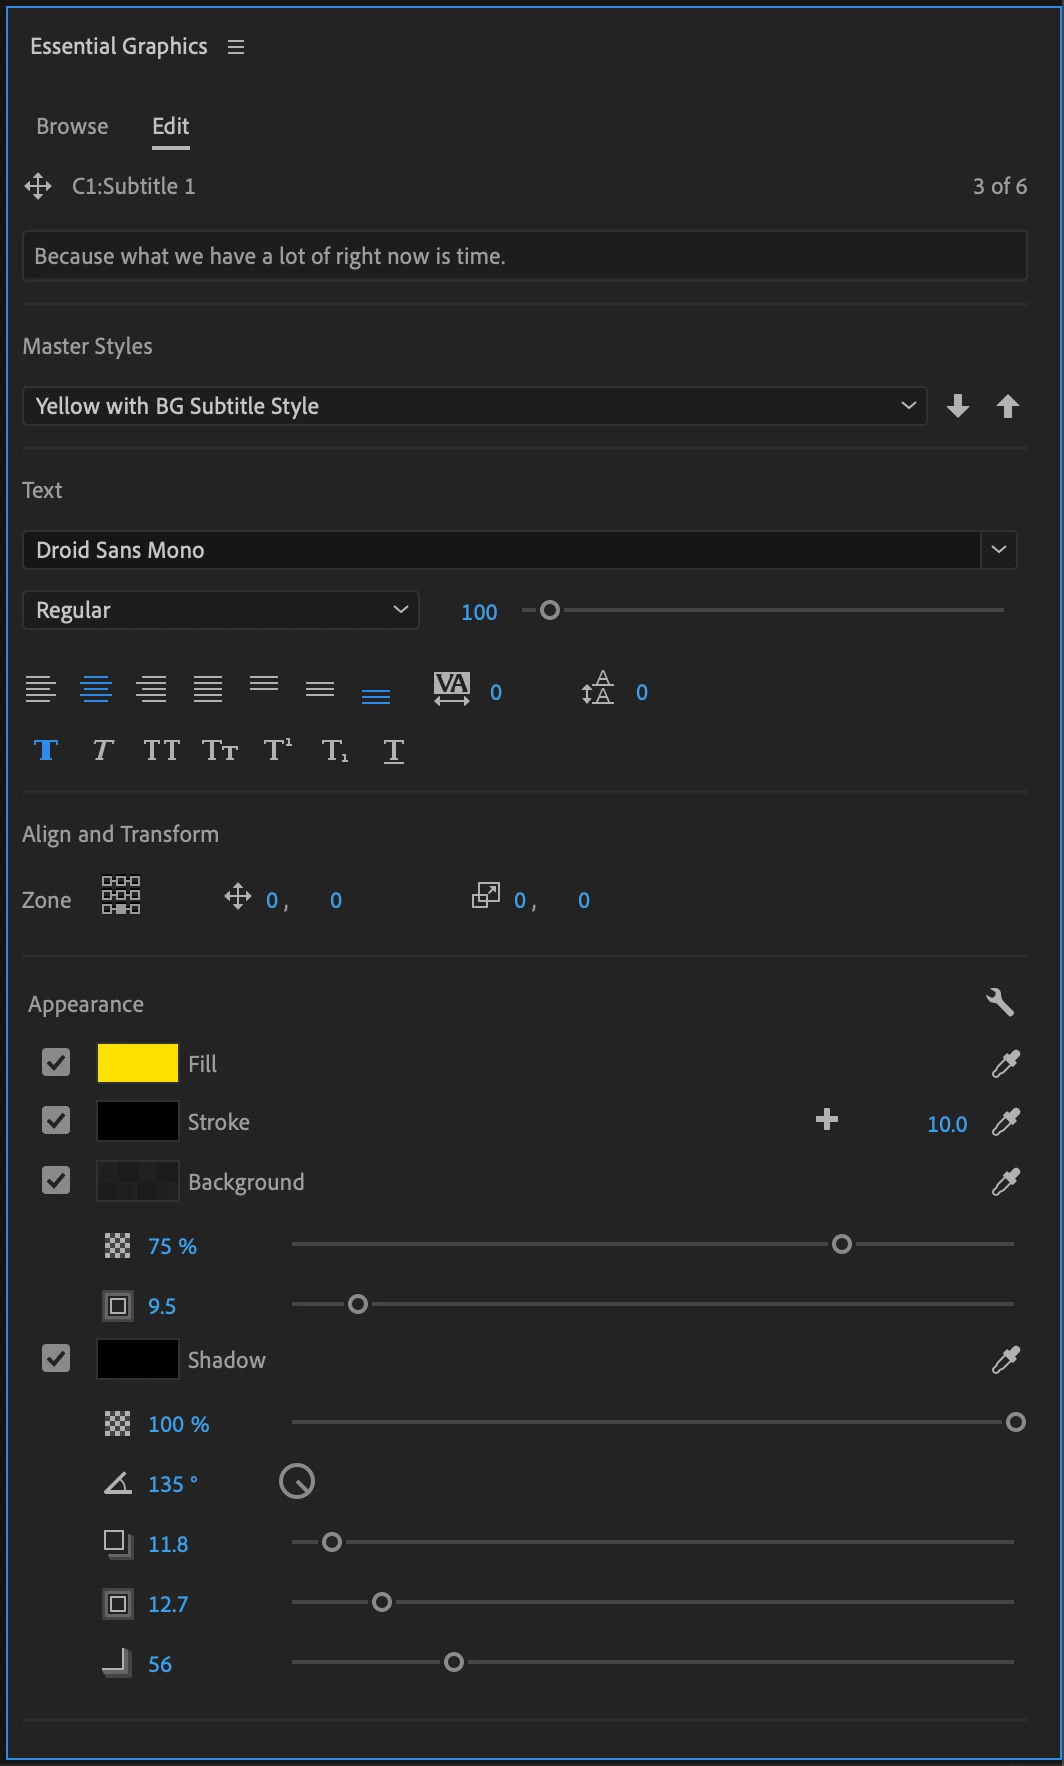
Styles
- Create Master Text Styles for consistent styling across the entire captions track. A style saves all the settings made in the Essential Graphics panels, including font, alignment, color and more. Setting a Master Text Style to one caption applies it to all captions on the track. You can have different styles for different tracks.
- Sync from Master Style and Push to Master Style: When changing the look of a caption you may want to push this change to the entire track for consistency, that’s were Push to Master Style comes into play. Or you might want to revert an edit to a caption back to the Master Style. Then use Sync from Master Style.
Text
- Font: Set font, font style and font size.
- Paragraph Alignment: For horizontal alignment use Left align text, Center align text, Right align text and Justify. We have now also added Vertical alignment with Top align text, Center text vertically and Bottom align text. This defines how a caption grows when adding additional lines. As an example, there is a good chance you will want a caption to be bottom aligned, this way a single line caption and the second line of a two-line caption will always be in the same vertical position.
- Tracking: Loose or tighten the space between characters.
- Leading: Loose or tighten the vertical space between lines.
- Faux Styles: Bold, Italic, All Caps, Small Caps, Superscript, Subscript, Underline.
Align and Transform
- Position captions with zones: You can choose from different zones to position your caption in different areas on screen, e.g. bottom center.
- Fine tune position: Through Set Horizontal and Set Vertical Position you can add an offset to your zone setting.
- Change the text box size: If you want to shrink or expand the text box size you can do this through Set Horizontal Scale and Set Vertical Scale. This will affect text wrapping and paragraph align settings.
Appearance
- Fill: Change the color of your captions.
- Stroke: Add single or multiple strokes. The Graphics Properties menu under the wrench menu gives you more control over stroke styling.
- Background: Add a background box. You can choose the color, add additional padding and change the opacity.
- Shadow: You can add a shadow and fine tune with controls such as opacity, angle, distance and more.
Transcribing the dialog into captions
You have three options for transcribing your audio and creating captions: speech to text, use a third-party service, or do it by hand.
Speech to text
- Text Panel > Transcript tab
- Only available for those who have applied and been accepted to the speech to text early access program. Other will not have access to this feature.
Use a third-party service
If you already have a workflow that uses a third party transcription service, you can bring in that file. SRT is the best option.
- Import the SRT file into your Premiere Pro project just like any piece of media
- Drag the SRT from the project panel into your sequence and let go anywhere
- A new caption track is automatically created, and the captions are placed on the track
Do it by hand
For short sequences, doing it by hand may not too much trouble.
- Open Text panel from the Window menu
- Go to the Captions tab of the Text Panel
- Press the “Add Captions Track” button – a new captions track is added to your current sequence
- Place the playhead at the beginning of your first piece of dialog (hint – use the waveforms in the audio to help align)
- Press the “+” button near the top of the Captions tab of the Text Panel to add a blank caption
- Double click on <Type your caption here> to go into edit mode
- Type out the caption text
- Trim the end of the caption in the timeline to align with the end of the spoken dialog
- Repeat for each caption you wish to add
- See the other sections on Working with captions in the Sequence and Styling with the Essential Graphics panel for more details on editing and styling.
Exporting your sequence with captions
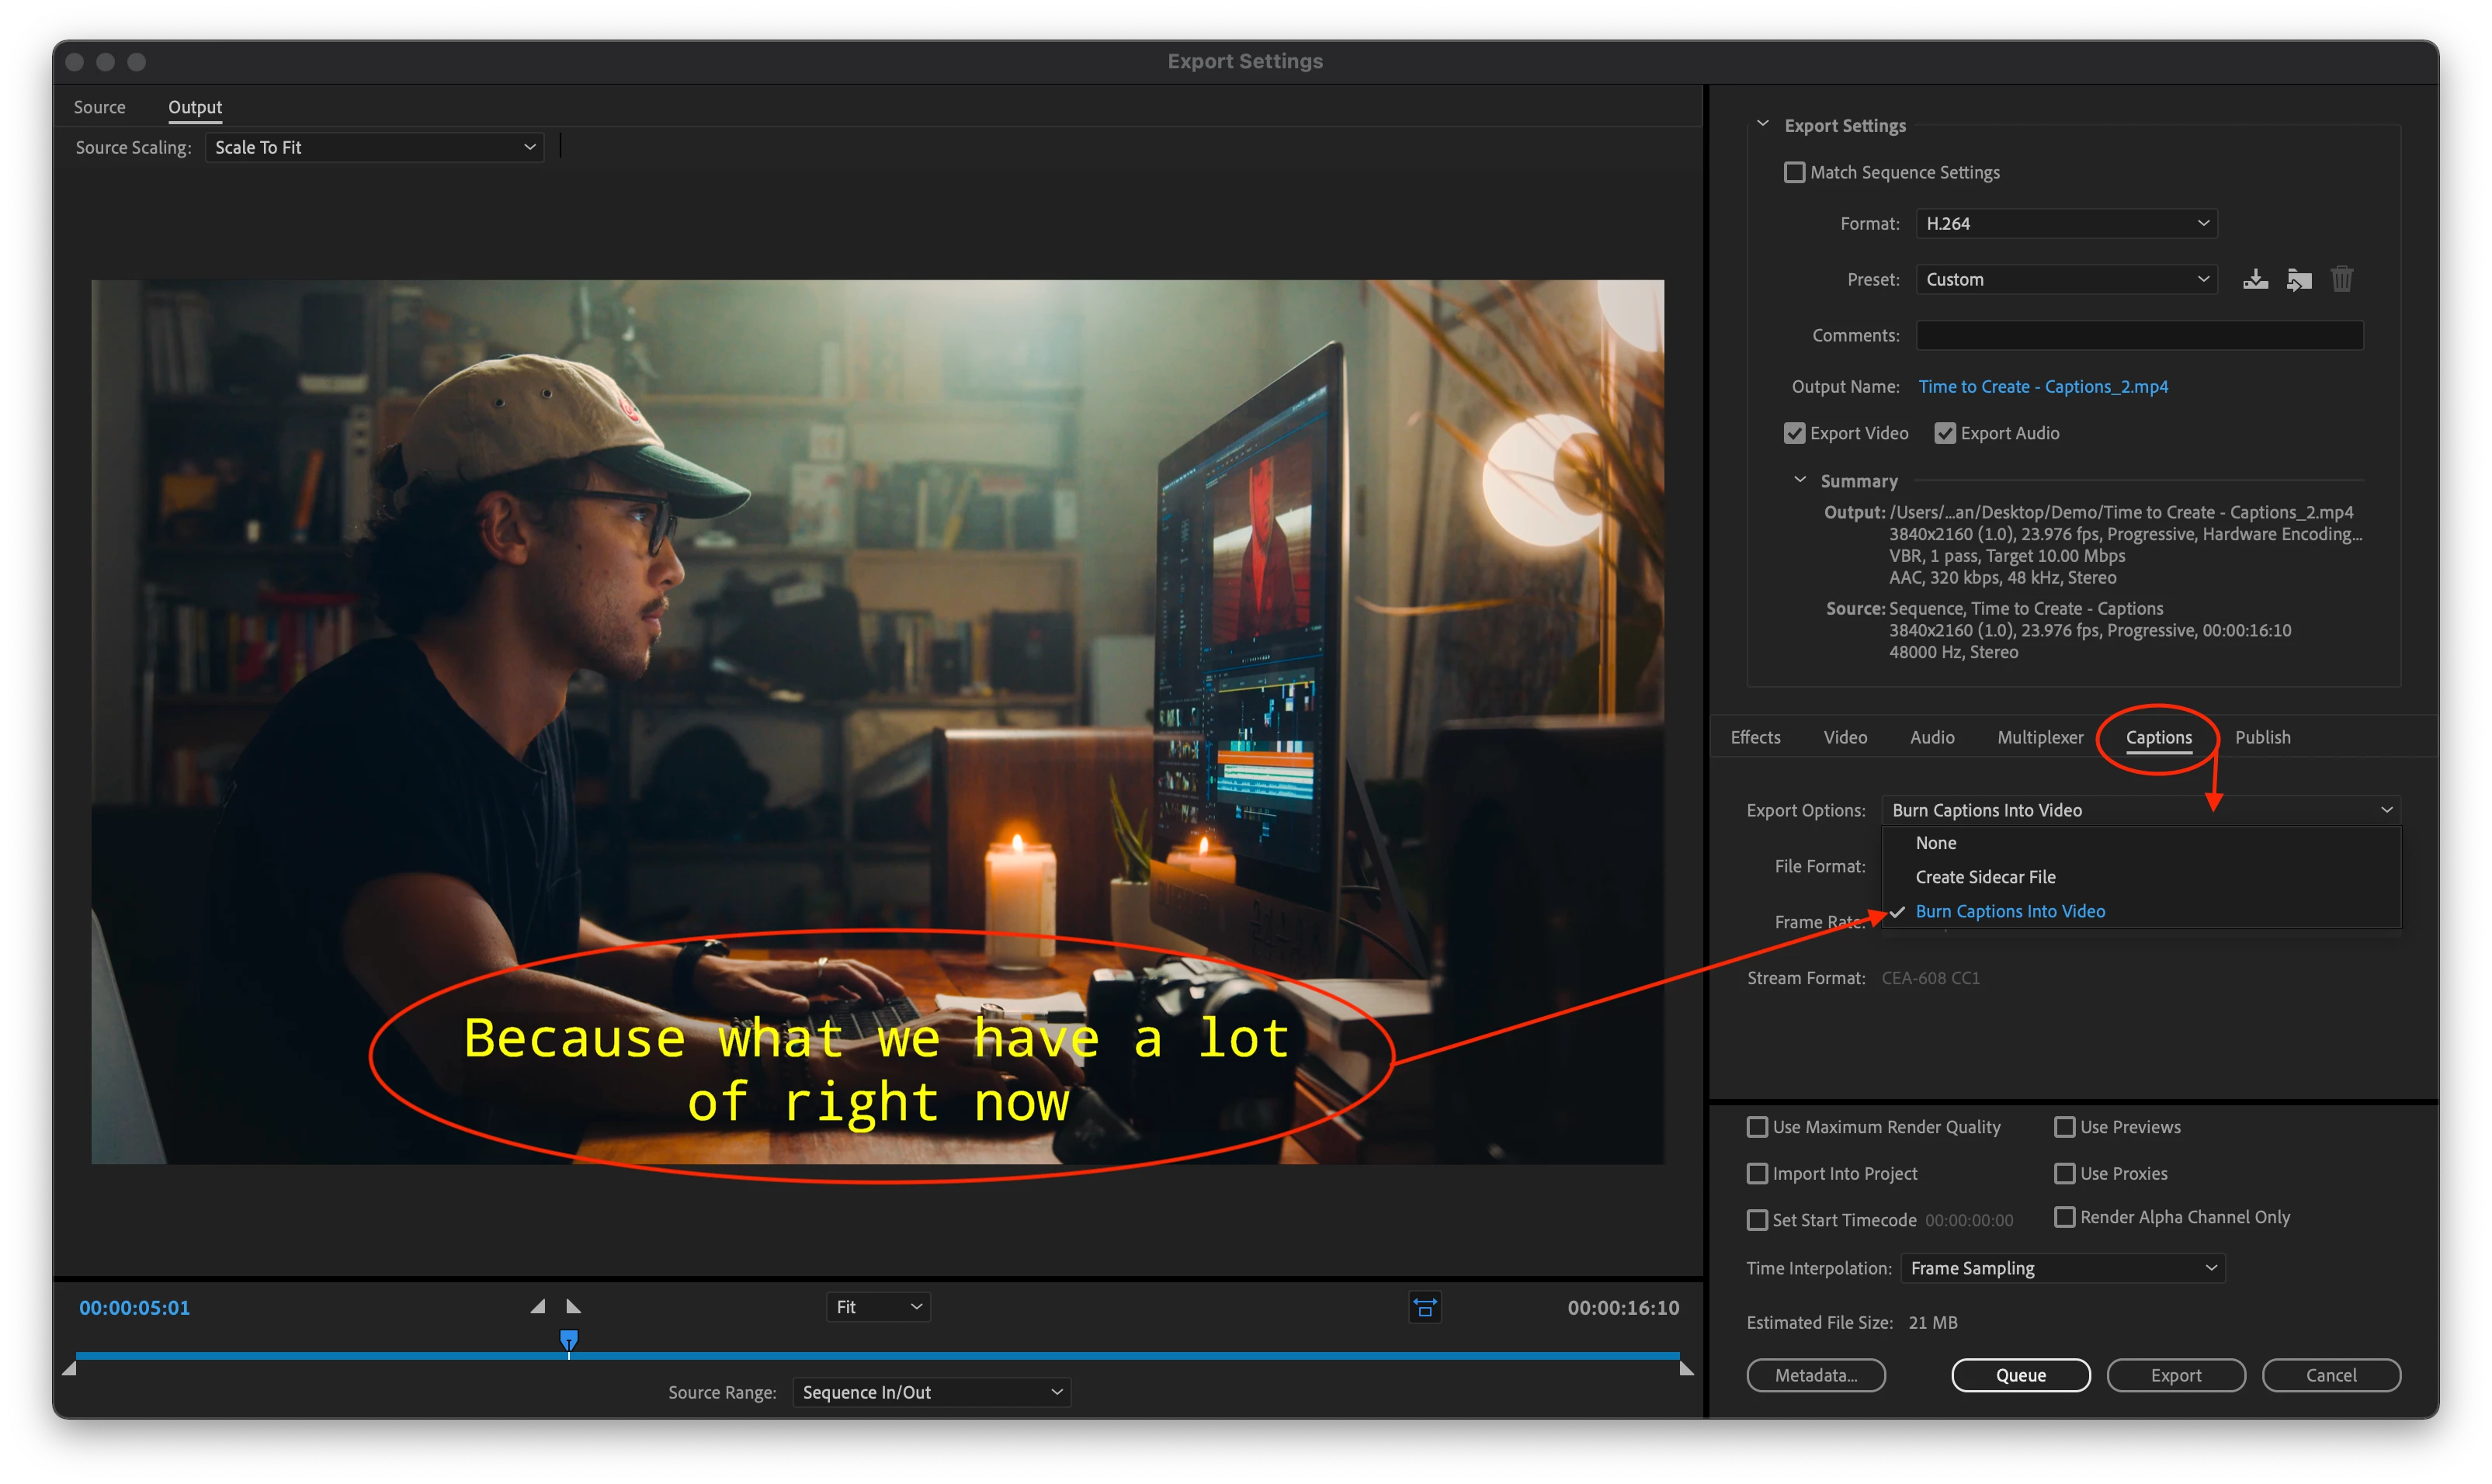
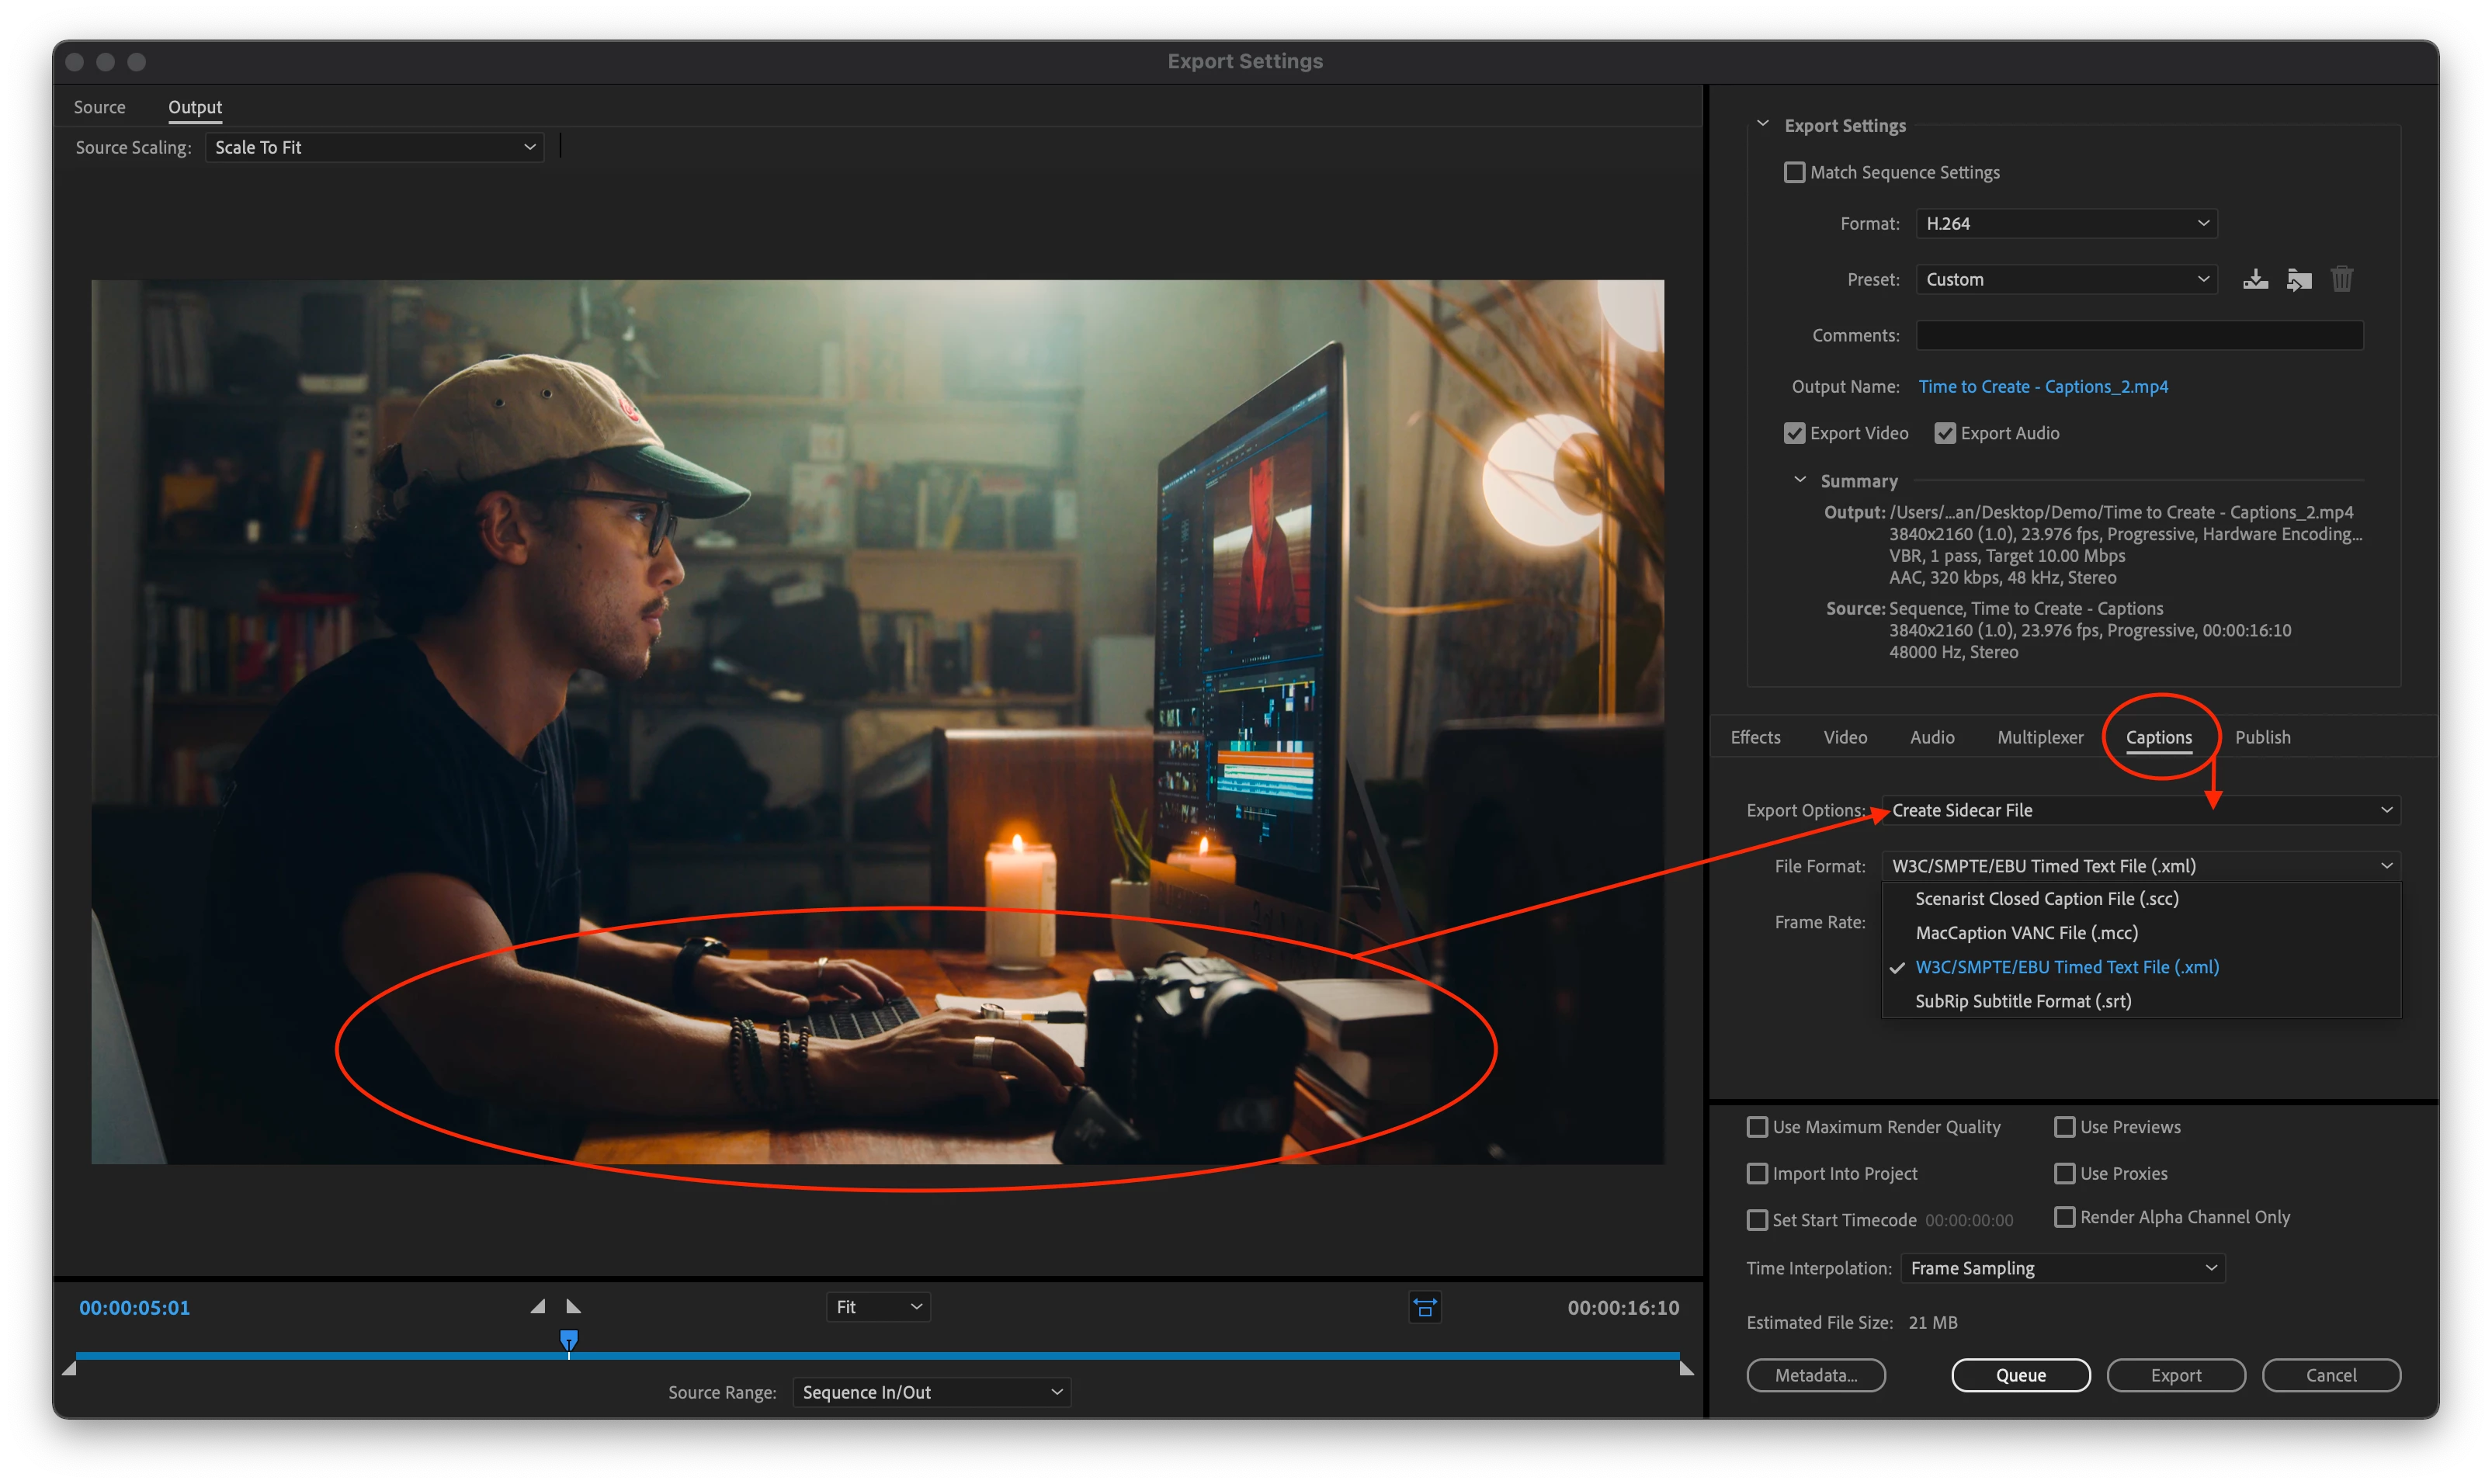
There are three options for exporting captions: burned in, sidecar file, or embedded into the video file.
- Make sure the caption track you want exported is visible by toggling the eyeball on (Toggle Active Captions Track).
- Choose File > Export
- Open the Captions tab in the export settings and choose burn in, sidecar or embedded
- Burned in and sidecar are supported with any encoding preset
- Embedded is limited to pro codecs like MXF OP1a, DNX, and Prores and requires that the caption track format be set to one of the broadcast standards like CEA-608
- Click Export
- Sidecar files will be saved next to the video file with the same name
- Queueing to Media encoder is supported too
Happy captioning! Once again, we welcome your feedback. Please leave comments below.
