
Introducing the Properties Panel in After Effects (Beta)
In our ongoing aim to make your After Effects experience better, we are excited to introduce the new Properties Panel to the beta today (22.2.0x29).
As always, we look forward to hearing your feedback here in the forum. Your responses help us know when features are ready to ship or if they need more polishing. Please speak up and help us build the product you need!
Properties Panel
Create motion graphics quicker and with greater ease inside the new Properties Panel. Cut down on your twirl-time by quickly accessing the properties you need the most. New designers coming from Photoshop and Illustrator should feel right at home with controls available where you are used to finding them.
This first build brings an easier way of working with Shape layers. Select a shape either in the composition window or timeline, and you will find its properties shown in the panel for easy access. If you change a value in the panel, it will change in the timeline as well. Select multiple shapes on a layer to change their values at the same time.
Alongside the Shape properties, we’ve also added basic layer transforms for Anchor Point, Position, Scale, Rotation and Opacity. The values can be modified for multiple layers at once when selected together.
How to Use Properties Panel
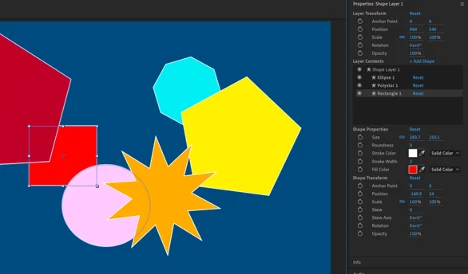
Select a Shape layer in the timeline, or in the composition window double-click to select a specific shape within that layer. The Properties Panel, which will be at the upper right side of the panel stack, will display the properties for your selection. You may need to extend the bottom edge of the panel down to see all the controls, or you can scroll down instead.
- Layer Transform controls at the top of the panel control the layer as a whole.
- Layer Contents lists any selected Shape layer(s) plus all the Shapes included within them.
- Shape Properties gives you quick access to the properties you need most frequently.
- Shape Transform gives the Anchor Point, Position, Scale, Rotation and Opacity controls specific to the selected shape.
Tips
- Double-click on any shape in the composition window to show its controls in the Properties Panel.
- Double-click on any property in the Properties Panel to reveal it within the timeline.
- The panel can be moved to wherever you find it most useful. Let us know where you end up using it most often!
For a longer introduction check out the attached video below.
Have fun with it!
Known Issues and Workarounds
- If you have multiple fills/strokes within a single shape, the fill/stroke does not show up in the Properties Panel. You can still edit these items within the timeline window.
- If you have multiple paths within a single shape, only the initial path shows in the Properties Panel. You can still edit the other paths within the timeline window.
- Shape Modifiers applied to Shapes do not show in the Properties Panel.
- Layers/Shapes cannot be renamed or reordered within the Layer Contents window.
- If you have a lot of Shapes on one layer, the Layer Contents window may not auto-scroll to your selected Shape. You can use the scrollbar to get to it.
- When scrubbing the Rotation angle, revolutions are not properly counted (rotating past 360 will start over at 0). You can type in values directly.
- If you have multiple keyframes on a property, deleting one or more from the Properties Panel does not work correctly. Move to the timeline to delete instead.
- Deleting a Shape Layer from either the timeline or Properties Panel throws an AE error. Just click OK and keep working.
- Keyframing a gradient fill/stroke from the Properties Panel throws an AE error. Click OK, and go to the timeline to set your keyframes.
- Resetting values in the Properties Panel will reset the values within the timeline, but the value still appears the same in the Properties Panel.
