Known Participant
July 24, 2013
Answered

How to create tick marks within an arched area

  • July 24, 2013
  • 4 replies
  • 8352 views

I need to recreate this dial and I've learned how to create evenly spaced tick marks within a circle, but this is an ellipse.  Here, I attempted to draw two ellipse then used the scissors to cut them to size.  Then I used the line tool and drew each of the tick marks.  Then I adjusted the weights of each tick.  This is not a good method because the end ticks are not meeting the ends of the ellipse perfectly, leaving a tiny bit of tick mark outside the ellipse.  There must be a better way to do this. Here is what I ended up with:

But this is what I need to create:

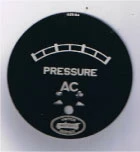
(I only need to create the arched part with tick marks of this dial)

Any help is appreciated, but please note that I am familiar with only the very basics of illustrator, I simply don't do this type of work often enough to completely understand the software.

Thanks!!!!

This topic has been closed for replies.
Correct answer Jacob Bugge

Jber,

If you wish to have the tick marks follow an ellipse and at the same time have constant widths (two different widths), you may:

0) Lock the image of the dial;

1) Create the thickest tick mark and move a copy to the right, then create a one step blend;

2) Create the thinnest tick mark and move a copy to the right, then create a five steps blend;

3) Create the two ellipses corresponding to the two arcs, then create a one step blend and Object>Blend>Expand to get a midway ellipse;

4) With the midway ellipse Object>Path>Add Anchor Points a few times (see below), and copy the midway ellipse;

5) Select the original midway ellipse and the thin blend and Object>Blend>Replace Spine;

6) Select the copy midway ellipse and the thick blend and Object>Blend>Replace Spine.

Now you should have the whole dial with the thickest tick marks on top of the thinnest ones on top of the elliptic arch set.

If you wish to extend the thick tick marks upwards, you may select that blend and:

7) Object>Blend>Expand;

8) Select each of the thick tick marks and select the appropriate bottom Reference Point in the Transform palette ((Right for left, Center for centre, Left for right), then multiply the H value by the deisred amount and click Ctrl/Cmd+Enter to make them a bit longer up/outwardly.

The Object>Path>Add Anchor Points in 4) is to get a even distribution of the thin tick mark blend (not necessary for the thick tick marks blend because it only has one step).

4 replies

JETalmage
Inspiring
July 25, 2013

JET

Jacob Bugge
Community Expert
Jacob BuggeCommunity ExpertCorrect answer
Community Expert
July 24, 2013

Jber,

If you wish to have the tick marks follow an ellipse and at the same time have constant widths (two different widths), you may:

0) Lock the image of the dial;

1) Create the thickest tick mark and move a copy to the right, then create a one step blend;

2) Create the thinnest tick mark and move a copy to the right, then create a five steps blend;

3) Create the two ellipses corresponding to the two arcs, then create a one step blend and Object>Blend>Expand to get a midway ellipse;

4) With the midway ellipse Object>Path>Add Anchor Points a few times (see below), and copy the midway ellipse;

5) Select the original midway ellipse and the thin blend and Object>Blend>Replace Spine;

6) Select the copy midway ellipse and the thick blend and Object>Blend>Replace Spine.

Now you should have the whole dial with the thickest tick marks on top of the thinnest ones on top of the elliptic arch set.

If you wish to extend the thick tick marks upwards, you may select that blend and:

7) Object>Blend>Expand;

8) Select each of the thick tick marks and select the appropriate bottom Reference Point in the Transform palette ((Right for left, Center for centre, Left for right), then multiply the H value by the deisred amount and click Ctrl/Cmd+Enter to make them a bit longer up/outwardly.

The Object>Path>Add Anchor Points in 4) is to get a even distribution of the thin tick mark blend (not necessary for the thick tick marks blend because it only has one step).

Jber505Author
Known Participant
July 25, 2013

Hi Jacob;

First let me say thanks for your patience.  I feel very embarressed to have to ask for explanation on what probably seems so apparent to yourself, but...here goes.

I got to step 3 and where you said create the ellipses then object>blend>expand to get a midway ellipses.  The option to "expand" was not there, I figured out that I first needed to: object>blend>make in order to get the "expand" option to show up. then I was able to move forward and create the anchor points as instructed in step 4. But in step 5 I got stopped again at your instruction object>blend>replace spine... the "replace spine" option is not available. I do have the midway ellipse selected.  This is what I have:

The ellipse on the bottom is the copy that I made.  Im sure that I'm missing a step in order to get "replace spine" to show up, but I don't know what.

Thanks for helping a newbie out.

Jber505Author
Known Participant
July 25, 2013

Jber,

create the ellipses then object>blend>expand to get a midway ellipses

In full, in post #4, it was:

3) Create the two ellipses corresponding to the two arcs, then create a one step blend and Object>Blend>Expand to get a midway ellipse;

I believe I should have written the emphasized part out in full, Object>Blend>Blend Options set Spacing to Specified Steps = 1, and Object>Blend>Make.

Likewise, in 1) and 2), you should create blends for the tick marks, setting Specified Steps = 1 and 5 respectively. Only then will the replace spine option be available in 5) and 6), because it requires an actual blend with a spine to replace.

Apart from that, you have to keep the copy of the midway ellipse in place together with the original to have both the tick mark blends in the right place.

And you will have to cut the ellipses where the dial is to end (with the outermost tick marks).


thank you Jacob, I will try again tomorrow after work, thanks for working with me.

Mike_Gondek10189183
Community Expert
Community Expert
July 24, 2013

I would draw this  straight, then use

Object >> Envelope Distort >> Warp

Jacob Bugge
Community Expert
Community Expert
July 24, 2013

And live with the widening tick marks, Mike?

Jacob Bugge
Community Expert
Community Expert
July 24, 2013

Jber,

I believe it is (close enough to be considered) a circle, at least when taking the irregularities into account. The two outermost tick marks seem to point to the largest circle below AC, and if you measure the distance from that to the ends and to the middle of the arc, I believe you will find that they are just about the same.