zachbaranowski
Participant
November 18, 2018
Question

Images showing up different in photoshop or export than in lightroom

  • November 18, 2018
  • 3 replies
  • 1140 views

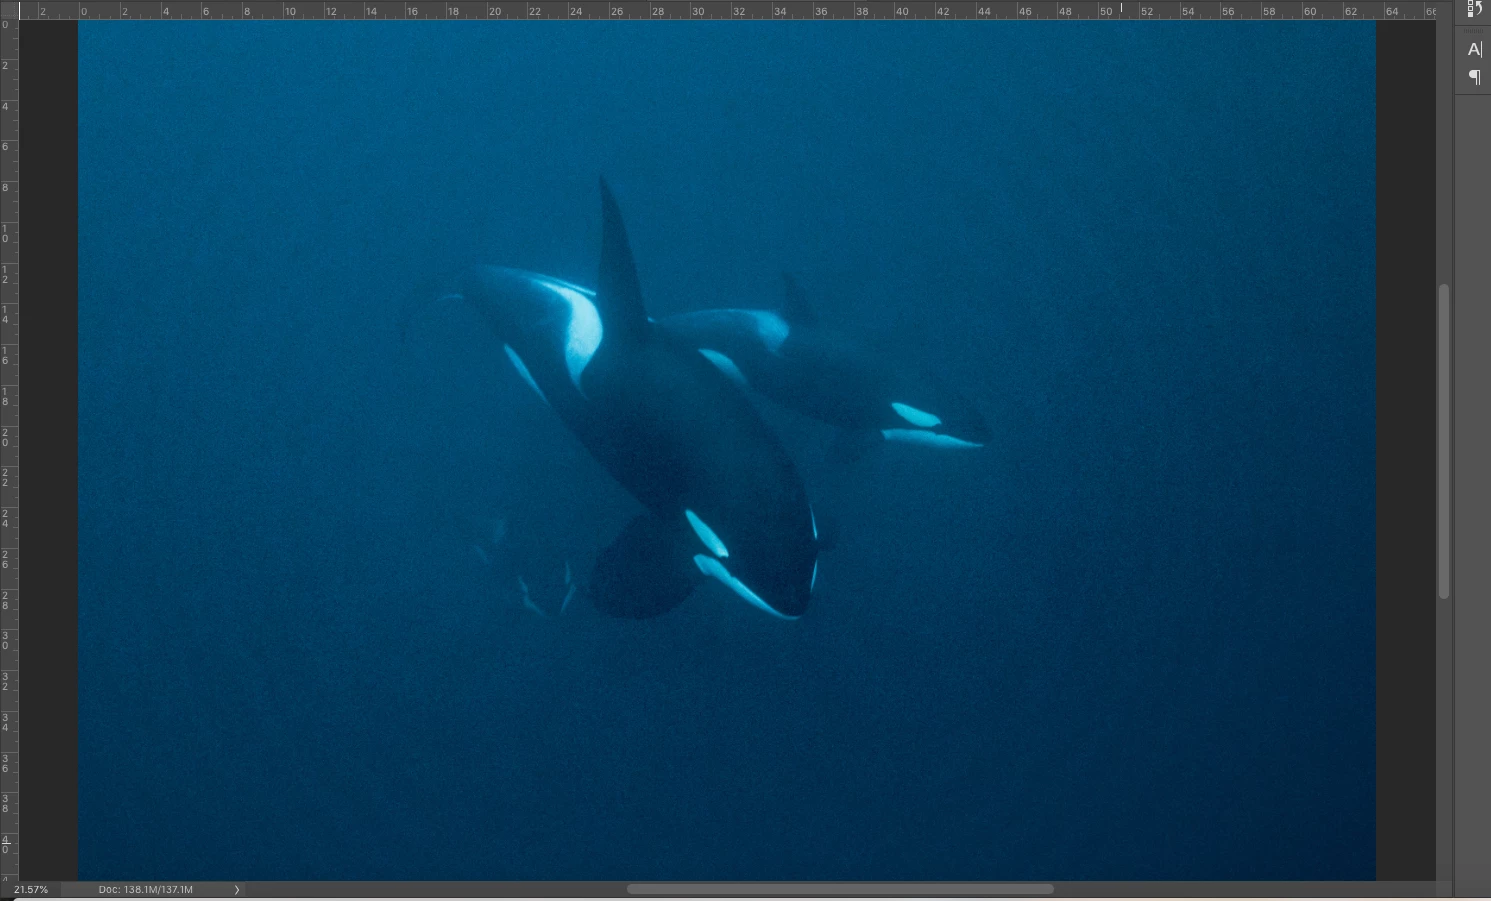
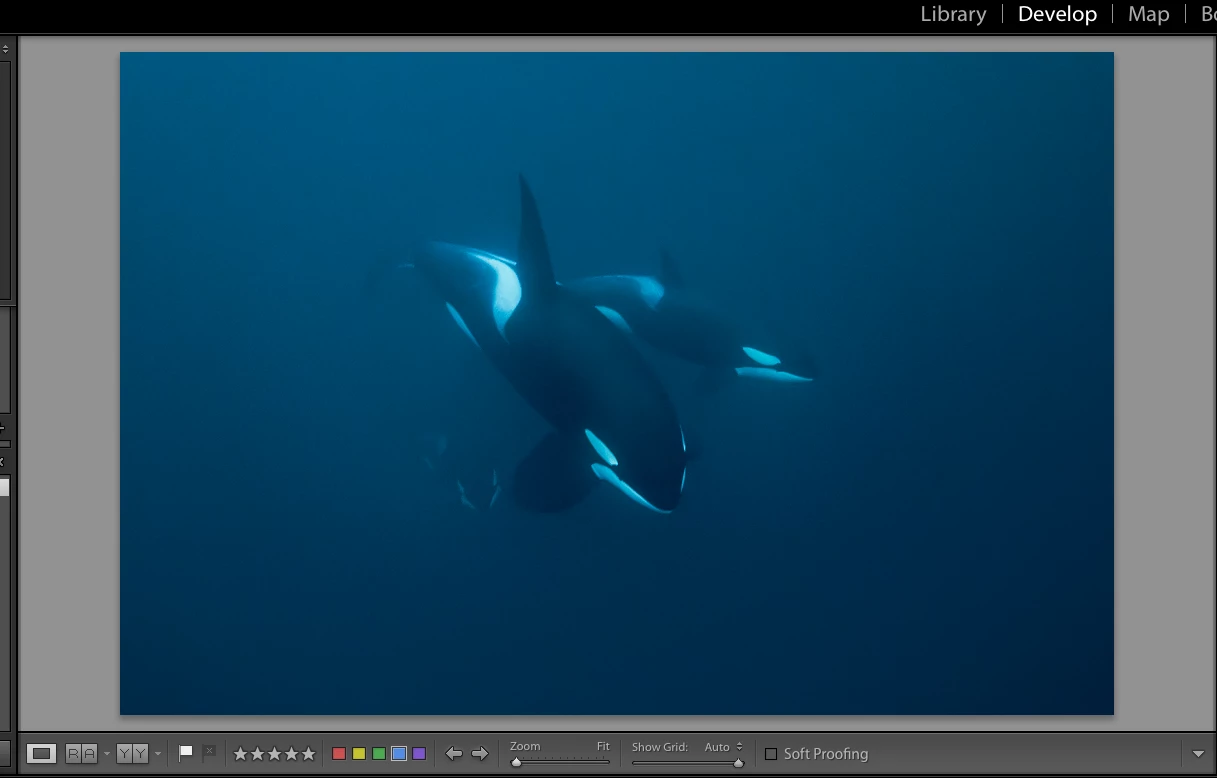
I am editing images with high noise (they had to be shot at 6400 iso). In all of the images the noise reduction smoothing seen in lightroom does not seem to transfer well to photoshop or the exported photos. Also, in some images, like the one below circular rings appear which are not apparent at all in the lightroom view. Any ideas on what is causing this and how to fix it? Also is there a better way of showing a more accurate view of the image in lightroom that would better reflect the exported image? At this point I almost feel like I'd be better off screenshotting the full screen view of the image than trying to export it.

Lightroom:

Photoshop:

This topic has been closed for replies.

3 replies

Community Expert
November 19, 2018

As said already, Lightroom does not accurately show the noise reduction and sharpening on very high noise images in Develop in zoomed out view. The preview in Library is somewhat more accurate. This is due to the fact that in zoomed out view, Develop subsamples the raw file and uses that for speed of display. If it were to render the entire raw file and then downscale for display, Lightroom would be completely unusable even on the very fastest computers. At 1:1 zoom in Develop, it uses the full raw data of the tiny part of the image that is visible which is why 1:1 is actually accurate there. Again, Library, because it is displayed from a jpeg preview, which is generated from the full raw data, is more accurate and should look closer to the Photoshop display concerning noise as long as you zoom to a power of two ratio in Photoshop (i.e. 25%, 50%, etc) where it does a fairly good job of averaging neighboring pixels. At all other zoom ratios in photoshop it uses nearest neighbor scaling which highly overrepresent the noise in the image but makes it look much sharper (which is false!). Note that you are zooming at 21.57% in photoshop which will always be wrong. You need to zoom to 25% to get a slightly more accurate view in Photoshop that is more comparable to what Lightroom does

Second, the rings are likely due to a very subtle color management effect. You sometimes see this in exports from Lightroom while you don't see them in the original because of the difference in a linear color scale that Develop uses and a gamma corrected one as used in Photoshop. Contrary to popular belief, you CANNOT match the color spaces between Lightroom and Photoshop as Lightroom uses a special colorspace which has prophotoRGB primaries but uses a linear gamma that simply does not exist in Photoshop. When you display an image in Photoshop, it goes from the gamma corrected space into the display color space which has another gamma again. The display profile is generally only in 8-bits precision if you don't have a 10 bit monitor or have a monitor with a hardware LUT. Therefore, the conversion to the monitor space can cause posterization in a different way when coming from the gamma corrected space than from the linear space in Lightroom. In this case, I would expect similar (but not exactly the same) rings to be there when you preview the file in Library in Lightroom as that also comes from a gamma corrected space albeit different primaries (usually adobeRGB or sRGB depending on the preview quality setting).

Per Berntsen
Community Expert
Community Expert
November 19, 2018

This has nothing to do with color settings or profiles, but with the image being scaled on screen..

1:1 (or 100%) is the only magnification that will show you a true representation of the image on screen, because one image pixel is represented by one screen pixel. Any other view will be inaccurate and misleading because the image has been scaled.

Also, different applications use different algorithms for scaling images, which makes it even more important to view at 1:1.

Noise and sharpening are particularly sensitive to scaling, so it is vital that you apply and evaluate noise reduction and sharpening only at 1:1. You also need to view the exported image at 1:1 to evaluate it.

Viewing at 1:1 is not something that you only need to do in Lightroom and Photoshop – it applies to any application that can display images.

davidg36166309 wrote

Probably due to different color space used in LR develop module as opposed to your PS default.

It's a widespread myth that color profiles or working spaces need to match between Lightroom and Photoshop – they don't.

Both are color managed, and will display images correctly regardless of the profile or working space.

So uncheck Ask when opening for Profile mismatches in the PS color settings, and the embedded profile will be used. (as long as Preserve embedded profiles is chosen under Color management policies)

GoldingD
Legend
November 19, 2018

Probably due to different color space used in LR develop module as opposed to your PS default. Not a big PS user, I Romberg that a means to deal with PS color space when bringing in an image from LR exists,

perhaps a PS capable member will add to that.

as for exporting for publishing to say JPEG, perhaps for a web page, consider using the soft proof option as to have a better idea in LR an image will look outside of LR.

Oh, got off my rear end, got off the iPad, and over to my workstation. So as to what I am referring to in PS. First in PS, alter color space settings. (/Edit/Color Settings/)::

Then after you select edit in PS from LR you get: