Participating Frequently
November 23, 2020
Question

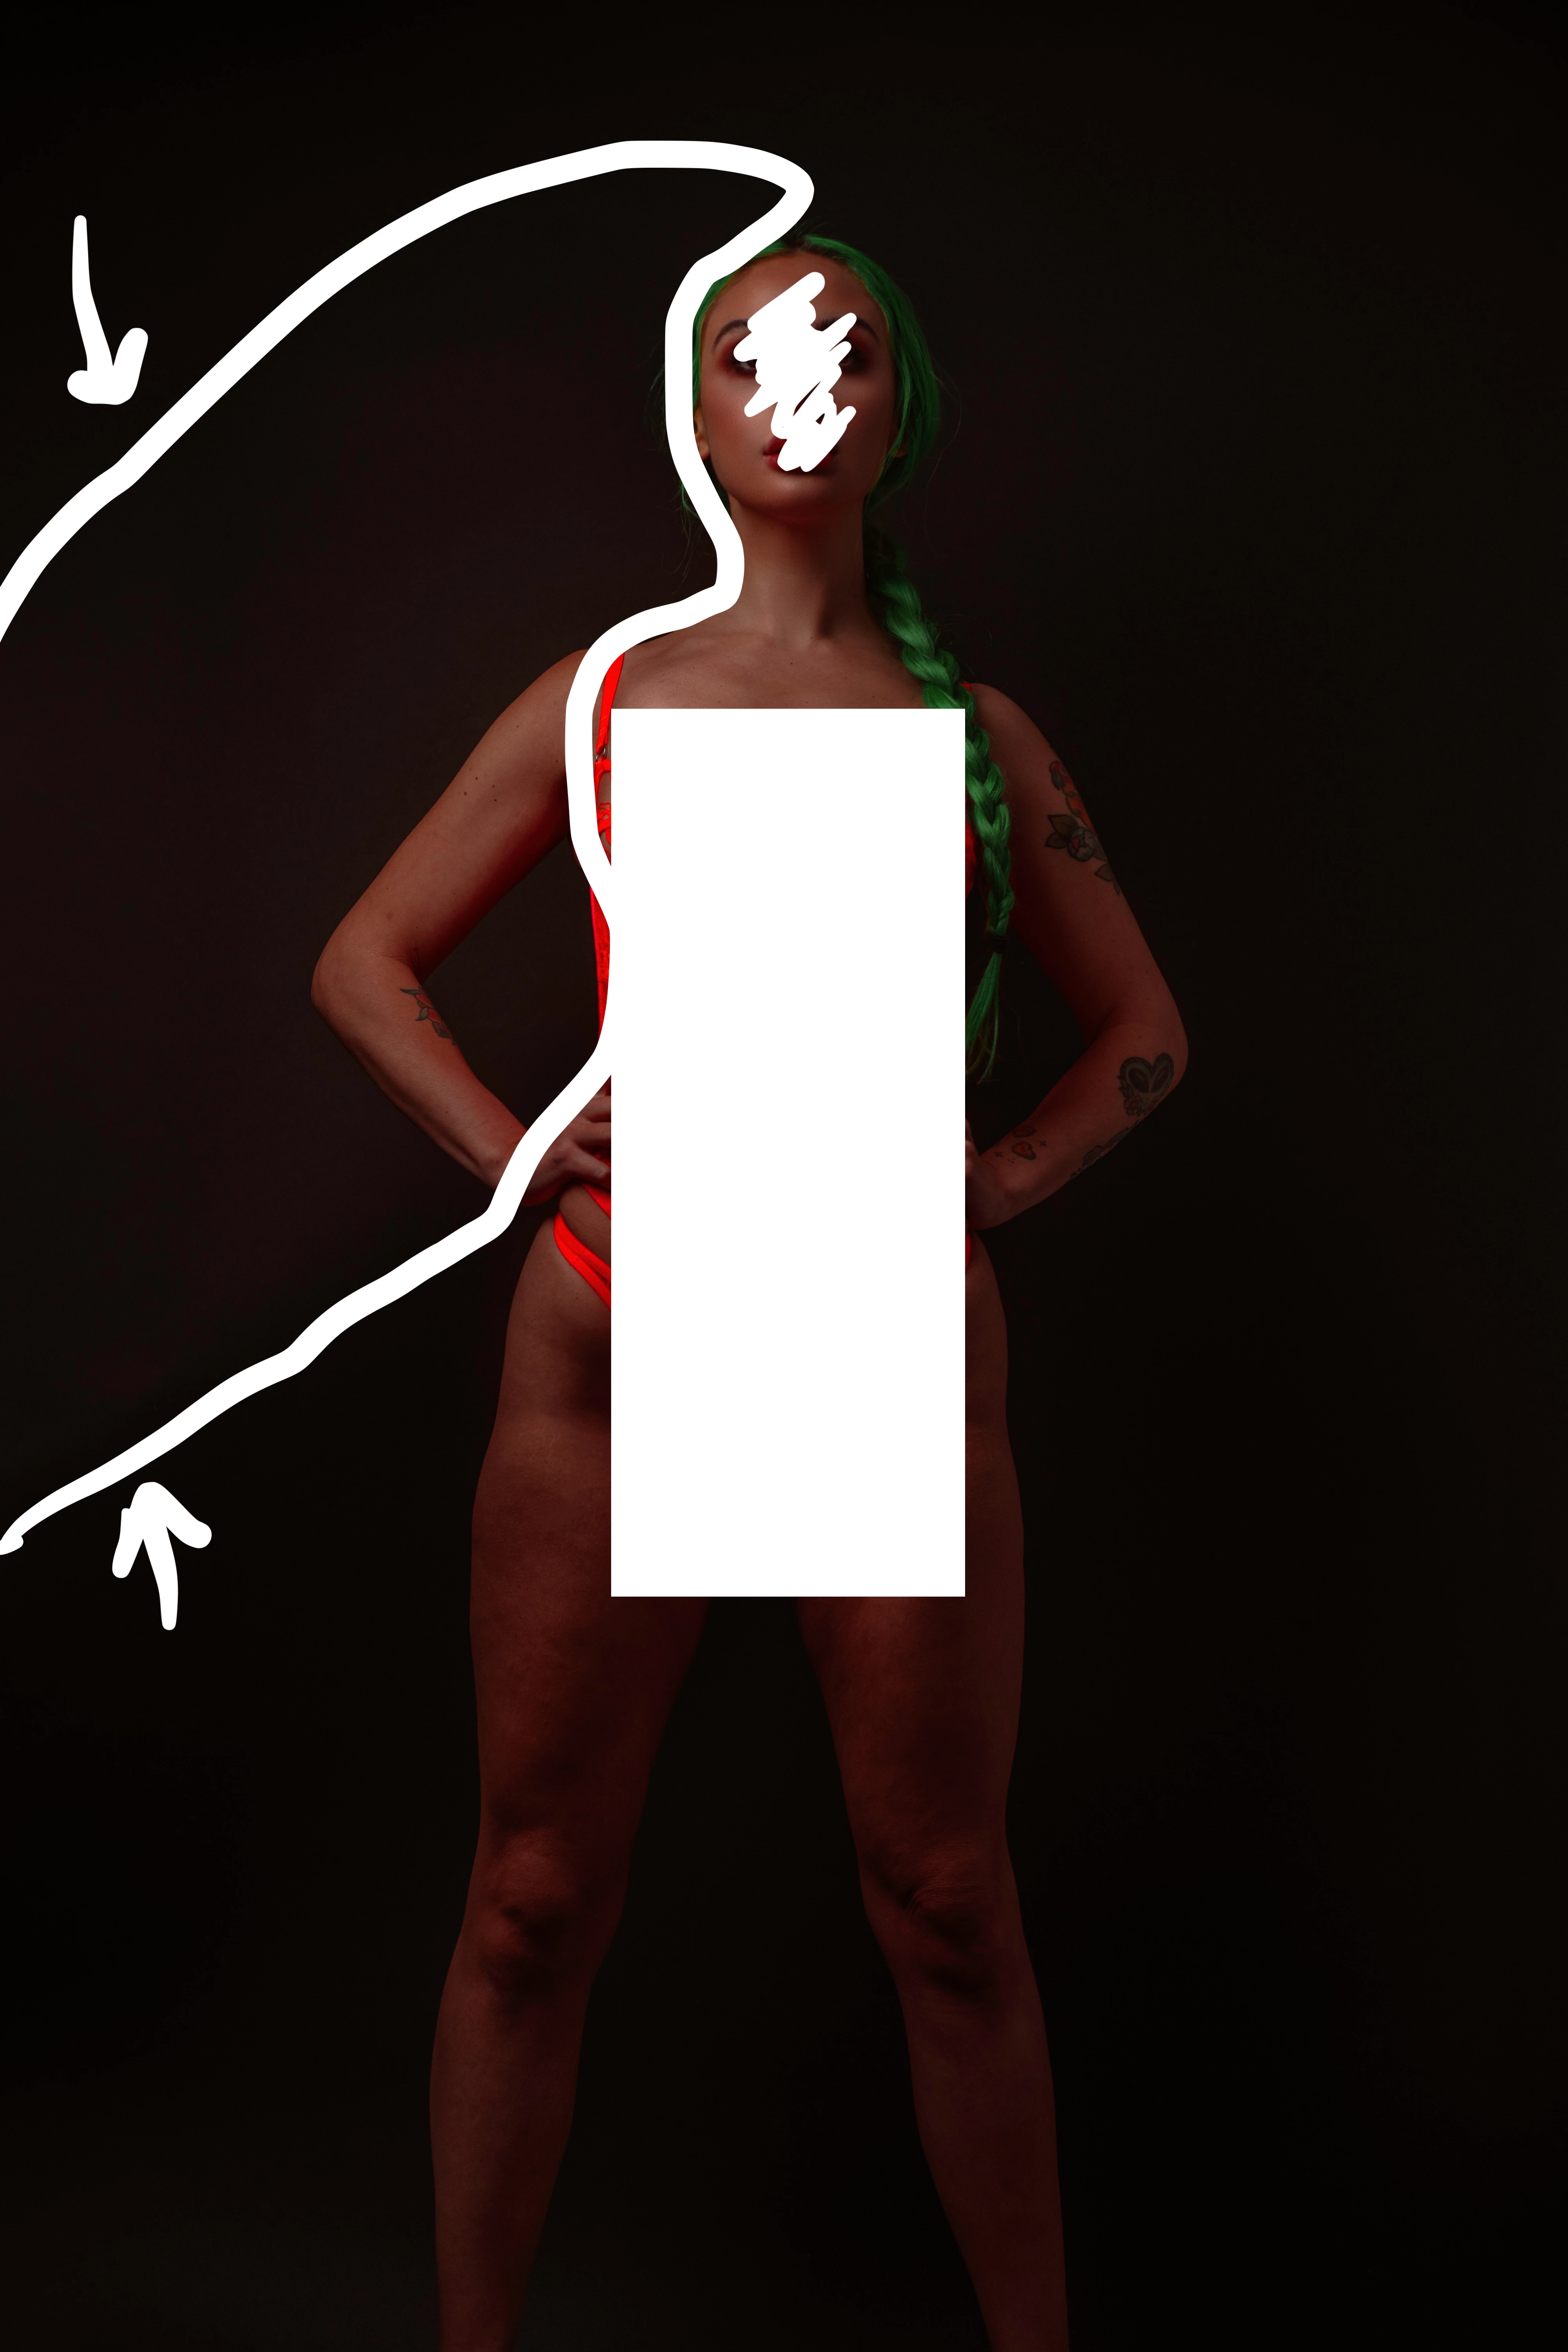
Weird distortion/ artifacts in my shadows? Help!

  • November 23, 2020
  • 11 replies
  • 4580 views

Im wondering if there is any way to rid this image of this weird digital "noise""banding" to left side of this image? I have attached the edited and unedited image. The images are slightly censored aswell fyi. I shot this image at 200 iso. I spend a decent time editing these and when I exported the finished images and added a bit of grain to them these looked really bad around those shadowy areas.

This topic has been closed for replies.

11 replies

Todd Shaner
Legend
November 27, 2020

Jao, I can see it now in your JPEG and TIFF export screenshots. The mottled background gets slighlty worse due to JPEG artifacting. What Luminace level is your display set to? With no boost in LrC Exposure it's hardly visible with my 100 cd/m2 display calibration. Personally I think the issue can be minimized by proper use of the LrC controls with the Basic panel +86 Blacks setting probably the largest contributor....and then downhill from there with every-other-setting to correct it. Anyhow, I think we've beat this one to death......cheers!

Community Expert
November 27, 2020

Yeah mine is at 120 cd/m2 but generally bright room. I can only barely see it. Agree it is easy to minimize in multiple ways.

Todd Shaner
Legend
November 26, 2020

"You can see this very well in the Dinal-G2.jpg file. The noise is posterized in that."

Jao still not seeing any posterization or stairstep artifacts in your posted screenshots or the original DinaIG-2.jpg file. Do you see posterization in your screenshots in the above post?  Can you upload the screenshots to a file sharing site so I can see them the same as you without the forum interface. The below screenshot is the DinaIG-2.jpg file in PS with +2EV Exposure applied at 200%. No posterization on my system and no stepping when using the Eyedropper with Point Sample setting. Do you see posterization in the below screenshot. There's something else going on. I'm on Windows 10 and both you and the OP are using Mac systems so it appears to be a Mac only issue.


Community Expert
November 27, 2020

I see clear noise quantization in the dinal screenshot you show. The noise seems to come in only a few discrete levels, especially visible in the top left corner. You also see some wormy artifacts in the noise all around. The latter is likely due to the jpeg compression. The blocky artifacts in my screen shots that I can clearly see are simply jpeg compression induced and are completely expected and not avoidable. Nothing to do with Mac or PC. If you want to take a look at the screenshots directly, click on them and download them from the zoomed in view. That will give you the original screenshot files. This artifact is simply a consequence of the JPEG compression algorithm. You should be able to see them on your screen too! Here is the above screenshot with outlined where it is particularly visible. Note, this is quite subtle! You should see blocky stair cases.


Here is the jpeg export amplified using levels in Photoshop and scaled up 200% to show you the blocky artifacts:

You should see posterization and blocky artifacts clearly now.

8-bit sRGB TIFF export with the same adjustment layer:

No blocky artifacts and no real staircasing. The mottling you see is undoubtedly just the actual surface of the background behind the model.


Again, the jpeg algorithm is well known to do this. Only thing to do about it is to increase the quality setting. Most of the time it is not visible and indeed this time it is very subtle and only if you look hard is it there.


Oh and last but not least, Here is the screenshot of the dinalG-2 file zoomed and amplified to show you thee jpeg compression artifacts are also present in the file with added grain. Again, completely expected. I can see these blocks and stringy/wormy artifacts in the file without the curves amplification.


Todd Shaner
Legend
November 26, 2020

Jao can you post a screenshot of what you're seeing in the JPEG sRGB export file. I'm not seeing any stairstep artifacts in a full-size or reduced size 2048 long edge sRGB export file with my well calibrated NEC PA272w wide gamut monitor.

Community Expert
November 26, 2020

Certainly. I investigated a bit further and I think now these are actually jpeg compression artefacts. I don't see the issue in tiff exports as much. Still a bit of mottled appearancwe but that might just be the background itself. Here is a 1500 pixels long side sRGB export quality 75 from the ARW file. You might need to click to zoom:

Here it is in tiff:

If you taste hoverover the blocky artefacts, you see single bit steps in the color values. I am guessing that this will get worsened by adding grain as the jpeg algorithm has a lot of trouble accurately encoding random noise. You can see this very well in the Dinal-G2.jpg file. The noise is posterized in that. Interestingly, the effect actually gets worse if you optimize the noise reduction in the orginal. I played a little and set masking in sharpening to 42 and noise reduction to 23. Here is a 75% quality sRGB jpeg export:

Very clear posterization. The steps are single bits again.

The same file exported to tiff doesn't show this:

If you export to qualities much higher (95 and up) you don't see these blocky areas and the result is close to the tif export. You get the same posterization problem if you run the image through Topaz denoise AI and export to 75% sRGB jpeg:

The original tiff coming from Topaz is completely clean. 


So this appears to be a problem with jpeg compression interacting with subtle gradients that is just a few bits. Jpeg export from a 16-bit prophotoRGB tiff (which looks normal in Photoshop) from Photoshop at 75% gives the same result with the posterized shadows. Fix is, like in Lightroom Classic, to increase jpg quality.

Community Expert
November 26, 2020

I can see what you are referring to on my well-calibrated screen but only in an exported image. If I open the raw in Develop, it looks normal with normal digital noise in that area. In an sRGB export from the file, the noise in the glowy area on the left is quantized with visible steps in this area. What is going on here is something I've seen before and is a limitation of 8-bit sRGB images. If you open the exported sRGB jpeg in Photoshop and turn on info and hover your mouse over one of the steps, you can see that the color steps are exactly one bit in the sRGB space. So what's happening here is that you are running into a limitation of the color space you're exporting into. It simply cannot accurately portray the noise here and it posterizes it. It's rare to run into this and you can only see this on some displays, but this is I think a direct consequence of the limited precision in 8-bits. There is not much you can do. I think I would darken the area a bit by simply painting over it to hide it. You can probably also hide it by slightly changing the editing approach.

Todd Shaner
Legend
November 24, 2020

"So the core of this is my grading is too heavy."

That's just an observation of your edits and probably not the root cause of the artifacts you're seeing, but we arent. Try recalibrating your display with the Spyder using the settings (under Adavanced) that I provided.


I would set the Calibration panel controls back to all 0 settings and use HSL, Color Grading, and the new local Range Mask Color and Luminace controls. Below is a tutorial I put together on the Tone control adjustment worklfow, which may be helpful. Following these instructions the Tone Curve is rarely needed except for special circumstances. In general it's best best to keep the number of controls used to edit an image to a minimum. They all interact and the more you use the longer it will take to edit images with very little difference in your results using fewer controls. Each control set has a place (Global and Local) for best usage. Once you understand HOW the controls work and what they do the easier and faster you will be able to work. Enjoy!


https://helpx.adobe.com/lightroom-classic/help/tone-control-adjustment.html


Participating Frequently
November 24, 2020

Todd,


Im going to recalibrate my monitorbased on your suggested settings. Thanks for the much needed feedback and time looking into this!

Todd Shaner
Legend
November 24, 2020

Examing the OP's LrC Develop settings the Blacks have been set to +86, which is going to raise the black level and the Tone Curve has the highlight enpoint dragged to 255/236, which will limit the maximum brightness on the image. In addition there are some very heavy color setings applied in the Calibration panel along with the HSL and Color Grading panels. In general the Calibration panel settings should only be used to "correct" the color rendering of the camera profile as a "calibration" setting and not a "creative" setting. These all add up towards creating the type of issues the OP is seing along with what I already mentioned ( Luminace NR and Display Calibration settings).


Participating Frequently
November 24, 2020

So the core  of this is my grading is too heavy. Eh that sucks . Well im extremely appreciate of all the troubleshooting everybody here has provided. You guys are very knowledgeable and very quick at responding.

D Fosse
Community Expert
Community Expert
November 24, 2020

I looked at one of the raw files and saw no problems whatsoever - except the rather extreme settings Todd describes. I think he's right. Even so, it all displayed perfectly here, no artifacts at all.


This has to be in your display system somewhere. Todd mentioned v4 and/or LUT monitor profiles as a potential problem, and I agree.

Todd Shaner
Legend
November 24, 2020

I still can't see significant artifacts unless I increase Exposure to +2 (see below) and same for the DSC6488.ARW file. Also I don't see any mention of viewing the files in PS so I assume these observations are inside LrC including the raw file with his edits.


I believe there are two issue contributing to what the OP is seeing. Examing the DSC06422.ARW file in RawDigger it appears to be underexposed by 2 EV or more. In addition the file with the OP's edits appears dark and requires +1 Exposure to get a "normal" rendering. This would indicate his display Luminance is set to high. Try two things:


1) Try applying some LrC Luminance Noise Reduction i(15-25).


2) Recalibrate your display using the Spyder with Luminace setting of 100-120 cd/m2, native white point, and most importantly, an ICC2 Matrix profile rather than an ICC4 or LUT-based profile, as these more recent profiles aren’t always compatible with LrC. Make sure to close and then reopen LrC so it can load the new calibration profile.


Here's what I'm seeing.

D Fosse
Community Expert
Community Expert
November 24, 2020

I know this is the Lightroom forum, but if the screenshot is indeed from Photoshop, I'm almost willing to guarantee it's the ProPhoto bug. This is exactly how it looks in a real photo.


It's also possible that the same problem occurs in Lightroom. I would assume the GPU code to be pretty much the same.


Anyway, I'll download the raw file and see for myself (haven't done that yet).


Participating Frequently
November 24, 2020

Yes I am using lightroom for these edits

Todd Shaner
Legend
November 24, 2020

Best way to determine what's wrong is to share the file with your settings, which I'm sure you do not want to do. If I crank up Exposure to +3 with you last screenshot I can see some color noise, but that's an extreme boost! Other than that I see nothing in that screeshot. Do this. Use CTRL + S to save your settings to XMP file. Navigate to that XMP file, upload it to Dropbox and provide the share link in a rpley here. That may reveal something.

Participating Frequently
November 24, 2020

Todd, 


Heres a link to the xmp file of the original raw file, and Ive also attached a copy of the editing image with the metadata embedded,


https://wetransfer.com/downloads/457fe112a0e908fda087a04b7c8030e420201124014004/491787f8f10ff96a1a8fe4b87f24408a20201124014021/231f46 

gary_sc
Community Expert
Community Expert
November 24, 2020

Hi Brandon,


I took a look. Again with the original image I see nothing. Then I opened it up as a smart object and simply clicked on Auto within ACR-Filter.


At that point I see a "glow" of colors at her right shoulder (our left) and her left hip (our right).


How far away is the background to her? I'm wondering if this is reflection on the black surface around her?

Her left hip

her left shoulder

Todd Shaner
Legend
November 24, 2020

I'm still not seeing it either, which indicates it's something in the display on your system that's causing it. Try changing your display profile to sRGB if using a standard gamut monitor or Adobe RGB if using a wide gamut monitor.


https://www.lightroomqueen.com/how-do-i-change-my-monitor-profile-to-check-whether-its-corrupted/


Make sure to close and then reopen LrC after changing the profile so it can be loaded.

Participating Frequently
November 24, 2020

Todd,

I don't believe its the monitor. Im working on a 2019 MBP and Ive also viewed these images on my iphone and can see the same issues if I turn the brightness up. I have my screen calibrated as good as you can do on a macbook where you cant actually change the individual rgb colors. But I do have a spyder

gary_sc
Community Expert
Community Expert
November 24, 2020

I do not see what you're seeing either, it's possibly due to some effect that the forum's software is doing to the image.


As to what's causing it, are you adjusting in 8-bit or 18-bit? Are you working in RGB, sRGB, or ProPhoto RGB? The latter in each option is the better one to do work in then export via "Convert to" to the other format that can be stored in a JPG.


But again, I can't see the problem so it's hard to make suggestions.

Participating Frequently
November 24, 2020

Im  editing in 18bit, profoto RGB