jrsva
Known Participant
December 9, 2020
Answered

Selecting among digital IDs for signatures

  • December 9, 2020
  • 2 replies
  • 5356 views

We have two different digital IDs for use in signing different types of documents.  Somehow the images have gotten mixed up so the same image is attached to both IDs.  I need to edit one ID to embed the correct image or delete it and start over.  I'm kinda shaky on this whole procedure.  Please advise.


In Acrobat DC:  Tools / Certificates / Digitally Sign

Draw the signature box, click the drop-down for Sign As to show two choices.  The printed data shown is correct but both display the same image.

This topic has been closed for replies.
Correct answer ls_rbls

ls_rbls:

"The only difference in screenshots is the 'Modern user interface' which can be enabled and disbaled through Edit-->>Preferences--->>> Signatures."


I can't find anything about "Modern user interface" here.  Sure it isn't somewhere else under Preferences?


I'm more than half of that 150 yr all by myself.  😉


I apologize, I forgot to add that the "Modern user interface" was added in Acrobat workspace after your version. So your version still uses the classic interface when signing.


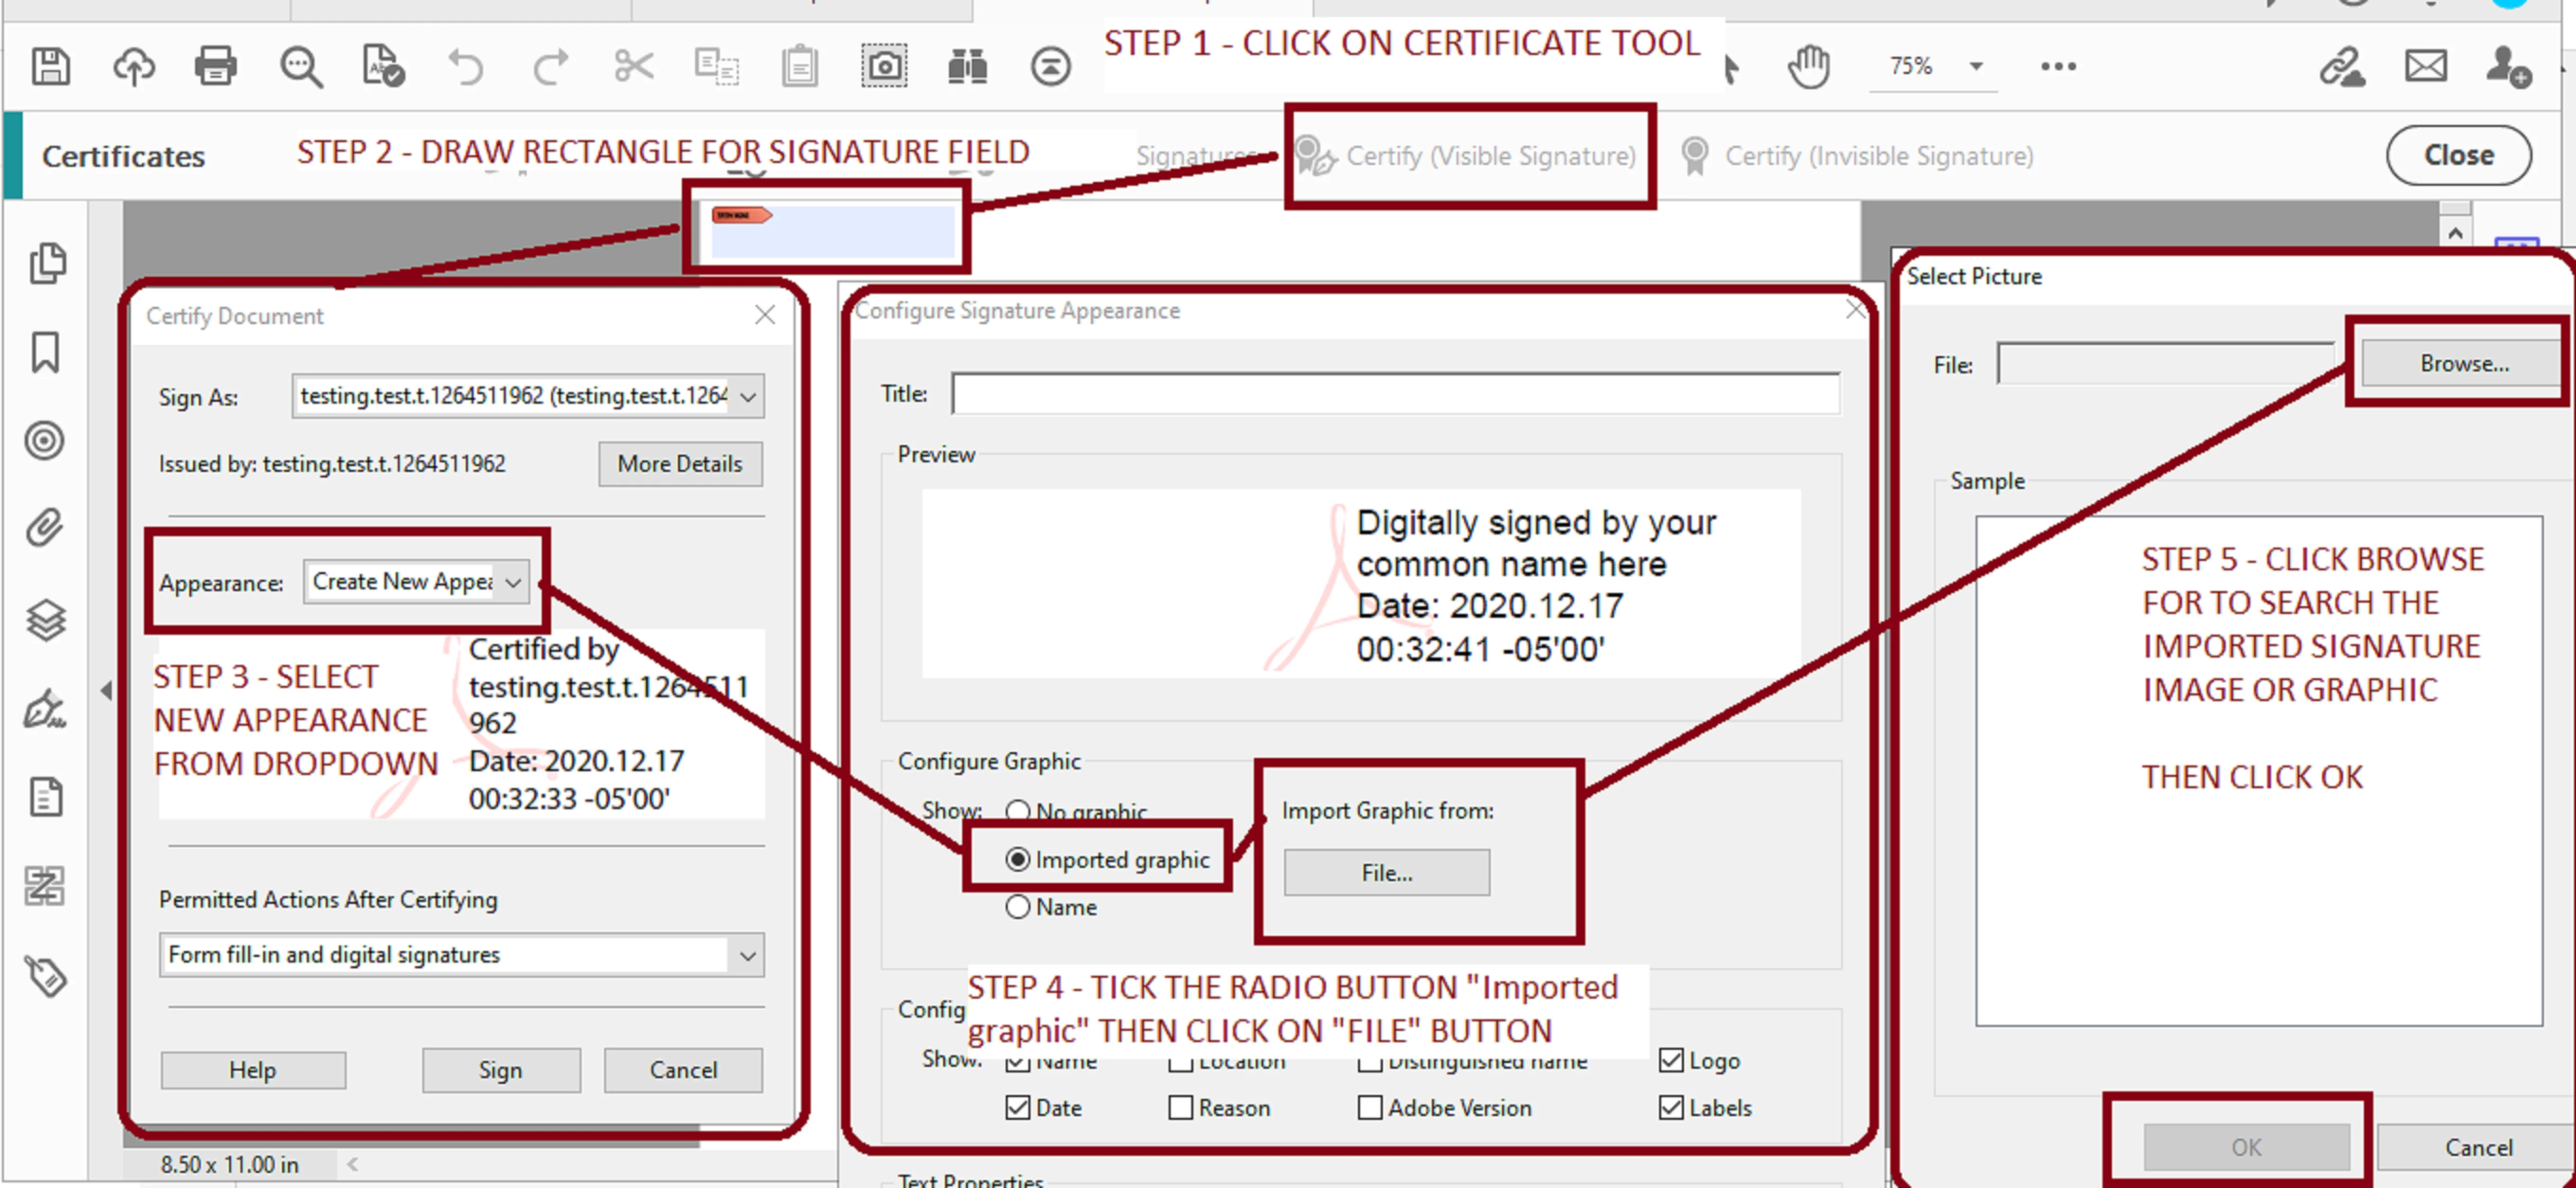
In the screenshots below I disabled the Modern user interface to illustrate that there is no difference between versions of Acrobat... maybe just some minute differences in the steps:


  • In my screenshots below I am using the same steps as you but I disabled the the modern user interface so you can appreciate the similarities of the classic user interface just like in the version that you're using


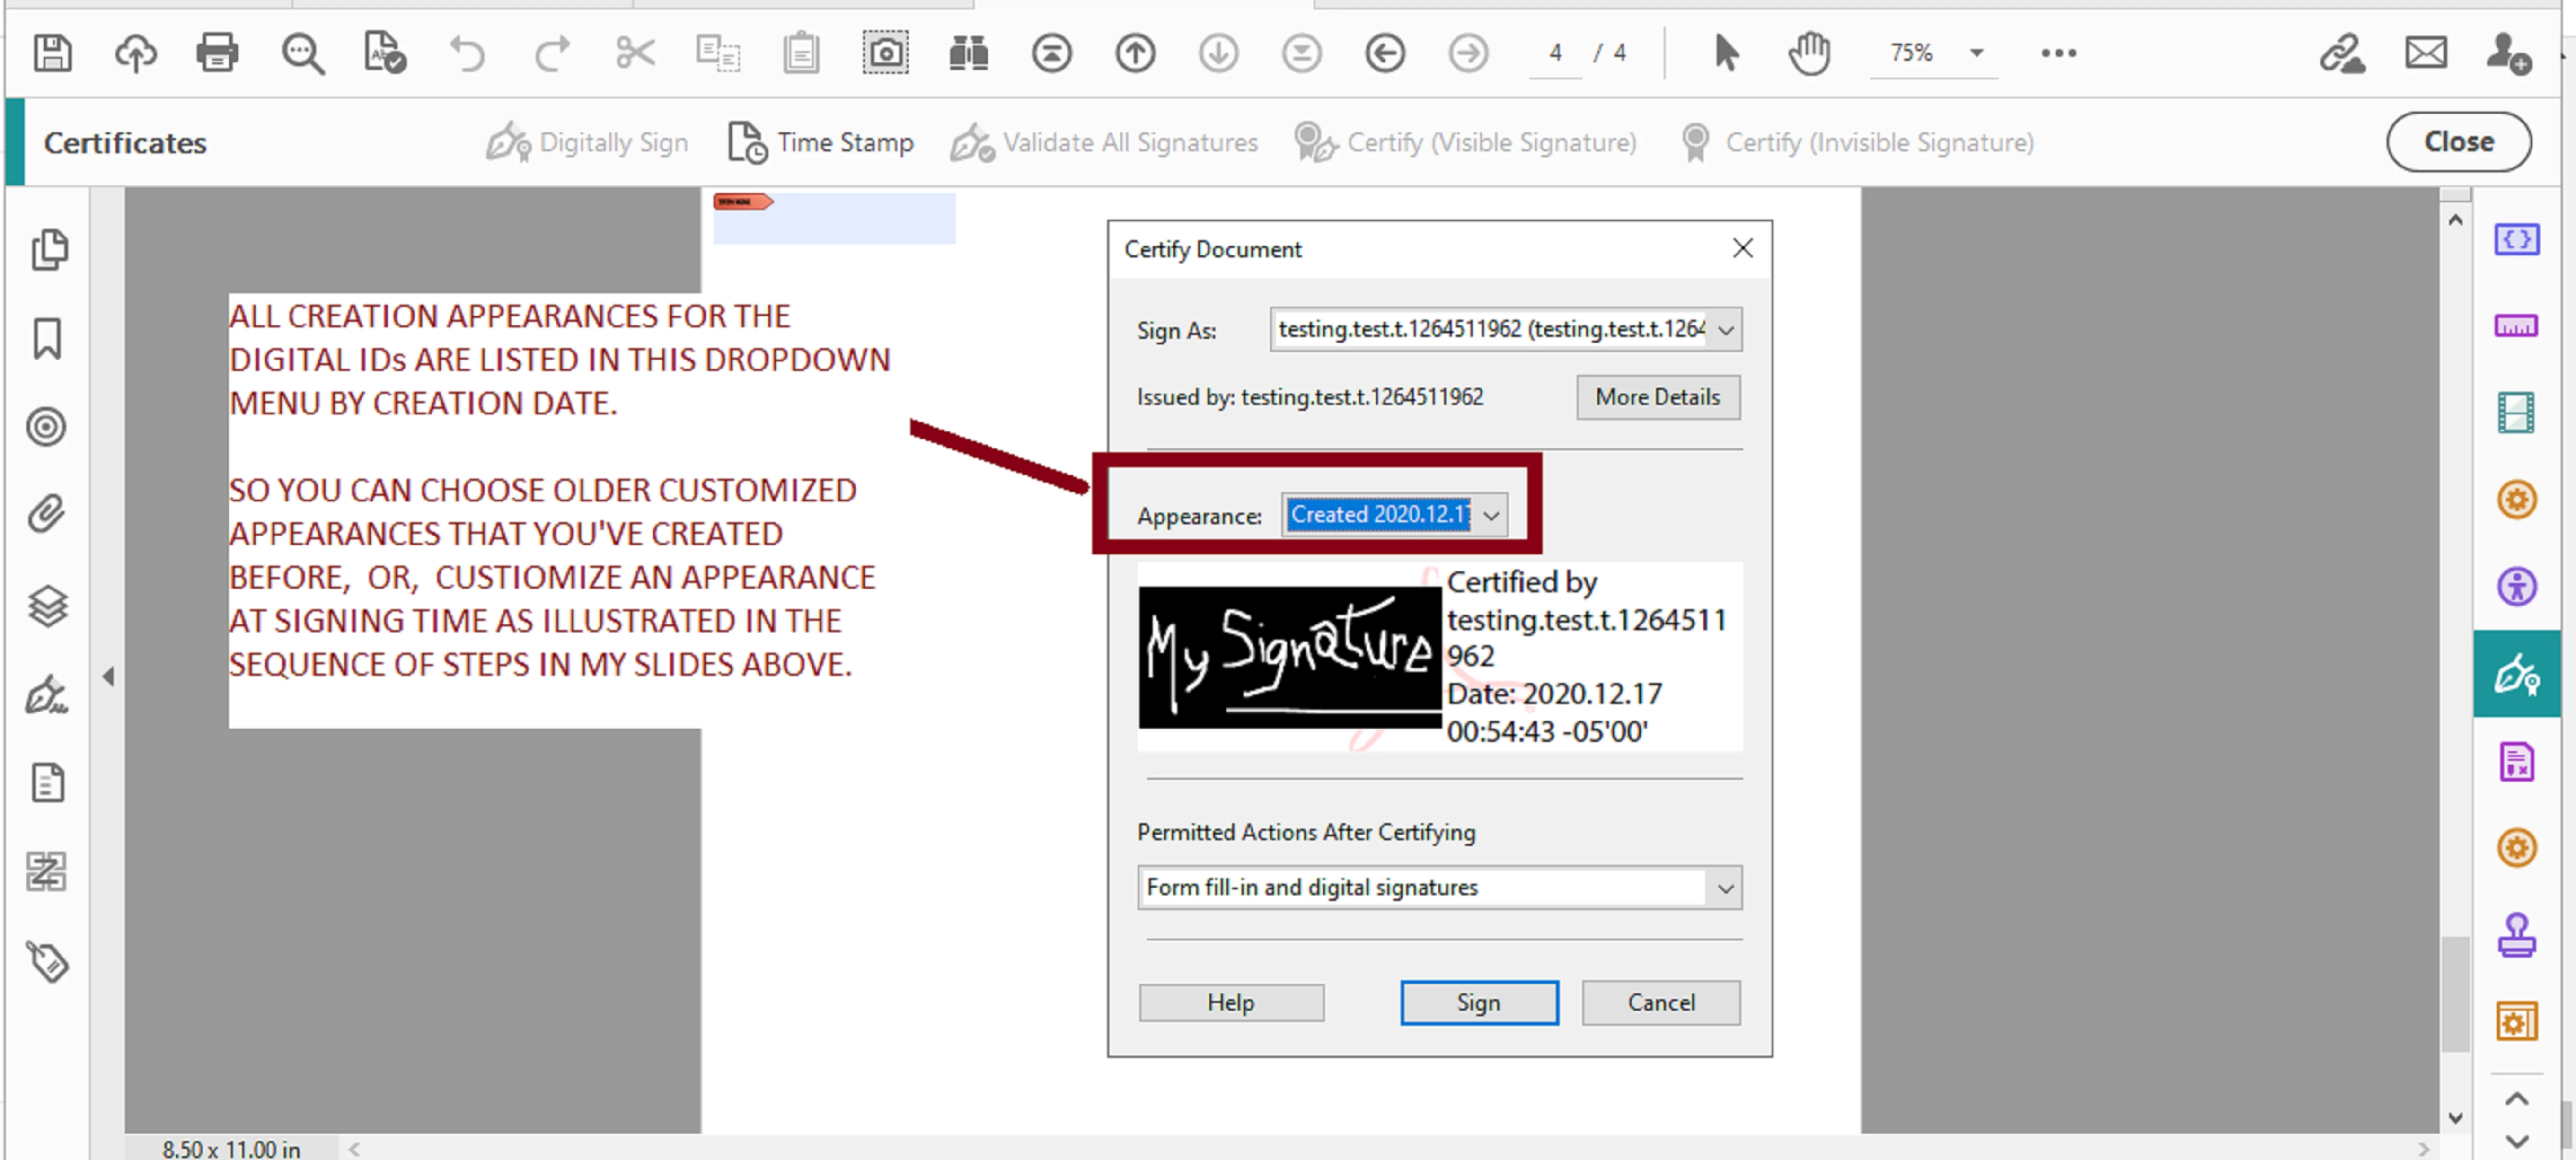
  • Below is the end result after I choose the desired graphic to be imported to the digitalID's appearance


And if I access these same settings from EDIT--->>>PREFERENCES--->>>SIGNATURE  this is how it looks with the modern user interface disabled in Adobe Acrobat Pro DC (paid subscription):


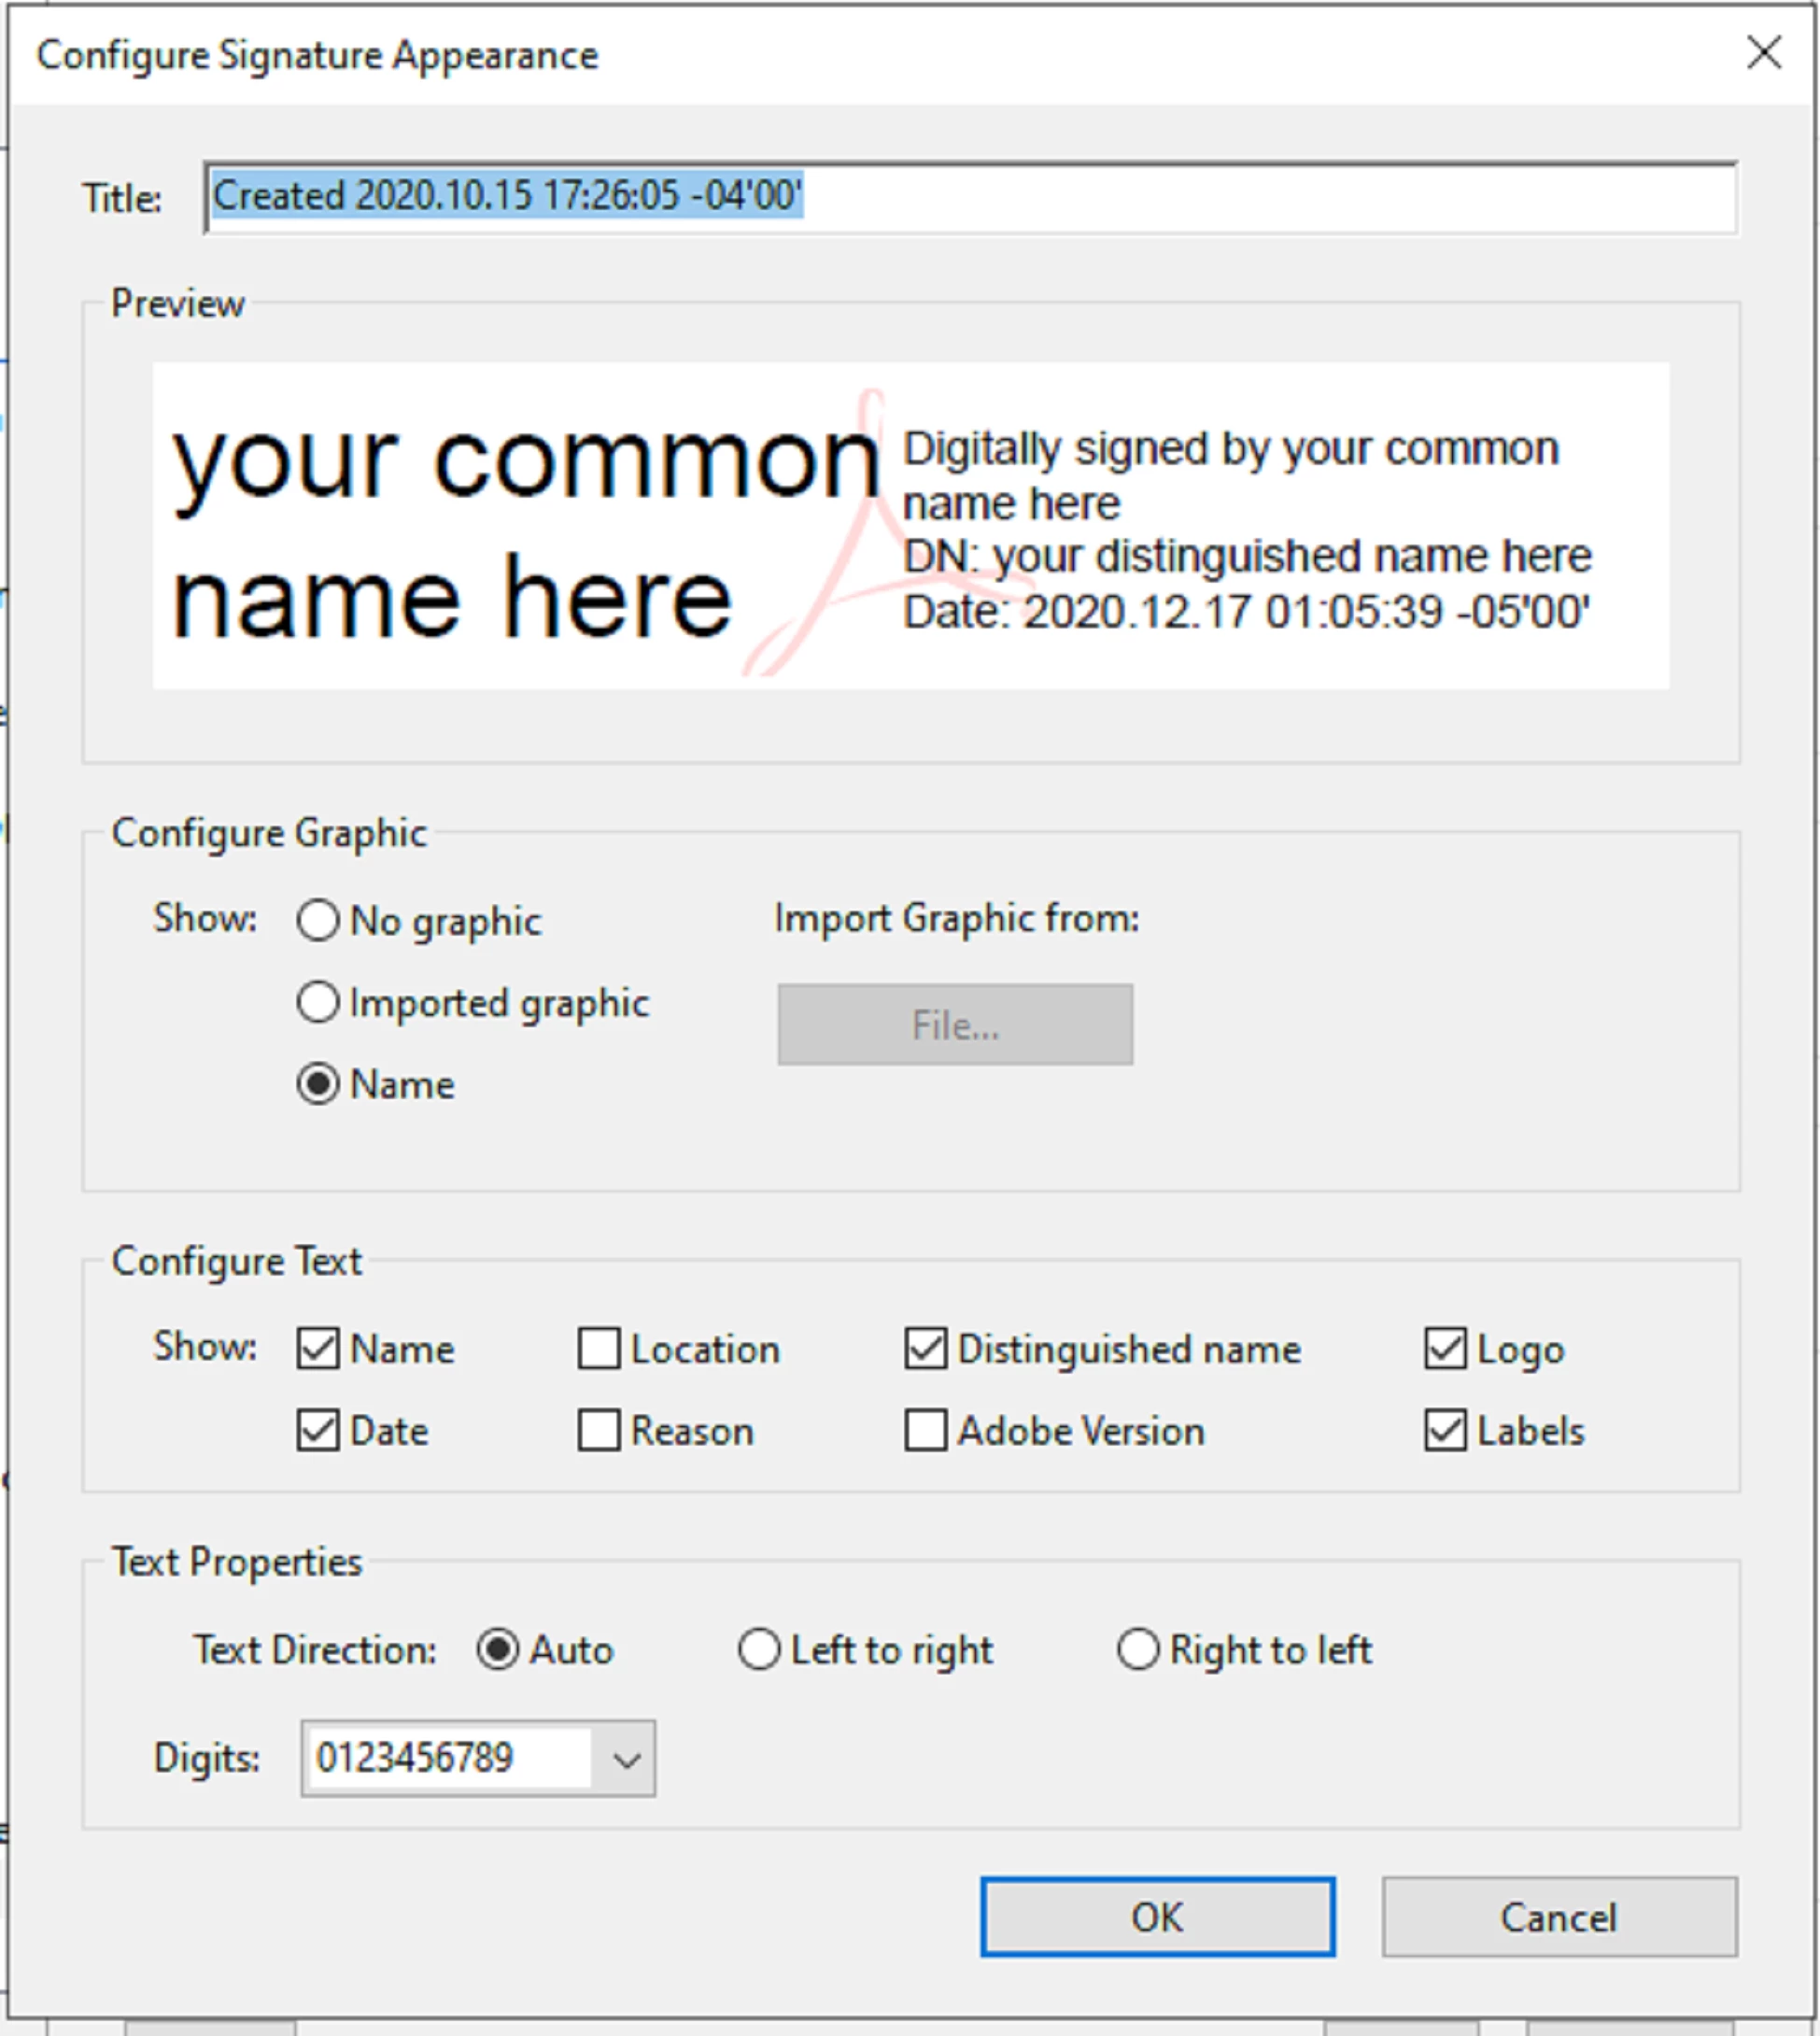
Note that there is no difference from the screenshots that you provided earlier. That is what I meant by Acrobat version been irrelevant. So it looks like we are missing an step.


But if none of this guidance works , I would say to click on Help and "Repair Installation", then try again.


2 replies

Bernd Alheit
Community Expert
December 18, 2020

The modern user interface is not available in your old version.

Dave__M
Community Expert
December 9, 2020

Go to your Preferences, and choose Signatures on the left.

Click on More..., and from there, you can choose the signature you wish to edit, and click the edit button.

I hope this is helpful.

My best,

Dave

jrsva
jrsvaAuthor
Known Participant
December 10, 2020

Sadly, this does not help.  We have two digital IDs and everything seems right in the edit mode.  They show the correct signature images and both say "Digitally signed by your common name here" and give the date and time.  When I look at the third item down, "Create and manage identities for signing," it also seems correct, referencing the proper digital ID files.  Now, when I try to apply the signatures, the printed names are correct but both use the image file for signature #1.  Oops.


I can make screen shots of these things if that will help to identify the problem; however. they will show both real names and real signatures, which I am not wild about posting on line.

jrsva
jrsvaAuthor
Known Participant
December 16, 2020

Seems like you're missing one important step that I explained for another user in the link that I posted earlier.


The version of the Acrobat product is irrelevant. The images are part of the appearance which is establisehd when you create the digital signature via the "Creation and Appearance " wizard.


If I understood this dicsussion correctly, you have two different digital signatures that you want to use, and both have different names. But when you use any of these two signature to sign a signature field the  imported graphic is the same for both, which shouldn't happen.


So, I am starting to think if this may be a bug because the screens that you've shared and the methods that Dave already explained to you should be enough.


However, I've found that this is not how you change the imported graphic. 


To do so, you need to click once on the signature field like you normally would  to sign. The dialogue window that will open "Sign with a digital ID" will pop up and you'll be presented with your available digital IDs to choose from.


Left-click once to select the digitalID that you want to use.and then click on "Continue". The next dialogue window will take over the screen "Customize the Signature Appearance".


  • NOTE: This is the step that most users seem to miss because it is done at signing time, not through "Edit" --->>> "Preferences"--->>> "Signatures"--->>"Digital Signatures"---->>> "Creation and Appearance".


So, in the next dialogue window that will open up next you get the opportunity to change the image. You may notice the following availavle options :


  • Text
  • Draw
  • Image
  • None


Click on "Image" followed by clicking on "Browse".


This will open up your file explorer (if on MS Windows) for you to navigate to the folder where you have saved the image filethat is associated for the selected digitalID.


Pay attention that, by default, this will open up  the roaming user profile directories that you already identified:


C:\Users\me\AppData\Roaming\Adobe\Acrobat\2015\Security\name#1.pfx

C:\Users\me\AppData\Roaming\Adobe\Acrobat\2015\Security\name#2.pfx


Obviously these folders paths doesn't contain the image file that you're looking for.


Unless you navigate back up in the directory structure of that tree,  and check where is it that you have saved it, which I will assume it should be somewhere in "MyDocuments" folder or the "Pictures" folder, for example.


Also keep in mind that "AppData\Roaming" is more of temporary folder that continuously changes. So if you have saved your imported graphic anywhere in the subtree of "AppData", that  is simply not a good idea.


Anyway, once you've located your image file select it and click on the "Save" button. This  will bring one last dialogue window with the option to actually sign. But if the preview window doesn't display the correct image that you want, you'll get the "EDIT" option available again to be able to change the  image  before executing the signing  action.


Clicking on the "Sign" button  will finalize the signing action and the field will be signed with the image that you have selected.


Thanks ls_rbls, that seems like a really detailed description, but here is where I get hung up:

"To do so, you need to click once on the signature field like you normally would to sign. The dialogue window that will open 'Sign with a digital ID' will pop up and you'll be presented with your available digital IDs to choose from.

Left-click once to select the digitalID that you want to use.and then click on 'Continue.' The next dialogue window will take over the screen 'Customize the Signature Appearance'."

~~~~~~~~~~~~~~~~~~~~~~~~~~~~~~~~~~~~~~~~~~~~~~~~~~

I have an open document that I want to sign so I go to Tools / Certificates / Digitally Sign

At this point I am asked to use the mouse to draw out the box where I want the signaure. When I complete that a pop-up appears captioned "Sign Document" and at the top it offers "Sign As:" with a drop-down menu for my two IDs.  One of them shows my name and signature correctly.  The other choice shows the other name but with my signature.


Apparently I have taken the wrong route to get to this point.  I never get 'Sign with a digital ID' or a 'Continue' button.  Please tell me how to start the signing process that will get me to those options.  Many thanks.  I'm sorry to be so thick-headed.