

- Home
- Audition
- Discussions
- Re: Trouble removing singing bugs from audio clips...
- Re: Trouble removing singing bugs from audio clips...

Copy link to clipboard
Copied
Hi. I tried painting out the singing bugs in Audition (way up high in the red zone) but the actors voices were disappearing also. Anyone have any tips for removing Cicadas from audio? I have learned my lesson never to record around these bugs again! My deadline is nearing... so if someone sees this and can do this successfully for me, I can pay you $50. 


 1 Correct answer

Cicadas. Complicated little things...
It's not just a band of noise; they have a band, certainly - from 5.5kHz to 7.5kHz, but there are also two separate narrower lines at 4.4kHz and 4.8kHz, and they all have to be dealt with separately. And they are not continuous, but fortunately that doesn't appear to matter too much. With a little care, and some rather extreme settings on Audition's process NR, you can get them to the point where you can't hear them. Well I can't, and I certainly could initia
... 13
Replies
13
13
Replies
13
Copy link to clipboard
Copied
We would have no idea at all whether this could be done without a sample, I'm afraid. You'd have to post it somewhere, and it should be uncompressed - ie, a wav file, not an MP3. Put a link to it on this thread, and we'll have a look.
Copy link to clipboard
Copied
Thanks Steve. I'm going to post it to dropbox when I get home from work, then paste the link.
Copy link to clipboard
Copied
Copy link to clipboard
Copied
Cicadas. Complicated little things...
It's not just a band of noise; they have a band, certainly - from 5.5kHz to 7.5kHz, but there are also two separate narrower lines at 4.4kHz and 4.8kHz, and they all have to be dealt with separately. And they are not continuous, but fortunately that doesn't appear to matter too much. With a little care, and some rather extreme settings on Audition's process NR, you can get them to the point where you can't hear them. Well I can't, and I certainly could initially!
I tried this several times using different settings, and I discovered that all of the usual things about NR apply, so it's careful selection, a high FFT setting and several passes. To give you some sort of an idea, I've redone this on my laptop, from where it's relatively easy to post screen grabs:
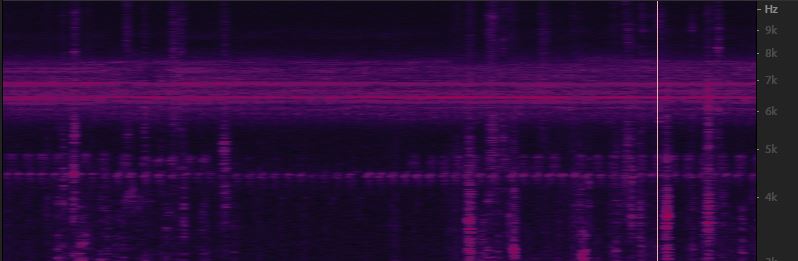
Okay, this is what you're up against. Initially I normalized the file to -1dB to make everything a bit clearer. We're looking at a section in the centre of the grab with no speech. At the top is the band you identified, but you will notice also that below it you can see the 4.4kHz and 4.8kHz (quieter) bands as well.
First you have to make a careful selection:
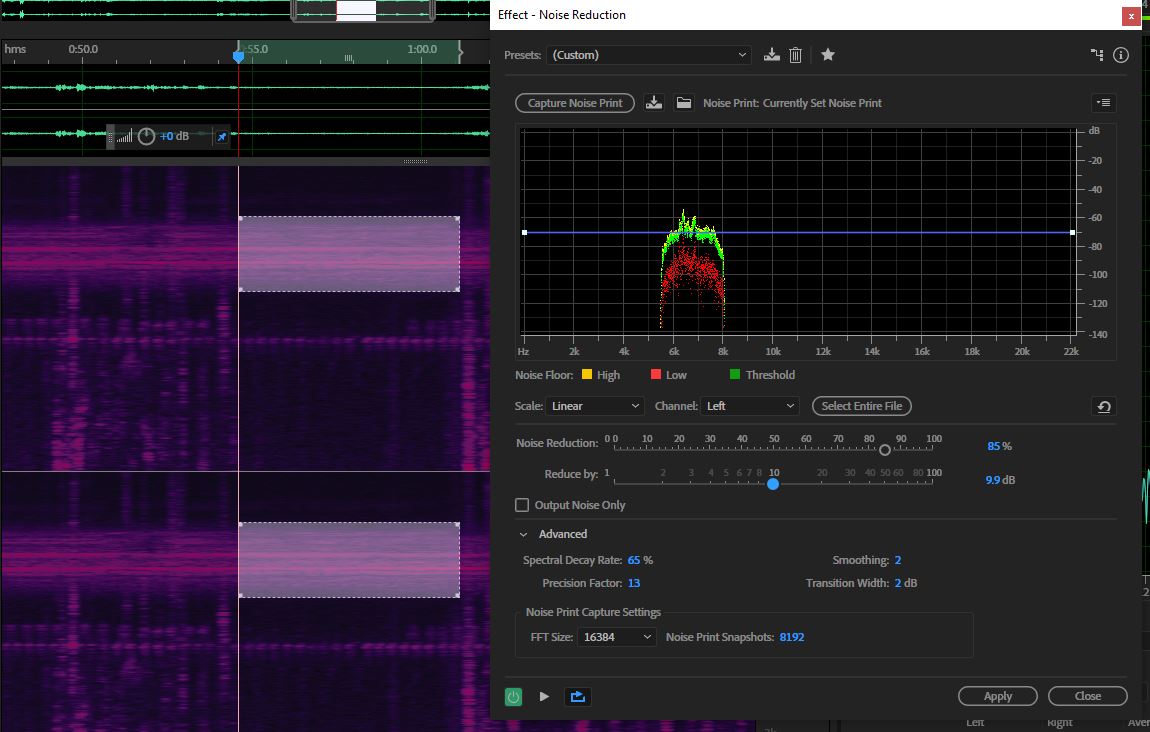
I've selected just the broad band. Before you capture the noise print, change the FFT setting in Advanced to the highest it will go - this is quite important; you can leave the rest of the settings there alone, but you need to alter the two sliders above to about where I've got them (don't overdo the 'reduce by' setting - that creates artifacts). Then select the entire file.
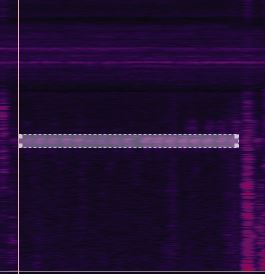
This is a grab after I've processed the top band, and selected the 4.4kHz line - note that you need to make quite a close selection, but not right up to what you can see, or the removal won't work effectively. I processed this with the same settings as above. Then do the same thing to the 4.8kHz band.
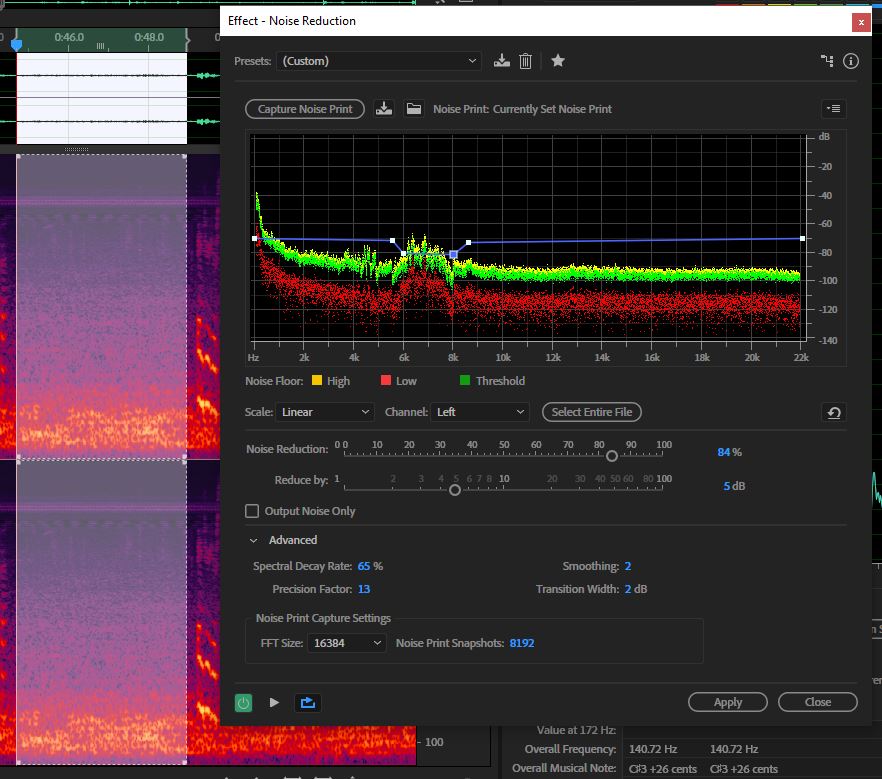
What I did next was to select all of that section with no talking and just noise, and use it as a sample to get rid of some of the rest of the background noise, just to see if the cicadas reappeared in a less noisy background. You could probably do this pass again, but you'd have to re-sample the remaining noise, and be careful not to take any more than about 5dB off per pass. You can see that the cicadas are still a little noisier than the background of the rest of the file, so I've used the rubber band to increase the amount of processing slightly at that point. This all seems to work quite well, and the speech quality is retained - I checked this at each stage. The overall NR in the final stage has increased the clarity, if anything. If it sounds okay on a pair of Neumann KH420 monitors (which it does) then believe me, it's okay...
Other points; if you save each step as a preset, you can use these on any files recorded with the same background. Also, the audio sounds like a camera mic; I'd try to avoid those under any circumstances! It sounds as though a carefully aimed shotgun might have got you some better results...
Yes I could do it again and post you a file, but really there shouldn't be any need - you should be able to manage this quite easily, and you'll learn something else in the process - which is really what we're about here. Anyway, give it a try and see how you get on.
Copy link to clipboard
Copied
Hi Steve,
I appreciate your instructions so much. I just spent a few hours on the 3 wav files and was able to remove most of the cicadas. Believe it or not, I used a boom mic and recorder for this audio, not the camera audio. I learned my lesson to NOT face the mic up and rather always face it down towards the ground (but above the actors)! Plus we hid the mic so it wasn't in the shot. Thanks for taking the time to upload the screen shots also!!!
One more question: On general audio that is way too quiet, would the direct solution be to ---open it in Audition, increase the db's and try to get rid of any background noise? Since I am a beginner and still learning, I actually was previously bringing my audio into garage band, increasing the db's and sharing it to iTunes, which did raise the volume. It seems just sharing to iTunes from garage band (in all cases )increases the volume on any audio file. Not sure why this happens.
Thanks again!!!!
Christine
Copy link to clipboard
Copied
Chrisflashhelp wrote
Believe it or not, I used a boom mic and recorder for this audio, not the camera audio. I learned my lesson to NOT face the mic up and rather always face it down towards the ground (but above the actors)! Plus we hid the mic so it wasn't in the shot.
The most important rule of the lot if you're using a boom mic is to have a pair of headphones listening to it all the time. Without these, you're somewhat doomed; the more directional it is, the more doomed you are. The best sound I heard on your tracks was the director shouting 'cut'... that should tell you something!
One more question: On general audio that is way too quiet, would the direct solution be to ---open it in Audition, increase the db's and try to get rid of any background noise? Since I am a beginner and still learning, I actually was previously bringing my audio into garage band, increasing the db's and sharing it to iTunes, which did raise the volume. It seems just sharing to iTunes from garage band (in all cases )increases the volume on any audio file. Not sure why this happens.
I would earnestly recommend that audio for video goes nowhere near garage band or iTunes first! But let's do the lot:
Why do we want the level up somewhat? If you have really quiet audio, everything has to be turned up to listen to it, and this invariably increases the overall noise level - so you're not sure what you've really got. It's also rather harder to see the waveforms, so ultimately editing it won't be so easy either. And the spectral display makes more sense; it's much easier if you have a wider range easily displayed to locate everything about quieter sounds you want to eliminate - like cicadas... And if at any stage you find that you need to use effects like limiting and compression, these are designed to work with signals that are occupying the whole of the available dynamic range.
The best way to achieve this is simply to import your audio directly into audition, and use the 'normalize' function. This will search for the highest peak in your recording and set that to whatever figure you choose; -1dB is a good choice. This brings up the level of everything, accordingly - doesn't alter anything about the sound of it at all, just the level.
Going back to the boom situation, the other thing you should note is that really, you should be checking the levels you're recording at the time you're doing them - because having them set too low will also introduce extra noise, especially in things like mic preamps. Ideally, you should be recording so that the normal levels are at about -12dB, which will allow for the occasional 'over' without it distorting. All mic inputs, whatever you're recording on, have a fixed noise floor and you need to keep your incoming signals well above that, otherwise it will all get added in when you normalize.
Copy link to clipboard
Copied
I still have a lot to learn. On my recorder, I was kind of winging it. We adjusted the recording level low Enough so that we weren’t picking up everything in the neighborhood and high enough so we could hear the actor’s voices. The recording levels went from 0 to 100 so I’d start high and work my way down if I needed. Also on the recorder screen there is a meter and I made sure the sound did not exceed the limit on the meter. I was afraid of distortion. Was this all making any sense? I was just using my instincts.
Im actually editing a film in FCPX and I’m learning how tricky the audio is. After I increase the volume of the audio for a couple scenes and add the end credits I should be done!! However I have no clue how this will sound when I play it on a projector. Will it be loud enough? Will there be distortion? I’m learning as I go. Should get interesting. Thanks again for all your help.

Copy link to clipboard
Copied
If you can tell us what recorder and mic you were using we might be able to give some extra advice on how to set up the recording levels.  As Steve suggests always take a listen on headphones when setting up the mic. If possible monitor all the time during takes. If not at least rehearse a bit whilst listening to get the mic position and levels correct. You really need to get the mic as close as possible to the talent without actually seeing it in shot. With practice an experienced boom swinger can judge what the camera is seeing and get the mic just an inch or two out of frame.
Copy link to clipboard
Copied
Hi. So I was using a Zoom H4N recorder and a Sennheiser boom mic for my entire movie. I adjusted the recording level so that it wouldn’t exceed the meter bar but also so it would not pick up every neighbor in the neighborhood. The recording levels I was seeing were between 1-100.
I was doing the filming and occasionally some sound but mostly I had a friend doing sound and they always had headphones on. But still there was a lot of audio that was too quiet.
So if there is another reading I need to see within the Zoom recorder please let me know. Otherwise we will try hard to keep the boom mic closer to the talent. Thanks so much!!
Copy link to clipboard
Copied
Chrisflashhelp wrote
Otherwise we will try hard to keep the boom mic closer to the talent. Thanks so much!!
That is generally the key to this - close co-operation between the boom and camera operators. You really need to get as close as you practically can, and the boom pole operator needs to be monitoring continuously. You get better results with more directional mics, but the price you pay for this is that the boom operator has to pay even more attention - it really is incredibly easy to miss stuff.

Copy link to clipboard
Copied
This is unhelpful for me because there is only one small buzz and it only takes place during speech. There is absolutely no way to isolate it. I've attempted audo-healing multiple spots in spectral frequency without any luck whatsoever. I am giving up. I don't believe it's possible to remove.
Copy link to clipboard
Copied
There is one option available now that wasn't when this thread originated, and if it's a speech issue, it's worth trying. And that is to use the Adobe online 'Enhance Speech' tool that you will find here. It can make quite a remarkable difference!

Copy link to clipboard
Copied
This was so so so helpful! I cannot thank you enough. You are a genius! The raising the FFT was huge and no one on Youtube or anywhere has been able to to get this cecada sound out for me. I'm at the coast and have to record outside. Its like tennitus in the ears/head 24-7 and the mic... welll, you know. Thank you!
Find more inspiration, events, and resources on the new Adobe Community
Explore Now
 AdChoices