Ok, I spent about 30 mins writing only to have the page quit working…..so I’m going to try and make this a shorter version of what I was trying to say.
First I just realized that you were trying to use the blog entry "New HTML5 'widget' for a print PDF certificate - As I promised a year ago." To make a project so I will reply to your question on the getting that type of project running.
I went ahead and just made you an example project file (using the setup shared in the blog title you shared) so that you will have something working to look over. The demo project is barebones but has everything setup that you can study how it all works togher...
Click here to download the project I made for you based on the blog entry you were using as a guide.
FYI: The Captivate project version file I’m sharing is 11.5.4.613
If you need this done in a lower version, I’d be happy to whip up another version for you.
After downloading the project, please do the following to get things up and running:
- Unzip the file. – there should be two items in the zip:
- PrintCertExHelp.cptx
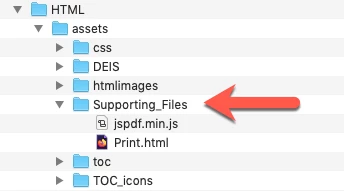
- Supporting_Files (folder containing your two files needed: Print.html and jspdf.min.js)
- Next copy the Supporting_Files folder to the assets folder that is located in your Captivate’s program/application folder:
- Path to copy the Supporting_Files folder to is: Your Adobe Captivate Application -> HTML -> assets
- This step is going to allow two things to happen:
- Enables you the ability to preview your project and run it as if it were on a server without all the extra steps for moving files to a server to test. This allows for quicker and smoother development/trouble shooting times…especially when working with external files that are needing JavaScript to correctly run.
- This step will also ensure that your files will be included when you publish your project as well…without having to remember to move files over manually after publishing the project.
- Now you should be able to run the Captivate project and it will allow you to input some info and generate your PDF file.
After you have finished with your project that needs to have the certificate printed, I’d suggest you do the following things to keep your work space clean of un needed files during publication.
- Make sure you copy/move the Supporting_Files folder to where ever your finished Captivate project file is stored for later use and etc. This allows you or anyone else needing to work on the project in the future the necessary files to make your project work.
- After you have ensured your Captivate project and the Supporting_Files folder has been copied/moved to a place for safe storage – delete the Supporting_Files folder only in the Adobe Captivate’s application assets folder. Doing this step keeps unnecessary files from being added to future published projects.
I have used this method for working on complex project for years! It has worked wonderfully and saved me a ton of time when needing to preview/troubleshoot/tweak projects being development. When I have student interns work for me, this method has been wonderful, as it allows my student interns to develop complex projects without giving them access to live servers.
In my previous post I did share that you can also manually add the files to your published folder as well - either way its VERY important to make sure that you have any paths need to access the files correctly entered where needed.
Make sure you have your print button setup with the correct path to the Print.html file! The following is the JavaScript that I used for the Print/Make PDF button: (its modeled exactly like the blog posting you are referencing)
var nameOfCompany = cp.vm.getVariableValue('companyName');
var coursetitle = cp.vm.getVariableValue('courseTitle');
var studentname = cp.vm.getVariableValue('cpQuizInfoStudentName');
var subjectname = cp.vm.getVariableValue('SubjectText');

// NOTE: how I set the URL path to the Print.html file:
var url = "assets/Supporting_Files/Print.html?&nameOfCompany=" + nameOfCompany +"&studentname=" + studentname + "&subjectname=" + subjectname + "&coursetitle=" + coursetitle;
window.open(url,"_blank","width=800,height=600,menubar=no");
Ok, I hope between the working demo projet file I setup for you as well as the instructions above...you will get your project on tract. If you have any other questions just let all of us know!

