Inspiring
January 19, 2018
Answered

Create a shape that encompasses several non-overlapping objects

  • January 19, 2018
  • 4 replies
  • 1515 views

Is there a script, technique or plugin that will allow me to easily create a shape which encompasses several objects which don't overlap. I can do it easily enough by hand but I have thousands of these to do and I need some method of automation.

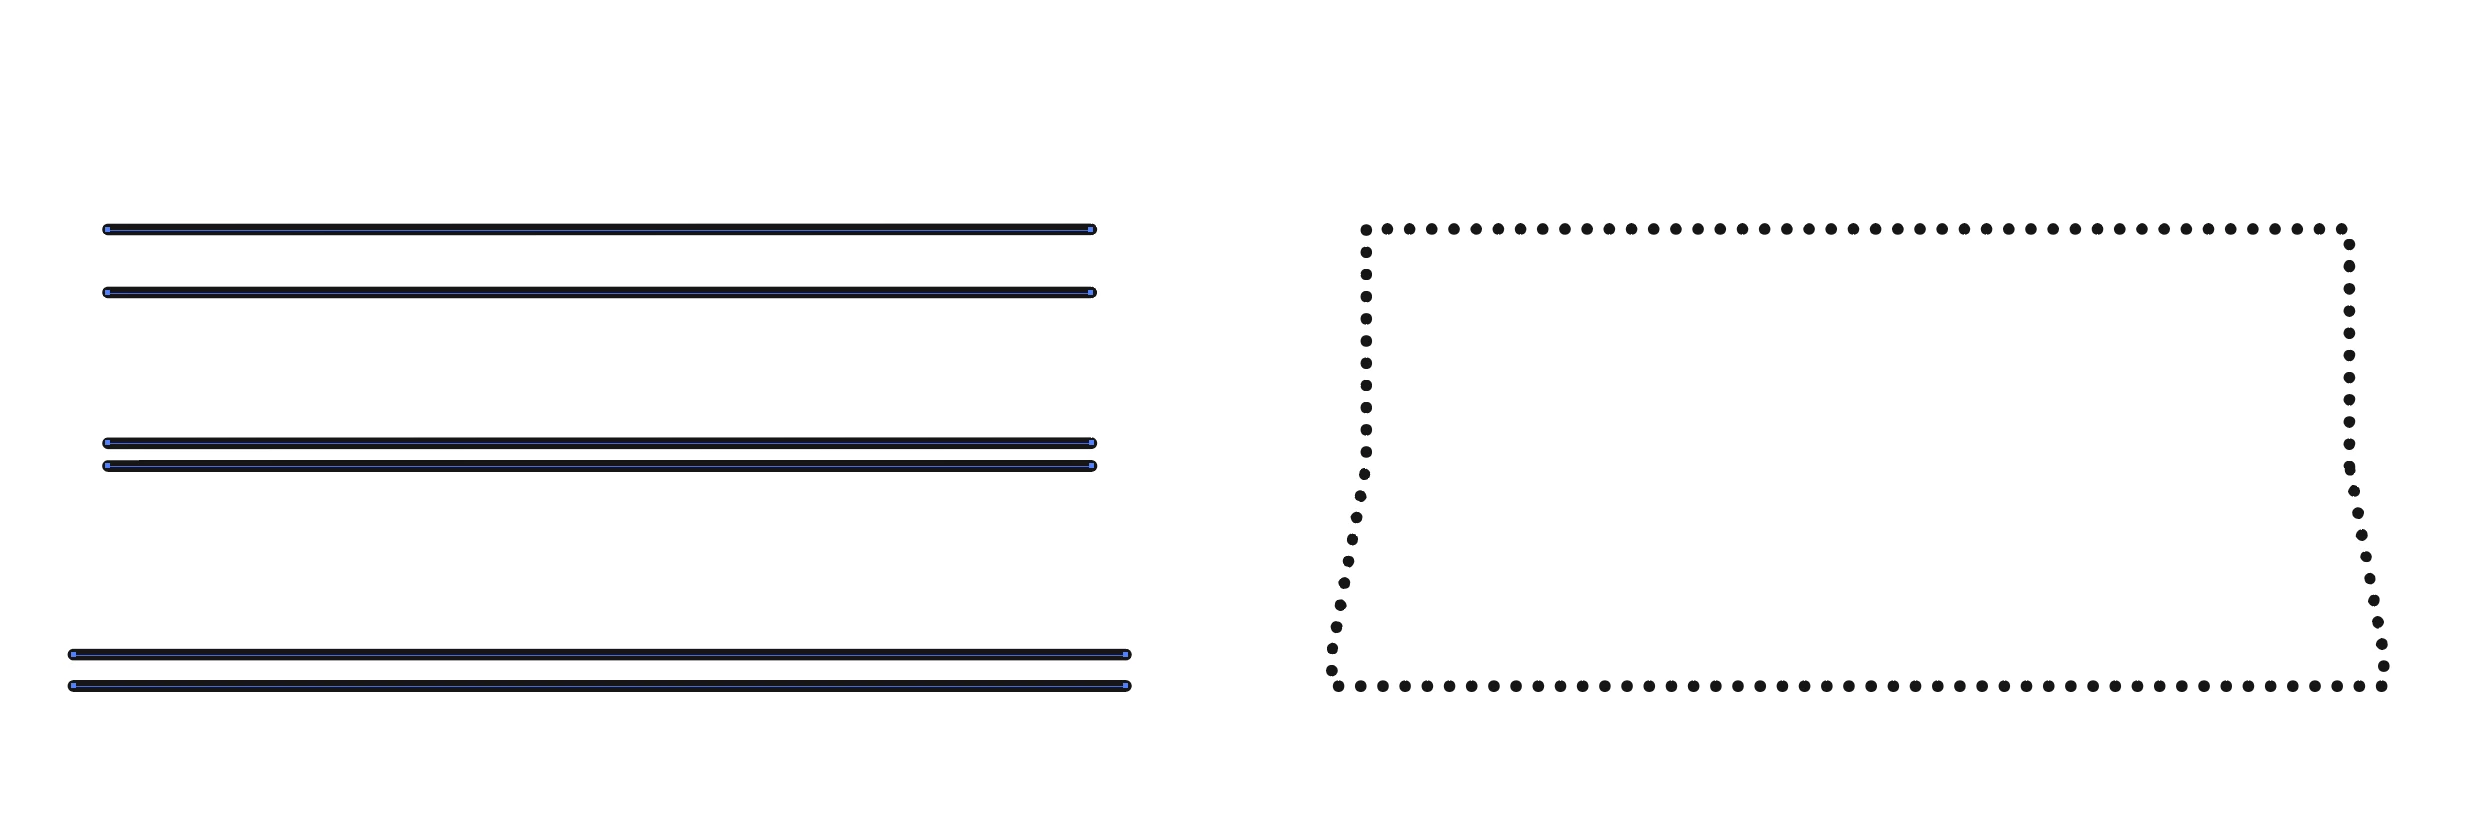
The left hand image is typical of the type of group I have and the image to the right is what I need to end up with; a shape which encompasses all objects but acts as a perimeter for the object group.

Thanks in advance.

This topic has been closed for replies.
Correct answer Kurt Gold

The following approach refers to the screenshot in your initial post that shows something you called „typical“ for the objects that have to be encompassed by a closed path.

This .zip file contains a sample .ai file and an action file (.aia):

encompass_strokes.zip - Google Drive

Instructions:

- Open the file called encompass_sample.ai

- In the Actions palette menu, import the action set encompass_straight_strokes.aia

- Select the grey strokes

- Play back the action

You may probably imagine that this is not a general purpose way. It won’t work in all situations and some groundwork may be required, but perhaps you can use it as a starting point for your own ideas.

4 replies

Kurt Gold
Kurt GoldCorrect answer
Community Expert
January 20, 2018

The following approach refers to the screenshot in your initial post that shows something you called „typical“ for the objects that have to be encompassed by a closed path.

This .zip file contains a sample .ai file and an action file (.aia):

encompass_strokes.zip - Google Drive

Instructions:

- Open the file called encompass_sample.ai

- In the Actions palette menu, import the action set encompass_straight_strokes.aia

- Select the grey strokes

- Play back the action

You may probably imagine that this is not a general purpose way. It won’t work in all situations and some groundwork may be required, but perhaps you can use it as a starting point for your own ideas.

Rob.WoodAuthor
Inspiring
January 21, 2018

Hello Kurt

That works a treat, thank you

Cheers

Rob

Rob.WoodAuthor
Inspiring
January 20, 2018

Thank you for your suggestions. These are all useful but they're not really what I'm after. I know how to create a shape to encompass items — I was more after something that can make it a one- or two-click thing. I have several thousand of these to do and having to manually join endpoints is going to be a long and boring process.

Live Paint is almost what I need except that the 'paint' doesn't appear to be able to jump across gaps (despite their being gap options.

Monika Gause
Community Expert
January 20, 2018

Rob.Wood  schrieb

Live Paint is almost what I need except that the 'paint' doesn't appear to be able to jump across gaps (despite their being gap options.

Triple-click to fill all the areas that have currently the same (or none at all) fill applied.

Jeff Witchel, ACI
Community Expert
January 19, 2018

Select all the shapes you wish to encompass.

Copy and Paste those shapes.

Go to View > Guides > Make Guides. Make sure Guides are Locked.

Use your Pen to to trace all of the ins and outs of your shapes. The Pen should Snap right to the Guides.

Move your new shape into position over the top of your original shapes and drag your new all-encompassing shape under the originals in the Layers panel.

Mike_Gondek10189183
Community Expert
January 19, 2018
  1. Pull a framed selection with hollow arrow tool (shown in red)
  2. Delete
  3. Select  and Command J
  4. make fill none, stoke dashed. You can set up a graphic style

This may not work depending on how differetn/complex your remaining art is

Rob.WoodAuthor
Inspiring
January 19, 2018

Hello

Thank you — that's useful for those groups that are that neat but some of them wouldn't allow for such an easy election of the obsolete lines.

Mike_Gondek10189183
Community Expert
January 19, 2018

You can use the lasso tool to help with free form selections.  Select >> Object >> Direction Handles  command and scaling  or edit corner radius on a live shape, can help with adding curvature.

Please post another example via screenshot or even better a dropbox/goggel drive/etc link to an .ai file, and we can try and figure something out for you.