dustiny74811282
Participating Frequently
October 12, 2020
Answered

Cutting lines inside / outside of shape.

  • October 12, 2020
  • 6 replies
  • 10763 views

Hello,


I am using Illustrator to create complex pen-plotter drawings that typically involve a lot of cross-hatched shading.  I am looking for a way to automate one of the most needlessly laborious parts of this process. 


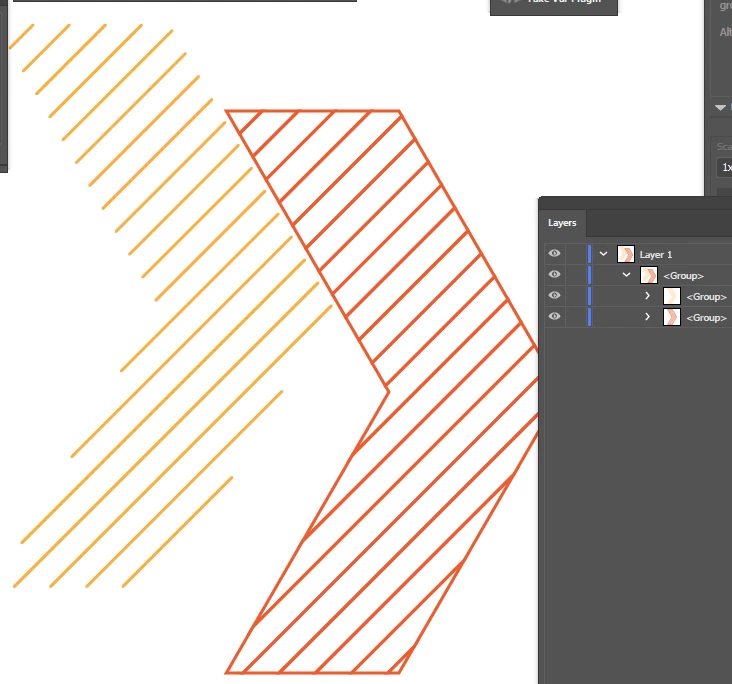
At present, to fill an area with parallel lines (I will refer to them as hatch-lines,) I first create the hatch-lines using the blend tool.  I expand the blend, then I place a shape on top to delineate the area I want to cut, and I use the Shape Builder tool to delete the unnecessary parts of each hatch-line individually, using the alt-click.  I am looking for a way to automate this process. (See Image 1).


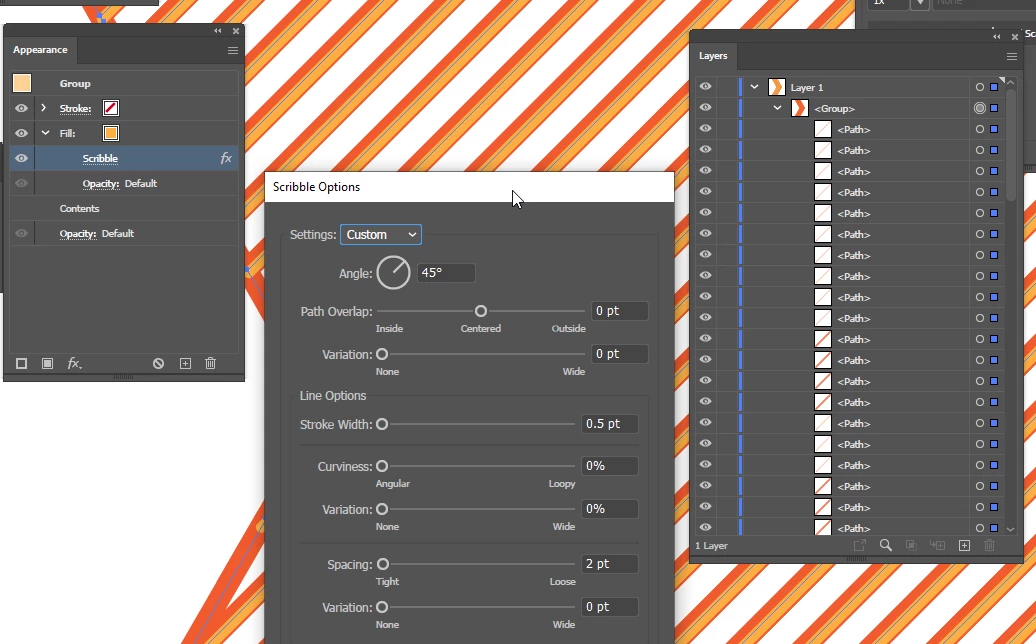
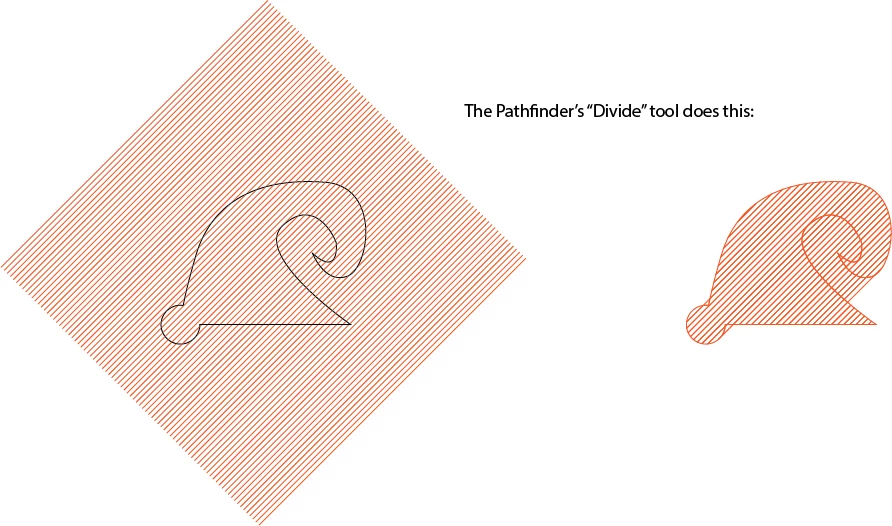
Unfortunately the Pathfinder tool does not do quite what I want.  The Divide command can erase lines outside of a shape, but only if the shape is simple, without "undercuts."  It does not seem to be able to erase lines inside of a shape.  (See Image 2).


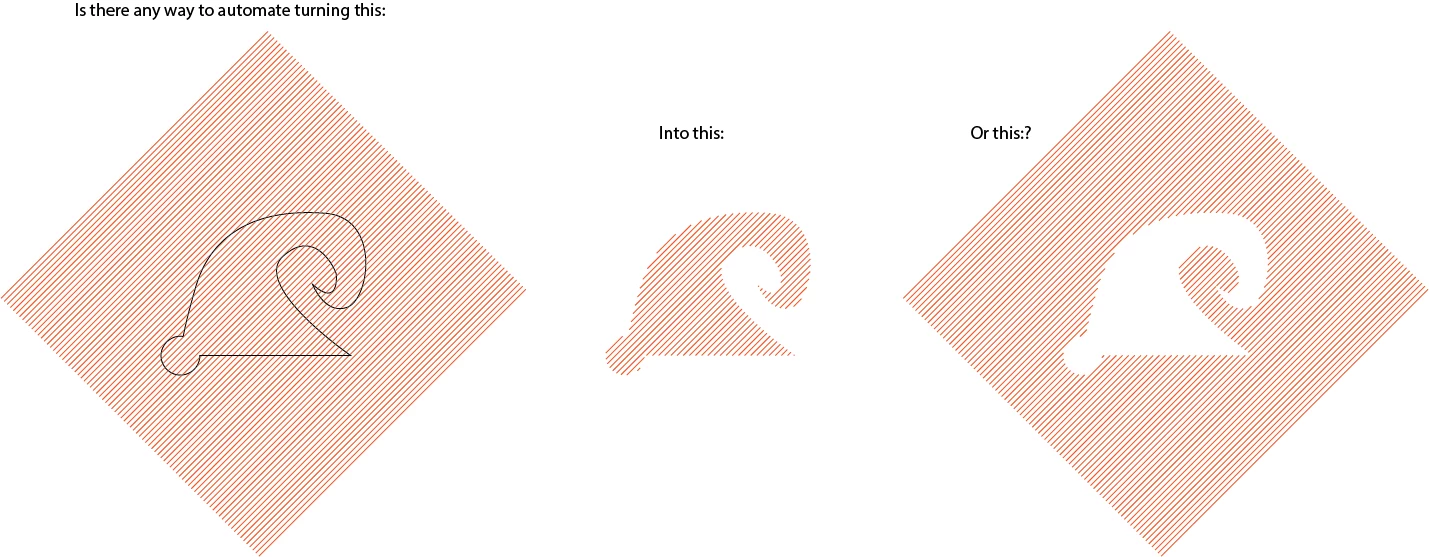
I need to actually sever the paths at the desired locations (where they intersect the shape's outline) and delete the unwanted parts of the path (either inside or outside the shape, depending on the context.).  I can't simply "mask" the image by layering filled shapes on top, because these are vector files for pen plotter, and all vectors will be plotted whether or not they are obscured.  


Does anyone know a solution?  Would it be possible to write a script which could perform these behaviors?  Please let me know if any further clarification or elaboration is needed.  If I could automate this task it would save hours or even days of alt-clicking per drawing!


With gratitude,


JCO

This topic has been closed for replies.
Correct answer Silly-V

Yes of course - and remember, the folks who were too busy to get automating are still too busy on the same thing. The following things you can read up on to apply to this project:

  • How to define and use a pattern
  • Defining and using a graphic style
  • Recording and playing actions
  • Using the Action panel flyout menu to insert difficult-to-record commands.
  • Using the scribble effect
  • Using the Expand and Expand Appearance buttons in the menu
  • Pathfinder - not really that much you need to know for this, just remember that after something is expanded that auto-creates clipping paths, Trim and then Merge will reduce it down to only visible paths.

Update: you can even forget the pattern! You can actually use your current technique by using a blend, then using a clipping path and ensuring the blend is expanded. All you need to do is first Divide with Pathfinder and then add a scribble effect to the result. Then Expand Appearance and you get a group which has your original divided lines at the bottom and just the lines you want at the top!

Of course, using a blend is going to be more than a one-click operation of just using a swatch or a graphic style containing a swatch but you could technically do a whole new blend each time and have all kinds of funky wavy lines in there. You ever wish to plot the kinds of intrucate geometric designs they have on money, but were constantly frustrated by not being able to clip it? Have we got a solution for you! (OOPS: this relies on the Scribble Effect adding only the kinds of lines it knows, so at most you could only to crazy zig-zags but not custom-warped or globally-curvy lines)

The whole thing can be automated as well by actions, and you can have different actions which could paste in different huge squares of pre-made blends in behind your shape, from other files


.

Note that after you expand and then divide, the result may be all clear paths - in which case just give it a stroke of your favorite color again. And you don't have to trim & merge or anything.

Dial the scribble effect in so the line appears and there you go!

Then expand the appearance: 


You get the two groups:

And this is the result that has the lines closer to what your examples are:

So now you can have a couple of options, both relying on the Scribble Effect whose unique properties we are exploiting to reduce a hatch-filled shape to just the filler lines as strokes only.

6 replies

Pictoid
New Participant
June 22, 2021

Hi,

Pathfinder-Crop method.

An old Pathfinder trick should do the cropjob (check the pics).

I use CS5, but it should work exactly the same on CC.

For the Action: put the blend on a new layer & lock all other layers, then run the action.

Note all answers up to now (except scripts) work for straight lines, not for Curved lines inside the crop area, so the question is only partially solved.

As for scripts, there's Serg Osokin's free script called Splitpath.  (it's for >CS6 & i have CS5, but i'm sure it works great).


Note also it wouldn't be difficult for Adobe to add a tool or feature doing this cutting-of-lines, and it has been asked regularly, so why they don't is a mystery. And clean, trimmed lines are superior to clipped lines: see comment on pic2 for demonstrating this.

Nic


Kurt Gold
Adobe Expert
October 13, 2020

"however there could be an issue due to inverse selection - so you may have to first group the art so as to enter the isolation mode and be able to use the inverse selection without affecting your other art."


That's why I said that it can be modified in order to work in other (unknown) contexts, Silly-V.


The action is just a prototype, of course.


Likes

 
dustiny74811282
Participating Frequently
October 13, 2020

I was able to successfully use your action not only in your example file, but also in a a file of my own-- Very exciting!  I understand how some of the steps function, but not all of them.  I will keep playing with it to understand better.  Thank you!


Kurt Gold
Adobe Expert
October 13, 2020

Silly-V has provided a very good action for one part of the request. The second part of the request is about to delete stroked segments inside a specific path area.


Here is my action-based approach to do it:


https://drive.google.com/file/d/1xQY5maxQWMBMzFNcllo59WI9ga3q4VAq/view?usp=sharing


Instructions:


- Download and unzip the file that contains a sample .ai file (delete_something_001.ai) and an action set file (del_segments_inside_path_area.aia).


- Open the sample .ai file and do not select anything.


- In the Actions palette flyout menu, load the action file.


- Play back the action.


As always, this can be modified in order to use it in other contexts.

dustiny74811282
Participating Frequently
October 13, 2020

Thank you Kurt-- I'm planning to sit down and learn Silly-V's techniques this evening.  I will also try your action.  Much appreciated!

Silly-V
Brainiac
October 12, 2020

You can esablish a pattern made of your cross-hatch lines and use it to fill a shape. When you are ready to plot, expand the shape by using Pathfinder's various buttons. Most of the time, Trim works for me.

If you want to reverse-out the shape you would first make your background square and fill it with the same pattern, then use Pathfinder operations to stamp out your negative shape.

You can automate this process without scripts by using actions. This would rely on you having such a pattern inside the document, but you can automate this as well by opening a file with your pattern(s) and copying a temporary shape which contains the pattern into your active document or you can simply add the pattern to your New Document Profile that you use. All in all you can action-automate coloring a shape with this pattern by bringing it in if it's not there and trimming it to just the visible vector-lines using Pathfinder. Then you can also automate the reverse by pasting in a pre-recorded shape for a background (actions flyout menu "Insert select shape") and coloring that shape, adding some note, maybe adding some other note to your stamp-out shape and finally stamping it out using Pathfinder. You could also use pre-recorded graphic styles in a similar way, among which are live pathfinder effects too. A graphic style could be created to add a relatively-sized shape behind your artwork as well.

dustiny74811282
Participating Frequently
October 12, 2020

Thank you.  I'm away from my desk, but will see if I can make these suggestions work when I return tomorrow.  I've never had luck expanding pattern fills into vector lines suitable for plotting, but since you are suggesting it, I will look into it more thoroughly.


In case this clarifies anything, the plotter requires me to export SVG files, and it can only plot lines-- fills are ignored. 


I am not familiar with setting up actions, or graphic styles, but I will look into those also-- Lots to learn!


Silly-V
Brainiac
October 13, 2020

Yesss, I figured it out!

It's not as easy as I initially suggested because I realized you are interested in strokes - all my advice was hinged on using simple fills.

However, I was able to mess with it and leverage another effect to finally get it done.

Here are the initial steps: do the pattern thing and use very thin rectangles because first we'll still use the fills to get the shape down. Now imagine you have your shape and it's got the cross-hatch pattern running all through it. At this point you can use Flatten Transparency, or Expand and then Trim to leave just the cropped filled paths which are in the shape of your cross-hatch lines. But it's not going to work for you until this very last step: while your cross-hatch lines are all ungrouped and separated, ensure they are all selected and add a new effect: the Scribble effect.

The Scribble effect should be now applied individually to the shapes (it may work with grouped shapes, but I didn't try). Adjust the settings on the Scribble Effect dialog to have the angle of your effect match the angle of your pattern cross hatch. I chose 45° when doing my pattern, so I put the same value into the Scribble dialog. Then I tweak the thickness and spacing to ensure the Scribble effect is only laying one continuous straight line down the length of each cross-hatch. You may see the cross-hatch visually get thinner although their paths are larger than the contained scribble stroke. Finally, when you expand this final stage of the art, Illustrator graciously leaves us with just that thin stroke as an actual stroke and not a very thin rectangle!


This can all be automated and I'll try to record a gif to prove this could actually work.


m1b
Brainiac
October 12, 2020

Can you use the "Crop" pathfinder command? I tested it just now. If the "masking" shape is filled, "crop" correctly cuts the lines, but also leaves a bunch of empty paths between the lines (the mask shape cut up by the lines).


Sorry I don't have time to do a script, but just thinking about what might work...

1. duplicate the selected path (which would be the "mask" path)

2. fill it with black

3. select the hatching (a script could make this too I think, if it were uniform step distance, etc.)

4. do the pathfinder crop

5. remove empty paths from the result


Does that seem feasible? Do you get the same results as me when you do the crop pathfinder?

dustiny74811282
Participating Frequently
October 12, 2020

I think I've tried this, but I will give it a shot following those steps exactly when I return to my desk tomorrow, and report back-- Thank you!

m1b
Brainiac
October 12, 2020

If manually testing, you can ungroup the result of the pathfinder, then select a single unwanted empty path, then use "Select > Same > Appearance" and press delete.

Kurt Gold
Adobe Expert
October 12, 2020

Which version of Illustrator are you using?

dustiny74811282
Participating Frequently
October 12, 2020

I am using CC 2020-- Will update my original post.

Simmer1
Inspiring
October 14, 2020

I would say use the Pathfinder Tool, just be sure to:

1) Duplicate the parallel lines and keep them on a separate Layer, lock it...

Next select the copied parallel lines and Expand the fill and stroke before using the Pathfinder Minus front function and Minus Back.