- Home
- Illustrator
- Discussions
- Re: How do i set custom uniform measurements betwe...
- Re: How do i set custom uniform measurements betwe...
Copy link to clipboard
Copied
Hi,
I am creating a template for my mosaic making. The tiles i use are 10mm and the grout lines are to be 0.1mm. The way i created the fan pattern in image is using the blend tool. But im struggling to set the width between each circular line at 10mm.
Is there any way of doing this?
Thank you
Daniel
 1 Correct answer
Daniel,
Here is a screenshot of different steps. The simplest way to remove unwanted parts may be the Pathfinder>Divide with a wee bit of cleanup. All measures are in pt, 1 pt corresponding to 1 mm. Am I right in believing that the grout lines are actually 1 mm (otherwise the measures will be a bit different, 0.1 mm would look much thinner than in your screenshot))?
The 1st part is a vertical line with a length of 110 (the radius of the circles), and the first rounded rectangle is 22 x 122 r
...Explore related tutorials & articles
Copy link to clipboard
Copied
Daniel,
You can create a line, then a rounded rectangle with a width of 22 mm, then you can just use Object>Path>Offset Path to create the following grout lines, and then you can cut everything with the other circles in different ways, including use of Shape Builder or Live Paint.
The line and the first rounded rectangle just need to be long/high enough.
https://helpx.adobe.com/illustrator/using/creating-shapes-shape-builder-tool.html
https://helpx.adobe.com/illustrator/atv/cs5-tutorials/creating-complex-art-with-the-shape-builder-to...
https://helpx.adobe.com/illustrator/using/live-paint-groups.html
Copy link to clipboard
Copied
Hi,
Thank you for your responce.
Unfortunately im just not that good at illustrator. I tried doing what you said but it looks very very different from what ive created so far loool
Also, the second link you posted comes back with a 404 broken link.
Im gonna have a look at some shapebuilder tutorials on youtube 🙂
Thank you
Daniel
Copy link to clipboard
Copied
Daniel,
Here is a screenshot of different steps. The simplest way to remove unwanted parts may be the Pathfinder>Divide with a wee bit of cleanup. All measures are in pt, 1 pt corresponding to 1 mm. Am I right in believing that the grout lines are actually 1 mm (otherwise the measures will be a bit different, 0.1 mm would look much thinner than in your screenshot))?
The 1st part is a vertical line with a length of 110 (the radius of the circles), and the first rounded rectangle is 22 x 122 round the line, and the offset is 11, so the largest rounded rectangle is 220 x 320 after Object>Path>Offset Path 9 times.
The 2nd part has the two cutting circles (W = H = 220) added in red.
The 3rd part is after Pathfinder Divide, showing the upper limit of the area to ClickDrag with the Direct Selection Tool in the next step in blue dashed.
The 4th part is after (deselecting everything and) ClickDragging with the Direct Selection Tool over the bottom area and pressing Delete twice.
This leaves two unwanted bits, on either side at the bottom.
The 5th part is after Clicking the left unwanted bit with the Direct Selection Tool and pressing Delete twice.
The 6th part is the same, only for the right unwanted bit.
The final cleanup, invisible in the screenshot, can be done in the expanded Layer in the Layers panel, and consists of two things:
A) Selecting and Releasing the Compound Path that forms the pointy bottom, so the original line and the surrounding closed path become simple paths as all the others in the Group forming the template;
B) Deletion of the (possible) path at the very tip that is different to all the others by appearing solid black.
Click/RightClick to see in full, Click again to get close
Copy link to clipboard
Copied
Ah man thank you so much!! I followed your instructions... it worked and i finished the mosaic tody 🙂
Your an adobe illustrator genius. I appreciate your help so much Jacob!!
Copy link to clipboard
Copied
You are welcome, Daniel, and thank you for your kind words.
A very nice mosaic.
Copy link to clipboard
Copied
Both links are OK for me. Perhaps you should try it again with a different browser?
Copy link to clipboard
Copied
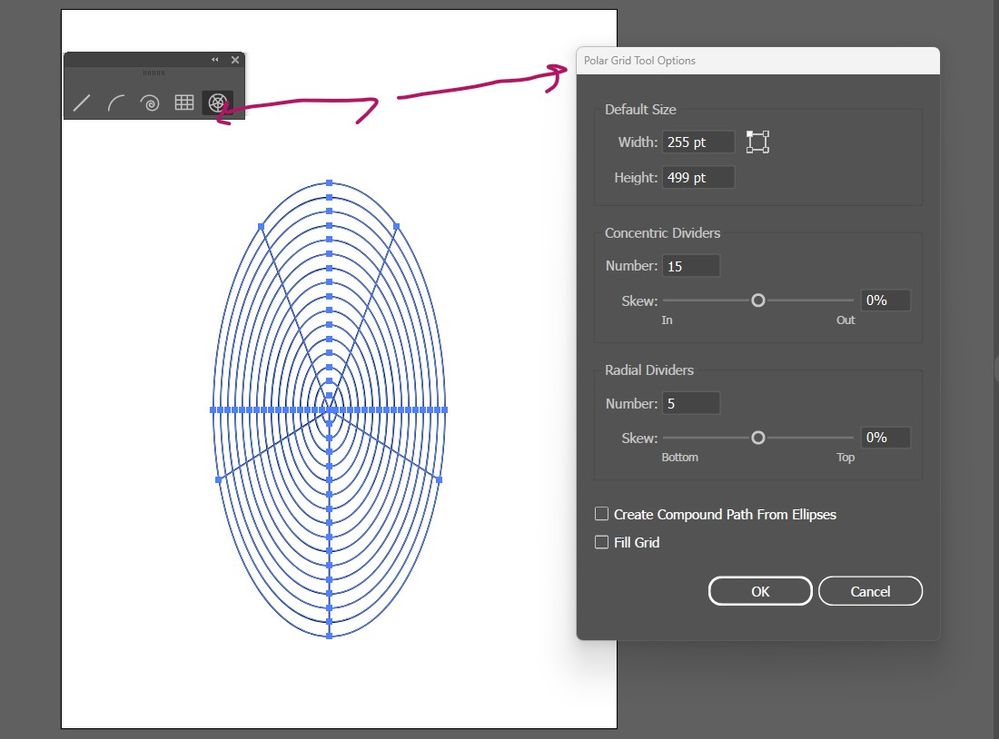
There is Polar Grid Tool in Ai that can be used for creating such object. You can also try that. Changing setting in Option Panel make sense.
Find more inspiration, events, and resources on the new Adobe Community
Explore Now


