

- Home
- Illustrator
- Discussions
- Re: Illustrator CC text doesn't change color using...
- Re: Illustrator CC text doesn't change color using...

Copy link to clipboard
Copied

Hello, I've been having this problem for a while with Illustrator CC but not with older versions. If I use the eyedropper to pick up a color, it captures that color and acts like it is applied but object/text continues to stay the older color. With text I have to use the type tool, highlight all of the text, and then select a color. This process if very annoying when I need to highlight and change several text boxes at once. Am I doing something wrong? What can I do to fix this. I would like to just be able to click on the object/text and use the eyedropper tool to capture whatever color I need.
Thank you in advanced


 1 Correct answer
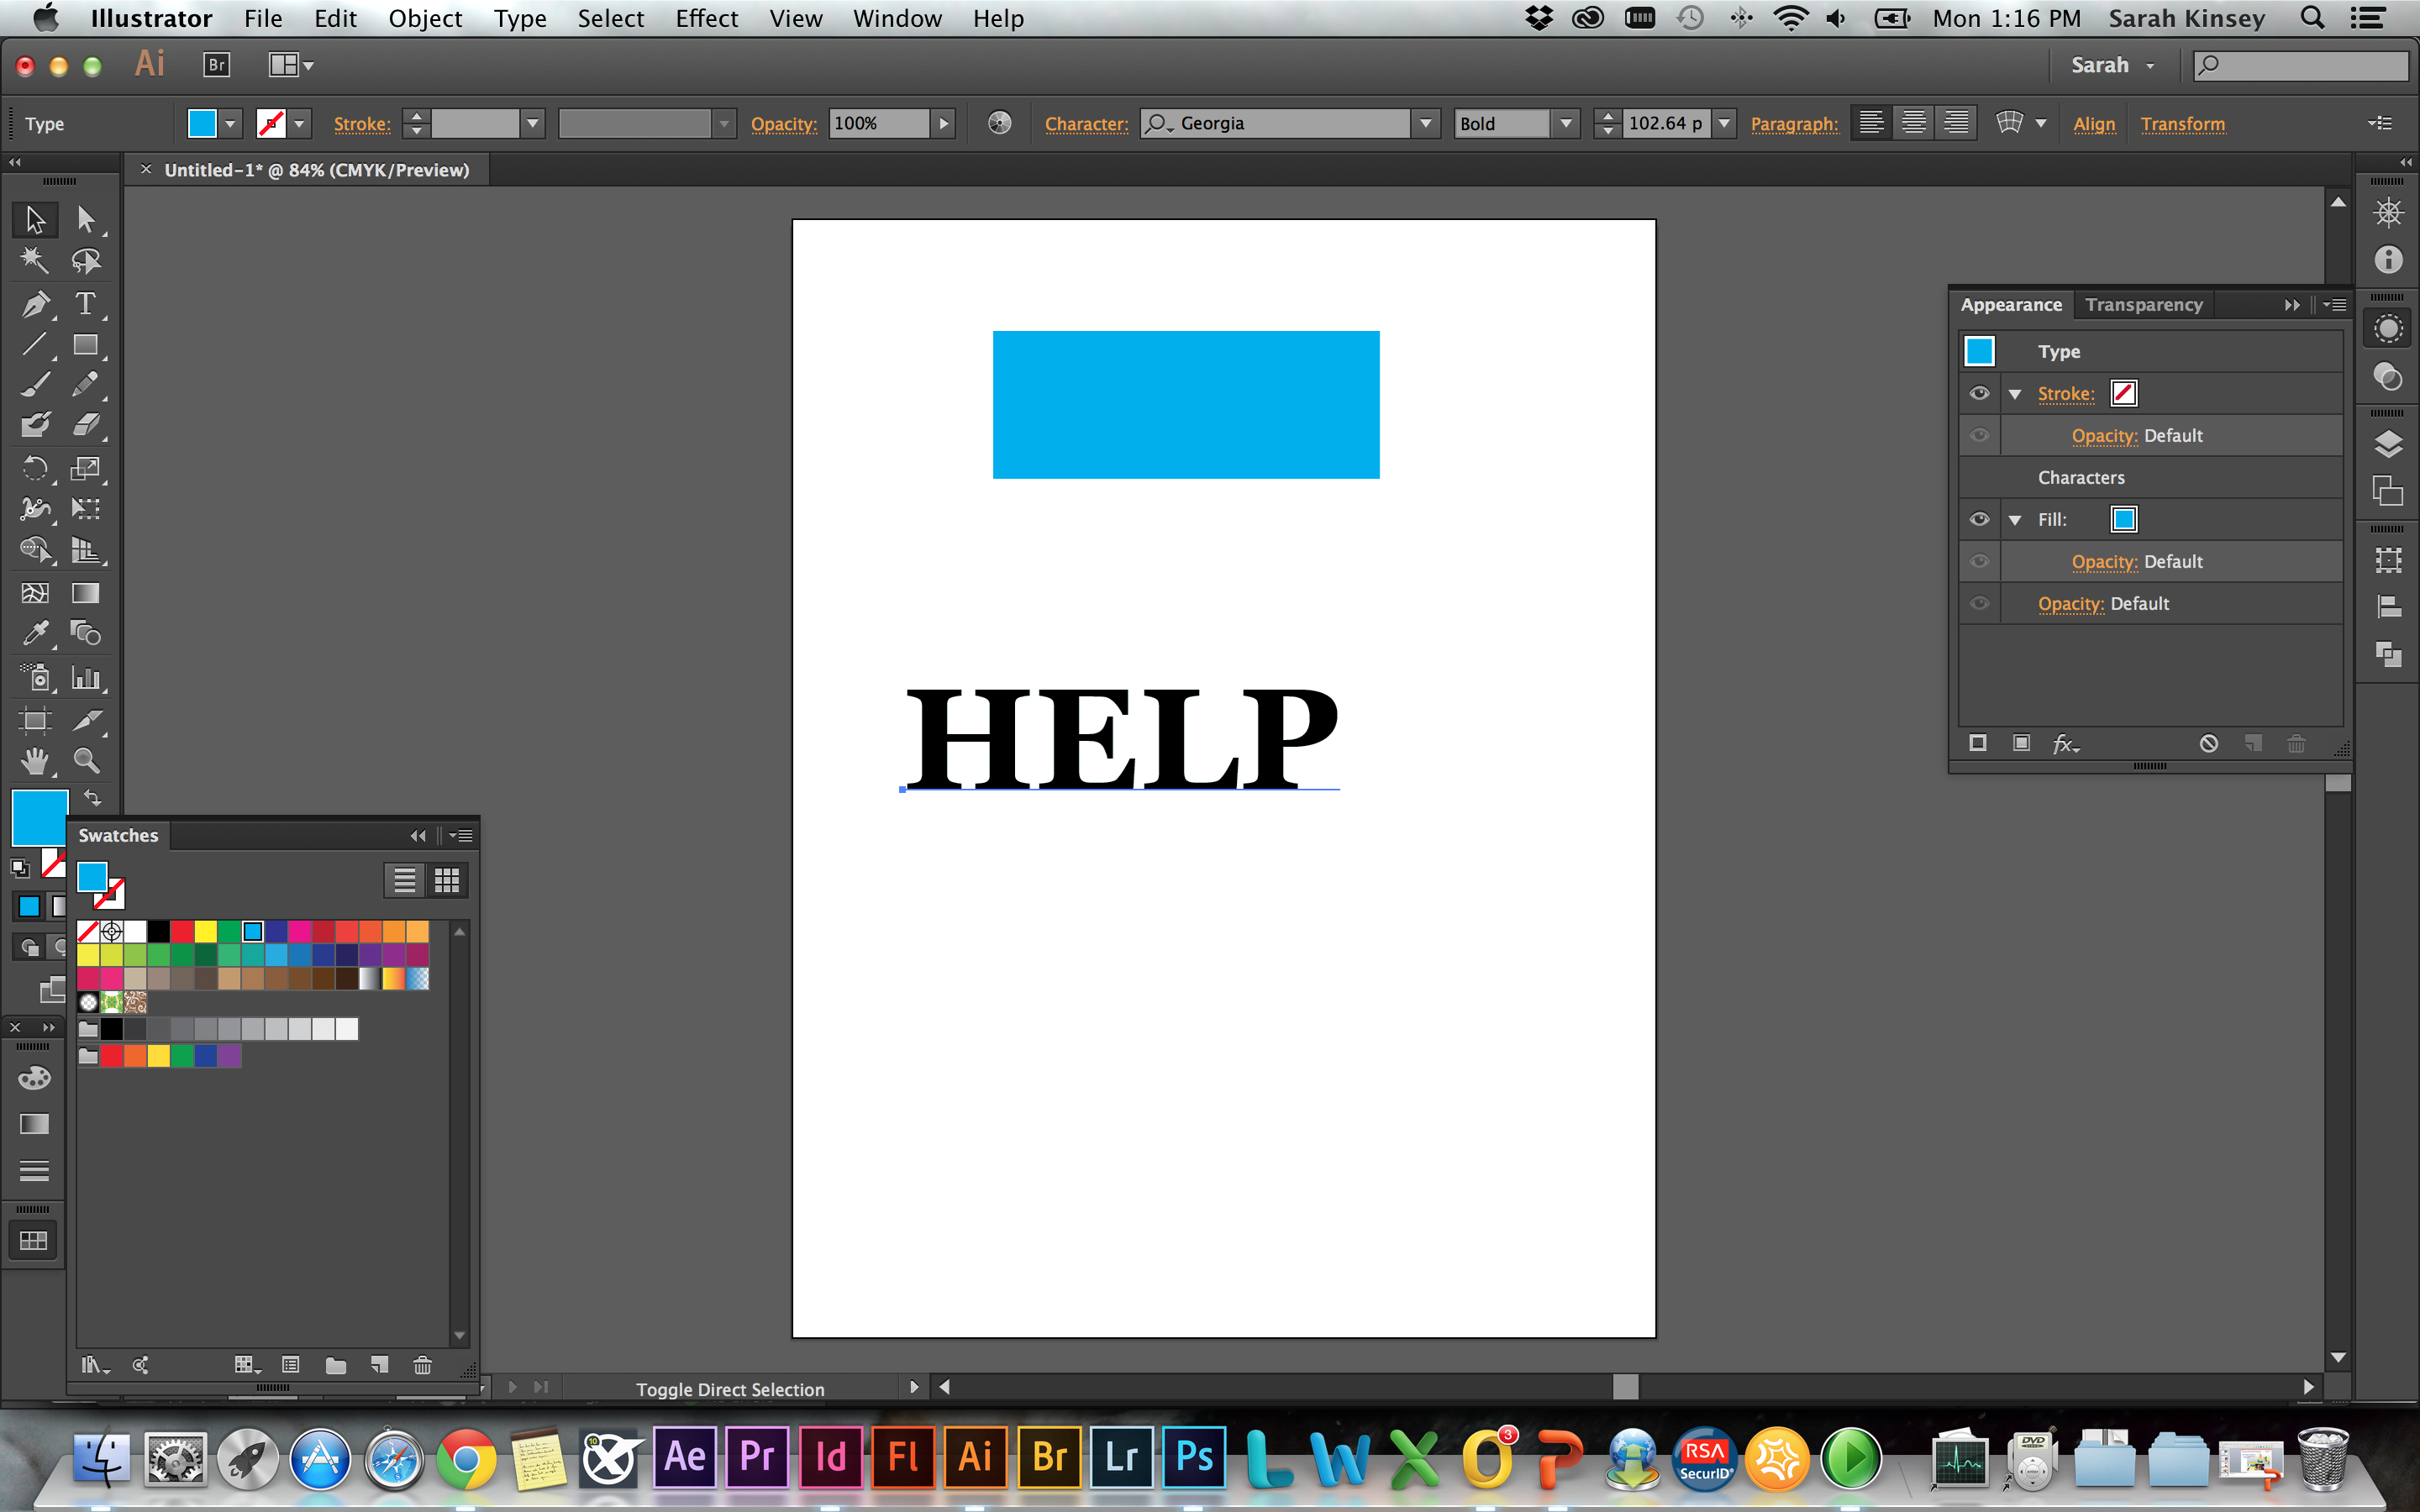
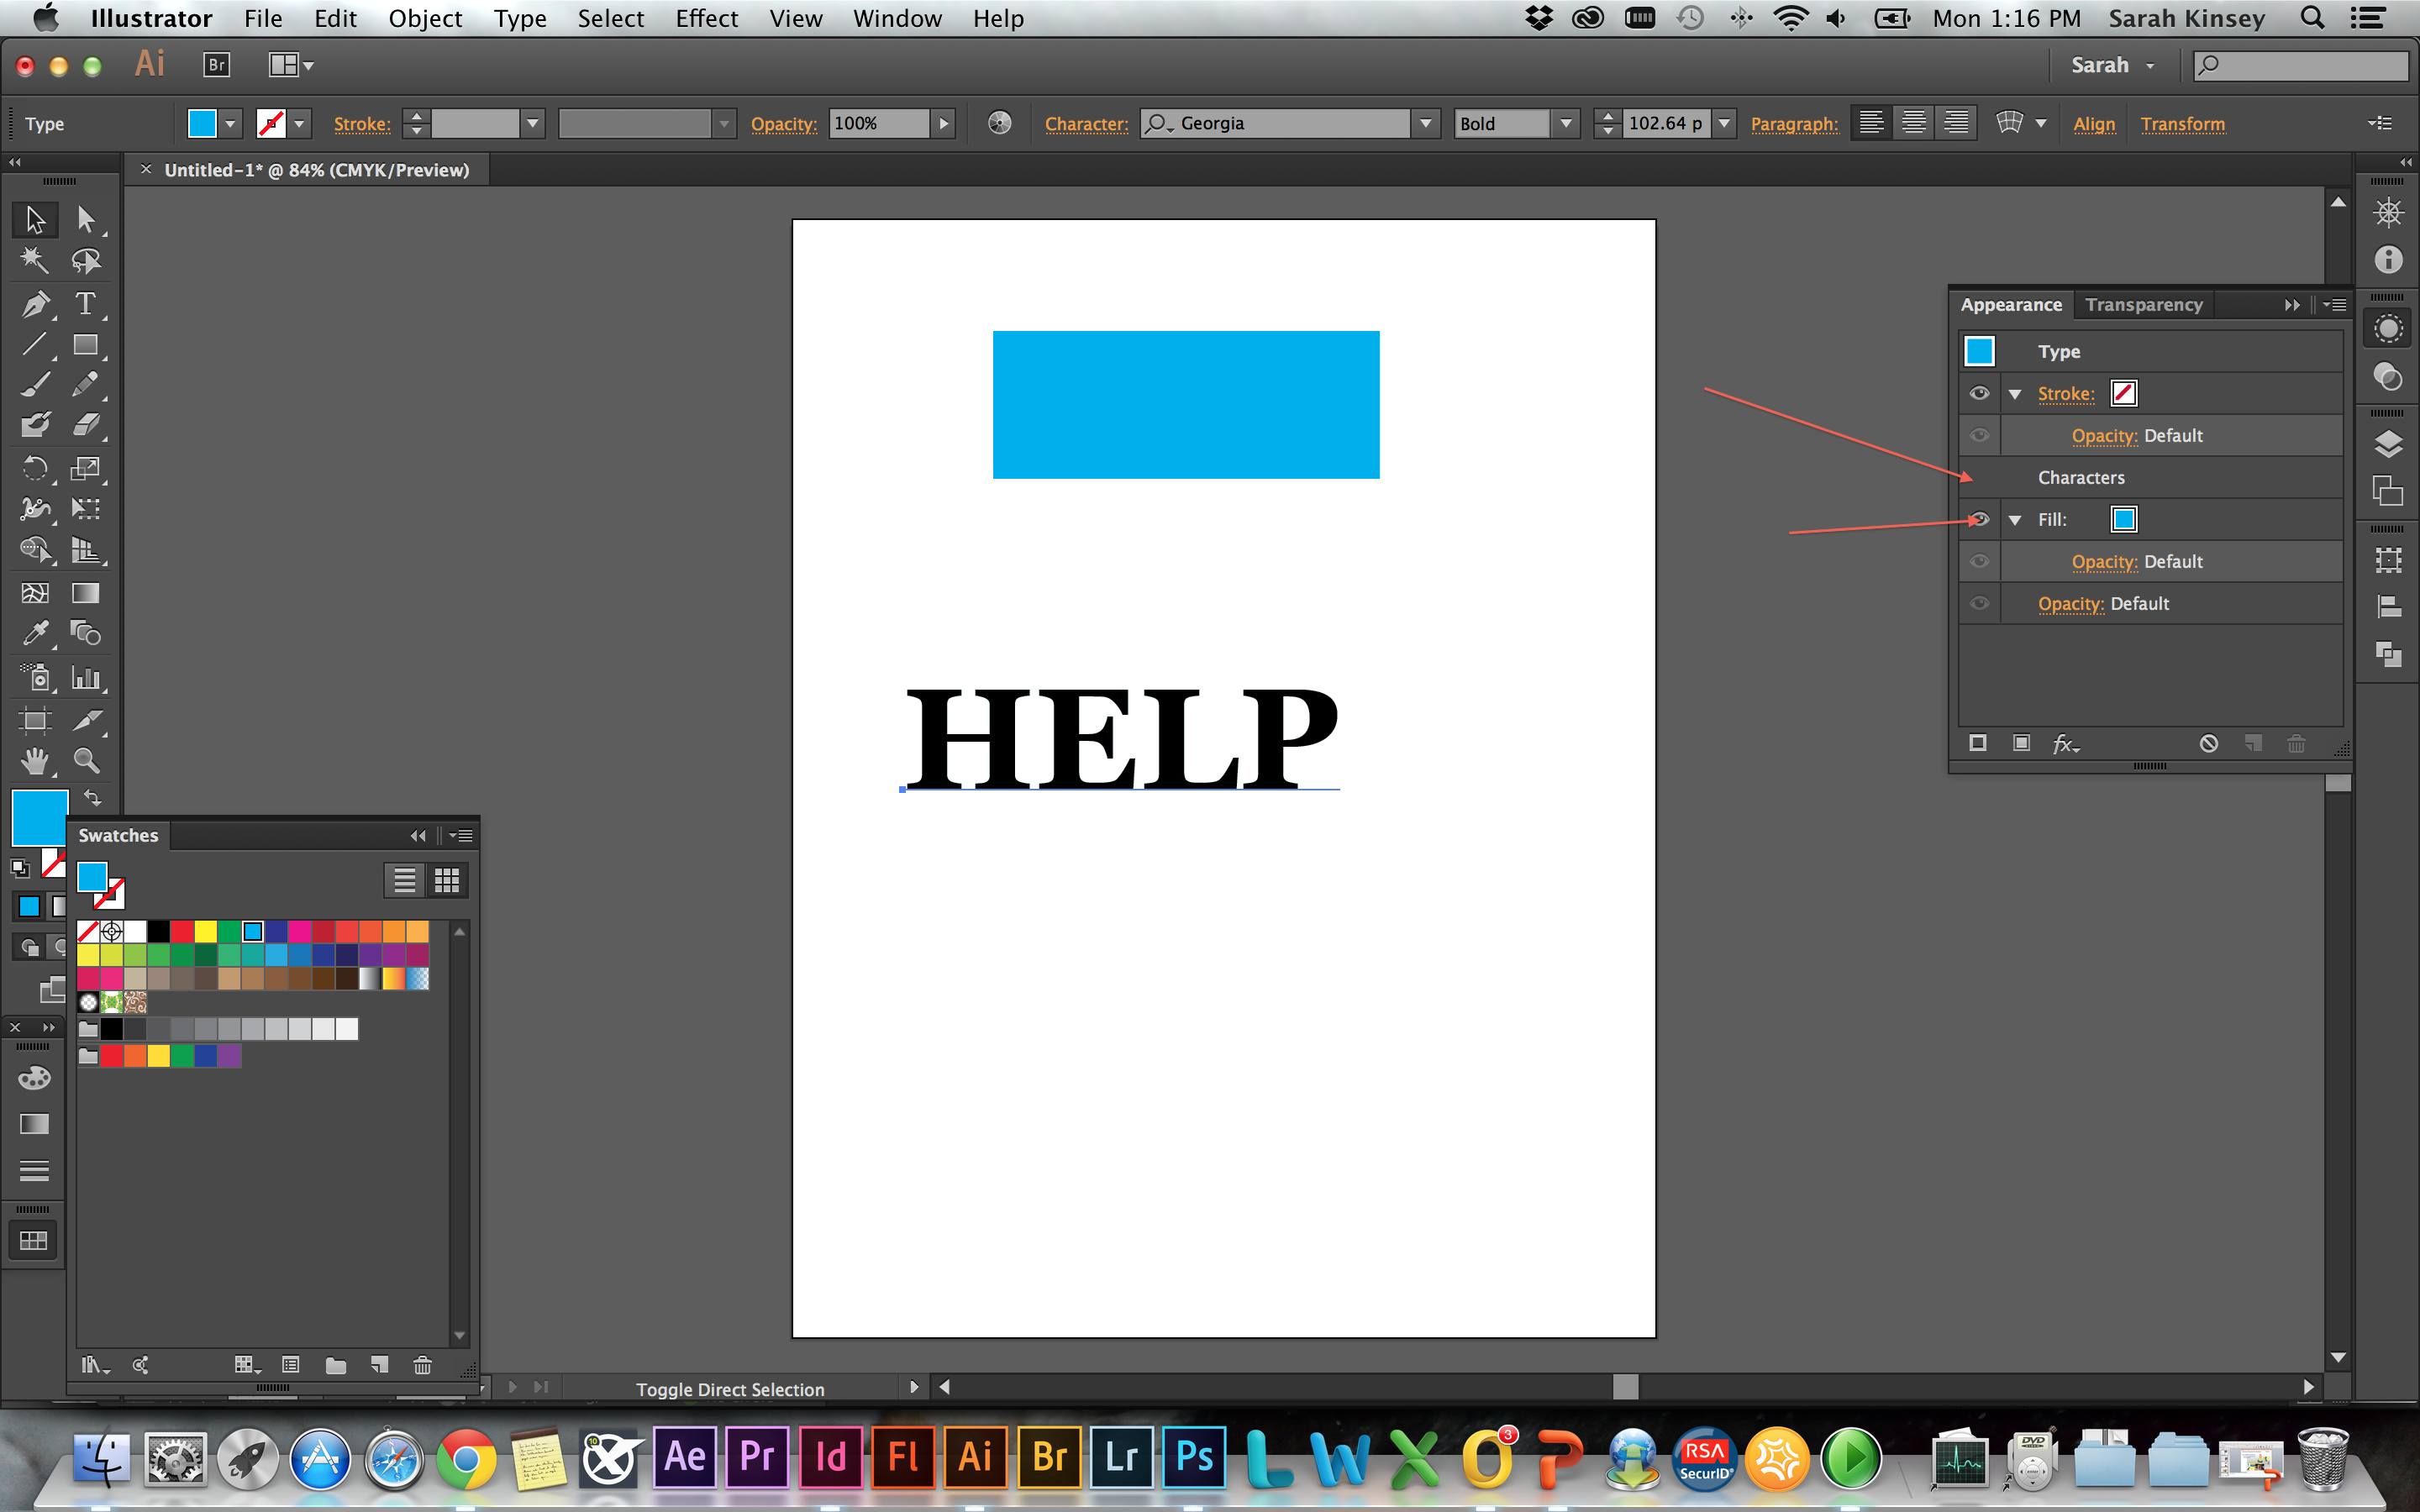
Look at the screenshot of the Appearance panel in post #9, above. The color showing for Group and Fill (and the Fill icon in the Tools panel) is black, and yet the paths on the artboard are cyan. If you use the eyedropper, the swatches panel, or any other method to try to change the color, it will only change the black swatches to the chosen color. The cyan paths will stubbornly stay cyan. Why? Look at where the black fill is in the Appearance panel. It is below Contents. This means that there m
...Explore related tutorials & articles
 20
Replies
20
20
Replies
20

Copy link to clipboard
Copied
Show us the Layers and Appearance panels expanded. Looks like it is being applied at a different level than the black fill.
Copy link to clipboard
Copied
Here it is with the appearance options shown
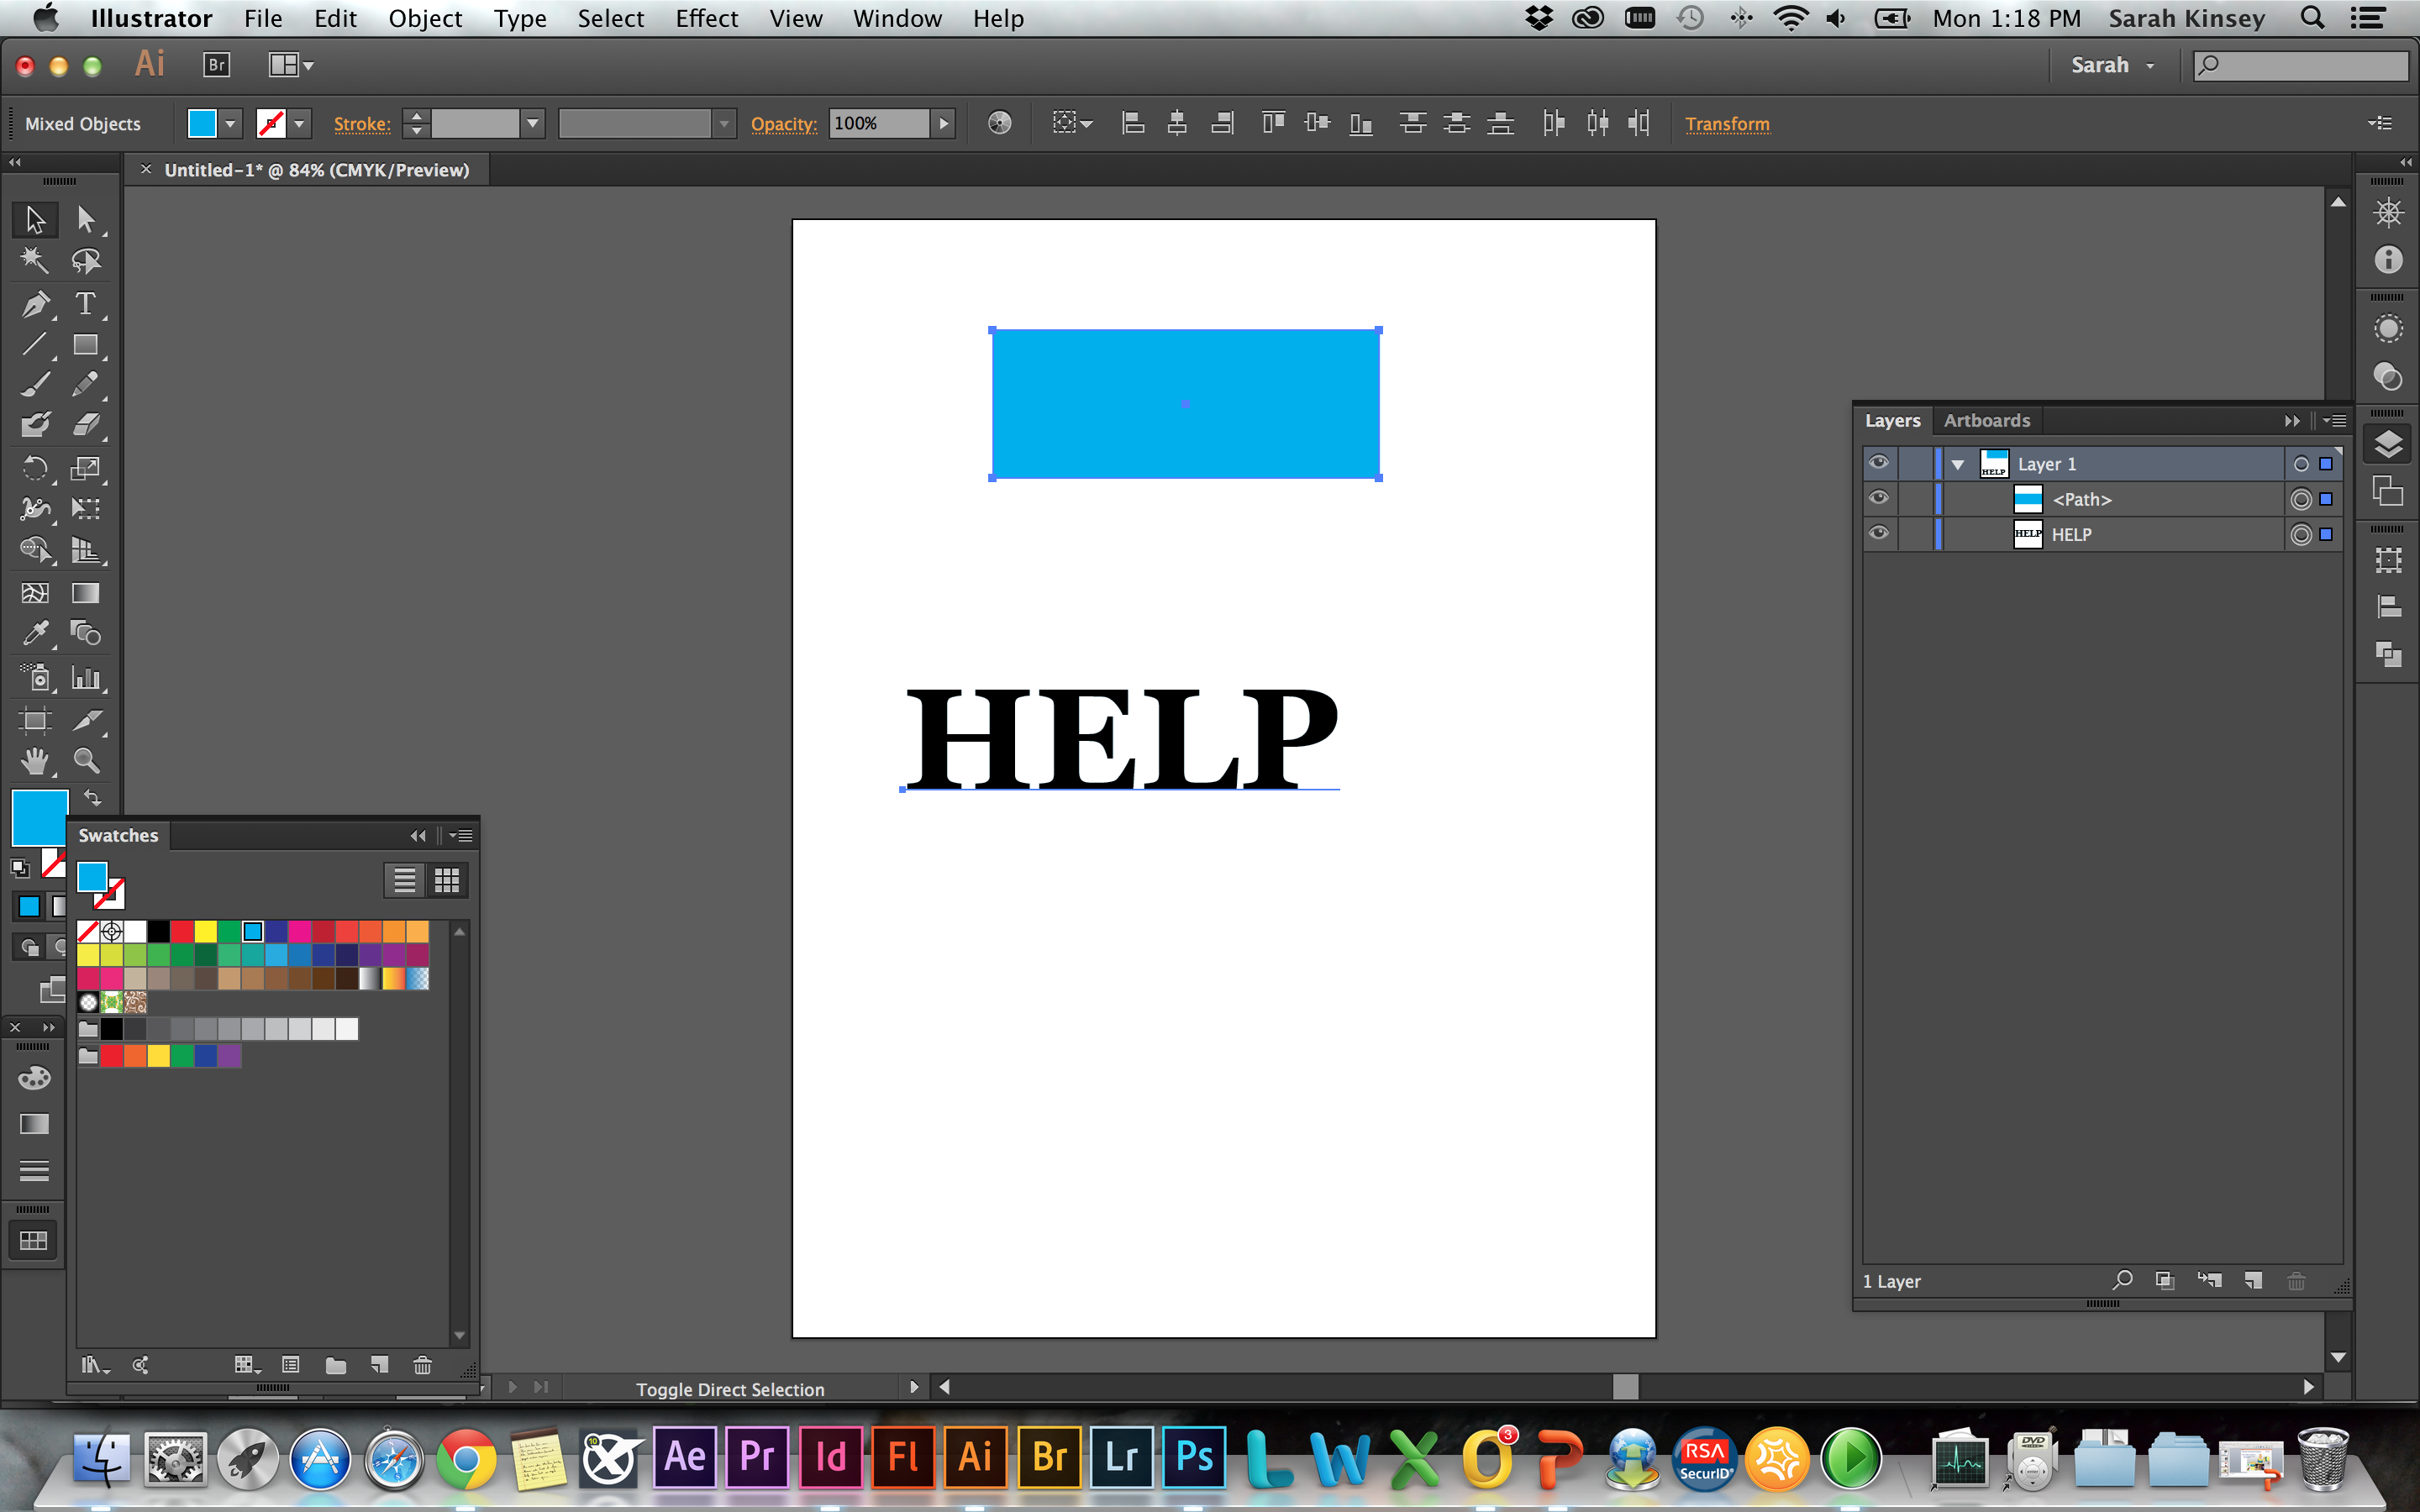
There is only one lay with the box (which I eyedropped color from) and the text. In this image I selected both of them and its saying they are both blue (if the text was black than a question mark would be in the pallet instead of the blue)
Copy link to clipboard
Copied
You need to highlight the text with the Text tool for it to change the color of characters of the text. As you have done it it has add a new fill below the existing character fill. Either move that line above the Character line in the stack or double click the Character line and remove the fill there.
Copy link to clipboard
Copied
Thats my problem. Is the only way to change the color of the text is to highlight it with the text tool and change it from there? In the past (on older Illustrator versions) I was just able to select the text and then use the eyedropper to change the color. How can I change more than one text box other than go into each one individually with the type tool?
Copy link to clipboard
Copied
Is there a way to change the eyedropper setting so that it changes the color of the characters, not add a new fill? I have the same problem with objects as well. It is very annoying and hard to work around...
Copy link to clipboard
Copied
This


Copy link to clipboard
Copied
I have the same problem! Did you find a solution?

Copy link to clipboard
Copied
SOLVED (i just ran into the same problem)!
The solution is not always the eyedropper panel ... if you look at the post where the appearance panel is shown, you will see there are two settings, one for fill and the other for outline. Larry Schneider already pointed this out.
For the eyedropper to work like people are used to, those appearances must be cleared > click on actions popup menu in the top right of the appearances panel. Now you are back to the base color ...
For me this problem happened when importing an old .eps ... its my unofficial guess that some import situations may prompt illustrator to tag the appearances in this manner

Copy link to clipboard
Copied

I've been having this problem a lot lately as well, except with objects, not type (this type was created by hand not with font).
Even after I cleared the appearance and placed it's fill to black, when I tried to use the eye dropper on this object to recolor another object, it made it blue.

Copy link to clipboard
Copied
Having the same issue above. Can't seem to recolor objects unless they are not in a group, and can't recolor text unless I clear the "appearance" of it from the appearance menu. Any more ideas?

Copy link to clipboard
Copied
Same issue here.
Copy link to clipboard
Copied
Look at the screenshot of the Appearance panel in post #9, above. The color showing for Group and Fill (and the Fill icon in the Tools panel) is black, and yet the paths on the artboard are cyan. If you use the eyedropper, the swatches panel, or any other method to try to change the color, it will only change the black swatches to the chosen color. The cyan paths will stubbornly stay cyan. Why? Look at where the black fill is in the Appearance panel. It is below Contents. This means that there must be a fill applied in Contents that is hiding the Group fill that we see in the thumbnails and that we want to see in the selected paths. As Larry said in post #3, you can make the desired Group fill visible by clicking and dragging the Fill line in the Appearance panel above the Contents line, or you can double-click the contents line, which will reveal the fill color, the cyan, that is applied to the individual paths in the selection. Change this to a fill of [None] and the paths will be changed to the Group color.
Please let me (or anyone) know if this is not clear. The top-to-bottom order of appearances is basic and critical to an understanding of how Illustrator works. The Appearance panel is a wonderful tool when you understand it, but baffling and frustrating when you don't.
Copy link to clipboard
Copied
Thank you, that worked.
Copy link to clipboard
Copied
You're welcome.

Copy link to clipboard
Copied
This story is hard to follow. Could you please list the steps instead? Then, explain your reasoning. Thank you.

Copy link to clipboard
Copied

Copy link to clipboard
Copied
So this is the 5th time in two months I am having problems with my eyedropper tool. What did Adobe do to a perfectly good working tool?
Thank all you guys for your time, I managed to click + drag the "Fill" to the top of the Appearance panel, and every time I use the Eyedropper tool the "Fill" tab changes places again. This basically means I have to drag and drop the god damned fill layer every single time. This is past borderline retarded and moved up in crazy town. I can not for the life of me imagine what or why this would have been perceived as an "improvement" by Adobe, nor am I willing to spend any more of my neurons trying to figure it out.
I am moving back to my CRACKED version of an Illustrator that WORKS. I am not going to keep on paying just to be frustrated on a regular basis. Thank you Adobe and goodbye.

Copy link to clipboard
Copied
Im dying here. Been tinkering all day. Same problem. Could somebody advise?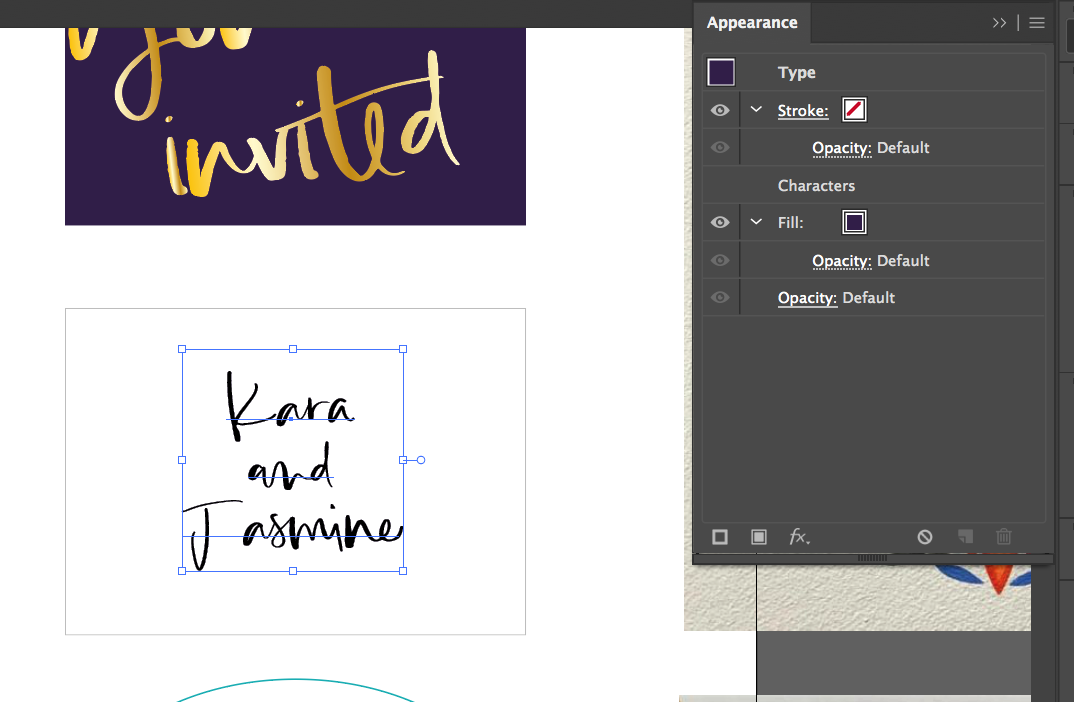
Copy link to clipboard
Copied
Suzanne, if I understand your image, you're trying to make the selected type purple? If so, in the Appearance panel click and hold to the right of the color square in the Fill line and drag it above the Characters line. This should give your lettering the purple color.
Items in this panel are prioritized in order from the top down. If you double-click in the Fill line it will reveal that the Characters have the color black applied to them. so that When the Characters line was above the purple fill its black fill overrode the purple color, which is applied to the type object rather than the characters. Moving the purple fill above the Characters appearance gives it precedence, and the letters appear purple. If you wish you may remove the black fill from the Character level, or you may wish to apply the purple color there rather than at the Type level where it is now. There can be good reasons for putting it one place or the other, but may not matter for your particular use. Just be aware.
I realize that this sounds a bit complicated, but it's pretty straightforward once you get it. If this doesn't make sense to you, I or someone else can try to make it clearer.
Peter

Copy link to clipboard
Copied
Illustrator SUCKS.
it works with bad logic and stupid codes

Find more inspiration, events, and resources on the new Adobe Community
Explore Now
 AdChoices