


Copy link to clipboard
Copied
I made continuous path that I want to change to a dash line so I went to stroke panel> dash lines put in dash and gap but it does not change.Any suggestions?
Thanks Susan


 1 Correct answer

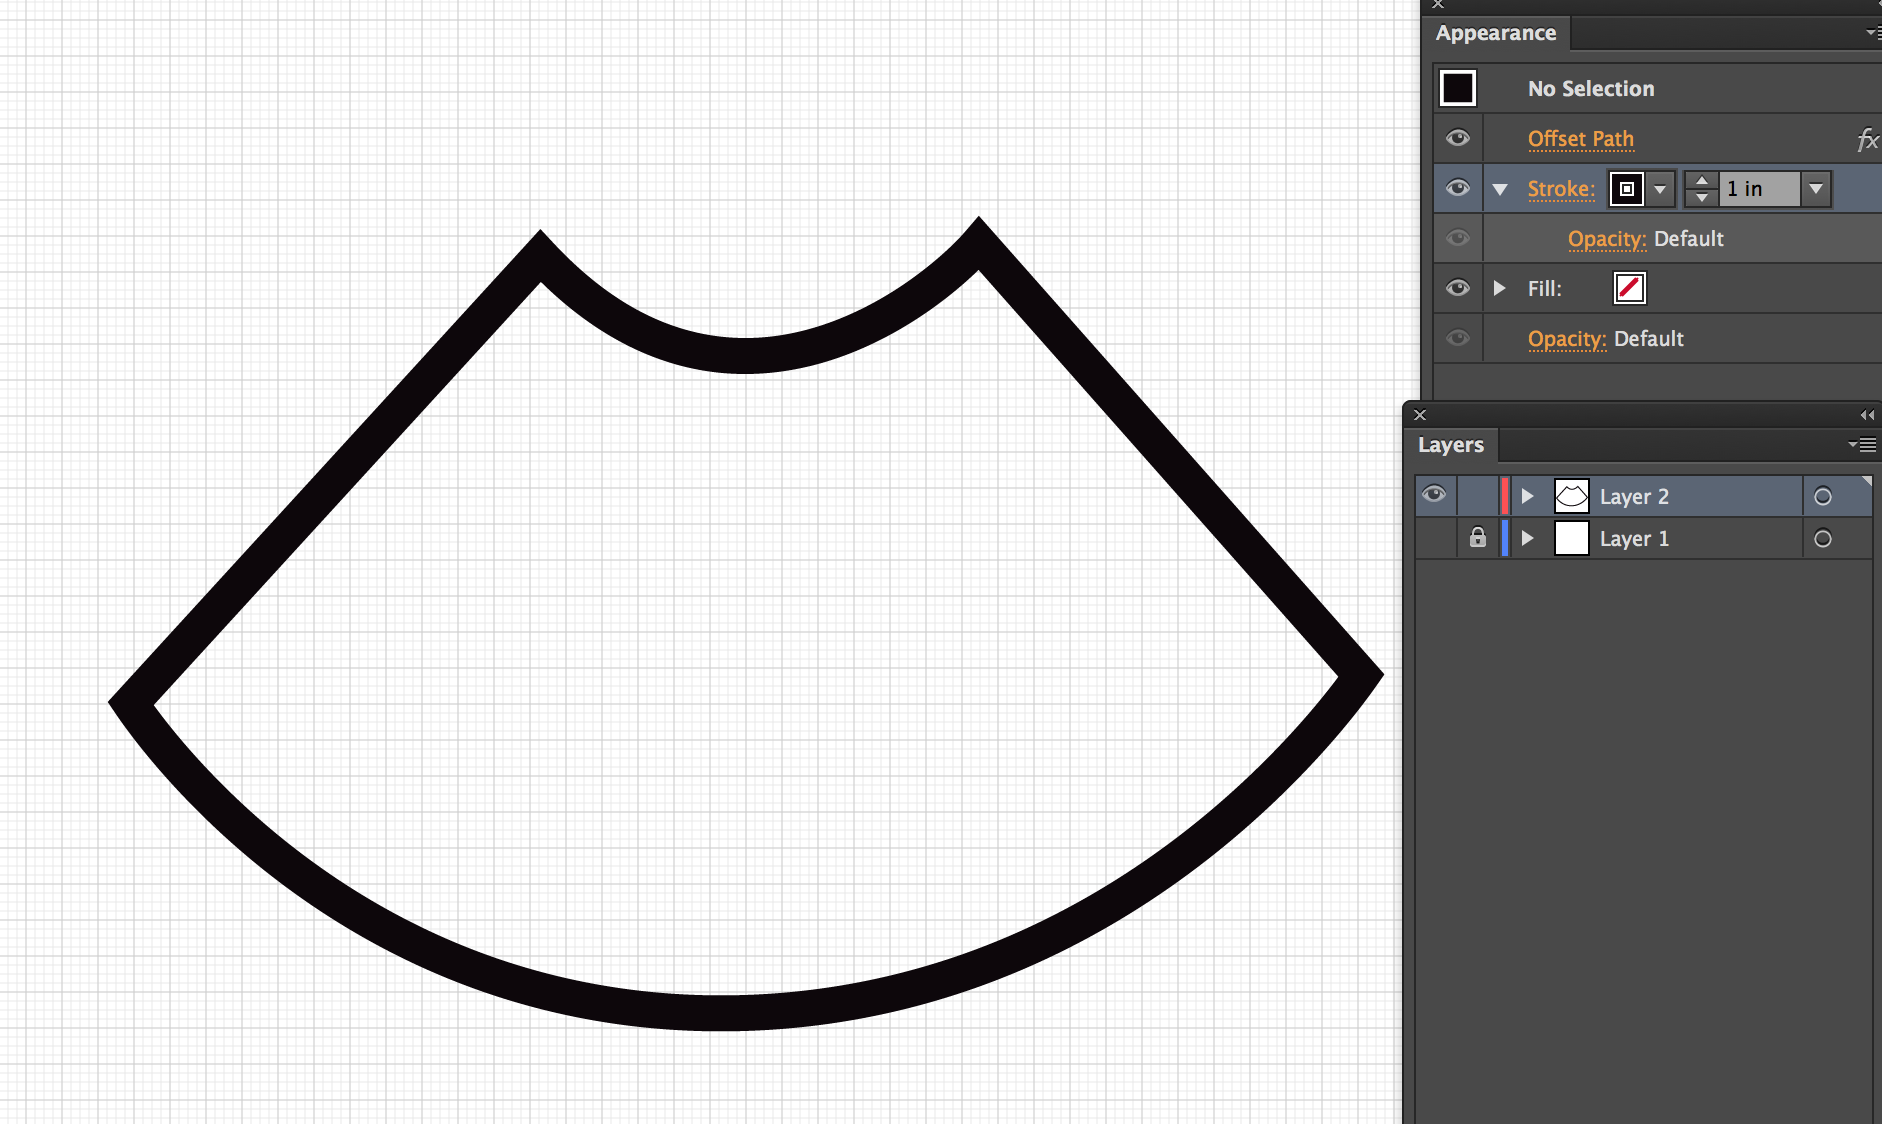
Thanks for posting the screenshot. I can see the bottom three paths in layer 2 appear to be a similar shape. I'd guess one is your outer path, one is your inner path, and then there's a duplicate. Click on the eye icons next to every path except the one where you want the dashes (don't turn the eye off for Layer 2, though). Make sure its target (the dot on the right in the layers panel) is still selected. Now, see if the dash applies to the stroke.
Explore related tutorials & articles
 43
Replies
43
43
Replies
43
Copy link to clipboard
Copied
Thanks!! It is working. The problem is I do not know how we got here. A bit confusing for me. 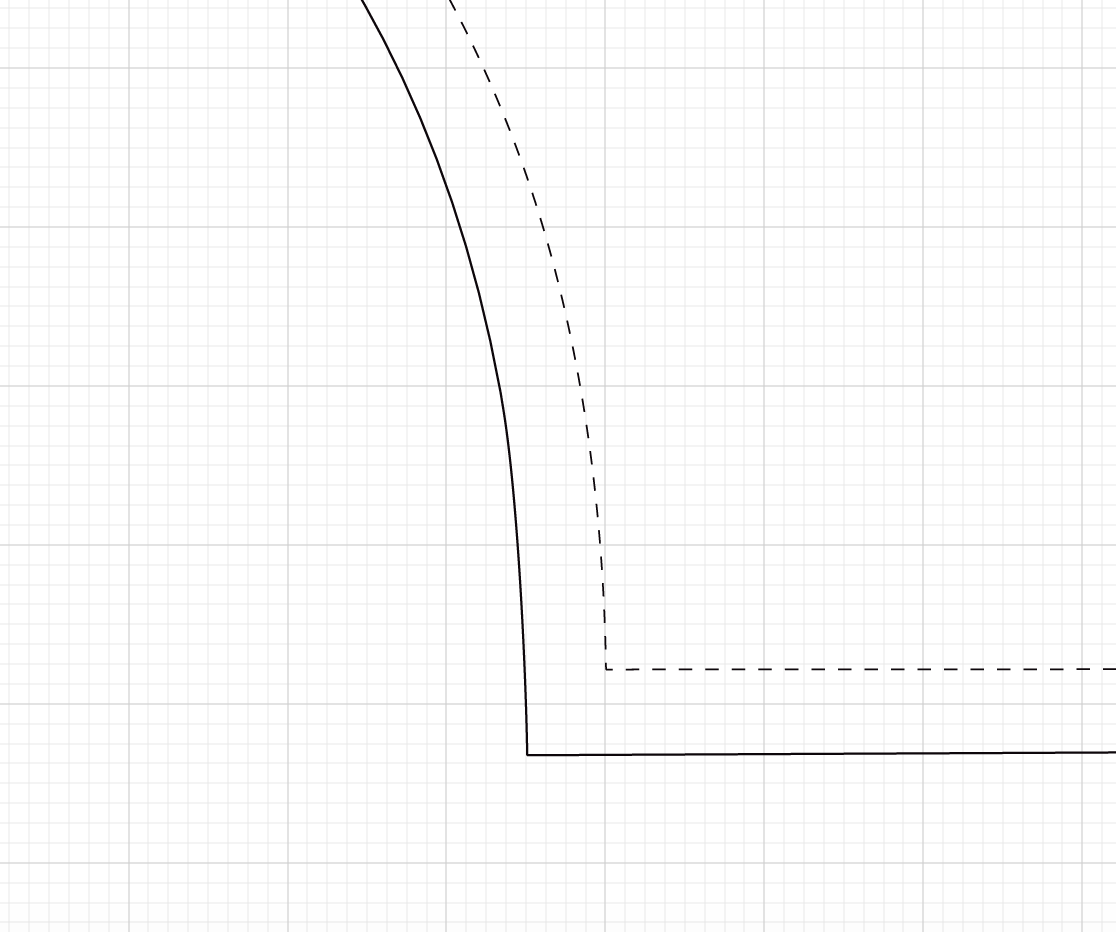 So to recap. I had too many layers? I should of only had one layer exposed?
Copy link to clipboard
Copied
What it looked like from your Layers panel was that there were 3 layers that had the shape. One of them should have the outside path with the solid stroke and one the inside path with the dashed stroke. But there was another layer with that shape. So my guess is that somehow that inside layer got duplicated. If it was duplicated and had a solid stroke in the same position as the one you had changed to a dashed stroke, then when they both appeared at the same time what you saw was a solid stroke.
If you're ever not sure about something, test it out in a new file. Try making something simple like a rectangle. Duplicate the layer. Then select one in your Layers panel and set the stroke to dashed. Then you'll see what I mean.
And as a completely unsolicited bit of advice, if you're making more of these shapes that appear to be a sewing pattern, try making just one shape then going to Object > Path > Offset Path and entering an amount you want to be offset like -.25" if you've made the outside outline (the offset would be a positive number if you drew the inside path).
I hope that helps. 
Copy link to clipboard
Copied
Thanks so much! Yes I did try the Object>Path>Offset Path. Not sure what happened after that
I want to ask another question. When I use Object >Path>Offset path and get all the areas done at once how would I redo only one area. So I want to do 3 seams the same and then on the 4th seam I want a different measurement. Would I do all 4 seams the same amount then go in and delete one and then I would put in new measurement in that area that I deleted? How would I do this?
Thanks

Copy link to clipboard
Copied
If you want to keep this editable, use Effect > Path > Offset path instead.
In case you need the original path as well, you need to open the appearance panel, create an additional stroke and apply the offset path effect only to the additional stroke.
Copy link to clipboard
Copied
I did Effect>Path>Offset Path. I got all the allowances to be .25 inch then I went in and did the Appearance panel for 1 inch and tried to apply to just one allowance but the whole thing changed to one inch. Should I save the file after first applying .25 inch?
Copy link to clipboard
Copied
Please show an example.
Copy link to clipboard
Copied
Copy link to clipboard
Copied
I don't understand where you entered the 1 inch.
Please be much more precise in your descriptions.
Usually when you set something to a value, that value should stick. It should not matter if the file is saved or not.
Copy link to clipboard
Copied
When I use Object >Path>Offset path and get all the areas done at once how would I redo only one area. So I want to do 3 seams the same and then on the 4th seam I want a different measurement. Would I do all 4 seams the same amount then go in and delete one and then I would put in new measurement in that area that I deleted? How would I do this?
First let me see if I understand the initial question above. When you say you want to do 3 seams, are you referring to the spacing of the contour from the original shape? So then the fourth seam would be consistently all over a different amount of spacing? Or do you mean the fourth seam would deviate from the initial shape like if you were doing a short sleeve and then instead of changing the size of the sleeve you want it the same size but as a long sleeve?
The reason I ask is because it makes a difference in your approach. I suggested Object > Path > Offset Path because it can be a little simpler to understand. Your initial shape should be at a final version and the copies this Offset Path command makes are additional shapes. In addition to it being a little simpler to get results the first time around if you're not as familiar with live effects, you could take a new path and lengthen one side which then just affects that side.
You still could do Effects > Path > Offset Path if you want to make concentric shapes. The benefit is that as a "live effect" you can alter the original shape and it updates the contours of the offset paths you've added. If you want to adjust just one of these path effects, you'll need to convert them to actual paths by going to Object > Expand Appearance which will make it so that it's no longer a live effect and then edit the shape you want.
Now, to your next question about it being 1 inch--I was thinking you mean the .25" and the 1" were the spacing of the contours not the width of the stroke. If that's the case and you want to make it a live effect, do the following:
- Make your shape
- Open the Appearance Panel
- Click on Add New Stroke (at the bottom of the panel)
- Click on Add New Effect (at the bottom of the panel) > Path > Offset Path
- For each additional contour you want, repeat by clicking on Add New Stroke
- And click on Add New Effect > Path > Offset Path
Because it is a live effect that is based on the original shape, the Offset amount is the distance from that original shape. So if you wanted one at .25", another at .25" from that 2nd one, and another at 1" from the 2nd, then the first offset amount would be .25", the 2nd would be .5", and the 3rd would be 1.5". In your Appearance Panel set the Offset by clicking on Offset Path for the path you want to adjust.
Copy link to clipboard
Copied
Thanks Myra. I have put together a visual aid (Photoshop) to lessen the confusion. I am a newbie at this.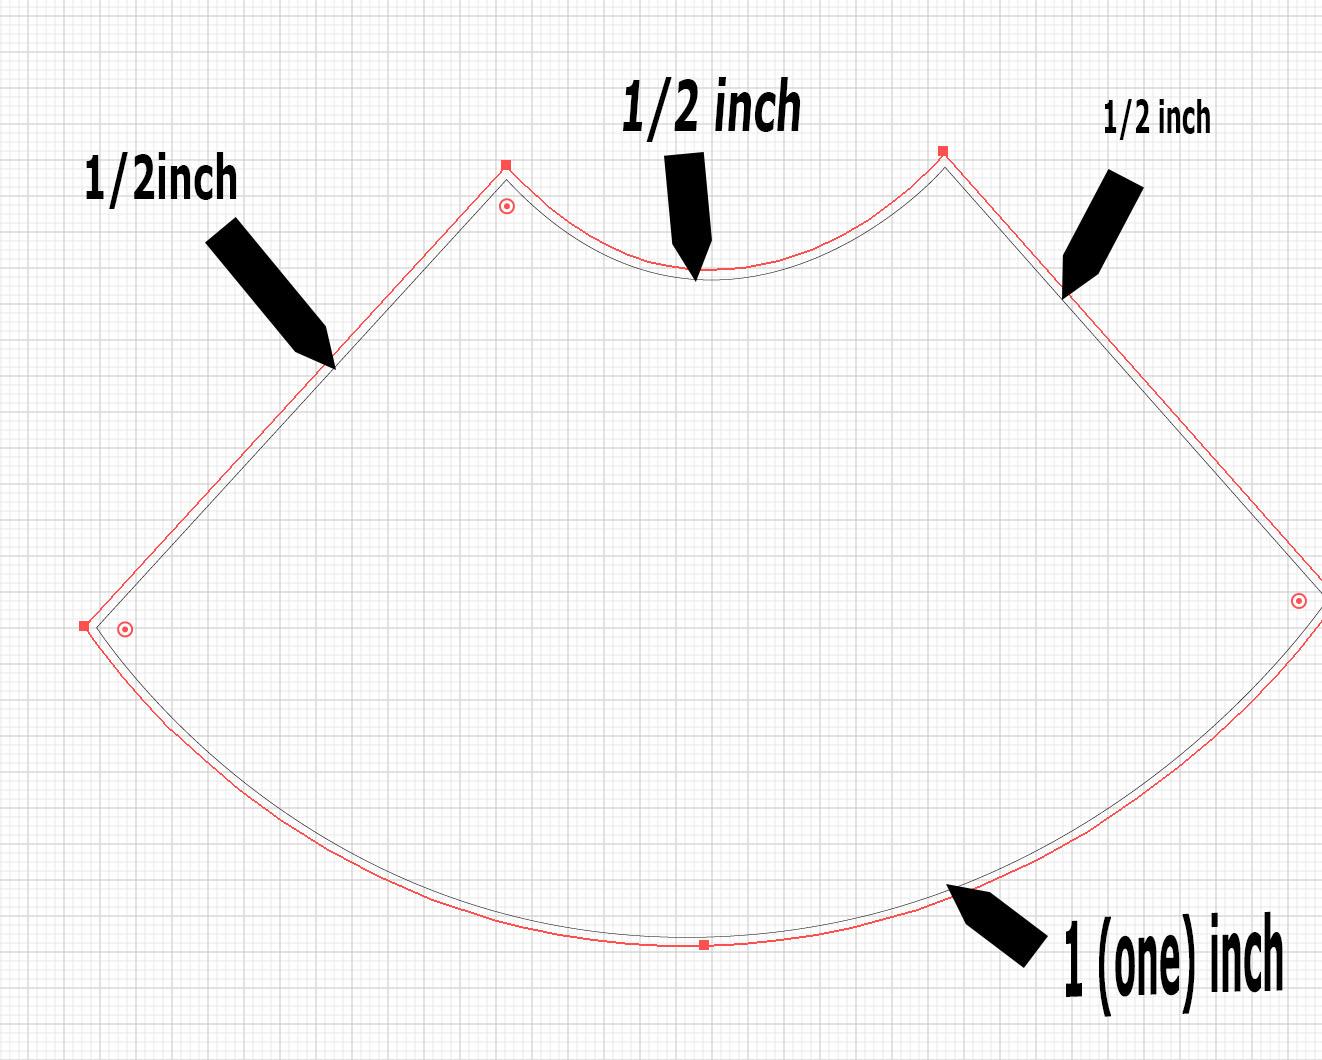
Copy link to clipboard
Copied
Ah, okay. That helps. No, you can't set the offset to be different across a shape. But what you can do is make 2 shapes and combine the parts you want.
Here's how I'd do it:
Use Offset Path, go the Object menu (instead of Effect menu) route and set the offset to .25". Then select the new outside path and do Object > Path > Offset Path again and set it to .75 " (that plus the .25" gets you to 1"). Use the Direct Selection tool (the white arrow, 2nd down in the Tools panel) and select the anchor point at one corner and move that point so that it extends your path and intersects the 1" offset. Do the same with the corner point on the other side.
Select the two intersecting paths (both of these paths have to be selected for this next part to work). Now I'd use the Shape Builder tool (it's about halfway down the Tools panel and looks like a headless snowman on its side). Use Alt+ drag (PC) or Option + drag (Mac) to subtract the upper outside area. Then do a regular drag over the lower curve to add it to the outside shape. If the points you originally moved to make the intersection go over the edge of the path, just Alt+ drag (PC) or Option + drag (Mac) over them to get rid of those.
Copy link to clipboard
Copied
Thanks, I will try later over weekend.

Copy link to clipboard
Copied
SuzieCue, Hi.
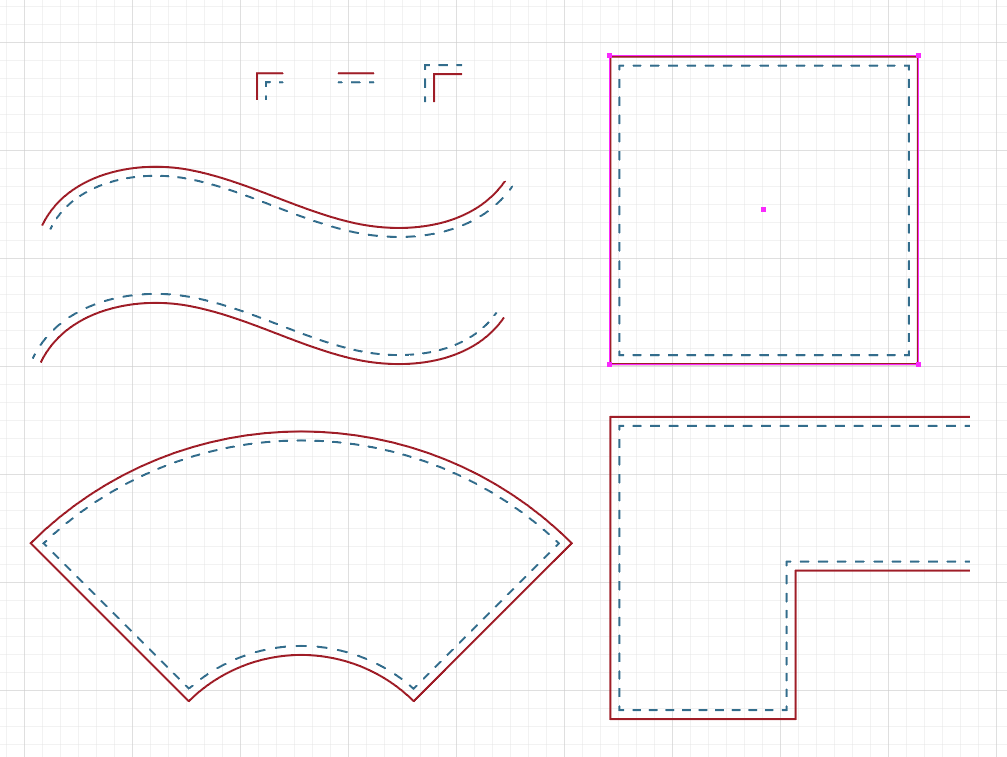
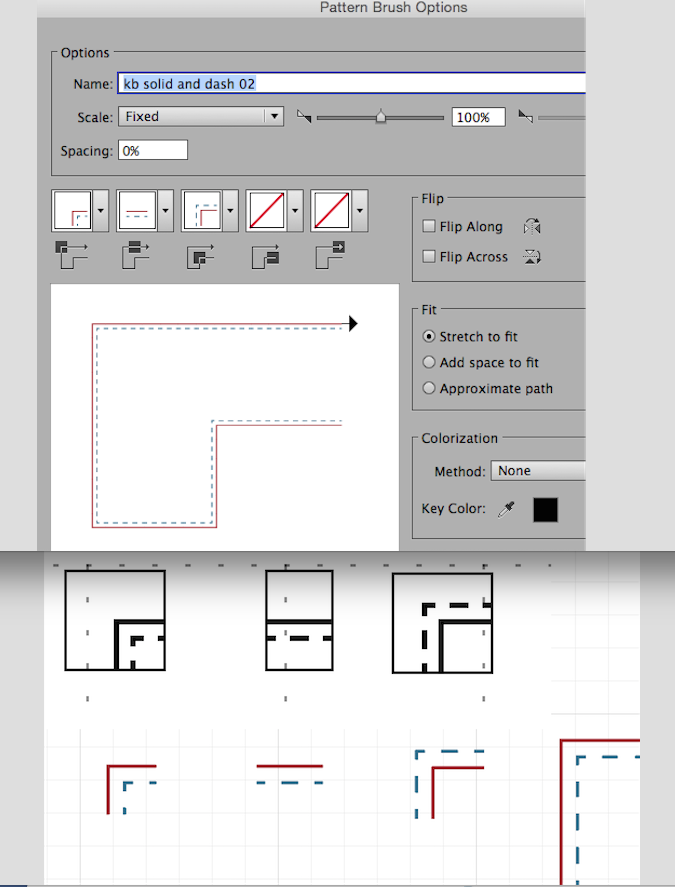
A little late but to add to the conversation, another way you can do this is to create and assign a Pattern Brush to your path.
See attached. Note that those dash corners are perfectly aligned and the solid line sits directly onto a single path.
The Pattern Brush works well with an open path as well as a close path.
In the Brush panel, you can also Flip, which puts the dash on the other side of that solid line.
Kathryn
Copy link to clipboard
Copied
Can you give step by step instructions?
Copy link to clipboard
Copied
SuzieCue, Glad you found my Pattern Brush helpful.
If you are new to Illustrator, the best place to start is by researching the basics on how to create seamless patterns and also how to create seamless Pattern Brushes.
There are many tutorials available online.
I created this file using Illustrator CC 2015.3.
Pattern Brush Panel - I did not use that new “Auto features” for the corner tiles- because of that inner dash.
Attached is my Pattern Brush Panel.
Also attached is a Zoom view - Outline Mode to show you my three Tiles you need for that Pattern Brush.
The key here is the size and placement of that Fill/Stroke path color - None at the bottom of those three Groups that define your patterns.
Hope that helps in some small way.
Have a nice weekend.
Kathryn
Copy link to clipboard
Copied
Thanks

Copy link to clipboard
Copied
Is Preview on? Cmd Y (or Ctrl Y on Win) switches between Outline and Preview.
Also check if the GPU preview causes the problem: Cmd E (or Ctrl E on Win) switches between CPU and GPU preview.

Copy link to clipboard
Copied
I am having the same issue, Although my problem with outline is not the issue. This problem came out of the blue, It had been working correctly, then all of a sudden, not. I appreciate any feedback

Copy link to clipboard
Copied
You will notice that many of the posts in this topic were asking the OP for further information. As no one but you can currently see your file, it might be an idea to have a read of the topic and share a similar set of information about your file and the object(s) you're having trouble with, preferably in a new topic.
-
- 1
- 2

Find more inspiration, events, and resources on the new Adobe Community
Explore Now
 AdChoices