- Home
- InDesign
- Discussions
- Re: Bullet alignment when using wrap text
- Re: Bullet alignment when using wrap text
Bullet alignment when using wrap text
Copy link to clipboard
Copied
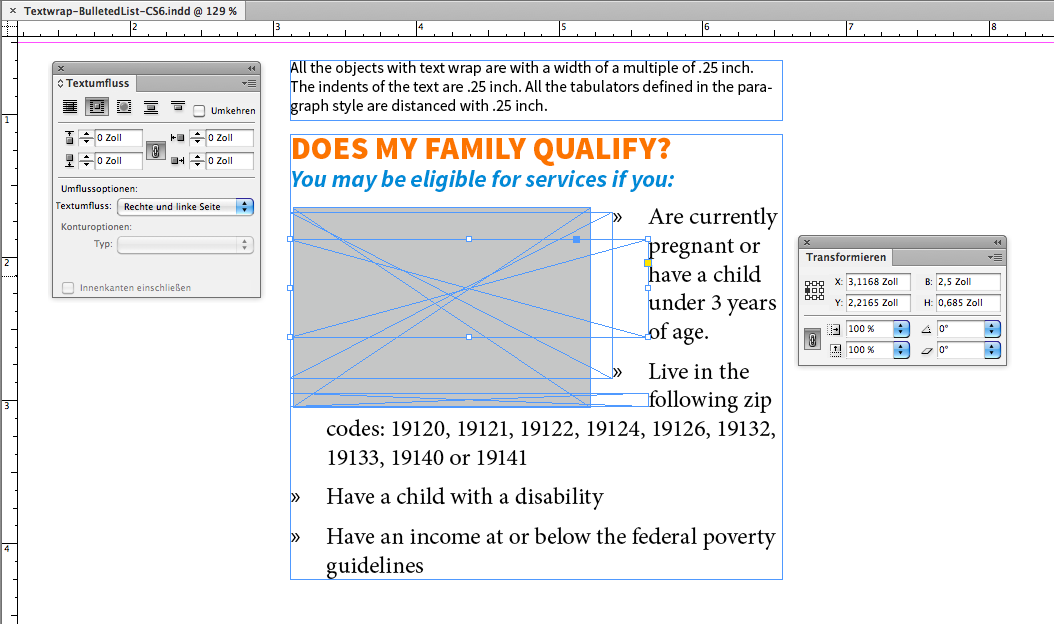
I'm running into a bullet alignment issue when using wrap text around an object. The bullets that is impacted by the picture do not align correctly. They no longer line up along the left hand side and they tab in much more than usual. I've attached a screenshot:
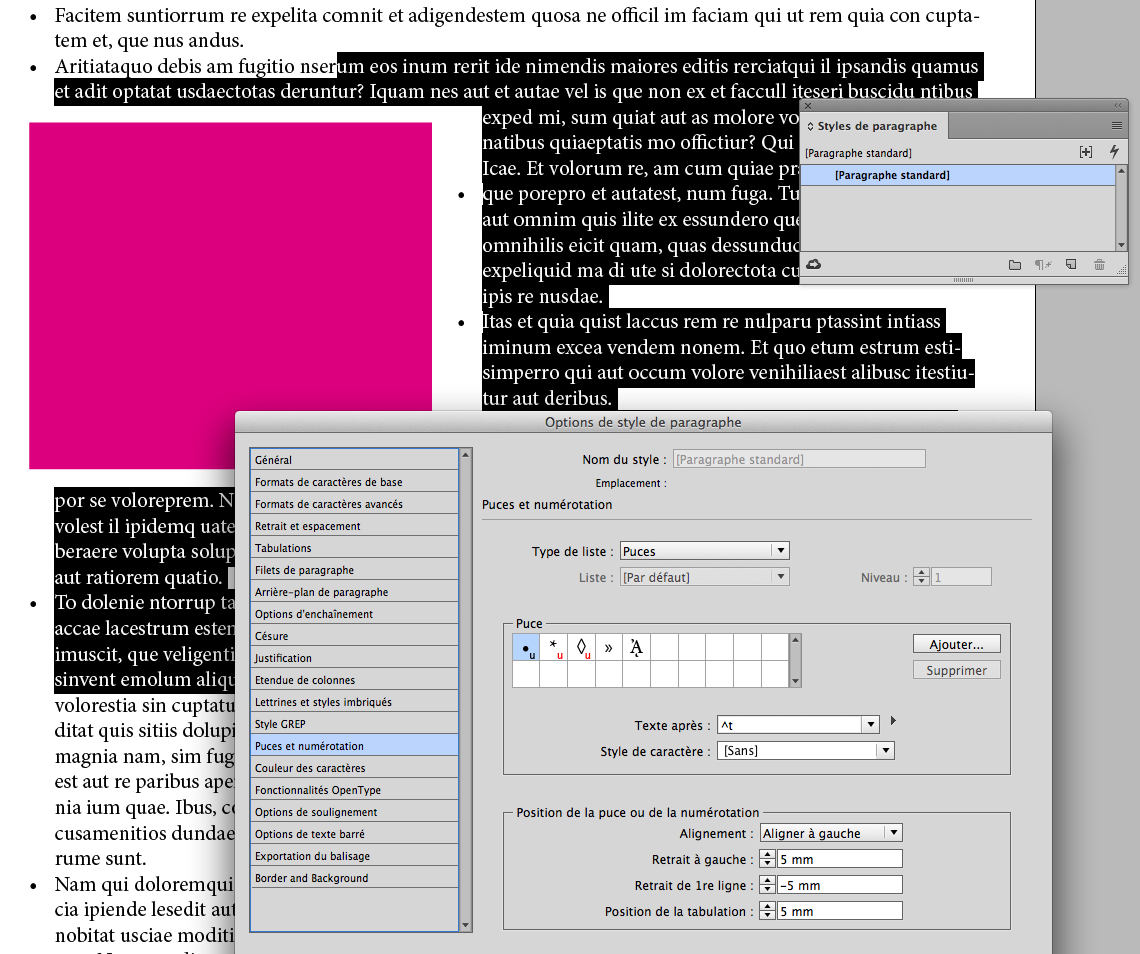
The bullet settings are as follows:
I have a feeling that this issue could be solved with a new character style or paragraph style, but I'm not sure how to go about it. (I have been using InDesign for 5 years, but have not ever had to create character or paragraph styles.)
Any help would be much appreciated. Thank you!
Copy link to clipboard
Copied
You've encountered a limitation of bulleted lists in InDesign when using a text wrap. I just ran into the exact same issue this past week on a project. The problem I believe is that in a standard bulleted list, it relies on a tab (as shown in the Text After field in your screen shot. When text wraps around an objects, those tabs are not updating to reflect the new position of the text.
To fix it, replace the ^t in the Text After field to an Em or En space by clicking on the arrow to the right of the Text After field and choosing Em or En space. This will replace the contents of the field with either ^m or ^>. You could even just type a single or double space to customize the spacing value if desired. Either way, this should produce a much more desirable result than what you currently have. You may want to create an additional paragraph style to use when you need to wrap bulleted items around an object.
Copy link to clipboard
Copied
Yes, that was very helpful! Using the En Space got me much closer to what I needed. Just as a follow up, do you know if there is a way to force the second and third lines to line up with the text first line text?
I have a feeling from your above answer there is not, but just wanted to double check.
Copy link to clipboard
Copied
Hi Andrea,
forcing text to move is doable by using objects with text wrap applied.
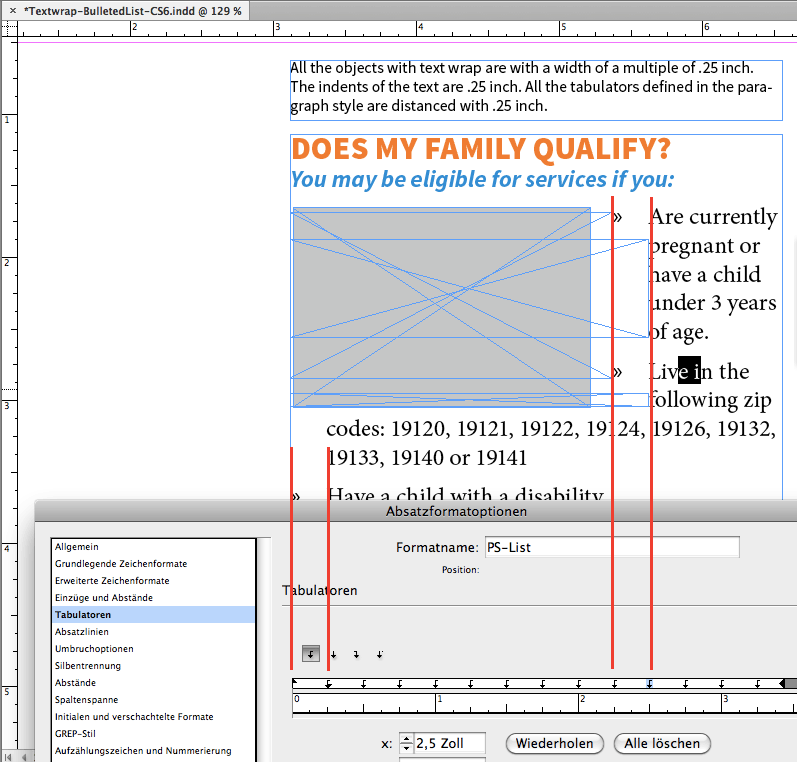
If you still like to use a tab between the bullet and the text, go to the tabulator section of the paragraph style, set a tab at position 0.25 and repeat the tab.

Repeated tabs in the paragraph style.
The tab at position 2.5 inch is selected (German "Zoll" is "Inch")

Regards,
Uwe
Copy link to clipboard
Copied
Hi,
You can use an automatic bullet with a tab! ![]()

(^/)
Copy link to clipboard
Copied
Uwe,
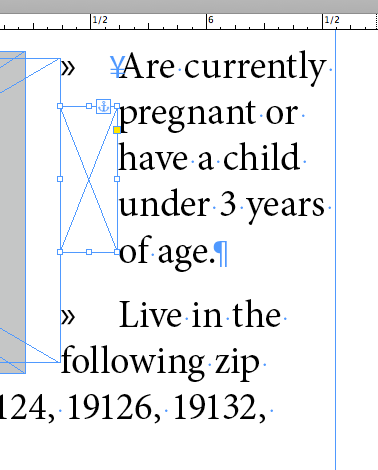
A similar way with 0,2mm width anchored frame with wrapping!
(^/)
Copy link to clipboard
Copied
Hm, hm…
More details, please 🙂
( Or a downloadable IDML file. )
Thanks,
Uwe
Copy link to clipboard
Copied
Are you using anchored rectangles 5 mm wide that do the text wrap?

Regards,
Uwe
Copy link to clipboard
Copied
Hi Uwe,
We can do more simple! … just 1 click! ![]() [code later]
[code later]
My last gift of the year! …
HAPPY NEW YEAR!
See: Bullets Wrapping Layout! … - YouTube
(^/)
Copy link to clipboard
Copied
Looking forward to the code, and my sympathies about your princess.
Copy link to clipboard
Copied
When someone asks how to do something, what is the point of telling them that it can be done without telling them how?
Copy link to clipboard
Copied
Tout simplement parce que :
1/ 3 approches ont déjà été données ici et il y a quelque temps une autre plus détaillée par votre serviteur (pas le temps de rechercher -- et au demeurant, ce n'est pas à moi de faire une telle recherche mais à celui qui pose la question !!) ;
2/ donner une nouvelle approche vraiment originale et "jamais" proposée, basée sur un script qui ne demanderait qu'un seul clic mérite un certain recul quant à sa totale efficience [ce qui n'est pas le cas à ce stade ! - script écrit en 4 heures !]] et si tu me suis un peu, tu prendras le temps de tester son code déjà donné dans cet autre post, et qui porte bien son nom :
Code to be evaluated! [013] Auto-numbering Bullets and wrapping! …
M'enfin! … La prochaine fois, j'irai "jouer aux boules" ! … les vraies !!
MTFBWY
(^/)
Copy link to clipboard
Copied
The easiest way is to use INDENT TO HERE in Special Characters.
Replace your TAB by 2 spaces and the special characters «Indent To Here.»
Copy link to clipboard
Copied
Hi Luc,
Not so simplistic! … Read my code! ![]()
(^/)
Copy link to clipboard
Copied
I can read English very well
Je peux lire un peu de français
Je ne peux pas lire le code très bien
Copy link to clipboard
Copied
Hi Jane,
The deal here is simple:
I'm still working on a totally relevant script and I think it's possible to make it work in all situations!
The first point is to use, as Chad said [post#1], a "bullet" para style without tabs.
So, I used a char style [playing with the "auto-numbering" bullet options] using an approach to simulate a 5mm-tab.
It's the only real work the op will need to do!
The 2nd point, not actually done by the script first version, is to let the script create itself the "In-Visible" object style (the op won't need to do it).
So, after that, the script could "evaluate" all cases:
In my video and script actual version, I focussed on this situation where the image is "enveloped" by text.
It's the most spectacular and complex situation to fix.
in this case, the script reveals 3 situations to be treated:
• The "first" para
The script makes calculations to insert an "In-Visible" anchored frame at the beginning of the para using a right-wrapping to move a part of the text. the script calculates the "height" of the text part for that and where it needs to move it to make the deal!
An accessory situation not taken yet in account by the script is when the text, moving, adds a supplementary line!
So, after treating this first situation, the script needs to evaluate again the lines number and increase the frame height! [doable].
The script will need to evaluate too if this first para "envelops" the image! If not, it will integrate it into the following situation …
• The "intermediate" paras
Here, I don't use an anchoring because not necessary.
As Luc said [post#12], the script inserts an "indent-to-here" special char. Totally relevant here!
• The "last" para
Here too, the script will need to know if the text "envelops" the image [almost similar treatment than for "first" para situation] or if we are in the same situation as "intermediate" paras.
The script needs to re-evaluate each situation after treatment because, adding or loosing lines, it could modify itself its working context!!
It was very funny to imagine/write this first version! ![]()
Maybe some other [really more experienced and "crazy"] scripters could help to finish it and give to all a script that fixes this annoying question that makes us lose a lot of energy when we meet it! ![]()
Last comment:
Give a basic solution that only works in a specific way when we could elaborate a more global is, imho, not serious!
I don't think like this and as Barb Binder recently wrote:
"[I'm] not one to let feature limitations stop [me]"!
(^/) HAPPY NEW YEAR TO ALL!
Copy link to clipboard
Copied
For those who have nothing to do today! … play with bullets!
[IDCC2015-IDML files and Script_Beta1-version]
https://www.dropbox.com/s/kcgu9p334nqse8f/0073_BulletsWrapping_MichelAllio.zip?dl=0
(^/)
Copy link to clipboard
Copied
Thank you for sharing, Obi-wan!
And also: "A Happy New Year" to you.
It would be a great feature request for a future version of inDesign, if indents could be made flexible enough that they would follow a text wrap. I'm sure this request was made very often before. Let's make this a regular feature of InDesign:
Regards,
Uwe
PS:
Regarding the basic concept around your script:
I would rather take a different approach where no additional special characters and anchored frames are added to the text. I would feel more comfortable with that. Instead I would add free floating rectangles with text wrap based on calculations about the graphic frame holding the image and the wrapping text. Maybe that can be synchoronized with an event listening mechanism for the Idle event. So that every time the text is changing or the image size is changing the text wrapping object(s) will change as well.
Did not work that out, though…
Just an idea. For the next year 😉
Copy link to clipboard
Copied
OR...
Instead of wrapping... make independant text linked boxes AND anchor-object them.
Unless it's a very long document !
Copy link to clipboard
Copied
Hi Luc,
a very good idea for a script based on an event listener.
Thank you for that!
Uwe
Copy link to clipboard
Copied
Uwe,
Surely another way! ![]()
I've worked 10 years with FrameMaker! I really don't like floating objets placed on pages and truly prefer anchorings.
… but very interested by the idea of a "live" synchronization!
About our question, these situations aren't on each page of a document! …
Just an annoying behavior not treated by default by ID!
(^/)
Copy link to clipboard
Copied
Obi-wan Kenobi wrote:
Hi Jane,
Last comment:
Give a basic solution that only works in a specific way when we could elaborate a more global is, imho, not serious!
I don't think like this and as Barb Binder recently wrote:
"[I'm] not one to let feature limitations stop [me]"!
(^/) HAPPY NEW YEAR TO ALL!
I am tagging BarbBinder. She is swimming with the fishes this week and may miss this otherwise!
Happy New Year! / Bonne Année!
Copy link to clipboard
Copied
In case it's still helpful to someone. I used to have the same issue in the "Before" screenshot below. Notice the unsightly gap and how the second line is not aligning in the bullet item.

Then I applied a combination of suggestions in this thread and the results are in the "After" screenshot below.

To get this result, I inserted an Em Space at the beginning of the first line of the bullet (as suggested). Then, in the second line, I inserted an "Indent to Here" character (using the tabs rulers window (Cmd/Ctrl + Shift + T), I had to manually adjust the alignment of the second line to match the first line indent). Finally, I created a paragraph style to use whenever a bullet falls around a wrap-around object. Try it and see if it works for you.
Copy link to clipboard
Copied
r5dsign: You're lucky that you didn't have a third line on your bullet curving around that water image. Your workaround would have failed then. Plus, apparently you don't mind your bullets being flush left. Today I'm trying to lay out a magazine article with LOTS of bullets and a design that uses photos canted at angles. No matter where I choose to put the photos, I can't seem to avoid having some to the left of bullets, resulting in this kind of thing (normal behavior on left, wrapped situation on right):
Two things are lacking: (1) the indent before the bullet (3mm in my case), and (2) the additional indent of non-first lines (3mm plus the size of an en-space, however much that is). "Indent to Here" would only solve #2, and only if the photo edge was straight vertical. It seems crazy to have to add a network of invisible rectangles (three rectangles just for these two bullets alone), but I guess that's what I have to do.
Why isn't there simply a checkbox in either the Text Wrap dialog or Bullets/Numbers dialog to tell InDesign to treat the edge of the wrap area as if it was the left edge of the text frame?
Copy link to clipboard
Copied
OsakaWebbie wrote
… Why isn't there simply a checkbox in either the Text Wrap dialog or Bullets/Numbers dialog to tell InDesign to treat the edge of the wrap area as if it was the left edge of the text frame?
Hi OsakaWebbie ,
very good suggestion!
Prepare your use case and make a feature request here:
Adobe InDesign: Feature Requests: Hot (944 ideas) – Adobe InDesign Feedback
I'll definitely vote for it!
( Don't forget to post a link to your feature request here. )
Regards,
Uwe
-
- 1
- 2

