

- Home
- InDesign
- Discussions
- Re: How to change color of black logo, while keepi...
- Re: How to change color of black logo, while keepi...

Copy link to clipboard
Copied
Dear InDesign-users,
I am facing the following problem with InDesign CS2 and I hope you can help me.
I have a logo (EPS, in black with a transparent background, so the logo is isolated). Now, I want to change the black of the logo to some Pantone color.
As far as I have understand, I have to make a non-transparant PSD, TIFF, BMP or JPG file of my EPS-file to change the color in InDesign. However, I have to place the logo over some other images, so I need the transparent background.
The only solution I could image was to multiply the transparency of the image, but this also blurs the color.
What would you suggest to do, when I want to change the color while maintaining the transparent background? Thank you very much for your help and advice in advance.


 3 Correct answers

I realise I'm a bit late to the table with my response, but thought I might share my thoughts anyway.
If it's just a simple vector file with one colour (black, white or something else), open the vector in Illustrator and copy it, then paste it directly into your document in InDesign. Once in InDesign, you'll have the freedom to change the colour to whatever you want using the swatches.

Waaay late here. I was looking for something similar to this. I have a imported vector object. I didn't want to create multiple objects of the same thing just to change the colour. So I found a work around:
- Select the object
- Right Click / Effects / Inner Glow
- Select the Colour and then for MODE make NORMAL (or maybe you want some effect?)
- And make the size of the glow whatever is required to cover the whole object.
It works!

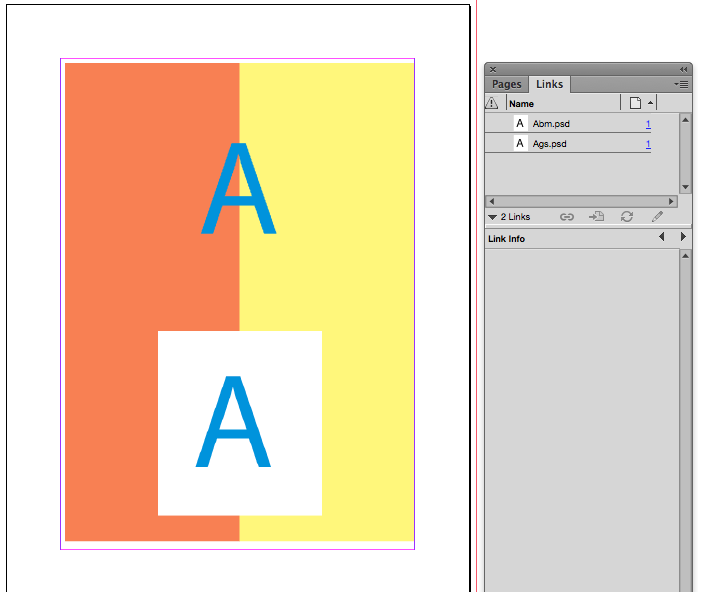
The original post is old, but if you are looking to color an image and keep the background transparent, save the file as a 1-color Bitmap.
Here the top A is a Bitmap mode .PSD, and the bottom is a Grayscale .PSD:
 25
Replies
25
25
Replies
25

Copy link to clipboard
Copied
I suggest you change the color in Illustrator and place it as an AI file.
Bob
Copy link to clipboard
Copied
There are a couple of things wrong here. First, you cannot colorize .eps files, nor vector files of any sort. Second, if this is a Photoshop .eps, it uses a clipping path, not transparency, to remove the background.
None of that really matters much, though, since the bottom line is you can't colorize .eps.
If this is really a vector logo, do what Bob said, if it's raster, you have a couple of choices: add a spot channel and move the black pixels into it and save as .psd or .tif with a transparent background or (ugh) DCS2 .eps with a clipping path which will probably look pretty crappy.
Copy link to clipboard
Copied
I realise I'm a bit late to the table with my response, but thought I might share my thoughts anyway.
If it's just a simple vector file with one colour (black, white or something else), open the vector in Illustrator and copy it, then paste it directly into your document in InDesign. Once in InDesign, you'll have the freedom to change the colour to whatever you want using the swatches.

Copy link to clipboard
Copied
Bless you! 🙂

Copy link to clipboard
Copied
PERFECT! Been looking for ages trying to figure this out!

Copy link to clipboard
Copied
THANK YOU SO MUCH!
Copy link to clipboard
Copied
Waaay late here. I was looking for something similar to this. I have a imported vector object. I didn't want to create multiple objects of the same thing just to change the colour. So I found a work around:
- Select the object
- Right Click / Effects / Inner Glow
- Select the Colour and then for MODE make NORMAL (or maybe you want some effect?)
- And make the size of the glow whatever is required to cover the whole object.
It works!

Copy link to clipboard
Copied
Thank you bingandham! That worked wonderfully for what I was trying to do today. Not sure if this would work in every situation, but for today --- NAILED IT!  Thank you, thank you!
Copy link to clipboard
Copied
The original post is old, but if you are looking to color an image and keep the background transparent, save the file as a 1-color Bitmap.
Here the top A is a Bitmap mode .PSD, and the bottom is a Grayscale .PSD:

Copy link to clipboard
Copied
rob day's solution should be marked as the correct one. It works and it's simple and I've spent a million years trying to solve this problem. Thank you!
Copy link to clipboard
Copied
I'm not seeing an option in Photoshop CC 2018 to save the file as a 1 color bitmap as suggested (or bitmap mode.PSD). can you elaborate please? This has been driving me crazy!
Copy link to clipboard
Copied
Image>Mode>Bitmap. The image has to be converted to 8-bit Grayscale first, otherwise Bitmap will be grayed out
Copy link to clipboard
Copied
Thanks so much for getting back so quickly - I followed your instructions, but once converted to 8-bit grayscale, I try to then go to Mode - Bitmap and I get a dialog box saying Flatten Layers and scared hidden layers? I can only cancel or hit OK. When I hit OK, it flattens and a white background appears. When I go to save file, what format do I choose? Thanks again-
Copy link to clipboard
Copied
Did you try flattening the image before you change modes? Bitmap mode images cannot contain layers. Once you Convert to bitmap mode save as a psd. also the bitmap mode dialog is going to ask for an output resolution and dither pattern.

Copy link to clipboard
Copied
hunterw469536 wrote
… it flattens and a white background appears. …
With a bitmap there are no white pixels. It's either writing pixels or nothing.
It only seems that there is a white background, because PhotoShop has no way to show transparent areas when doing the background layer.
I think, the best format will be TIFF where you can use a non-destructive way of compression.
LZW and ZIP is offered. InDesign can work with both kinds of compression when it comes to placing bitmap TIFFs.
Regards,
Uwe
Copy link to clipboard
Copied
You might want to show a screen capture of your artwork. If you are trying to convert an image containing gray values, the pattern you choose could produce unexpected results. The example I'm showing in #6 has no gray values, the A is 100% black and its background is white.
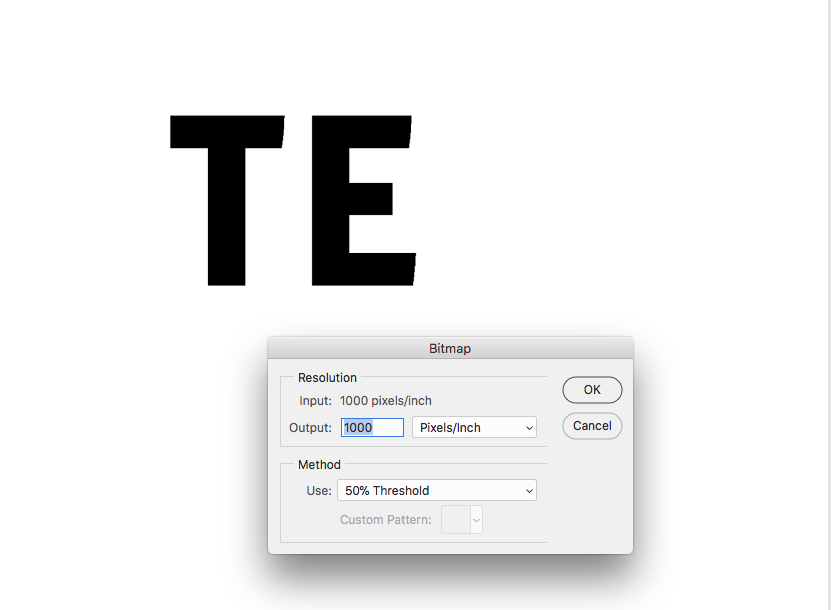
If you try to bitmap gray values and choose 50% Threshold, the gray pixels will convert to either black or white, so here XT will go to white
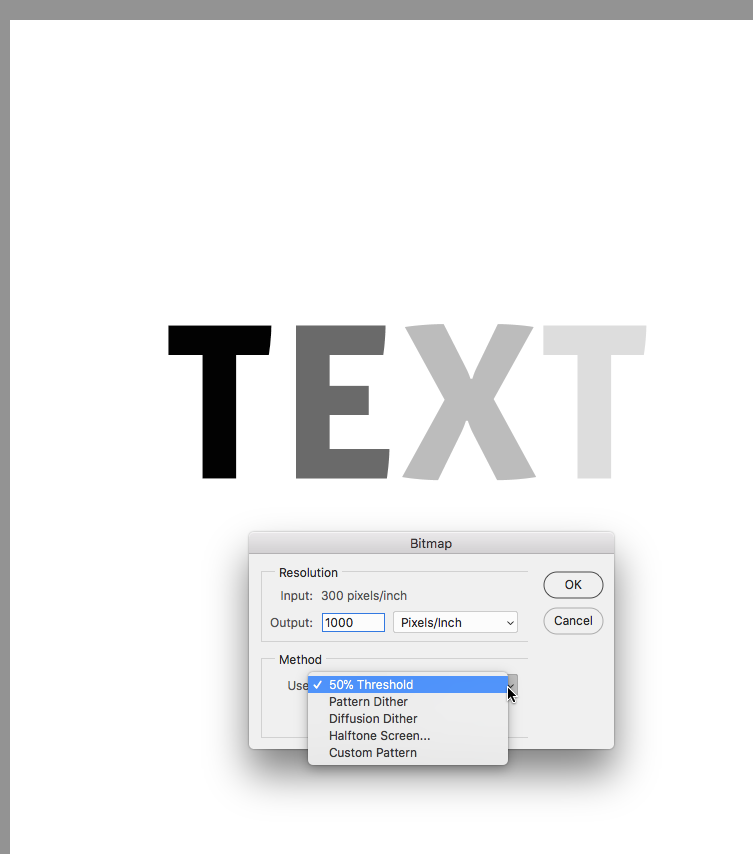
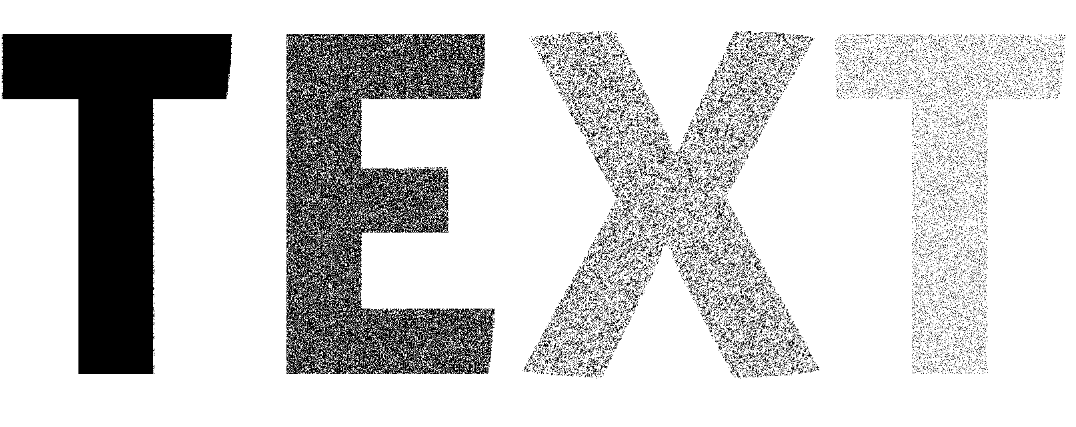
If you choose dither the gray values will be converted to a pattern dither, which could be difficult for a press to hold because the dots might be too small.
You can also convert to a halftone pattern


Copy link to clipboard
Copied
I don't get it. If you convert your image to a greyscale before turning into a bitmap how do you keep your color?
Copy link to clipboard
Copied
Color is applied to the bitmap or grayscale in the InDesign page layout. The technique lets you change the bitmap’s color in the layout—you don't have to edit the original in PS.

Copy link to clipboard
Copied
Exactly what I was searching for, thank you!
Copy link to clipboard
Copied
Amazing!

Copy link to clipboard
Copied
@bingandham - BRILLIANT!!!! If I could give you 100 upvotes, I would.

Copy link to clipboard
Copied
Hi, with regards to changing the color of vector art in InDesign - I don't think I saw anyone suggest this, but its very handy, expecially if you've transformed the properties of the placed art aside from its native properties (such as scale, rotation, etc...)
- Select the vector art in InDesign
- Open up Illustrator
- Paste the art from the clipboard
- Using direct selection tool in Illustrator (white arrow) select the encompassing path and delete
- Select all the remaining vectors
- Switch back to InDesign and paste - usually InDesign will paste it directly over the original.
- Lock the new pasted art and delete the old one or hide it in a sub-layer
- Unlock the new pasted art and use the direct selection tool in InDesign to select the vectors, you can now change the colors of the object paths from the swatch palate
Has always worked great for me!
Copy link to clipboard
Copied
I feel none of the workaraounds / solutions are really ideal. If your goal is to have design consistency across multiple documents and applications, which is usually the case when dealing with logos, you want to work with one single source file. Applying color should not force you to make a copy of the vector at all, especially if it's a one color file. Bitmaps are certainly not the alternative, because the have issues with resolution and are not editable in the future.
Best solution would be: Give the ability to apply color to vectors saved in CC Libraries.
Copy link to clipboard
Copied
Bitmaps are certainly not the alternative, because the have issues with resolution and are not editable in the future
A 10,000px x 10,000px 1-bit file is only around 5mb, so you could have a master vector file for editing, and a bitmap exported with enough resolution for any scale.
-
- 1
- 2

Find more inspiration, events, and resources on the new Adobe Community
Explore Now
 AdChoices